There are brownies, and then there are these brownies. Imagine the richest, fudgiest chocolate brownie you’ve ever tasted. Now, picture a thick, gooey layer of warm, spiced Biscoff cookie butter hidden inside, melting into every single bite. This isn’t just a brownie with a swirl on top; it’s a full-on Biscoff experience.
My name is Sophie, and after testing this recipe more than nine times, I can confidently say I’ve perfected it. I’ve tweaked the sugars for the ultimate crinkly top, adjusted the bake time for maximum fudginess, and discovered the one trick that guarantees a perfect Biscoff layer every time. It’s the ultimate comfort-food indulgence, perfect for sharing at family gatherings or hoarding all to yourself (I won’t tell!).
If you’re ready to elevate your brownie game, you’re in the right place.
Why You’ll Be Obsessed with This Recipe
This isn’t just another brownie recipe. It’s designed to be unforgettable. Here’s why you’ll fall in love:
- Incredibly Fudgy Texture: We’re using a specific combination of melted chocolate, butter, and sugars to create a dense, moist, and deeply satisfying brownie that’s the complete opposite of cakey.
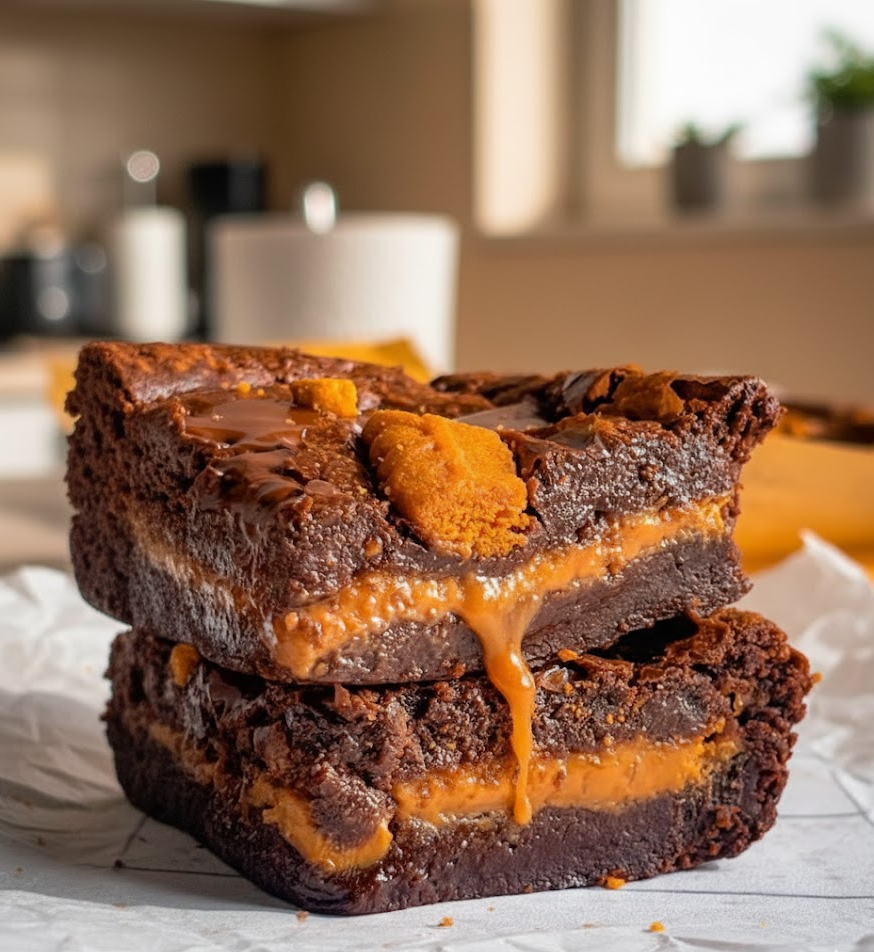
- The “Magic” Biscoff Layer: My special technique of freezing the Biscoff spread creates a distinct, gooey layer that doesn’t get lost in the batter. It’s a game-changer!
- Perfectly Balanced Flavors: The deep, dark chocolate pairs beautifully with the sweet, caramelized spice notes of Lotus Biscoff. It’s a match made in dessert heaven.
- Surprisingly Simple to Make: Despite the impressive results, the steps are straightforward and perfect for home cooks of any skill level. No special equipment needed!
The Star Ingredients for Fudgy Perfection
Great baking starts with understanding your ingredients. After many trials, I’ve found this combination yields the absolute best results. Here’s what you’ll need and why it matters.
- Biscoff Spread & Cookies: This is the star of the show. Lotus Biscoff spread (or cookie butter) is made from finely crushed spiced shortcrust biscuits. Its flavor is a unique mix of caramel, cinnamon, and ginger. You can use smooth for a creamier center or crunchy for extra texture. The cookies on top add a delightful crunch that contrasts with the gooey brownie.
- Good Quality Chocolate: I recommend a dark or semi-sweet chocolate (60-70% cacao). Using a high-quality chopped chocolate bar instead of just chips will melt more smoothly and provide a richer, more complex chocolate flavor that stands up to the Biscoff.
- A Combination of Sugars: This recipe uses both powdered sugar and light brown sugar. The light brown sugar adds moisture and a slight caramel note, which contributes to the fudgy texture. The powdered sugar dissolves easily, helping to create that beautiful, shiny, crinkly top that all great brownies have.
- Dutch-Processed Cocoa Powder: This is key! Unlike natural cocoa, Dutch-processed cocoa has been alkalized, making it less acidic. This results in a darker, richer color and a smoother, less bitter chocolate flavor that complements the Biscoff perfectly.
- Butter & Warm Milk: Unsalted butter provides the necessary fat for flavor and a tender crumb. The small amount of warm milk helps the sugars dissolve completely, ensuring a smooth batter and that coveted crinkly crust.
Step-by-Step Guide to Perfect Biscoff Brownies
Let’s walk through the process together. Don’t be intimidated by the freezing step—it’s the easiest and most important part!
Part 1: Prepare the Biscoff Layer
This is my secret weapon for the ultimate Biscoff brownie.
- Spread and Freeze: Take a piece of parchment paper and cut it to roughly the size of your 8×8-inch pan. Spread your Biscoff evenly over the parchment. It doesn’t have to be perfect.
- Freeze Solid: Place the parchment on a small baking sheet or plate and pop it in the freezer for at least 30 minutes. You want it to be a firm, solid sheet. This prevents it from mixing into the batter.
Part 2: Make the Fudgy Brownie Batter
While the Biscoff is freezing, let’s make the batter.
- Preheat and Prep: Preheat your oven to 170°C (340°F). Grease and line your 8×8-inch pan with parchment paper, leaving some overhang on two sides. These “slings” will make it easy to lift the brownies out later.
- Melt Chocolate and Butter: In a large, microwave-safe bowl, combine the chopped chocolate and butter. Microwave in 30-second intervals, stirring well each time, until completely melted and smooth. Alternatively, use a double boiler. Let it cool for about 5-10 minutes; you don’t want to scramble any ingredients with hot chocolate.
- Add Sugars and Milk: Whisk the light brown sugar, powdered sugar, and warm milk into the cooled chocolate mixture. Whisk vigorously for about a minute until the mixture is smooth, glossy, and well-combined.
- Fold in Dry Ingredients: Sift the all-purpose flour, Dutch-processed cocoa powder, baking powder, and salt directly into the bowl. Use a rubber spatula to gently fold them in. Stop mixing as soon as the last streak of flour disappears. Overmixing develops gluten and leads to cakey brownies. If you’re adding chocolate chips, fold them in now.
Part 3: Assemble and Bake
- First Layer: Scoop about half of the thick brownie batter into your prepared pan and spread it into an even layer.
- Add the Biscoff: Retrieve your frozen Biscoff sheet. Peel it off the parchment and place it right on top of the batter in the pan.
- Second Layer: Dollop the remaining brownie batter over the Biscoff layer and gently spread it to cover the Biscoff completely.
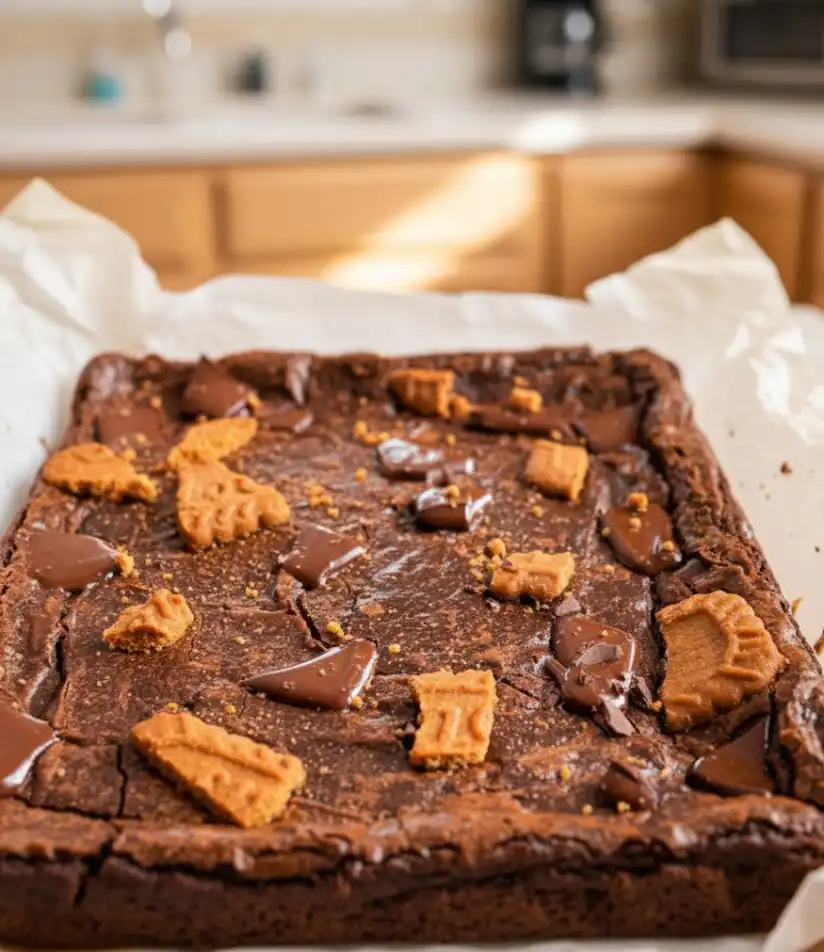
- Top and Bake: Arrange whole or roughly crushed Biscoff cookies on top, pressing them in slightly. Bake for 25-30 minutes. The edges should be set, but the center should still be soft. A toothpick inserted near the edge should come out with moist, fudgy crumbs, not wet batter.
Sophie’s Pro-Tips from My Kitchen
After making these countless times, I’ve gathered a few tips that guarantee success:
- Do Not Overbake: This is the #1 rule for fudgy brownies. It’s always better to err on the side of underbaking. The brownies will continue to cook and set from the residual heat of the pan as they cool.
- Patience is a Virtue (Cool Completely!): I know it’s torture, but you must let the brownies cool completely in the pan before slicing. This allows the center to set into that dense, gooey texture we’re after. Slicing them warm will result in a delicious, but messy, pile of goo.
- The Hot Knife Trick for Clean Slices: For bakery-worthy squares, run a large, sharp knife under hot water. Wipe it completely dry, then make one clean cut. Repeat this process for every single slice. It’s a little extra work, but the results are so satisfying.
More Decadent Cookie & Bar Recipes
If you’re as obsessed with stuffed, gooey desserts as I am, you’re going to love these other creations from my kitchen. Each one is designed for maximum flavor and pure comfort.
- For the Red Velvet Lover: My Stuffed Red Velvet Cookies are a sensation, with a creamy cheesecake filling that will blow you mind.
- A Taste of NYC: If you love thick, chunky cookies, you must try this unique Pistachio NYC Cookies Recipe.
- The Ultimate Easter Treat: Don’t wait for spring to make these incredible Creme Egg Stuffed Cookies.
- A Classic Combo: For a timeless pairing, my Peanut Butter Nutella Cookie Recipe is a guaranteed family favorite.
- White Chocolate Dreams: Indulge in the sweet, creamy perfection of these White Chocolate Stuffed Cookies.
Storage and Freezing Instructions
These brownies are fantastic for making ahead.
- At Room Temperature: Store in an airtight container for up to 4 days. Their texture is best at room temperature.
- Refrigerating: You can refrigerate them, which will make them even fudgier and denser, almost like fudge. Let them sit out for 15-20 minutes before serving to take the chill off.
- Freezing: These freeze beautifully! For best results, slice them first. Wrap individual brownies tightly in plastic wrap and then place them in a freezer-safe bag or container. They will last for up to 3 months. To thaw, simply leave them on the counter for an hour or two.
Frequently Asked Questions (FAQ)
Can I use crunchy Biscoff spread for these brownies?
Absolutely! Crunchy Biscoff spread works wonderfully in this recipe. It will add a delightful texture to the gooey center. The freezing process works just the same for both smooth and crunchy varieties.
Why do I need to freeze the Biscoff spread?
Freezing the Biscoff spread into a solid sheet is the secret to creating a perfect, distinct layer inside the brownie. If you try to swirl in room-temperature spread, it will mostly blend into the batter. The frozen layer melts as it bakes, creating a gooey, concentrated river of Biscoff in every bite.
How do I get perfectly clean brownie slices?
The key to clean slices is patience! First, ensure the brownies are completely cooled—even slightly warm brownies will be messy. For best results, chill them in the refrigerator for 30-60 minutes. Then, use a large, sharp knife. Run the blade under hot water, wipe it completely dry, and make one clean cut. Repeat the warming and wiping process for every single cut.
How should I store these Biscoff brownies?
Store the brownies in an airtight container at room temperature for up to 4 days. Refrigerating them can make the brownie texture a bit firm, but they will still be delicious. You can also freeze them for up to 3 months by wrapping them tightly in plastic wrap and then placing them in a freezer-safe bag.
Decadent Biscoff Brownies
These Decadent Biscoff Brownies are the ultimate fudgy treat — rich, gooey, and filled with a molten layer of Biscoff cookie butter that melts into every bite. Tested more than nine times by Sofie for flawless results, this recipe delivers bakery-quality brownies with crinkly tops, deep chocolate flavor, and a spiced caramel Biscoff center.
- Prep Time: 25 minutes
- Cook Time: 30 minutes
- Total Time: 55 minutes
- Yield: 16 brownies
- Category: Dessert, Brownies, Bars
- Method: Baked
- Cuisine: American
Ingredients
**For the Biscoff Layer**
3/4 cup (180 g) smooth or crunchy Biscoff spread
5–6 Biscoff cookies, for topping
**For the Brownie Batter**
170 g dark or semi-sweet chocolate (60–70% cacao), chopped
115 g unsalted butter
1/2 cup (100 g) light brown sugar
1 cup (120 g) powdered sugar
2 tablespoons warm milk
2 large eggs, room temperature
1 teaspoon vanilla extract
1/2 cup (65 g) all-purpose flour
3 tablespoons (20 g) Dutch-processed cocoa powder
1/4 teaspoon baking powder
1/4 teaspoon salt
Optional: 1/2 cup (80 g) chocolate chips or chunks
Instructions
1. Line a tray with parchment paper and spread Biscoff into a thin 8×8-inch square. Freeze for at least 30 minutes until solid.
2. Preheat oven to 340°F (170°C). Grease and line an 8×8-inch square baking pan with parchment, leaving an overhang for lifting.
3. In a large bowl, melt chopped chocolate and butter together in the microwave (30-second bursts) or over a double boiler until smooth. Let cool slightly.
4. Whisk in light brown sugar, powdered sugar, and warm milk. Mix vigorously until glossy and smooth.
5. Add eggs and vanilla extract. Whisk until thick and well combined.
6. Sift flour, Dutch-processed cocoa powder, baking powder, and salt into the bowl. Gently fold until no dry streaks remain. Do not overmix.
7. Spread half of the batter evenly into the prepared pan.
8. Remove the frozen Biscoff layer from the freezer, peel off parchment, and place on top of the batter.
9. Spread the remaining brownie batter over the frozen Biscoff to cover completely.
10. Top with whole or roughly crushed Biscoff cookies.
11. Bake for 25–30 minutes, until edges are set but the center is slightly soft. A toothpick should come out with moist crumbs, not wet batter.
12. Cool completely in the pan before slicing. For clean slices, use a warm, dry knife, wiping between cuts.
Notes
Storage:
• Store brownies in an airtight container at room temperature for up to 4 days.
• Refrigerating gives a denser, fudge-like texture. Allow to warm before serving.
• To freeze: Slice, wrap individually in plastic wrap, and store in a freezer-safe bag up to 3 months.
Pro Tips:
• Freeze the Biscoff layer to ensure a distinct, gooey center.
• Use good-quality chocolate for best flavor and fudgy texture.
• Let brownies cool fully before slicing for clean edges.
• Slightly underbake for the perfect fudgy finish.