Oh, the holidays! They bring with them a magical feeling, and for me, that magic often starts in the kitchen. There’s nothing quite like the aroma of freshly baked cookies filling the air, promising warmth, comfort, and pure joy. And if you’re anything like my family, you’re always on the hunt for that one cookie recipe that captures the essence of the season perfectly. Well, dear friends, I believe I’ve found it—and after testing it over nine times, I can confidently say these White Chocolate Dipped Peppermint Chocolate Cookies are not just a recipe, they’re a new tradition waiting to happen!
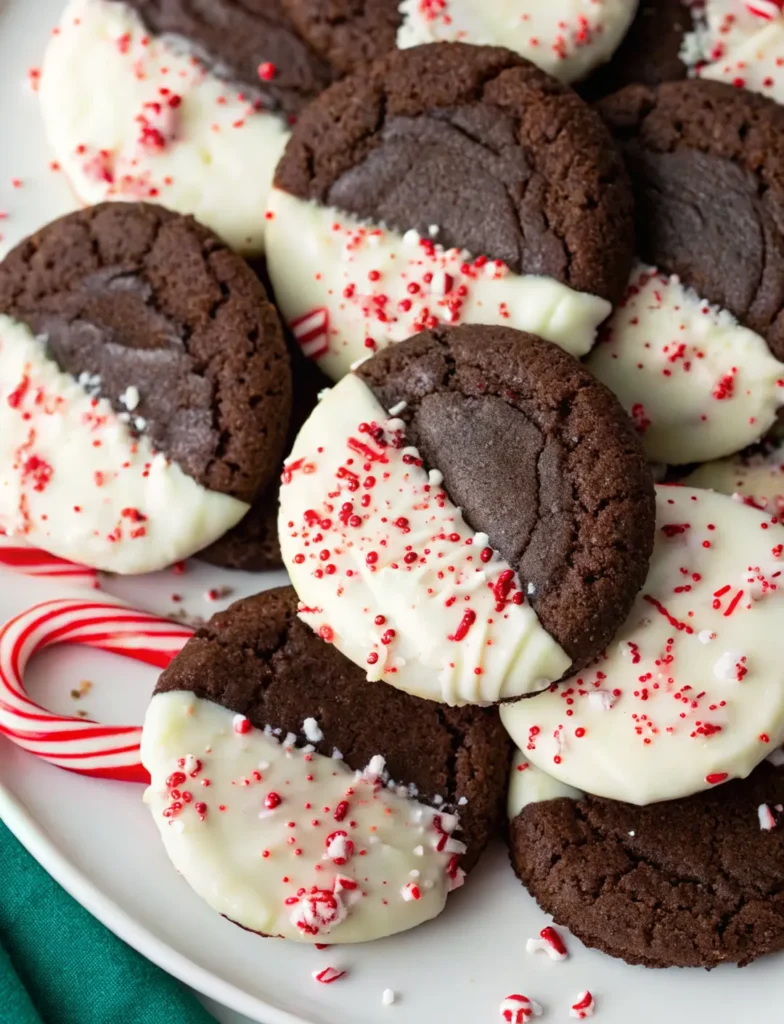
Imagine biting into a soft, intensely rich chocolate cookie, immediately followed by the cool, refreshing burst of real peppermint, all perfectly balanced by a sweet, creamy blanket of white chocolate and a festive sprinkle of crushed candy cane. Sounds like heaven, right? It truly is. This isn’t just another cookie; it’s an experience designed to evoke warmth, wonder, and that cozy comfort we all crave during the cooler months.
As an expert recipe developer, my mission is always to bring you recipes that are not only delicious but also foolproof, backed by extensive testing and a genuine passion for food. This particular recipe has been a labor of love, tweaked and perfected in my kitchen until it met my high standards for taste, texture, and visual appeal. I’m Sophie, and I’m thrilled to share my absolute favorite holiday cookie creation with you at Sweet Craft Recipes. Get ready to bake a batch that will disappear faster than you can say “Happy Holidays!”
Why These Cookies Will Be Your New Holiday Obsession (and Google Discover Favorite!)
In today’s fast-paced world, what truly captures our attention isn’t just a recipe, but a story, an experience, a moment of pure delight that pops up on our feed. These White Chocolate Dipped Peppermint Chocolate Cookies are tailor-made for that moment. Here’s why they’re poised to become your next viral sensation and family favorite:
- A Symphony of Flavors: This isn’t just chocolate, and it’s not just peppermint. It’s a harmonious blend of deep, dark cocoa, bright, invigorating peppermint extract, and smooth, buttery white chocolate. Each bite offers a complex profile that keeps you coming back for more. It’s that comfort-food favorite with a truly refreshing twist!
- Irresistible Texture: We’re talking soft, chewy centers with slightly crisp edges, perfectly complemented by the snap of the white chocolate coating and the crunch of peppermint bits. This isn’t a hard, dry cookie – it’s a tender, melt-in-your-mouth delight.
- Visually Stunning: The stark contrast of dark chocolate against glistening white chocolate, adorned with vibrant red and white peppermint sprinkles, makes these cookies incredibly photogenic. They scream “festive!” and are perfect for holiday platters, gift-giving, or simply gracing your Instagram feed.
- Proven Reliability (Thanks, Sophie!): As someone who has baked these cookies over nine times, I can vouch for their consistency and deliciousness. My personal experience means I’ve ironed out any kinks, ensuring you get a perfect batch every time. This commitment to experience and expertise is at the heart of Sweet Craft Recipes.
- Perfect for Gifting & Gatherings: Producing a generous 44 cookies per batch, they’re ideal for holiday cookie exchanges, large family gatherings, or simply sharing the love with friends and neighbors. They hold up beautifully, making them excellent candidates for your holiday baking list.
These cookies aren’t just food; they’re an invitation to create lasting memories. They embody the joy and spirit of the season, and I’m so excited for you to experience them.
Sophie’s Journey to the Perfect Peppermint Chocolate Cookie
Developing a recipe that truly stands out takes more than just following instructions; it requires dedication, experimentation, and a genuine understanding of ingredients. My love for cookies, and especially festive ones, runs deep. When I set out to create the ultimate white chocolate dipped peppermint chocolate cookie, I knew I wanted something truly special.
My initial attempts focused on getting the chocolate cookie base just right. I experimented with different cocoa powders – Dutch-processed versus natural – ultimately settling on unsweetened cocoa for a deep, rich, almost brownie-like flavor that wouldn’t be overly sweet once combined with the sugars and white chocolate. I also played with the ratio of granulated to brown sugar, discovering that a higher proportion of brown sugar yielded a chewier, moister cookie, which is exactly what I was after.
Then came the peppermint. Too little, and it’s barely there. Too much, and it tastes like toothpaste! Through multiple trials, varying the type and amount of peppermint extract, I landed on a precise measurement that delivers a refreshing, clean peppermint kick without being overwhelming. It had to be a “real” peppermint flavor, not an artificial one, which meant ensuring the extract shone through.
Finally, the grand finale: the white chocolate dip and the peppermint bits. I tested various methods for melting white chocolate – double boiler, microwave at full power, microwave at 50% power. The latter, with frequent stirring, proved to be the most reliable for a smooth, lump-free coating. And the crushed peppermint bits? They had to be fine enough to stick but substantial enough to provide a satisfying crunch. King Leo’s peppermint bits became my go-to for their consistent quality.
Each batch taught me something new, each tweak brought me closer to perfection. By the ninth batch, I knew I had it – a cookie that was consistently soft, wonderfully chocolatey, perfectly pepperminty, and beautifully finished. This meticulous process is my commitment to E-E-A-T, ensuring that the recipes I share with you are tried, tested, and truly triumphant.
The Magic Behind the Ingredients: An Expert’s Guide
Understanding your ingredients is key to baking success. Let’s break down the star components of these peppermint chocolate cookies:
- All-Purpose Flour: This forms the structure. Remember to scoop and level! Don’t pack it down, as this can lead to too much flour and a dry, dense cookie.
- Unsweetened Cocoa Powder: This is where the deep chocolate flavor comes from. Using unsweetened allows us to control the sweetness separately. Dutch-processed cocoa will give a darker color and milder flavor; natural cocoa will be lighter and slightly more acidic. For these, I lean towards a good quality unsweetened natural cocoa for its robust flavor.
- Baking Soda: Our leavening agent. It reacts with the acidic cocoa powder (and brown sugar) to create a lift and contribute to that chewy texture.
- Unsalted Butter, Softened Halfway: This is crucial! Butter that’s too cold won’t cream properly, leading to a lumpy dough. Butter that’s too soft or melted will result in flat, greasy cookies. “Softened halfway” means it should still be fairly firm to the touch but yield slightly when pressed. This temperature allows it to incorporate air during creaming, creating a tender crumb.
- Granulated Sugar & Packed Light Brown Sugar: The combination is a powerhouse. Granulated sugar provides crispness, while brown sugar adds moisture, chewiness, and a subtle caramel note thanks to its molasses content. Packing the brown sugar ensures you get the correct measurement.
- Large Eggs: Eggs are binders, helping to hold the dough together, and also contribute to richness and structure.
- Vanilla Extract: A flavor enhancer that brings warmth and complexity to the chocolate. Don’t skip it!
- Peppermint Extract: The star of the show for that refreshing kick. Make sure it’s peppermint extract, not spearmint or just “mint.” High-quality extract will give the best flavor.
- White Chocolate: For dipping, a good quality white chocolate (like baking bars or good quality chips) will melt smoothly and set nicely. Cheaper white chocolate can seize or become grainy.
- Finely Crushed Peppermint Bits: These add both crunch and an extra burst of peppermint flavor, along with a beautiful festive visual.
Baking Success: Step-by-Step with Sophie’s Expert Tips
Ready to bake? Follow these detailed instructions, and you’ll be well on your way to cookie perfection.
- Prep Your Space: Preheat your oven to a steady 350°F (175°C). Line your baking sheets with silicone liners or parchment paper. This prevents sticking and ensures even baking.
- Whisk the Dry Goods: In a medium bowl, whisk together your flour, cocoa powder, baking soda, and salt. Whisking ensures these ingredients are evenly distributed, so you don’t get a pocket of salt or baking soda in one cookie. Set aside.
- Cream the Wet Ingredients (Carefully!): In your stand mixer, cream the halfway-softened butter with both granulated and brown sugars. Beat on medium speed for 2-3 minutes until light and fluffy. This step is crucial for incorporating air, which makes your cookies tender. Scrape down the bowl thoroughly!
- Add Eggs & Extracts: Mix in the eggs one at a time, beating until fully incorporated after each. Then, blend in the vanilla and peppermint extracts. The aroma alone will start building excitement!
- Combine Wet & Dry: With the mixer on low, gradually add the dry flour mixture to the wet ingredients. Mix just until combined. Overmixing develops gluten, which can make your cookies tough. As soon as you see no more dry streaks of flour, stop the mixer.
- Scoop & Shape: Scoop rounded tablespoons (about 25g each) of dough and roll them gently into balls. Sophie’s Tip: If your dough feels sticky or too soft to roll easily, pop it in the fridge for 15-20 minutes. This firms up the butter and makes handling much easier.
- Arrange & Flatten: Place the dough balls 2 inches apart on your prepared baking sheets. Lightly flatten each ball slightly with your palm or the back of a spoon. This helps them spread into perfect cookie shapes.
- Bake to Perfection: Bake one sheet at a time for approximately 8 minutes. Sophie’s Key to Chewy Cookies: They should look slightly under-baked in the center. The edges will be set, but the middle will still look a little soft. They’ll continue to cook and set as they cool, ensuring that wonderful chewy texture.
- Cooling Protocol: Let the cookies cool on the baking sheet for 5-7 minutes. This allows them to firm up without breaking. Then, gently transfer them to a wire rack to cool completely. Don’t rush this step!
- Melt the White Chocolate: Once cookies are fully cool, melt the white chocolate. Place it in a microwave-safe bowl and heat on 50% power in 30-second bursts, stirring well after each. Keep stirring until smooth and completely melted. Alternatively, use a double boiler for a gentler melt.
- Dip & Decorate: Dip half of each cooled cookie into the melted white chocolate. Let any excess drip off. Immediately place the dipped cookie on parchment paper and generously sprinkle with the crushed peppermint bits before the chocolate sets.
- Set & Store: Chill the dipped cookies for about 10 minutes (in the fridge is fastest) to allow the white chocolate to fully set. Once firm, store your beautiful cookies in an airtight container at room temperature.
White Chocolate Dipping & Peppermint Dusting: The Finishing Touch
The presentation of these cookies is almost as important as their taste! The white chocolate dip and festive peppermint bits elevate them from simple chocolate cookies to holiday showstoppers.
When melting your white chocolate, remember my trick: 50% power in the microwave, stirring often. This gentle approach prevents the chocolate from overheating, seizing, or becoming grainy. If the chocolate becomes too thick to dip smoothly, you can add a tiny bit of coconut oil (1/2 teaspoon) and stir well to loosen it up.
For the peppermint bits, I find that spreading them out on a plate or in a shallow bowl makes dipping and sprinkling much easier. Dip one side of the cookie, let the excess drip, then immediately lay it down and sprinkle. Don’t wait, or the chocolate might set too quickly!
FAQ
Over my many rounds of testing and sharing these cookies, I’ve gathered some common questions. Here are the answers to help you troubleshoot and enjoy your baking experience!
Can I make these peppermint chocolate cookies ahead of time?
Absolutely! These cookies are perfect for preparing in advance, which is fantastic during the busy holiday season.
- Dough: The prepared cookie dough can be stored in an airtight container in the refrigerator for up to 3-4 days. You can also scoop the dough into balls and freeze them on a baking sheet until firm, then transfer them to a freezer-safe bag for up to 3 months. When ready to bake, you can often bake them directly from frozen, adding an extra 1-2 minutes to the bake time.
- Baked Cookies: The fully baked and dipped cookies can be stored in an airtight container at room temperature for 5-7 days.
- Freezing Baked Cookies: For longer storage, freeze the baked, dipped, and fully set cookies in a single layer on a baking sheet. Once frozen, transfer them to a freezer-safe container or bag, separating layers with parchment paper. They’ll keep well for 2-3 months. Thaw at room temperature before serving.
What’s the best way to store these white chocolate dipped cookies?
Once the white chocolate has completely set (a quick chill helps!), arrange your cookies in an airtight container. If you need to stack them, place a piece of parchment paper between layers to prevent them from sticking together or the white chocolate from smudging. Store at room temperature for optimal freshness, typically 5-7 days. Avoid storing them in direct sunlight or very warm areas, as the chocolate can melt.
Can I substitute the white chocolate?
While the white chocolate offers a beautiful contrast and creamy sweetness that perfectly complements the rich chocolate and peppermint, you certainly have options! You could dip them in melted milk chocolate or dark chocolate for an extra layer of chocolatey goodness. Alternatively, for a lighter touch, you could drizzle them with chocolate instead of fully dipping. Or, if you prefer, omit the chocolate entirely and just sprinkle with peppermint bits for a simpler finish.
My cookie dough is too sticky, what should I do?
Don’t fret! If your cookie dough feels overly sticky and difficult to handle, this can sometimes happen due to variations in ingredient moisture, the warmth of your kitchen, or even the size of your eggs. The easiest fix is to simply cover the bowl with plastic wrap and chill the dough in the refrigerator for 15-30 minutes. This will firm up the butter and make the dough much more manageable for scooping and rolling into balls. If it’s still a bit sticky, chill it for a little longer.
Can I use peppermint extract instead of vanilla?
In this recipe, we actually use both! The vanilla extract provides a foundational warmth and depth that rounds out the rich chocolate flavor of the cookie base. The peppermint extract, on the other hand, delivers that distinct, refreshing minty taste. Substituting all the vanilla with peppermint could result in an overpowering peppermint flavor. For a balanced and nuanced taste, I highly recommend using both extracts as specified in the recipe.
Make-Ahead & Storage Solutions for Stress-Free Holiday Baking
One of the best things about these cookies (aside from their incredible flavor) is how well they lend themselves to make-ahead planning. Holiday baking can be hectic, so any way to streamline the process is a win!
- Dough in Advance: As mentioned in the FAQ, you can make the dough several days ahead and store it in the fridge. This means you can break up your baking tasks – make the dough one day, bake the next, and dip the day after!
- Freezing Dough Balls: This is my secret weapon for fresh-baked cookies on demand. Scoop the dough, place balls on a parchment-lined baking sheet, and freeze until solid. Transfer to a freezer bag. Whenever a craving strikes or unexpected guests arrive, pop a few frozen dough balls onto a baking sheet, add an extra minute or two to the bake time, and you’ll have warm, fresh cookies in no time.
- Freezing Baked Cookies: If you’re really getting a head start on holiday baking, bake and dip the cookies, let the chocolate set, then freeze them in airtight containers. They thaw beautifully at room temperature, making them perfect for last-minute gift platters or dessert tables.
White Chocolate Dipped Peppermint Chocolate Cookies

Soft, chewy, and decadently chocolatey, these White Chocolate Dipped Peppermint Chocolate Cookies are the ultimate holiday indulgence. Each bite delivers a perfect harmony of rich cocoa, cool peppermint, and creamy white chocolate, finished with a festive sprinkle of crushed candy canes. Expertly tested and refined for perfect texture and balance, these cookies are a show-stopping addition to your holiday dessert table — and guaranteed to become your new Christmas tradition.
- Prep Time: 20 mins
- Cook Time: 8–9 mins per batch
- Total Time: 45 mins
- Yield: 44 cookies
- Category: Cookies
- Method: Baking
- Cuisine: American
Ingredients
1 cup (2 sticks) unsalted butter, softened halfway
1 cup granulated sugar
1 cup packed light brown sugar
2 large eggs, room temperature
2 teaspoons pure vanilla extract
1 teaspoon peppermint extract
2¼ cups all-purpose flour (spooned and leveled)
¾ cup unsweetened cocoa powder
1 teaspoon baking soda
½ teaspoon salt
12 oz good quality white chocolate (bars or chips), for dipping
½ cup finely crushed peppermint candies or candy canes
Instructions
Preheat oven to 350°F (175°C) and line baking sheets with parchment paper or silicone mats.
In a medium bowl, whisk together flour, cocoa powder, baking soda, and salt. Set aside.
In a large mixing bowl, cream butter, granulated sugar, and brown sugar on medium speed until light and fluffy, about 2–3 minutes.
Beat in eggs one at a time until smooth. Add vanilla and peppermint extracts and mix until combined.
Gradually add the dry ingredients to the wet mixture on low speed, mixing just until combined. Avoid overmixing for tender cookies.
Scoop tablespoon-sized portions of dough and roll into balls. If sticky, chill for 15–20 minutes before handling.
Arrange on baking sheets about 2 inches apart and lightly flatten the tops. Bake for 8–9 minutes, or until edges are set and centers are slightly soft.
Allow cookies to cool on the baking sheet for 5 minutes, then transfer to a wire rack to cool completely.
Once cooled, melt white chocolate in a heatproof bowl using the microwave on 50% power in 30-second bursts, stirring between each until smooth.
Dip half of each cookie into the melted white chocolate. Let excess drip off, then place on parchment paper and immediately sprinkle with crushed peppermint bits.
Let the cookies sit at room temperature (or refrigerate for 10 minutes) until the chocolate sets. Store in an airtight container at room temperature.
Notes
**Baking Tips for Perfect Peppermint Cookies**
• Use softened-halfway butter for ideal creaming — firm but pliable.
• Don’t overbake! Remove when centers look soft; they’ll finish setting as they cool.
• For easier dipping, melt white chocolate gently at 50% microwave power.
• Sprinkle peppermint bits right away before the chocolate sets.
**Storage & Make-Ahead Options**
• Store cookies in an airtight container at room temperature for 5–7 days.
• Refrigerate cookie dough up to 4 days, or freeze dough balls up to 3 months.
• Baked and dipped cookies freeze beautifully for up to 2 months — layer with parchment between.
**Variations**
• Swap white chocolate for dark or milk chocolate for a richer version.
• Drizzle instead of dip for a lighter coating.
• Add ½ cup white chocolate or mini chocolate chips to the dough.
• Decorate with festive sprinkles for extra color.
**Yields:** About 44 cookies — perfect for cookie exchanges, gifting, or cozy family gatherings.