There’s something inherently nostalgic and comforting about a perfectly soft sugar cookie. It’s a taste that transports you back to childhood, to grandma’s kitchen, or to festive holiday gatherings. But what if I told you there’s a secret ingredient that elevates the classic sugar cookie to an entirely new level of fluffy, tender perfection, and even offers a subtle “healthier twist”? Enter the Sour Cream Sugar Cookie.
Hi, I’m Sophie! And if there’s one recipe I’ve baked, tinkered with, and perfected more times than I can count – at least nine times, to be exact – it’s these incredible sour cream sugar cookies. I’ve tested different ratios, chilling times, and baking temperatures to bring you what I confidently believe is the ultimate recipe for cookies that are not just soft, but melt-in-your-mouth pillowy. They’re a true American comfort food favorite, ideal for family gatherings, gifting, or simply indulging on a quiet afternoon.
You might be wondering about the “healthier twist” in a sugar cookie recipe. While these are undoubtedly a treat, my approach focuses on creating a wholesome, homemade indulgence. By using real, quality ingredients and making them from scratch, you’re in control of what goes in. It’s about choosing fresh, recognizable components over highly processed alternatives, allowing us to enjoy a beloved comfort food in a more mindful way. These cookies aren’t ‘diet food,’ but they embody a healthier approach to enjoying sweets, prioritizing quality and the joy of home baking.
So, get ready to roll up your sleeves and discover the magic of sour cream in baking. This recipe will not only yield the most delightfully fluffy sugar cookies you’ve ever tasted but will also equip you with expert tips to ensure success every single time.
Why Sour Cream is Your Secret Weapon for Super Soft Sugar Cookies
If you’ve never baked with sour cream before, prepare for a revelation! This humble dairy product is a game-changer for cookies, cakes, and quick breads. Here’s why it works wonders in our sugar cookies:
- Unrivaled Tenderness and Moisture: Sour cream is rich in fat and moisture. When added to dough, it creates an incredibly tender crumb and helps the cookies stay moist for days. It prevents them from drying out, even after baking.
- A Touch of Tang for Balanced Sweetness: The slight acidity in sour cream reacts with the baking soda in the recipe. This chemical reaction creates tiny air bubbles, contributing to that desirable fluffy texture. More importantly, this acidity also adds a subtle, pleasant tang that beautifully balances the sweetness of the sugar and frosting, preventing the cookies from being overly cloying.
- Rich, Complex Flavor: Beyond texture, sour cream imparts a delightful depth of flavor. It’s not overtly ‘sour’ in the baked cookie, but rather adds a creamy, almost buttery richness that enhances the overall taste experience.
- Structure and Stability: While it adds moisture, sour cream also contributes to the dough’s structure, allowing it to hold its shape better during baking (especially when properly chilled).
In essence, sour cream is the secret to moving beyond a merely ‘good’ sugar cookie to an absolutely extraordinary one. It’s the reason these cookies are so irresistible!
Embracing the “Healthier Twist” in Comfort Baking
Let’s talk about what a “healthier twist” truly means in the context of a beloved comfort food like sugar cookies. It’s not about calorie restriction or eliminating sugar; it’s about making smart, conscious choices that enhance both enjoyment and well-being.
- Quality Ingredients, Always: My philosophy at SweetCraftRecipes is that homemade food, made with quality ingredients, is almost always a healthier choice than highly processed store-bought alternatives. Here, we use real butter, a fresh egg, and full-fat sour cream – no mystery ingredients, no artificial flavors or preservatives. You know exactly what’s in every bite.
- Mindful Indulgence: A healthier twist also means savoring your treats. These cookies are meant to be enjoyed, shared, and celebrated. When you bake from scratch, there’s an appreciation for the process and the end result that makes each cookie feel more special and satisfying. You’re more likely to enjoy one or two mindfully, rather than overindulging in something less satisfying.
- Control Over Sweetness and Customization: While the recipe includes standard amounts of sugar, you have the option to subtly reduce the sugar in the cookie dough (though not too much, as it affects texture) or even adjust the sweetness of the frosting. You can also opt for natural food colorings or sprinkles, or create simple, elegant designs without excessive additions.
- The Joy of Homemade: There’s a psychological benefit to baking from scratch. The act of creation, the aroma filling your home, and the pride in sharing something you’ve made with love contributes to a sense of wellness and happiness. This ‘feel-good’ factor is undeniably a part of a healthier lifestyle.
So, when I say “healthier twist,” I mean a recipe that delivers incredible flavor and texture through thoughtful ingredient choices and the invaluable joy of homemade baking.
Ingredients You’ll Need
Gathering your ingredients first ensures a smooth baking process. For the best results, make sure your butter, egg, and sour cream are all at room temperature. This allows them to emulsify properly, creating a smooth, homogenous dough and frosting.
For the Cookies:
- 2 ¾ cups all-purpose flour: The structure of our cookies.
- 1 teaspoon baking powder: For lift and tenderness.
- ½ teaspoon baking soda: Reacts with sour cream for extra fluffiness.
- ½ teaspoon salt: Enhances all the flavors.
- 1 cup unsalted butter, softened: Crucial for richness and texture.
- 1 cup granulated sugar: Sweetness and contributes to browning.
- 1 large egg: Binds ingredients and adds moisture.
- 1 cup sour cream (full-fat preferred): Our star ingredient for tenderness and tang!
- 1 teaspoon vanilla extract: Essential for classic cookie flavor.
For the Frosting:
- ½ cup room temperature butter: For a creamy, rich buttercream.
- 2 cups powdered sugar: The base of our smooth frosting.
- 2-4 tablespoons milk (as needed for consistency): Thins the frosting to your desired spreadability.
- 1 teaspoon vanilla extract: Adds warmth and aroma.
- Food coloring (optional): For festive customization.
- Sprinkles (optional): Because what’s a sugar cookie without them?
Step-by-Step Instructions for Fluffy Sour Cream Sugar Cookies
Follow these detailed steps to bake your perfect batch of sour cream sugar cookies.
- Combine Dry Ingredients: In a medium bowl, whisk together the flour, baking powder, baking soda, and salt. Set aside. This ensures all leavening agents and salt are evenly distributed.
- Cream Butter and Sugar: In a large mixing bowl, using an electric hand mixer or stand mixer with the paddle attachment, cream the softened butter and granulated sugar together until the mixture is light, fluffy, and pale yellow, about 2-3 minutes. Scrape down the sides of the bowl as needed. This step incorporates air, contributing to the cookie’s texture.
- Mix Wet Ingredients: Add the egg, sour cream, and vanilla extract to the creamed mixture. Mix on low speed until the batter is smooth and well combined. Again, scrape down the sides to ensure everything is incorporated.
- Gradually Add Dry to Wet: With the mixer on low speed, gradually add the dry ingredients to the wet ingredients, mixing just until combined. Be careful not to overmix! Overmixing develops the gluten in the flour, leading to tougher cookies. Stop as soon as no dry streaks remain.
- Chill the Dough: Divide the dough into two equal portions. Shape each into a disc, wrap tightly in plastic wrap, and chill in the refrigerator for at least 1 hour. For best results, chill overnight. Chilling is crucial as it firms up the butter, prevents the cookies from spreading too much in the oven, and allows the flavors to meld.
- Prepare for Baking: When you’re ready to bake, preheat your oven to 375°F (190°C). Line a large cookie sheet with parchment paper or a silicone baking mat.
- Roll and Cut: On a lightly floured surface (or between two sheets of parchment paper), use a rolling pin to roll out one chilled dough disc to approximately ¼-inch thickness. Use your favorite cookie cutters to cut out shapes and carefully transfer them to the prepared baking sheet, leaving about 1 inch between cookies. Gather and re-roll scraps only once or twice to avoid overworking the dough.
- Bake: Bake for 8-12 minutes, or until the edges are lightly golden and the centers are just set. Baking time will vary depending on the size and thickness of your cookies and your oven’s calibration. Do not overbake; these cookies are meant to be soft, so a slightly underbaked center is better than a dry, crisp cookie.
- Cool: Let the cookies cool on the baking sheets for 2 minutes before gently transferring them to a wire rack to cool completely. Repeat with the remaining dough. Ensure cookies are completely cool before frosting.
For the Fluffy Buttercream Frosting:
- Cream Butter: In a large bowl, using an electric mixer, beat the softened butter until creamy and smooth, about 1-2 minutes.
- Add Powdered Sugar: Gradually add the powdered sugar, 1 cup at a time, beating on low speed until incorporated, then increasing to medium speed until light and fluffy.
- Add Vanilla and Milk: Mix in the vanilla extract and 1–2 tablespoons of milk. Continue beating until the frosting reaches a smooth, spreadable consistency. If the frosting is too thick, add more milk, ½ teaspoon at a time, until desired consistency is reached. If it’s too thin, add more powdered sugar, 1 tablespoon at a time.
- Color (Optional): If you wish to color your frosting, divide it into separate bowls and mix in food coloring until you achieve your desired shades.
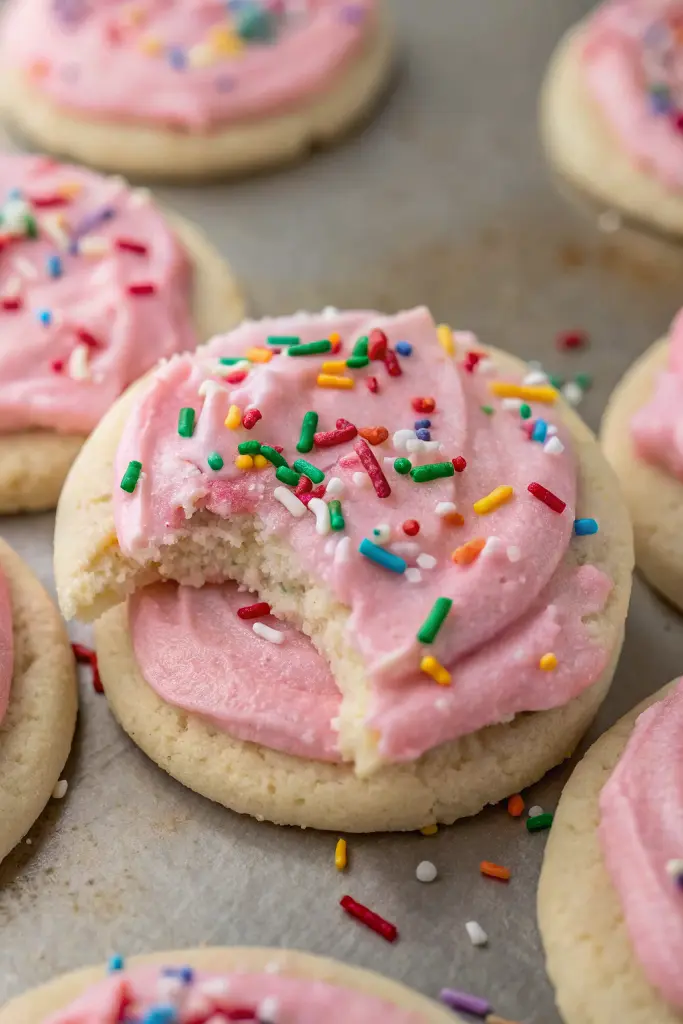
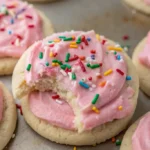
- Frost and Decorate: Once the cookies are completely cool, spread or pipe the frosting onto the tops. Add your favorite sprinkles or other decorations immediately after frosting.
- Set and Store: Allow the frosting to set for at least 15-30 minutes before stacking or storing the cookies.
Sophie’s Expert Tips for Cookie Success (Tested 9+ Times!)
Through countless batches, I’ve refined the process to guarantee perfect sour cream sugar cookies every time. Here are my tried-and-true tips:
- Room Temperature Ingredients are Non-Negotiable: This is probably the most crucial tip! Softened butter, a room-temp egg, and room-temp sour cream emulsify beautifully, creating a smooth batter that traps air for fluffiness. Cold ingredients can lead to a lumpy batter and a denser cookie.
- Don’t Overmix the Dough: Once you add the dry ingredients, mix just until the flour streaks disappear. Overmixing develops gluten, which makes cookies tough and chewy, sacrificing that coveted soft texture.
- Chill Time is Your Best Friend: Seriously, do not skip or skimp on chilling the dough.
- Prevents Spreading: Cold butter takes longer to melt in the oven, giving the cookies time to set before they spread too much.
- Easier Handling: Chilled dough is much less sticky and easier to roll out and cut.
- Flavor Development: The flavors in the dough have time to meld and deepen, resulting in a more delicious cookie.
- Sophie’s Insight: I always aim for at least 2 hours, but often chill overnight. It makes a noticeable difference!
- Flour Your Surface (and Cutters) Lightly: Too much flour will make your cookies dry and tough. A light dusting is all you need. Consider rolling dough between two pieces of parchment paper for minimal extra flour and easier transfer.
- Bake Until Just Set: Sour cream sugar cookies are meant to be soft. Look for edges that are barely golden and centers that appear set, but not deeply colored. If they look underbaked in the middle, they’re probably perfect! Overbaking is the quickest way to dry out your cookies.
- Cool Completely Before Frosting: This seems obvious, but patience is key! Warm cookies will melt your beautiful buttercream frosting into a sticky mess.
- Get Creative with Cutters & Decorations: This recipe is a fantastic canvas for any occasion. Use holiday-themed cutters, or just simple circles. Change up your sprinkle colors, or try piping intricate designs with a pastry bag for a professional touch.
- Invest in a Good Baking Mat or Parchment Paper: This prevents sticking, ensures even baking, and makes cleanup a breeze.
- Rotate Your Baking Sheets: Ovens often have hot spots. Rotating your baking sheet halfway through baking (if baking multiple sheets) ensures all cookies bake evenly.
Delicious Variations & Customizations
These sour cream sugar cookies are delightful on their own, but they also offer a fantastic base for creativity!
- Citrus Zest: Add 1-2 teaspoons of lemon, orange, or lime zest to the cookie dough (or even the frosting!) for a bright, refreshing flavor profile.
- Almond Extract: Swap out half of the vanilla extract for almond extract in both the cookies and frosting for a delightful nutty aroma.
- Spiced Cookies: Incorporate ½ teaspoon of ground nutmeg or cinnamon into the dry ingredients for a warmer, cozier flavor, especially lovely for fall or winter.
- Chocolate Drizzle: Instead of traditional frosting, melt some chocolate chips and drizzle them over the cooled cookies for a simpler, yet elegant finish.
- Cream Cheese Frosting: For an extra tangy and rich frosting that complements the sour cream beautifully, consider making a cream cheese buttercream instead of a classic buttercream.
Storage & Make-Ahead Tips
These cookies are fantastic for making ahead, which is perfect for busy family gatherings or when you want to spread out your baking efforts.
- Dough: The prepared dough can be chilled in the refrigerator for up to 2-3 days. This is actually beneficial as it allows the flavors to deepen. You can also freeze the dough (well-wrapped in plastic wrap, then foil) for up to 3 months. Thaw in the refrigerator overnight before rolling and baking.
- Unfrosted Baked Cookies: Store completely cooled, unfrosted cookies in an airtight container at room temperature for up to 5 days. For longer storage, freeze unfrosted cookies in a single layer until solid, then transfer to a freezer-safe bag or container for up to 3 months. Thaw at room temperature.
- Frosted Baked Cookies: Once frosted and the frosting has set, store the cookies in a single layer in an airtight container at room temperature for 3-4 days. If you need to stack them, place a piece of parchment paper between layers to prevent sticking and smudging. You can also freeze frosted cookies (follow the same freezing method as unfrosted, ensuring frosting is firm) for 1-2 months, thawing at room temperature.
Common Questions About Sour Cream Sugar Cookies
Why use sour cream in sugar cookies?
Sour cream is a magical ingredient in sugar cookies! Its acidity reacts with baking soda to create extra tender, soft, and moist cookies. It also adds a subtle tang that balances the sweetness beautifully, resulting in a richer, more complex flavor profile than traditional sugar cookies. Plus, the fat content contributes to a delightfully fluffy texture that melts in your mouth.
Can I make these cookies ahead of time?
Absolutely! This recipe is fantastic for making ahead. You can prepare the dough and chill it in the refrigerator for up to 2-3 days. This actually enhances the flavor and makes the dough easier to roll. Once baked and cooled, the unfrosted cookies can be stored in an airtight container at room temperature for up to 5 days, or frozen for up to 3 months. Frosting can also be made a day or two in advance and stored in the fridge, then re-whipped before use.
How do I store sour cream sugar cookies?
Once frosted, allow the frosting to set completely before storing. Store frosted sour cream sugar cookies in a single layer in an airtight container at room temperature for up to 3-4 days. If stacking, place parchment paper between layers to prevent sticking and smudging. For longer storage, you can freeze frosted cookies (well-wrapped) for up to 1-2 months, thawing at room temperature before serving.
What’s the best way to roll out sugar cookie dough without it sticking?
The key to non-sticky rolling is well-chilled dough and a lightly floured surface. Work with one portion of dough at a time, keeping the rest refrigerated. You can also roll the dough between two sheets of parchment paper – this minimizes the need for extra flour, keeping your cookies tender, and makes transferring cut shapes much easier. If the dough gets too warm and sticky, simply pop it back into the fridge for 10-15 minutes.
What does a ‘healthy twist’ mean for comfort food like sour cream sugar cookies?
For these Sour Cream Sugar Cookies, a ‘healthy twist’ emphasizes making a beloved comfort food better for you by prioritizing quality, homemade ingredients, and mindful preparation. It means controlling sugar levels (though we still have frosting!), using real butter and full-fat sour cream for rich flavor without artificial additives, and enjoying them as a balanced treat. It’s about savoring a homemade indulgence that feels wholesome compared to highly processed store-bought options, rather than making them a low-calorie diet food. The focus is on quality, flavor, and the joy of home baking.
Serving Suggestions
These delightful sour cream sugar cookies are incredibly versatile and perfect for a variety of occasions:
- Family Gatherings: A classic choice that everyone from kids to adults will adore. Arrange them on a platter for an inviting dessert spread.
- Coffee or Tea Time: Their soft texture and balanced sweetness make them a perfect companion to a warm cup of coffee, tea, or even a glass of cold milk.
- Holiday Gifts: Package them in festive boxes or bags for homemade gifts that show you care. The decorative possibilities are endless!
- After-School Treat: A comforting and satisfying snack that beats any store-bought alternative.
- Dessert Bar: Alongside other treats, these cookies hold their own. Consider pairing them with a variety of textures and flavors.
More SweetCraft Cookie Creations You’ll Love!
If you’ve enjoyed mastering these fluffy sour cream sugar cookies, you’ll be thrilled to explore more of our tested and perfected cookie recipes. Each one offers a unique taste and baking adventure, guaranteed to satisfy your sweet tooth!
- For the Ultimate Indulgence: Craving something decadent and rich? You absolutely must try our Stuffed Red Velvet Cookies Recipe. They’re a showstopper!
- A Taste of the Big Apple: If you dream of giant, chewy cookies with incredible flavor, our Pistachio NYC Cookies Recipe is calling your name.
- Seasonal Delights: For a truly unique and irresistible treat, especially around spring, don’t miss our Creme Egg Stuffed Cookies Recipe. They’re an unexpected delight!
- Classic Combos: You can never go wrong with the timeless pairing in our Peanut Butter Nutella Cookie Recipe. Pure bliss!
- Simple & Sweet Stuffed: For another take on a filled cookie that’s always a hit, check out our White Chocolate Stuffed Cookies.
Concluding Thoughts: Bake Your Way to Bliss
There’s undeniable magic in baking, especially when the results are as consistently delightful as these sour cream sugar cookies. From the moment the sweet, tangy aroma fills your kitchen to the first bite of their tender, fluffy perfection, you’ll understand why these have become a beloved staple in my own home. My 9+ times testing this recipe wasn’t just about achieving technical perfection; it was about ensuring every home baker can experience the joy and comfort of creating something truly special.
These cookies truly represent the best of comfort food – familiar, deeply satisfying, and made with love. They’re a reminder that a “healthier twist” can simply mean choosing homemade quality and savoring every moment. So go ahead, embrace the flour, get your hands a little messy, and bake a batch of these unforgettable sour cream sugar cookies. They’re more than just a dessert; they’re an experience, a memory in the making, and a testament to the simple pleasures of life.
I can’t wait for you to try them. Happy baking, and don’t forget to share your creations with me!
PrintFluffy Sour Cream Sugar Cookies
Discover the secret to the softest, most pillowy sour cream sugar cookies! Sophie has meticulously tested this comfort-food favorite over 9 times, perfecting a recipe that’s easy to make and yields irresistibly tender cookies with a subtly tangy flavor. A healthier-twist approach means focusing on quality ingredients and homemade goodness. Perfect for any gathering, these frosted beauties will be an instant hit.
- Prep Time: 25
- Cook Time: 12
- Total Time: 97
- Yield: 36 cookies
- Category: Dessert, Cookie
- Method: Baking
- Cuisine: American
Ingredients
2 ¾ cups all-purpose flour
1 teaspoon baking powder
½ teaspoon baking soda
½ teaspoon salt
1 cup unsalted butter, softened
1 cup granulated sugar
1 large egg
1 cup sour cream, full-fat preferred
1 teaspoon vanilla extract
For the Frosting:
½ cup room temperature butter
2 cups powdered sugar
2–4 tablespoons milk (as needed for consistency)
1 teaspoon vanilla extract
Food coloring (optional)
Sprinkles (optional)
Instructions
1. In a medium bowl, whisk together the flour, baking powder, baking soda, and salt. Set aside.
2. In a large mixing bowl, use an electric hand mixer or stand mixer to cream the butter and granulated sugar together until the mixture is light and fluffy, about 2-3 minutes.
3. Mix in the egg, sour cream, and vanilla extract until the batter is smooth and well combined. Scrape down the sides of the bowl as needed.
4. Gradually add the dry ingredients to the wet ingredients, stirring just until combined. Be careful not to over mix, as this can make the cookies less tender and chewy.
5. Divide the dough into two portions, shape each into a disc, and wrap tightly in plastic wrap. Chill in the refrigerator for at least 1 hour, or overnight for best results. This is crucial for easy handling and preventing spread.
6. When ready to bake, preheat the oven to 375°F (190°C). Line a cookie sheet with parchment paper or a silicone baking mat.
7. On a lightly floured surface, use a rolling pin to roll out one chilled dough disc to about ¼-inch thickness. Cut into desired shapes with cookie cutters and carefully transfer them to the prepared baking sheet, leaving about 1 inch between cookies.
8. Bake for 8-12 minutes, or just until the edges are lightly golden and the centers are set. Baking time may vary depending on cookie size and oven. Do not overbake.
9. Let the cookies cool on the baking sheets for 2 minutes before transferring them to a wire rack to cool completely. Repeat with the remaining dough.
10. For the Frosting: In a large bowl, beat the softened butter until creamy and smooth, about 1-2 minutes with an electric mixer.
11. Gradually mix in the powdered sugar, adding 1 cup at a time until fully incorporated. Beat until light and fluffy.
12. Add the vanilla extract and 1–2 tablespoons of milk, stirring until the frosting reaches a smooth, spreadable consistency. Add more milk, ½ teaspoon at a time, if a thinner consistency is desired. If too thin, add more powdered sugar.
13. If desired, divide the frosting into portions and add food coloring to create different colors. Mix well until the color is evenly distributed.
14. Spread or pipe the frosting onto the tops of the completely cooled cookies. This step is best done when cookies are completely cool to prevent melting.
15. Add your favorite sprinkles or other decorations as desired. Allow the frosting to set for at least 15-30 minutes before stacking or storing the cookies.
Notes
For the best results, use full-fat sour cream. Low-fat or non-fat varieties may alter the texture. Ensure all cold ingredients (butter, egg, sour cream) are at room temperature before beginning, as this helps them cream together smoothly and creates a more even dough. Do not skip the chilling step for the dough; it’s essential for preventing cookies from spreading too much in the oven. For perfect cut-outs, flour your cookie cutters slightly before each cut.