The crisp air, the gentle glow of holiday lights, and the promise of cozy evenings by the fireplace. What could make these moments even more enchanting? A mug of rich, velvety hot chocolate, made extra special by the delightful surprise of Hot Cocoa Bombs!
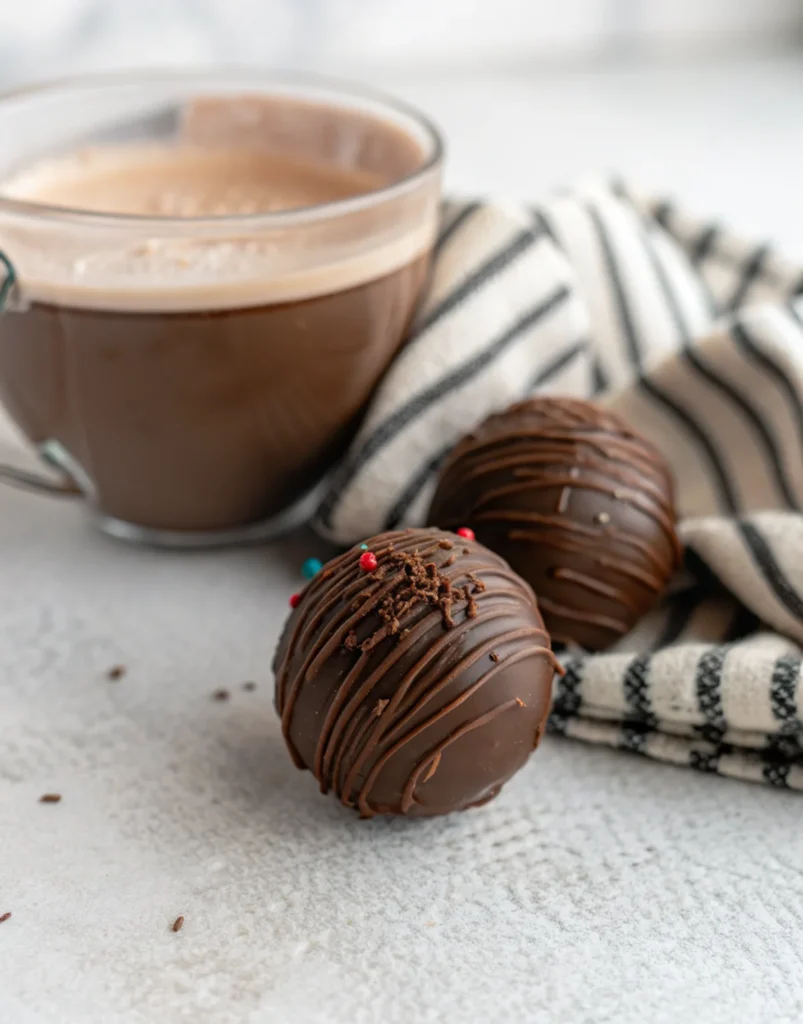
Gone are the days of simple powdered mixes. Enter the hot cocoa bomb: a whimsical, chocolatey sphere packed with cocoa, mini marshmallows, and often a secret sprinkle of magic. Pour hot milk over it, watch the chocolate shell melt away, and voila! A delicious, effervescent transformation occurs right before your eyes, creating an experience as delightful to watch as it is to drink.
As someone who lives for seasonal treats and bringing a touch of homemade charm to every occasion, I’ve spent countless hours perfecting the art of the hot cocoa bomb. From mastering the chocolate shell to experimenting with decadent fillings, I’m here to share all my insider tips and tricks so you can create your own magical moments. This comprehensive guide will walk you through every step, ensuring your homemade hot cocoa bombs are not just delicious, but truly spectacular.
Why You’ll Love This Hot Cocoa Bomb Recipe
This recipe isn’t just about making hot chocolate; it’s about crafting an experience. Here’s why you’ll fall in love with making your own hot cocoa bombs:
- Whimsical & Fun: They’re an instant hit with kids and adults alike, transforming a simple drink into an exciting event.
- Perfect for Gifting: Handmade hot cocoa bombs make thoughtful, impressive gifts for neighbors, teachers, or friends during the holidays.
- Customizable: Once you master the basic technique, the possibilities for flavor combinations and decorations are endless!
- More Flavorful: You control the quality of chocolate and cocoa mix, resulting in a far superior tasting hot chocolate than store-bought options.
- A Creative Outlet: It’s a fun and rewarding kitchen project that sparks joy and creativity, especially on a chilly afternoon.
Join me in transforming your winter beverage routine into an extraordinary adventure. Let’s make some magic!
What Exactly Are Hot Cocoa Bombs?
If you’re new to the hot cocoa bomb phenomenon, imagine this: a hollow sphere of solid chocolate, meticulously crafted to hold a generous helping of hot cocoa mix and mini marshmallows inside. The magic truly begins when you place one of these delightful spheres into a mug and pour steaming hot milk over it.
As the hot milk embraces the chocolate shell, it slowly begins to melt. The sphere gracefully cracks open, releasing the powdered cocoa mix and buoyant marshmallows, which then swirl into the milk. A quick stir, and you’re left with a rich, creamy, and incredibly indulgent cup of hot chocolate, complete with a fluffy marshmallow topping. It’s a sensory experience that combines sight, sound (the gentle fizz!), and taste, making it far more exciting than dissolving traditional powdered hot chocolate. They’re a trending treat that combines confectionery art with comforting warmth, perfect for chilly days and festive gatherings.
Ingredients You’ll Need for Hot Cocoa Bomb Success
Creating delicious hot cocoa bombs starts with quality ingredients. While the list is short, each component plays a crucial role in the final product.
- 8 oz Chocolate Bars, Broken into Pieces:
- The Star of the Show: This is the foundation of your bomb, so choose wisely! High-quality chocolate (like Ghirardelli, Lindt, or even good baking chocolate bars) will melt smoothly and taste fantastic.
- Type: Milk chocolate, semi-sweet, or dark chocolate all work beautifully. For a classic hot chocolate flavor, milk chocolate is often preferred. Semi-sweet offers a richer, less sweet alternative. You can also use good quality chocolate chips, but bars tend to melt more evenly.
- Avoid: Chocolate with a low cocoa butter content (often labeled “chocolate flavored coating” or “compound chocolate”) as it may not melt as smoothly or set as firmly. Candy melts are an exception if you prefer vibrant colors and easy melting, but they have a different flavor profile.
- 6 tbsp Hot Cocoa Mix:
- The Core Flavor: Again, quality matters here. Use your favorite premium hot cocoa mix. This is where a lot of your drink’s flavor will come from.
- Variety: Don’t be afraid to experiment! Vanilla bean hot cocoa, dark chocolate cocoa, or even a spicy Mexican hot chocolate mix can create unique bombs.
- Mini Marshmallows:
- The Classic Topping: These are essential for that signature hot chocolate experience. Mini marshmallows fit perfectly inside the bombs and float beautifully.
- Storage: Keep them fresh! Stale marshmallows won’t soften as nicely.
- Extra Chocolate for Decorating:
- Finishing Touch: This is for drizzling over the finished bombs, adding a professional and appealing look. You can use the same chocolate as your shells or a contrasting color for visual interest.
- Application: A small amount melted in a piping bag (or a ziplock bag with a snipped corner) works best.
Expert Tip on Chocolate Choice: For the best, shiny, and most stable chocolate shells, tempering your chocolate is the professional technique. However, for home cooks, simply melting good quality chocolate carefully (as instructed) works perfectly well and is much less intimidating! If you want to delve into tempering, ensure you have a thermometer and research the specific tempering method for your chosen chocolate type (e.g., seeding method, tabling method).
Essential Equipment for Hot Cocoa Bomb Success
While the ingredients are simple, having the right tools makes the process much smoother and more enjoyable.
- Microwave-Safe Bowl: For melting your chocolate. Glass or ceramic bowls work best as they retain heat well.
- Spatula or Spoon: For stirring the melting chocolate. A rubber spatula is great for scraping down the sides of the bowl.
- Silicone Half Sphere Molds:
- Absolutely Crucial: These are non-negotiable! Look for silicone molds that create hemispheres (half-spheres) that are roughly 2 to 2.5 inches in diameter.
- Why Silicone? Silicone is flexible, making it incredibly easy to pop out the delicate chocolate shells without cracking them. Ensure they are clean and completely dry before use.
- Small Spoon or Pastry Brush: For spreading the melted chocolate evenly inside the molds. A clean, dedicated pastry brush works wonders for an even coating.
- Piping Bag or Zip-Top Bag: For sealing the bombs and for decorative drizzles. A small hole snipped from the corner of a sturdy zip-top bag works just fine as an alternative to a dedicated piping bag.
- Baking Sheet or Flat Plate: Lined with parchment paper or a silicone mat, this provides a stable, non-stick surface for refrigerating your molds and finished bombs.
- Gloves (Optional, but Recommended): Wearing food-safe gloves can help prevent fingerprints and keep your chocolate shells pristine, especially when handling them.
Having these tools at the ready will streamline your hot cocoa bomb-making process and lead to beautifully crafted results!
How to Make Hot Cocoa Bombs: Step-by-Step Guide
Making hot cocoa bombs is a rewarding process, and with these detailed steps, you’ll be a pro in no time!
1. Melting Your Chocolate to Perfection
The key to a smooth, shiny shell is properly melted chocolate.
- Break Down the Chocolate: Start by breaking your 8 oz chocolate bars into small, even pieces. Smaller pieces melt more consistently.
- Microwave Carefully: Place the chocolate pieces in a clean, microwave-safe bowl.
- Gentle Heat: Microwave at 50% power in 30-second increments. This prevents scorching the chocolate.
- Stir Between Intervals: After each 30-second burst, remove the bowl and stir the chocolate gently with a spatula. Even if it doesn’t look fully melted, stirring helps distribute the heat.
- Finish Melting Off-Heat: Continue microwaving and stirring until the chocolate is almost completely melted, with just a few small lumps remaining. Remove it from the microwave and stir gently until the residual heat melts the remaining lumps and the chocolate is perfectly smooth and fluid. This helps prevent overheating, which can make chocolate seize or become dull.
2. Coating the Molds
This is where your bombs take shape!
- Prepare Molds: Choose 12 half sphere molds (this will make 6 full bombs) and ensure they are impeccably clean and completely dry. Any moisture can cause your chocolate to seize.
- Apply Chocolate: Using a small spoon or a clean pastry brush, generously coat the inside of each half sphere mold with the melted chocolate. Make sure the chocolate extends all the way to the rim and creates an even, opaque layer. If it looks too thin, apply a second thin coat.
- Remove Excess: Gently tip the molds upside down over your bowl of melted chocolate or a piece of parchment paper to let any excess chocolate drip out. This ensures your shells aren’t too thick or brittle. You can use the back of a knife or a bench scraper to smooth the edges around the rim.
- Set Chocolate: Refrigerate the coated molds for about 5-10 minutes, or until the chocolate is completely set and firm to the touch. You should be able to see the chocolate pull slightly away from the silicone.
3. Filling Your Spheres with Magic
Now for the delightful surprise inside!
- Release Shells: Carefully remove the molds from the refrigerator. Gently peel the silicone away from the chocolate shells, being extra careful not to press too hard on the delicate chocolate. Place the released chocolate halves on your lined baking sheet.
- Fill Half the Halves: Take half of your chocolate spheres (6 halves) and fill each one with 1 tablespoon of hot cocoa mix.
- Add Marshmallows: Generously top the cocoa mix with a handful of mini marshmallows. You can add other fillings here too, like sprinkles or crushed candy canes!
4. Sealing the Deal: The Trick to Perfect Bombs
This step requires a little finesse for a clean seal.
- Re-melt Chocolate: If your remaining melted chocolate has hardened, gently remelt it using the same 30-second increment method. Transfer it to a piping bag or a zip-top bag and snip a tiny hole (about 1/8 inch) at the tip or corner.
- Pipe a Ring: Take one of your filled chocolate halves. Pipe a thin, even ring of melted chocolate around the rim of this filled half.
- Attach Top Half: Immediately take an empty chocolate half and gently but firmly press it on top of the piped ring. Twist slightly to ensure a good seal and to smooth out any excess chocolate. The two halves should stick together quickly as the chocolate sets.
- Smooth Seams: If there are any gaps, you can pipe a tiny bit more chocolate along the seam and smooth it with your finger (wear gloves!) or the back of a spoon.
5. Decorating for Extra Sparkle
Add a personal touch to your beautiful bombs!
- Drizzle Chocolate: Using any remaining melted chocolate in your piping bag, drizzle decorative patterns over the top of your sealed cocoa bombs. Zigzags, swirls, or simple lines all look great.
- Add Toppings (Optional): While the drizzle is still wet, quickly add any extra toppings like sprinkles, edible glitter, finely crushed peppermints, or a dusting of cocoa powder.
- Set Decorations: Allow the cocoa bombs to set and harden for about 10-15 minutes at room temperature or in the refrigerator. This ensures the decorations are firm before handling.
6. Storing Your Hot Cocoa Bombs
To keep your creations fresh and ready for action:
- Store finished hot cocoa bombs in an airtight container at room temperature. Keep them away from direct sunlight or any heat sources, which could cause them to melt.
- They will stay fresh for up to 2-3 weeks. If you live in a very warm climate, you can refrigerate them, but allow them to come to room temperature for 10-15 minutes before using for the best experience.
Hot Cocoa Bomb Variations and Customizations
The true joy of making hot cocoa bombs lies in their endless customizability. Once you master the basic technique, unleash your creativity!
Flavor Boosters
- Peppermint Delight: Add crushed candy canes or a few drops of food-grade peppermint extract to the melted chocolate, or sprinkle them into the filling.
- Spicy Mexican Hot Chocolate: Mix a pinch of cayenne pepper and cinnamon into your cocoa mix.
- Mocha Mania: Add a teaspoon of instant espresso powder to your hot cocoa mix for a coffee kick.
- Orange Zest: A tiny bit of finely grated orange zest in the chocolate or cocoa mix adds a bright, zesty note.
- Chai Spice: Incorporate a blend of cardamom, cinnamon, ginger, and cloves into your cocoa for a warm, aromatic bomb.
Gourmet Fillings
- Caramel Drizzle: A small dollop of caramel sauce (ensuring it’s not too liquidy) inside the bomb.
- Chocolate Chips: Mini chocolate chips (milk, dark, or white) can add an extra burst of chocolate flavor.
- Nutella Swirl: A tiny spoonful of Nutella or another hazelnut spread.
- Chopped Nuts: Finely chopped pecans, walnuts, or almonds for a textural crunch.
- Sprinkles: Edible glitter or colorful sprinkles instantly make them more festive.
Holiday Themes
- Christmas: Use white chocolate shells with red and green sprinkles, or add edible glitter.
- Valentine’s Day: Pink or red candy melt shells, filled with raspberry hot cocoa mix and heart-shaped sprinkles.
- Fall Harvest: Use white chocolate shells with a pinch of pumpkin spice mix in the cocoa, and decorate with orange and brown sprinkles.
- Birthday Bash: Use colorful candy melts for the shells and fill with funfetti cake batter hot cocoa mix (available commercially) and rainbow sprinkles.
Don’t be afraid to experiment! Your kitchen is your creative laboratory.
Troubleshooting Common Hot Cocoa Bomb Problems
Even experienced makers can run into snags. Here are solutions to common issues:
- Chocolate is Seizing/Grainy:
- Cause: Moisture introduced into the chocolate, or overheating.
- Solution: Ensure all your tools (bowls, spatulas, molds) are completely dry. Melt chocolate slowly at 50% power in short bursts, stirring frequently, to avoid overheating. If it seizes, sometimes adding a teaspoon of vegetable oil or melted shortening and stirring vigorously can rescue it, but it may affect the final texture.
- Chocolate Shells Are Too Thin and Breaking:
- Cause: Not enough chocolate applied or uneven coating.
- Solution: After the first coat sets, apply a second thin, even coat of melted chocolate to the molds. This adds strength without making them overly thick. Ensure the chocolate is well-distributed to the edges.
- Shells Are Difficult to Remove from Molds:
- Cause: Chocolate not fully set or molds are not perfectly clean.
- Solution: Refrigerate for the full 5-10 minutes (or longer if your fridge isn’t super cold) until the chocolate is very firm and pulls away from the silicone. Make sure molds are clean and dry before starting. Gently peel the silicone away from the chocolate, don’t try to pull the chocolate out.
- Cocoa Bombs Won’t Seal Properly:
- Cause: Chocolate used for sealing is too cool, too much chocolate, or not pressing halves together quickly enough.
- Solution: Ensure the melted chocolate in your piping bag is still warm and fluid. Apply a thin line of chocolate around the rim. Work quickly to press the halves together. If you’re struggling, try heating a small, clean plate in the microwave for 30 seconds. Quickly touch the rim of an empty chocolate half to the warm plate to slightly melt the edge, then immediately press it onto a filled half.
- Bombs Melt Before They Reach the Mug:
- Cause: Stored in a warm environment.
- Solution: Store in an airtight container in a cool, dark place. If your home is very warm, the refrigerator is best, but let them warm up slightly before use.
- The Bomb Floats and Doesn’t Melt/Open Completely:
- Cause: Milk isn’t hot enough, or the chocolate shell is too thick.
- Solution: Ensure your milk is steaming hot (but not boiling). If your shells are very thick, next time try to make them thinner with a more even coat.
Patience and practice are key! Don’t get discouraged if your first batch isn’t perfect. Each attempt makes you a more skilled hot cocoa bomb artist.
How to Serve Hot Cocoa Bombs for the Ultimate Experience
The moment of truth! Serving a hot cocoa bomb is an event in itself.
- Choose Your Mug: Select a sturdy, heat-safe mug that’s large enough to hold the bomb and your desired amount of milk.
- Heat Your Milk: This is crucial. Heat about 8-10 ounces of milk (dairy or non-dairy works beautifully) per bomb until it is steaming hot, but not boiling. Boiling milk can scald the chocolate and alter its flavor. You can do this on the stovetop or in the microwave.
- Place the Bomb: Gently place one hot cocoa bomb into the bottom of your empty mug.
- Pour & Watch the Magic: Slowly and carefully pour the hot milk over the cocoa bomb. Position your mug so you can watch the magic unfold! The chocolate shell will begin to melt, crack open, and then the hot cocoa mix and marshmallows will burst forth, swirling into the milk.
- Stir & Enjoy: Once the bomb has completely dissolved, give your hot cocoa a good stir to ensure all the ingredients are fully incorporated. Garnish with a dollop of whipped cream, more mini marshmallows, or a sprinkle of chocolate shavings if desired. Then, sit back, relax, and savor your delicious, homemade creation!
Hot Cocoa Bombs as Gifts: DIY Delight!
One of the most heartwarming aspects of homemade hot cocoa bombs is their potential as thoughtful, personalized gifts. They’re perfect for spreading cheer during the holiday season or as a unique present any time of year.
- Presentation is Key: Once your bombs are completely set, package them beautifully. Individual bombs can be placed in clear cellophane bags, tied with festive ribbon, and adorned with a cute gift tag.
- Gift Sets: For a more elaborate gift, create a set of 2-4 bombs in a small decorative box, perhaps alongside a personalized mug or a small bottle of a liqueur for adult-friendly hot cocoa (like peppermint schnapps or Kahlúa).
- Gift Tags: Don’t forget to include simple instructions on the gift tag: “Place bomb in mug. Pour 8-10 oz hot milk over it. Stir & enjoy!”
- The Personal Touch: A handmade gift always feels more special. The effort and care you put into crafting these delicious treats will surely be appreciated by anyone lucky enough to receive them. They’re a fantastic way to show you care, offering a moment of warmth and joy.
Frequently Asked Questions (FAQ) About Hot Cocoa Bombs
What are hot cocoa bombs made of?
Hot cocoa bombs are typically made from a tempered or melted chocolate shell, which holds hot cocoa mix and mini marshmallows (and sometimes other delicious fillings) inside. When hot milk is poured over them, the chocolate shell melts, releasing the contents into the mug to create a rich and creamy hot chocolate.
How do you store hot cocoa bombs?
Store hot cocoa bombs in an airtight container at room temperature, away from direct sunlight or heat, for up to 2-3 weeks. If your home is particularly warm, you can store them in the refrigerator, but allow them to come to room temperature briefly before using to prevent the chocolate from seizing when hot milk is added.
Can I use candy melts instead of chocolate bars for hot cocoa bombs?
Yes, you can absolutely use candy melts! Candy melts are often easier to work with as they don’t require tempering and set quickly. They come in various colors, making them excellent for festive and themed hot cocoa bombs. However, keep in mind that the flavor profile of candy melts is typically different from actual chocolate.
What kind of molds do I need to make hot cocoa bombs?
You will need silicone half-sphere molds, typically 2-2.5 inches in diameter. These are readily available online and at most craft or kitchen supply stores. Silicone is ideal because it’s flexible, making it easy to pop out the delicate chocolate shells without breaking them.
My hot cocoa bombs are breaking when I try to remove them from the mold. What am I doing wrong?
This is a common issue! It could be due to a few factors: 1) The chocolate layer might be too thin. Ensure you apply an even, slightly thicker coat. If needed, apply a second thin coat after the first has set. 2) The chocolate might not be fully set. Make sure to refrigerate them long enough (5-10 minutes) until they are firm. 3) You might be trying to remove them too quickly or forcefully. Gently peel the silicone mold away from the chocolate, rather than trying to pry the chocolate out.
Expert Tips for Hot Cocoa Bomb Perfection
- Cleanliness is Key: Ensure all your equipment is spotless and bone dry. Even a tiny drop of water can ruin your melted chocolate.
- Don’t Overheat Chocolate: Melt chocolate slowly and gently. Overheated chocolate becomes dull, thick, and difficult to work with.
- Two Coats for Strength: For sturdier shells that are less prone to breaking, apply two thin coats of chocolate to your molds, letting each coat set in the fridge for a few minutes.
- Work Smart, Not Hard: If sealing is tricky, use the warm plate method for a perfectly smooth seam.
- Experiment with Fillings: The basic recipe is a canvas. Don’t be afraid to try different cocoa mixes, candies, or even a drizzle of liqueur for adult versions.
- Patience is a Virtue: Allow the chocolate to fully set at each stage. Rushing can lead to cracks or messy bombs.
Embrace the Hot Cocoa Bomb Magic!
Making homemade hot cocoa bombs is more than just a recipe; it’s an experience. It’s about creating moments of warmth, wonder, and deliciousness, perfect for those chilly evenings, festive gatherings, or simply a treat for yourself. With this detailed guide, you have all the tools and knowledge to craft beautiful, delectable hot cocoa bombs that will delight everyone.
So, gather your ingredients, put on your favorite cozy playlist, and get ready to create some edible magic. Don’t forget to share your creations with us in the comments below or tag us on social media. Happy bomb-making!
PrintHomemade Hot Cocoa Bombs
Hot cocoa bombs turn ordinary hot chocolate into a delicious drink experience that is whimsical and fun for kids & adults alike!
- Prep Time: 45
- Cook Time: 5
- Total Time: 50
- Yield: 6 bombs
- Category: Dessert, Drink
- Method: Melting, Molding
- Cuisine: American
Ingredients
8 oz chocolate bars, broken into pieces
6 tbsp hot cocoa mix
mini marshmallows
extra chocolate for decorating
Instructions
1. Break the 8 oz chocolate bars into small, even pieces.
2. Place the chocolate in a microwave-safe bowl.
3. Microwave the chocolate at 50% power in 30-second increments, stirring after each increment until almost completely melted.
4. Remove from the microwave and stir gently to finish melting the chocolate.
5. Choose 12 half sphere molds and ensure they are clean and dry.
6. Use a small spoon or pastry brush to coat the inside of the molds with the melted chocolate. There will be some remaining melted chocolate, just set aside for now.
7. Refrigerate the coated molds for about 5-10 minutes until the chocolate sets.
8. Carefully remove the molds from the refrigerator.
9. Fill half of the molds half with 1 tablespoons of hot cocoa mix and mini marshmallows.
10. Remelt the remaining chocolate and place in a piping bag or in a zip top bag.
11. Snip a tiny hole at the tip of the piping bag or corner of the zip top bag. Pipe a ring of melted chocolate onto then half sphere that is filled with hot cocoa mix and marshmallows.
12. Immediately press matching halves together to seal the cocoa bomb.
13. Drizzle any remaining melted chocolate over the top of the cocoa bombs for decoration.
14. Allow the cocoa bombs to set and harden for about 10-15 minutes at room temperature or in the refrigerator.
15. To use, place one cocoa bomb in a mug and pour hot milk over it. Watch it dissolve and release the cocoa mix and marshmallows.
16. Stir and enjoy your delicious hot cocoa!
Notes
For best results, use good quality chocolate. You can also temper your chocolate for a shinier, more stable finish, but melting gently is sufficient for beginners. Experiment with different flavored cocoa mixes or add a pinch of cinnamon for a festive twist!