Hello, fellow bakers and sweet-treat enthusiasts! Are you ready to add a burst of color and a whole lot of fun to your baking routine? Today, we’re diving into one of my absolute favorite recipes for bringing smiles and vibrant hues to any gathering: Tie Dye Cookies! And the best part? We’re taking a clever shortcut by using a white cake mix, making this recipe incredibly simple, fast, and virtually foolproof.
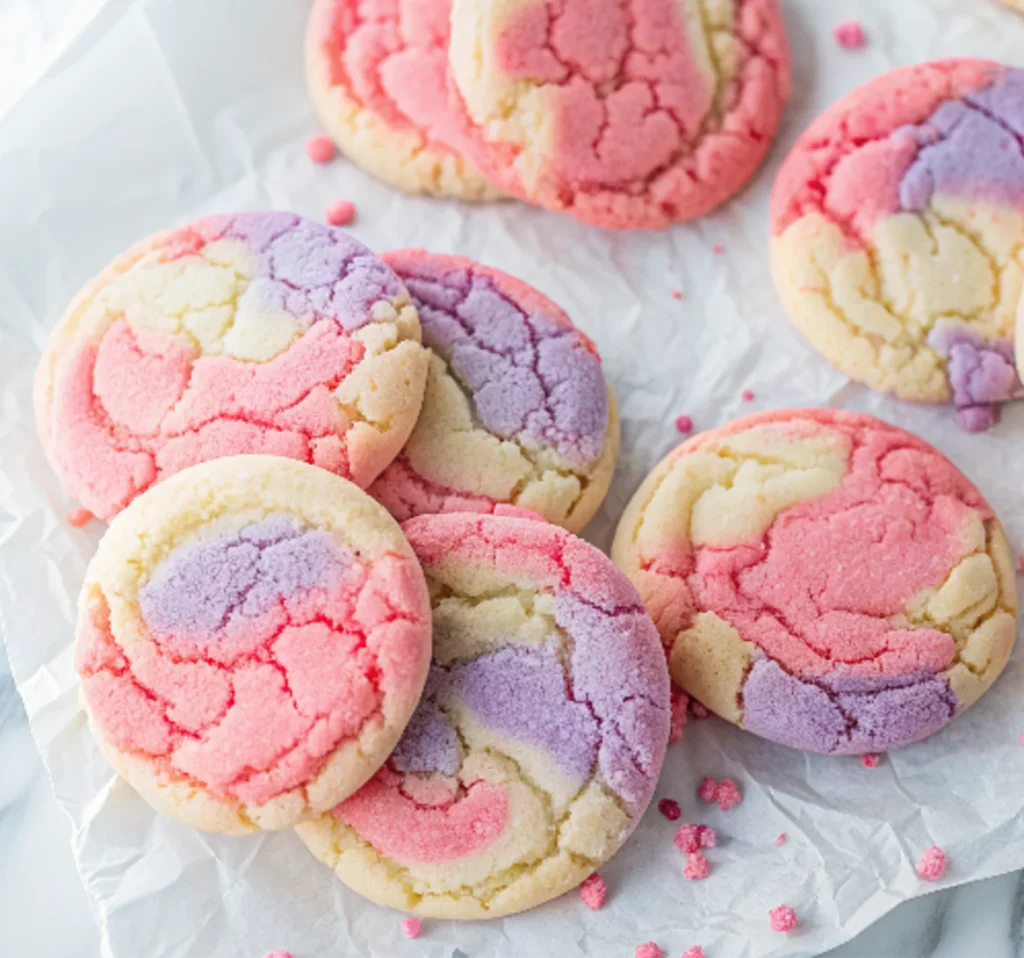
I personally adore making these for Valentine’s Day. The pink and purple swirls turn out so unbelievably cute, creating a festive, loving vibe that’s perfect for sharing with family and friends. But don’t limit yourself to just one holiday – these cookies are truly versatile for birthdays, themed parties, or even just a fun weekend baking project with the kids. Imagine the delight on their faces as they help create edible works of art!
In this comprehensive guide, I’ll walk you through everything you need to know to master the art of Tie Dye Cookies. From selecting the right ingredients and achieving those distinct, beautiful swirls to expert tips for perfect baking and creative variations, you’ll be a tie-dye cookie pro in no time. Get ready to bake, create, and impress!
Why These Cake Mix Tie Dye Cookies Are a Must-Try
Before we get our hands delightfully doughy, let’s talk about what makes this particular Tie Dye Cookie recipe stand out from the crowd and why it’s a go-to in my kitchen:
- Effortlessly Easy with a Cake Mix Base: This is the star secret! Using a white cake mix dramatically cuts down on ingredients and prep time. No need to measure out individual dry ingredients – the cake mix handles it, guaranteeing a consistently delicious, tender cookie every time. It’s perfect for beginners or when you need a quick yet impressive treat.
- Visually Stunning & Instagram-Worthy: Let’s be honest, these cookies are pure eye candy! The swirling patterns of vibrant colors are captivating and always draw compliments. They’re a fantastic centerpiece for dessert tables and make for delightful, shareable photos.
- Incredibly Versatile for Any Occasion: While I love them for Valentine’s Day, you can customize the colors for literally any holiday or event. Think red and green for Christmas, orange and black for Halloween, blue and white for Hanukkah, or school colors for graduation parties. The possibilities are endless!
- Fun for All Ages (Especially Kids!): This recipe is fantastic for involving younger bakers. Mixing colors and creating the tie-dye pattern is a hands-on, creative process that kids absolutely adore. It’s a wonderful way to create lasting memories in the kitchen.
- Deliciously Soft & Chewy: Thanks to the cake mix base and the addition of egg whites, these cookies have a wonderfully soft, almost cake-like texture that melts in your mouth. They’re sweet, flavorful, and incredibly satisfying.
Ready to spread some colorful joy? Let’s gather our ingredients and get baking!
Essential Ingredients for Your Vibrant Tie Dye Cookies
You’ll be amazed at how few ingredients you need to create such a spectacular cookie! Here’s what you’ll need, along with a few expert notes:
- 1/2 cup (1 stick) Salted Butter, softened: Softened butter is crucial for creaming properly with sugar, creating that light, fluffy base. I specify salted butter here because the hint of salt perfectly balances the sweetness of the cake mix, enhancing the overall flavor profile. If you only have unsalted, simply add an additional 1/4 teaspoon of fine salt to your dry ingredients.
- 1/2 cup Granulated Sugar: Just enough to add extra sweetness and structure, complementing the sugar already present in the cake mix.
- 3 Egg Whites: This is key for a light, tender cookie texture and also helps keep the base dough a very light color, allowing your food coloring to truly pop! Using whole eggs might make the dough a bit too rich or yellow, affecting the vibrancy of your tie-dye effect.
- 1 tsp Clear Vanilla Extract: This is a secret weapon for brilliantly colored cookies! Regular vanilla extract has a brownish tint that can dull your vibrant food colors. Clear vanilla ensures your whites stay white and your pinks, purples, and other hues remain pure and bright.
- 1 (15.5 oz box) White Cake Mix: The ultimate shortcut! This pre-portioned mix provides the bulk of your dry ingredients, including flour, sugar, leavening agents, and sometimes even a hint of vanilla flavoring. Opt for a standard white cake mix, not yellow or funfetti.
- 1/2 cup All-Purpose Flour: This extra flour helps to firm up the cake mix dough, making it more cookie-like and less cake-like. It provides the necessary structure for holding those beautiful swirls.
- Food Coloring (Pink and Purple recommended, or your choice!): This is where the magic happens! I highly recommend using gel food coloring over liquid. Gel colors are highly concentrated, providing intense, vibrant hues with just a tiny amount, without adding excess liquid that could change the dough’s consistency. Liquid colors might require more drops, potentially making your dough sticky or altering its texture.
Recommended Equipment:
- Stand Mixer or Hand Electric Mixer: Essential for creaming butter and sugar, and efficiently incorporating the cake mix and flour. It also makes quick work of coloring the dough!
- Large Mixing Bowl: For combining ingredients.
- 3 Small Bowls: For separating and dyeing the dough.
- Rubber Spatula: For scraping down the bowl.
- Cookie Scoop (1.5 tbsp or 3 tbsp): Ensures uniform cookie sizes for even baking and a professional look. I used a 3 tbsp scoop for the photos you see!
- Parchment Paper or Silicone Baking Mats: Prevents sticking and makes cleanup a breeze.
- Baking Sheets: You’ll likely need two, or bake in batches.
- Airtight Container: For storing your delicious cookies.
Step-by-Step Instructions: Crafting Your Colorful Tie Dye Cookies
Let’s turn that plain dough into a canvas of color! Follow these detailed steps for perfect Tie Dye Cookies every time.
- Preheat Your Oven: Set your oven to 350°F (180°C). Line two baking sheets with parchment paper or silicone mats. This prepares your baking station and ensures your oven is at the correct temperature for consistent baking.
- Cream Butter and Sugar: In the bowl of your stand mixer (fitted with the paddle attachment) or a large mixing bowl with a hand electric mixer, cream together the softened salted butter and granulated sugar. Beat on medium speed for about 1 minute until the mixture is light and fluffy. This incorporates air, contributing to a tender cookie.
- Add Wet Ingredients: Scrape down the sides of the bowl to ensure everything is well combined. Add in the three egg whites and the clear vanilla extract. Mix on low speed until just combined. Be careful not to overmix at this stage.
- Incorporate Dry Ingredients: Gradually add the white cake mix and the 1/2 cup of all-purpose flour to the wet ingredients. Mix on low speed until the dough just comes together. It will be soft, but cohesive. Again, avoid overmixing, which can lead to tough cookies.
- Separate and Dye the Dough: Divide your soft cookie dough evenly into three separate bowls. Now for the fun part!
- Leave one bowl of dough white.
- In the second bowl, add a few drops of pink gel food coloring. If using your stand mixer, return this portion to the mixer bowl and mix on low speed until the color is evenly distributed. This is my preferred method for thorough, even coloring! Alternatively, you can knead the color in by hand with gloves.
- Repeat the dyeing process with the third bowl of dough, using purple gel food coloring.
- Expert Tip: Start with 2-3 drops of gel food coloring, mix, and then add more if you desire a deeper, more vibrant hue. Remember, a little gel color goes a long way!
- Assemble for the Swirl: Once each portion of dough is beautifully colored, carefully place all three portions (white, pink, purple) side-by-side on a clean counter or a large piece of parchment paper. Gently press them together to form a rough log or block of striped dough.
- Create the Tie-Dye Effect: This is the critical step for gorgeous swirls!
- Gently press the combined dough block together.
- Carefully break or cut the dough in half, cutting through all the colors.
- Push the two halves back together, pressing gently.
- Repeat this breaking/pressing process a few times (2-3 times is usually enough). The goal is to create distinct swirls and streaks, not to fully blend the colors into one muddy hue. You want to see distinct lines of each color!
- Portion the Cookies: Using a cookie scoop (I used a 3 tbsp scoop for larger, photo-ready cookies, but a 1.5 tbsp scoop works for smaller cookies), portion out the tie-dyed dough.
- Shape and Arrange: Roll each portion into a smooth ball, then gently flatten it slightly between your palms before arranging them on your prepared baking sheets. Leave about 2 inches between cookies to allow for spreading.
- Bake to Perfection: Bake at 350°F (180°C) until the cookies have spread, puff up slightly in the center, and no longer look glossy on top. The edges should be very lightly golden.
- Small cookies (1.5 tbsp dough): Bake for 8-10 minutes.
- Medium cookies (3 tbsp dough): Bake for 10-12 minutes.
- Pro Tip: Baking time can vary, so keep a close eye on your cookies, especially during the last few minutes.
- Cool Completely: Allow the cookies to cool completely on the baking sheets. They will firm up as they cool. Moving them too soon can cause them to break or lose their shape.
- Store and Enjoy: Once fully cooled, store your vibrant Tie Dye Cookies in an airtight container at room temperature for up to 4 days, or freeze for longer enjoyment.
Expert Tips for Achieving the Best Tie Dye Cookies
As an experienced recipe developer, I’ve picked up a few tricks to ensure your Tie Dye Cookies turn out spectacular every single time.
- Don’t Overmix the Dough: Once the flour and cake mix are added, mix only until just combined. Overmixing develops gluten, which can lead to tough, chewy cookies instead of soft, tender ones.
- Gel Food Coloring is Your Best Friend: I cannot stress this enough! Gel colors are concentrated, vibrant, and won’t thin out your dough. They are readily available at most craft stores or online.
- Avoid Over-Swirling: The key to distinct tie-dye patterns is gentle handling. Resist the urge to keep folding and pressing the dough. A few presses and breaks are all you need to create those beautiful, separate color swirls. Too much handling will blend the colors into a single, less appealing hue.
- Use a Cookie Scoop: This isn’t just for convenience; it ensures all your cookies are the same size. Uniformity means even baking, so all your cookies will be perfectly done at the same time.
- Don’t Overbake: These cookies are meant to be soft and tender. Remove them from the oven when the edges are just set and the tops no longer look raw or glossy. They will continue to set and firm up as they cool on the baking sheet. Overbaking leads to dry, crumbly cookies.
- Clear Vanilla for True Colors: If you want your white dough to be truly white and your colors to be as pure as possible, clear vanilla extract is the way to go. Regular vanilla can give a slight yellowish tint.
- Chill if Sticky: If your dough feels too sticky to handle easily, pop it into the refrigerator for 15-20 minutes. This will firm it up and make it much easier to roll and shape.
- Room Temperature Ingredients Matter: Ensure your butter is properly softened (it should give slightly when pressed, but not be greasy or melted) and your egg whites are at room temperature. This helps ingredients emulsify better, creating a smoother, more uniform dough.
Creative Variations & Customizations
One of the most exciting aspects of this Tie Dye Cookie recipe is its incredible versatility! Here are some ideas to spark your creativity:
- Holiday-Specific Color Schemes:
- Christmas: Red, green, and white.
- Halloween: Orange, black, and purple (or green).
- 4th of July: Red, white, and blue.
- Easter: Pastel pink, blue, yellow, and green.
- St. Patrick’s Day: Various shades of green and white.
- Pride Month: Rainbow colors (divide dough into 6-7 portions).
- Flavor Boosts:
- Citrus Zest: Add 1-2 teaspoons of lemon or orange zest to the dough for a bright, fresh flavor.
- Almond Extract: Swap a portion of the vanilla for almond extract for a delicious nutty flavor (use regular vanilla if you don’t mind the color).
- Different Cake Mixes: While white cake mix is best for vibrant colors, you can experiment with other cake mix flavors for different bases (e.g., strawberry cake mix for pink dough, then swirl with white). Just be aware the initial dough color will affect your final tie-dye vibrancy.
- Fun Add-Ins:
- Sprinkles: Gently fold in rainbow sprinkles (or themed sprinkles) into one or all of the colored dough portions before swirling, or press them onto the top of the flattened cookies before baking.
- White Chocolate Chips: Mini white chocolate chips would be a delicious addition to the dough.
- Edible Glitter: A dusting of edible glitter after baking adds extra sparkle for special occasions.
- Glazes & Frostings:
- Simple Vanilla Glaze: Whisk powdered sugar with a splash of milk and vanilla extract until smooth. Drizzle over cooled cookies.
- Cream Cheese Frosting: A thin layer of cream cheese frosting would be heavenly, especially if you add a touch of color to the frosting itself!
- Royal Icing Drizzle: For more intricate designs or outlines.
Serving Suggestions & Perfect Pairings
These Tie Dye Cookies are gorgeous enough to stand alone, but here are some ideas to make them even more special:
- Dessert Platter Star: Arrange them on a platter with other colorful treats for a stunning display.
- Party Favors: Individually bag them in clear cellophane with a ribbon for delightful take-home treats.
- Cookie Exchange: They’re always a hit at cookie swaps, thanks to their unique appearance.
- Coffee or Tea Time: Enjoy with a warm cup of coffee, tea, or a glass of milk.
- Ice Cream Sandwich: Lightly warm a cookie and press it around a scoop of vanilla ice cream for a decadent treat.
- Kid-Friendly Snack: Serve them after school or as a special weekend treat – kids absolutely adore them!
Storage & Make-Ahead Tips
Want to enjoy these cookies for longer or get a head start on your baking? Here’s how:
- Room Temperature: Store baked and completely cooled Tie Dye Cookies in an airtight container at room temperature for up to 4 days. They’ll stay perfectly soft and chewy.
- Freezing Baked Cookies: For longer storage, place cooled cookies in a single layer on a baking sheet and freeze until firm. Then transfer them to a freezer-safe airtight container or bag. They can be frozen for up to 3 months. Thaw at room temperature before serving.
- Freezing Dough: You can also prepare the colored and swirled dough, portion it into balls, and flash freeze them on a baking sheet. Once firm, transfer the dough balls to a freezer-safe bag. When ready to bake, place frozen dough balls on a prepared baking sheet and bake for an additional 2-4 minutes (no need to thaw first!). This is fantastic for having fresh cookies on demand!
Common Questions About Tie Dye Cookies (FAQ)
Q: Can I use unsalted butter instead of salted butter?
A: Yes, you can! If using unsalted butter, simply add 1/4 teaspoon of fine salt to your dry ingredients (along with the cake mix and all-purpose flour) to balance the flavors. Salted butter adds a subtle depth that complements the sweetness of the cookies.
Q: Why do you specifically use egg whites? Can I use whole eggs?
A: Using only egg whites helps keep the dough very light in color, which allows your food coloring to appear brighter and more vivid. It also contributes to a slightly lighter, cakier texture. While you could technically use whole eggs, the yolk might tint the dough a bit yellowish and make your colors less vibrant. For true tie-dye brilliance, stick with egg whites!
Q: What if my dough is too sticky or too dry?
A: If your dough is too sticky, it likely needs more flour, or perhaps your butter was too soft. Try adding a tablespoon more all-purpose flour at a time, mixing until just incorporated, or chilling the dough in the refrigerator for 15-20 minutes to firm it up. If your dough is too dry or crumbly, it might be due to measuring errors or different cake mix absorption. Try adding 1/2 to 1 tablespoon of milk (or water) at a time until it comes together.
Q: How do I prevent the colors from blending completely?
A: The secret is gentle handling and minimal mixing once the colors are together. When you press and break the dough, do it just a few times (2-3 times maximum). The goal is to create streaks and swirls, not a homogenous blend. Resist the urge to knead or overwork the dough after it’s colored.
Q: Can I make these cookies gluten-free?
A: Yes, you can! Look for a gluten-free white cake mix and ensure your all-purpose flour is also a gluten-free blend (one designed for baking, often containing xanthan gum). Follow the rest of the recipe as directed.
Q: What is clear vanilla extract, and where can I find it?
A: Clear vanilla extract is a synthetic vanilla flavoring that is clear in color, unlike traditional vanilla extract which is brown. It’s often used in baking where color is important (like white cakes or frostings) to avoid tinting the final product. You can find it in the baking aisle of most major supermarkets or specialty baking stores, or easily online.
Q: Can I use natural food colorings?
A: While natural food colorings derived from fruits and vegetables are an option, they typically produce more subdued, pastel shades compared to artificial gel food colorings. They also can sometimes require a larger quantity, which may affect the dough’s consistency. For the most vibrant tie-dye effect, artificial gel colors are recommended.
The Science Behind the Swirl: Why It Works So Well
Ever wondered how those beautiful, distinct swirls are formed without the colors just muddying together? It’s a fun little dance of dough physics and gentle technique!
- Dough Consistency is Key: Our cake mix cookie dough is soft but not overly sticky, thanks to the added flour. This consistency allows the colored portions to adhere to each other without immediately blending.
- Strategic Layering: By placing the different colored doughs side-by-side, you create distinct layers.
- The “Break and Press” Method: When you gently press the dough together, then break it in half and re-press, you’re creating new surfaces and folding the colors over each other. Because the dough is soft but not fluid, these folds create streaks and marbling rather than a full mix. The limited repetition (2-3 times) is crucial; more repetitions would eventually lead to a uniform color. You’re essentially creating controlled chaos!
- Gel Coloring’s Role: As mentioned, gel food coloring is highly concentrated. This means you need very little to achieve intense color, which keeps the dough’s moisture content and texture consistent across all colored portions. If one color was significantly wetter or drier, it would mix differently.
This recipe is not just about baking; it’s about creating edible art with a little scientific flair. It’s truly satisfying to watch the colors transform into a beautiful pattern!
Ready to Bake Your Own Rainbow?
There you have it – your complete guide to creating the most stunning, delicious, and easy Tie Dye Cookies! Whether you’re celebrating Valentine’s Day, a birthday, or simply want to brighten a gloomy day, these vibrant treats are sure to bring joy. The cake mix shortcut makes them incredibly approachable, even for novice bakers, while the detailed tips ensure a professional-looking result every time.
Don’t be afraid to experiment with different color combinations and add-ins. This recipe is a fantastic canvas for your creativity! Imagine pastel swirls for an Easter brunch, bold primaries for a superhero party, or subtle ombrés for an elegant touch.
So grab your mixer, pick your favorite colors, and get ready to swirl! I can’t wait to see your colorful creations. If you try this recipe, please let me know in the comments below what colors you chose and how they turned out. Happy baking!
Did you love this recipe? Don’t forget to pin it to your favorite cookie board on Pinterest for later! And be sure to check out our other fun and easy baking recipes like our Best Ever Chocolate Chip Cookies or Fluffy Vanilla Cupcakes.
PrintEasy Tie Dye Cookie Recipe (Cake Mix!) – Fun & Festive Swirls for Every Occasion!
Vibrant and easy-to-make Tie Dye Cookies using a convenient cake mix base. Perfect for Valentine’s Day, kids’ parties, or any festive occasion, these pink and purple swirled cookies are as fun to make as they are to eat!
- Prep Time: 15
- Cook Time: 10
- Total Time: 25
- Yield: 24 small cookies
- Category: Dessert, Cookie, Baking
- Method: Bake
- Cuisine: American
Ingredients
1/2 cup salted butter softened
1/2 cup granulated sugar
3 egg whites
1 tsp vanilla I used clear vanilla
1 (15.5 oz box) white cake mix
1/2 cup all purpose flour
food coloring I used pink and purple
Instructions
1. Preheat the oven to 350° F (180° C).
2. In the bowl of a stand mixer or in a bowl using a hand electric mixer, cream together the butter and sugar for 1 minute.
3. Scrape the sides of the bowl, add in the egg whites and vanilla. Mix until combined.
4. Add in the white cake mix and all-purpose flour. Mix until the dough comes together. The dough will be soft.
5. Separate the dough out into 3 bowls. Dye each bowl your desired color. I left one bowl white and then dyed one bowl pink and the other purple.
6. I usually place the portion of cookie dough back into the mixer and let the mixer do the work of dying the cookie dough.Once each of your portions have been dyed, place all of your cookie dough on the counter side by side.
7. Gently press the cookie dough together and then break the dough in half, cutting all of the colors in half.
8. Push the halves back together gently and repeat this process a few times, being careful not to mix the colors, but leaving the dough ‘tie dyed’.
9. Use a cookie scoop or a spoon to portion out the cookie dough into your desired size. For the photos in this recipe I used a 3 tbsp scoop.
10. Roll into a ball and then flatten slightly before arranging on a parchment or silicone lined cookie sheet.
11. Bake at 350° F (180° C) until the cookies have spread, puff up in the center and no longer look glossy on top. Small cookies (using 1 1/2 tbsp of dough) will bake for 8-10 minutes. Medium cookies (using 3 tbsp of dough) will bake for 10-12 minutes.
12. Allow the cookies to cool completely on the pan.
13. Store in an airtight container for up to 4 days at room temperature or in the freezer for up to 3 months.
Notes
For the best tie-dye effect, use gel food coloring as it provides vibrant colors without adding excess liquid to your dough.
The key to distinct swirls is gentle handling. Do not overmix the colored dough portions; a few folds are enough.
If your dough is too sticky to handle, chill it for 15-20 minutes in the refrigerator before shaping.
Cooking times can vary slightly based on your oven and cookie size. Watch for the edges to be lightly set and the tops no longer glossy.
Clear vanilla extract helps maintain the bright colors, as regular vanilla can tint the white dough slightly.