There are some desserts that just feel like a warm hug, a sweet embrace of comfort and nostalgia. For me, Sophie, and the Sweet Craft Recipes kitchen, that dessert is undoubtedly a classic cookie. But what if you could take a beloved favorite and elevate it with a burst of fresh flavor, a creamy, dreamy surprise, and a touch of wholesome goodness? Enter my absolute favorite Strawberry Thumbprint Cookies with Cheesecake Filling. This isn’t just any cookie; it’s a celebration of fresh, vibrant strawberries, a rich shortbread-style base, and a luscious, tangy cream cheese filling that will make your taste buds sing.
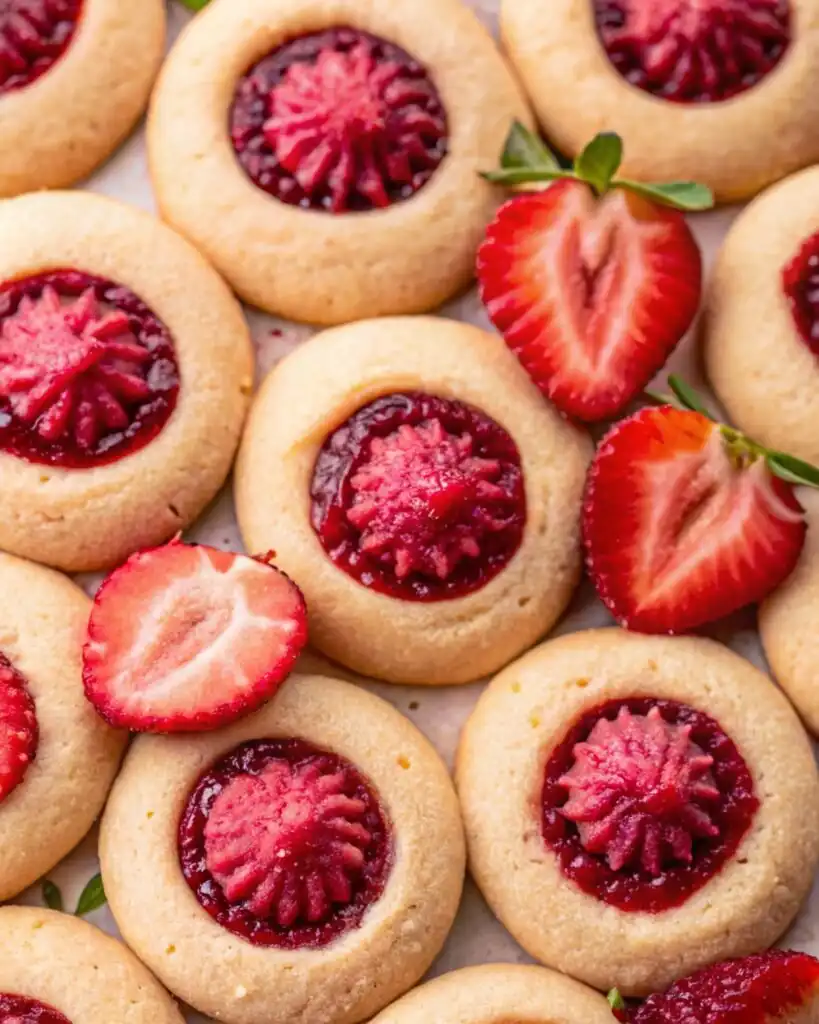
These cookies are more than just a treat; they’re a testament to the joy of homemade baking. Imagine biting into a tender, buttery cookie, hitting a pocket of intensely flavorful strawberry jam, and then being met with the cool, creamy decadence of a light cheesecake topping. It’s a symphony of textures and tastes, and I’ve spent countless hours – 9+ tests, to be precise! – perfecting this recipe to ensure every single bite is pure bliss. Perfect for family gatherings, special occasions, or simply a delightful moment with a cup of tea, these cookies offer a delightful twist on a comfort-food favorite, proving that “healthy-ish” can also be incredibly indulgent.
Why These Strawberry Thumbprint Cookies Are a Must-Try
In a world overflowing with cookie recipes, what makes these Strawberry Thumbprint Cookies stand out? It’s the thoughtful combination of classic techniques and fresh, high-quality ingredients that truly sets them apart.
Firstly, the homemade strawberry jam is a game-changer. Forget store-bought preserves; crafting your own jam from fresh, ripe strawberries means you control the sweetness and intensify that pure, fruity flavor. It’s a simple step that yields monumental results, creating a vibrant, jewel-toned center that truly pops.
Secondly, the creamy cheesecake filling isn’t just an afterthought; it’s the secret weapon that transforms these from delightful thumbprints into truly extraordinary cookies. Made with cold cream cheese and a hint of freeze-dried strawberries, it adds a tangy, rich dimension that perfectly complements the sweet jam and the buttery cookie base. It’s like having a mini strawberry cheesecake nestled in every bite!
Finally, the cookie itself is a masterpiece of texture. It’s a tender, melt-in-your-mouth base that holds its shape beautifully while remaining soft and crumbly. I’ve tweaked the butter-to-flour ratio and chilling times to ensure you get that quintessential thumbprint cookie experience without any spreading mishaps. These are comfort food at its finest, but with the freshness of summer strawberries and the creamy delight of cheesecake, they feel light and sophisticated.
Sophie’s Secret to Perfect Thumbprint Cookies (Tested 9+ Times!)
As a passionate recipe developer and home baker, I (Sophie!) believe that baking should be a joy, not a struggle. That’s why I’ve personally tested this Strawberry Thumbprint Cookie recipe over nine times, making meticulous adjustments to ensure it’s foolproof and fabulous for you. My dedication ensures that when you follow these steps, you’re tapping into tried-and-true methods that guarantee success.
My biggest secret? Ingredient temperature and patience. Many baking “fails” can be traced back to not having butter soft enough, or cream cheese too warm. For the cookie dough, your butter must be perfectly softened to room temperature – not melted, not cold. This allows it to cream properly with sugar, incorporating air for a light, fluffy dough. For the cheesecake filling, the cream cheese should be cold from the fridge; this helps it whip up thick and stable without becoming runny.
Another crucial tip I’ve learned through my extensive testing is the importance of chilling the dough. Don’t skip that hour in the fridge! Chilling solidifies the butter, preventing the cookies from spreading too much in the oven and helping them maintain their perfect thumbprint shape. It also allows the flavors to meld beautifully. Think of it as a little rest for your dough, preparing it for its grand oven debut.
Finally, the “scooting” trick straight out of the oven is a game-changer. As cookies bake, they can sometimes lose a bit of their perfectly round edge. Gently circling a slightly larger cookie cutter around them immediately after they come out of the oven helps them regain that pristine, store-bought look. It’s a small detail, but it makes a huge difference in presentation, making your homemade treats look truly professional. Trust me, these expert tips are what elevate a good cookie to a great cookie!
Ingredients Deep Dive: The Heart of Your Strawberry Thumbprint Cookies
Every exceptional recipe begins with exceptional ingredients. Understanding the role of each component can elevate your baking from simply following instructions to truly crafting a masterpiece.
- Fresh Strawberries (16 oz): These are the star of our show. Opt for ripe, vibrant red strawberries for the most intense flavor in your homemade jam. Fresh berries provide a natural sweetness and tartness that’s unmatched. If fresh isn’t an option, frozen unsweetened strawberries (thawed and drained) work well too, though you might need to cook the jam slightly longer.
- Granulated White Sugar (for jam & dough): Sugar isn’t just for sweetness; it also helps tenderize the cookies and aids in the thickening process of the jam, acting as a preservative. Don’t skimp, but also don’t add extra unless you taste the jam first.
- Vanilla Extract (for jam & dough): A good quality pure vanilla extract is essential. It enhances the natural flavors of both the strawberries and the butter, adding depth and warmth.
- All-Purpose Flour (2 1/2 cups): Spooned and leveled, please! This ensures you don’t add too much flour, which can result in dry, tough cookies. Flour provides the structure for our tender cookie base.
- Baking Powder (1/2 tsp): This leavening agent gives a slight lift to the cookies, ensuring they’re not too dense.
- Salt (1/2 tsp): Don’t skip the salt! It balances the sweetness and brings out all the other flavors, much like in savory cooking.
- Unsalted Butter, softened (1 cup): The foundation of our rich, shortbread-like cookie. Using unsalted butter allows you to control the overall saltiness of the recipe. Ensure it’s truly softened, not melted, for proper creaming.
- Egg Yolk (1): This little powerhouse adds richness, tenderness, and helps bind the dough without making the cookies too firm. It contributes to that beautiful golden color.
- Cream Cheese, cold (5 oz): The star of our luscious filling. Using cold cream cheese is paramount for achieving a thick, fluffy, stable filling when whipped. Full-fat cream cheese yields the best results.
- Powdered Sugar (5 tbsp): Also known as confectioners’ sugar, this finely ground sugar blends smoothly into the cream cheese, creating a silky-smooth, lump-free filling.
- Freeze-Dried Strawberries (1/2 oz): Ground into a fine powder, these intensify the strawberry flavor in the cheesecake filling and provide a beautiful natural pink hue. They’re optional but highly recommended for an extra punch of fruity goodness.
Step-by-Step Instructions: Crafting Your Strawberry Thumbprint Cookies
Let’s get baking! Follow these detailed steps for guaranteed success. Remember Sophie’s tips along the way!
Part 1: Homemade Strawberry Jam (The Flavor Bomb!)
- Puree the Strawberries: In a food processor, puree the trimmed 16 oz strawberries until smooth. Transfer this vibrant puree to a large, heavy-bottomed pot.
- Combine & Cook: Stir in 3/4 cup (150 g) granulated white sugar and 1 1/2 tsp vanilla extract. Place the pot over medium-low heat. Let the strawberry puree gently simmer, stirring frequently, for 20-25 minutes. Sophie’s Tip: You’re looking for a thick, jam-like consistency. It should coat the back of a spoon and measure out to approximately 1 cup when reduced.
- Cool Completely: Remove the jam from the heat and transfer it to a heatproof bowl or jar. Allow it to cool completely to room temperature, or even chill it in the refrigerator. This can take a couple of hours. Sophie’s Tip: A fully cooled jam prevents soggy cookie centers! You can even make this a day or two ahead.
Part 2: The Tender Cookie Dough (Your Buttery Base)
- Combine Dry Ingredients: In a medium bowl, whisk together the 2 1/2 cups (313 g) all-purpose flour (remember to spoon and level!), 1/2 tsp baking powder, and 1/2 tsp salt. Set aside.
- Cream Butter & Sugar: In a large bowl, using an electric mixer on high speed, cream the 1 cup (224 g) softened unsalted butter and 1 cup (200 g) granulated white sugar together. Mix for 2-3 minutes until the mixture is light, fluffy, and pale in color. Sophie’s Tip: Proper creaming creates air pockets, leading to a tender cookie.
- Add Wet Ingredients: Reduce the mixer speed to medium-high. Add the 1 egg yolk and 1 tsp vanilla extract. Mix for another 1-2 minutes until everything is well combined and the mixture is even paler and fluffier.
- Incorporate Dry into Wet: With the mixer on low speed, gradually add the dry ingredients to the wet ingredients. Mix just until combined. As soon as you see no streaks of flour, stop mixing. Sophie’s Tip: Overmixing develops gluten, which can lead to tough cookies. Less is more here!
Part 3: Shaping, Chilling & Baking Perfection
- Scoop & Roll: Using a small cookie scoop (about 1 tablespoon), scoop portions of dough. Roll each portion into a smooth, even ball.
- Make Your Indents: Immediately after rolling each ball, gently press the center with a 1/4 teaspoon to create a small indent.
- Chill Time is Crucial: Arrange the prepared cookie dough balls on a parchment paper-lined baking sheet. Chill them in the refrigerator for at least 1 hour. Sophie’s Tip: Do NOT skip chilling! This prevents spreading and helps the cookies maintain their beautiful shape.
- Preheat & Prepare: Preheat your oven to 350°F (175°C). Line another baking sheet with parchment paper.
- Bake the Cookies: Once chilled, place 12 cookies at a time on the prepared baking sheet, leaving some space between them. Bake for 9-10 minutes. The edges should be lightly golden, and the centers still soft.
- The “Scoot” Trick & Deepen Indents: As soon as the cookies come out of the oven, while they’re still hot and soft, use a small, round cookie cutter (slightly larger than your cookies) to gently scoot around the edges in a circular motion. This helps shape them back into perfect circles. You can also press the centers again with a ½ teaspoon to create a deeper indent for more filling.
- Cooling: Let the cookies cool on the baking sheet for 5 minutes before carefully transferring them to a wire cooling rack to cool completely. Sophie’s Tip: Just like the jam, cookies must be completely cool before filling, or your cheesecake will melt!
Part 4: The Luscious Cheesecake Filling (The Creamy Crown)
- Whip Cream Cheese: In a small bowl, add the 5 oz (142 g) cold cream cheese. Using an electric mixer on high speed, whip the cream cheese until it’s light, fluffy, and smooth, about 1-2 minutes.
- Add Sweetness: Reduce speed to medium-low and add the 5 tbsp (40 g) powdered sugar. Mix until just combined and smooth.
- Strawberry Boost: Add the 1/2 oz (14 g) finely ground freeze-dried strawberries (if using) and mix on low speed until fully incorporated.
- Chill (Optional): If your kitchen is warm, you can pop the filling in the fridge for 15-20 minutes to firm up slightly before piping.
Part 5: Assembly & Serving (The Grand Finale)
- Fill with Jam: Once the cookies are completely cooled, spoon about 1 teaspoon of the cooled strawberry jam into the center indent of each cookie.
- Pipe Cheesecake Filling: Transfer the cheesecake filling to a piping bag fitted with your favorite star tip (or a Ziploc bag with a corner snipped off). Pipe about 1 teaspoon of the cheesecake filling on top of the jam in each cookie.
- Garnish & Serve: For an extra touch of elegance and flavor, sprinkle with additional crushed freeze-dried strawberries if desired. Serve immediately or store as directed. Enjoy your beautiful, delicious Strawberry Thumbprint Cookies!
Common Questions About Strawberry Thumbprint Cookies
Baking can sometimes bring up a few questions. Here are the answers to some common queries about these delightful cookies:
How should I store Strawberry Thumbprint Cookies?
For optimal freshness and to keep the cheesecake filling at its best, store your assembled Strawberry Thumbprint Cookies in an airtight container in the refrigerator for up to 3-4 days. The soft cookie base and creamy filling benefit from being kept cool.
Can I use frozen strawberries for the jam?
Yes, you absolutely can! If using frozen strawberries, thaw them completely first and drain any excess liquid. Then, proceed with pureeing and cooking the jam as directed. You might find that frozen strawberries release a bit more water, so the cooking time for the jam might be slightly longer to achieve that perfect thickened consistency.
What if my homemade strawberry jam isn’t thickening?
Patience is truly a virtue when making jam! Ensure you’re cooking it over medium-low heat, stirring frequently, and giving it the full 20-25 minutes (or even a little longer if needed). The jam will continue to thicken significantly as it cools, so don’t be alarmed if it seems a bit thin when hot. If, after cooling completely, it’s still too runny, you can gently reheat it and cook for a few more minutes, or as a last resort, stir in a tiny pinch of cornstarch mixed with an equal amount of cold water (a slurry) during the reheating process.
Can I make these cookies ahead of time?
Yes, these cookies are fantastic for making ahead!
- Cookie Dough: The rolled and indented cookie dough balls can be chilled in the refrigerator for up to 2-3 days before baking, or frozen for up to 3 months. If baking from frozen, add an extra minute or two to the bake time.
- Strawberry Jam: The homemade strawberry jam can be prepared up to a week in advance and stored in an airtight container in the refrigerator.
- Cheesecake Filling: The cream cheese filling is best made closer to assembly, but can be prepared a day ahead and stored in the fridge.
- Assembled Cookies: Once the cookies are fully assembled with jam and filling, they are best enjoyed within 3-4 days when stored in the refrigerator.
Pro Tips for Success (Beyond the Recipe Card)
Want to take your Strawberry Thumbprint Cookies to the next level? Here are a few extra tips from my kitchen to yours:
- Don’t Overfill the Thumbprints: While it’s tempting to load them up, resist the urge to overfill the cookie indents with jam and cheesecake. Too much filling can make them messy and difficult to handle. A good teaspoon of each is usually perfect.
- For a Smoother Filling: Sift your powdered sugar before adding it to the cream cheese. This helps prevent any lumps, ensuring a perfectly smooth, velvety cheesecake filling.
- Flavor Variations: While strawberry is divine, feel free to experiment with other fruit jams! Raspberry, apricot, or even a citrus curd would be wonderful. For the cheesecake filling, a touch of lemon zest could add an extra bright note.
- Presentation Matters: A dusting of powdered sugar over the finished cookies, or a fresh mint leaf on the serving platter, can add a beautiful touch. These vibrant cookies are already stunning, but a little extra flourish never hurts!
Explore More Sweet Craft Recipes You’ll Love!
If you’ve fallen in love with the joy of baking these Strawberry Thumbprint Cookies, you’re in for a treat with more delightful creations from Sweet Craft Recipes. I’m passionate about sharing recipes that bring comfort and joy to your kitchen.
For more stuffed cookie goodness, be sure to check out some of my other popular recipes:
- Craving a rich, indulgent classic? You absolutely must try my Stuffed Red Velvet Cookies Recipe.
- If you’re a fan of nutty flavors and unique textures, my Pistachio NYC Cookies Recipe Printable PDF is a must-bake.
- For an unexpected, seasonal delight, my Creme Egg Stuffed Cookies Recipe are always a hit.
- And for the ultimate peanut butter and chocolate lovers, my Peanut Butter Nutella Cookie Recipe offers an irresistible combination.
- Finally, for a sophisticated twist, my White Chocolate Stuffed Cookies are pure decadence.
Each recipe is crafted with the same dedication to flavor and foolproof results, ensuring your baking adventures are always sweet successes.
The Sweetest Ending
These Strawberry Thumbprint Cookies with Cheesecake Filling truly embody everything wonderful about homemade desserts: fresh flavors, comforting textures, and a touch of expert care. From the vibrant, homemade jam to the creamy, tangy cheesecake filling, every element comes together to create a cookie that’s simply unforgettable. They’re a delicious comfort food with a fresh, healthy-ish twist, perfect for sharing with loved ones or savoring all by yourself.
I hope you enjoy baking and sharing these cookies as much as I’ve enjoyed perfecting them for you. Happy baking from my kitchen at Sweet Craft Recipes to yours! Don’t forget to leave a comment below and let me know how your cookies turned out!
PrintStrawberry Thumbprint Cookies with Cheesecake Filling

Indulge in Sophie’s ultimate Strawberry Thumbprint Cookies featuring homemade strawberry jam and a luscious cheesecake filling. A beloved comfort treat with a fresh, healthy-ish twist, perfected through 9+ tests for your family gatherings. Get the recipe for these irresistible soft cookies!
- Prep Time: 90
- Cook Time: 35
- Total Time: 210
- Yield: 24 cookies
- Category: Cookies, Dessert
- Method: Baking, No-Bake Filling
- Cuisine: American
Ingredients
16 oz strawberries, trimmed
3/4 cup (150 g) granulated white sugar
1 1/2 tsp vanilla extract
2 1/2 cups (313 g) all-purpose flour, spooned and leveled
1/2 tsp baking powder
1/2 tsp salt
1 cup (224 g) unsalted butter, softened
1 cup (200 g) granulated white sugar
1 egg yolk
1 tsp vanilla
5 oz (142 g) cream cheese, cold
5 tbsp (40 g) powdered sugar
1/2 oz (14 g) freeze dried strawberries
Instructions
1. Puree the strawberries in a food processor, then transfer them to a large pot. Mix in 3/4 cup (150g) granulated sugar and 1 1/2 tsp vanilla extract. Let the strawberry puree cook over medium-low heat for 20-25 minutes until it has thickened to a jam-like consistency and measures out to just about 1 cup. Remove it from the heat and allow it to completely cool.
2. In a medium bowl, whisk together the flour, salt, and baking powder.
3. In a large bowl, cream the softened butter and 1 cup (200g) granulated white sugar together with an electric mixer on high speed until it’s light and fluffy, 2-3 minutes.
4. Add in the egg yolk and 1 tsp vanilla extract and mix on medium-high speed until pale in color and fluffy, 1-2 minutes.
5. Gradually add the dry ingredients to the wet ingredients and mix on low then medium speed just until combined. Be careful not to overmix.
6. Scoop the dough with a small cookie scoop into 1 tablespoon portions. Then, roll them into smooth balls. After each ball is rolled, immediately press it with a 1/4 teaspoon to make an indent in the center. Chill the prepared cookie dough balls on a parchment paper lined baking sheet for 1 hour.
7. Once chilled, separate the cookies 12 at a time on a prepared baking sheet and bake for 9-10 minutes. When the cookies are straight out of the oven, scoot a small, round cookie cutter around them in a circular motion to help them return to their original smaller size. You can also press the centers again with a ½ teaspoon to create a deeper indent. Let the cookies cool for 5 minutes on the cookie sheet, then transfer them to a cooling rack to completely cool.
8. Add the cold cream cheese to a small bowl. Mix with an electric mixer on high speed until it is light and fluffy, about 1-2 minutes. Add in the powdered sugar and mix on medium-low speed until combined. Then mix in the finely ground freeze-dried strawberries on low speed until fully combined.
9. Once the cookies are completely cooled, spoon about 1 teaspoon of the cooled strawberry jam into the center of each cookie. Then pipe about 1 teaspoon of cheesecake filling on top of the jam. Sprinkle with crushed freeze-dried strawberries if you wish, then serve and enjoy!
Notes
For the best texture, ensure your butter is properly softened but not melted. Don’t rush the chilling process – it’s crucial for preventing cookie spread. The cheesecake filling can be piped using a small Ziploc bag with a corner snipped off if you don’t have a piping bag.