There’s something incredibly comforting about a homemade cookie, isn’t there? It evokes warmth, family gatherings, and pure, unadulterated joy. And when that comfort comes in a perfectly portioned, bite-sized package? Even better! Meet your new obsession: Easy Sugar Cookie Cups. This recipe transforms the classic, beloved sugar cookie into an adorable, impressive, and utterly delicious treat that’s perfect for any occasion, from a casual family night to a festive holiday party.
As Sophie, the recipe developer here at SweetCraft Recipes, I’ve poured my heart (and countless hours in the kitchen!) into perfecting this recipe. I’ve tested these Sugar Cookie Cups no less than nine times, tweaking ingredients and methods to ensure every single batch comes out flawless. My goal was to create a recipe that delivers consistent results: beautifully golden cookie bases, perfectly formed cups, and a luscious, creamy buttercream frosting that will have everyone asking for more. You’ll find my personal insights and pro tips throughout this article to guide you to success.
These mini delights offer the soft, tender chew of a classic sugar cookie, elevated with a sweet, fluffy buttercream filling. They’re a fantastic way to enjoy a comforting favorite with a slight “healthy-ish” twist – the mini size naturally encourages mindful portion control, and by making them from scratch, you know exactly what fresh, wholesome ingredients are going into every bite. Get ready to bake some magic!
Why You’ll Absolutely Love This Sugar Cookie Cups Recipe
- Effortlessly Impressive: These look fancy but are surprisingly simple to make, even for novice bakers.
- Bite-Sized Bliss: Their mini size makes them perfect for parties, kids’ treats, or a guilt-free sweet snack.
- Customizable Fun: Easily adaptable with different frostings, colors, and sprinkles to match any theme or season.
- Crowd-Pleaser Guaranteed: A nostalgic flavor profile that appeals to everyone, from toddlers to grandparents.
- Tested & Perfected: With over 9 personal tests by Sophie, you can trust this recipe for consistent, delicious results every time.
- Comfort Food Classic: Taps into that warm, fuzzy feeling of homemade goodness, reminiscent of childhood memories.
Equipment You’ll Need
- Mini Muffin Tin (36-cup capacity recommended)
- Stand Mixer (or hand mixer)
- Mixing Bowls
- Measuring Cups and Spoons
- Wire Cooling Rack
- Piping Bag and Tip (or resealable plastic bag)
- Spatula
- Vanilla extract bottle cap or mini tart tamper (for forming cups)
Ingredients List
For the Sugar Cookie Dough
- 3/4 cup (1.5 sticks) salted butter, softened
- 3/4 cup granulated sugar
- 1 large egg
- 1 teaspoon vanilla extract
- 1/4 teaspoon almond extract (optional, but adds a lovely depth of flavor!)
- 1/2 teaspoon baking powder
- 2 cups all-purpose flour
For the Buttercream Frosting
- 1/4 cup (1/2 stick) salted butter, softened
- 1 1/3 cups powdered sugar (confectioners’ sugar)
- 1/2 teaspoon vanilla extract
- 1 tablespoon milk or heavy whipping cream (plus 1/2-1 tbsp more if needed)
- Food coloring (optional)
- Sprinkles (optional, for decoration)
Step-by-Step Instructions: How to Make Perfect Sugar Cookie Cups
Making these cookie cups is a delightful process, and I’m here to guide you through each step to ensure your success. Remember, precision and patience are key for baking!
Make the Sugar Cookie Cups
- Prepare Muffin Tin: Preheat your oven to 350°F (175°C). This temperature ensures even baking and a lovely golden edge. Thoroughly grease 36 mini muffin cups with cooking spray. I find that a good spray prevents sticking and makes removal much easier.
- Cream Butter and Sugar: In the bowl of your stand mixer fitted with the paddle attachment, beat the softened butter and granulated sugar together on medium speed for 2-3 minutes. You want this mixture to be light and fluffy – this incorporates air, contributing to a tender cookie. Scrape down the sides of the bowl with a spatula as needed to ensure everything is well combined.
- Add Wet Ingredients: Next, stir in the egg, vanilla extract, and almond extract (if you’re using it). Mix until just combined. Be careful not to overmix here; we’re just incorporating the liquid.
- Combine Dry Ingredients: In a separate medium bowl, whisk together the baking powder and all-purpose flour. This step helps distribute the leavening agent evenly. Gradually add the dry ingredients to the wet ingredients in the stand mixer, mixing on low speed until just combined and a soft dough forms. Stop mixing as soon as the flour disappears to avoid overdeveloping the gluten, which can make your cookies tough.
- Form Cookie Cups: Take rounded tablespoons of dough (each about 1 inch in diameter, or roughly 2 teaspoons). Roll them into smooth balls between your palms. Place one dough ball into each greased mini muffin cup. Now, using your clean fingers, gently flatten each dough ball – you don’t need to create a distinct “cup” shape yet, just press it into a flat disc that fills the bottom of the muffin cup.
- Bake: Transfer the muffin tin to your preheated oven and bake for about 10 minutes. The edges of the cookies should be lightly golden brown. The centers might still look a bit soft, but they will firm up as they cool. Overbaking will result in dry cookies, so keep an eye on them!
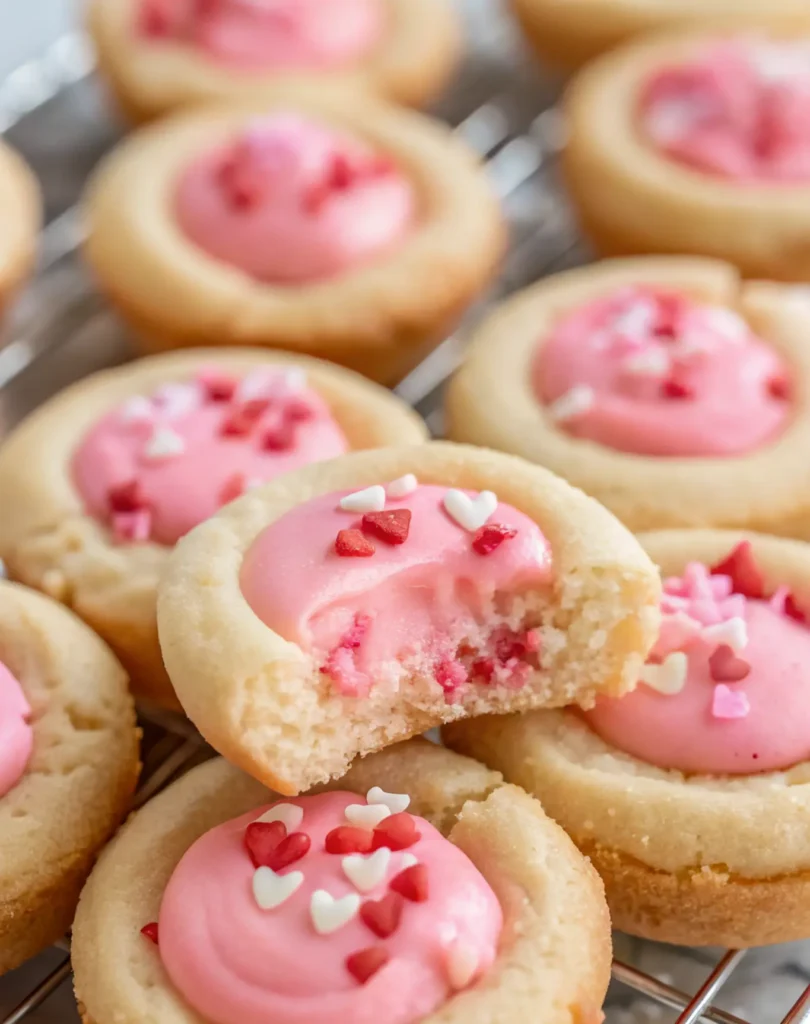
- Form Cups: This is a crucial step! As soon as you remove the muffin tin from the oven, while the cookies are still warm and pliable, immediately use the cap of a bottle (a vanilla extract cap works perfectly, as I discovered after many trials!) or a mini tart tamper to gently press into the center of each warm cookie. This creates the perfect “cup” indentation for your frosting. Be gentle but firm enough to create a defined well.
- Cool: Allow the cookie cups to cool in the mini muffin pan for 5 minutes. This cooling period in the pan helps them set and prevents them from breaking when you remove them. After 5 minutes, carefully transfer them to a wire cooling rack to cool completely. They must be entirely cool before frosting to prevent the buttercream from melting.
Make the Frosting and Assemble
- Make Buttercream Frosting: While your cookie cups are cooling, it’s time to whip up that luscious buttercream! In the clean bowl of a stand mixer, beat the softened butter until it’s smooth and creamy. Gradually add the powdered sugar, about 1/2 cup at a time, beating until fully incorporated after each addition. Stir in the vanilla extract.
- Adjust Frosting Consistency: Add 1 tablespoon of milk or heavy whipping cream. Beat on medium-high speed until the frosting is light, fluffy, and perfectly smooth. If you find the frosting is too stiff for piping, add an additional 1/2 – 1 tablespoon of milk, a tiny bit at a time, until you achieve your desired consistency. If you want to add food coloring, mix it in now until evenly distributed.
- Assemble & Decorate: Scoop your finished buttercream frosting into a piping bag fitted with your favorite tip (a star tip or a round tip works wonderfully for these) or, for simplicity, a sturdy resealable plastic baggie with one corner snipped off. Pipe the frosting into each of the completely cooled cookie cups. For a final festive flourish, top with sprinkles, if desired!
Sophie’s Expert Tips for Perfect Sugar Cookie Cups Every Time
Through my extensive testing process (and a few delicious “failures”), I’ve gathered some invaluable tips to ensure your Sugar Cookie Cups turn out absolutely perfect:
- Use Room Temperature Ingredients: This is non-negotiable for both the cookie dough and the buttercream. Softened butter (not melted!) creams much better with sugar, creating a smooth, airy base. Room temperature eggs also incorporate more evenly into the batter, preventing curdling.
- Don’t Overmix the Dough: Once you add the flour, mix only until just combined. Overmixing develops gluten, leading to tougher cookies. A light hand here ensures tender, melt-in-your-mouth cookie cups.
- Grease Your Mini Muffin Tin Generously: Seriously, don’t skimp! These little cookies have a tendency to stick if not properly greased. Cooking spray is your best friend.
- Press Cups Immediately: The moment those cookies come out of the oven, press those indentations! If you wait too long, they’ll cool and firm up, making it difficult to create the cup shape without cracking the cookie. A vanilla extract bottle cap is my go-to tool, but a mini tart tamper or even the back of a small measuring spoon can work.
- Cool Completely Before Frosting: Patience is a virtue, especially in baking! If your cookie cups are even slightly warm, your beautiful buttercream will melt and slide right off. Let them cool completely on a wire rack.
- Adjust Frosting Consistency: Not all powdered sugars or types of milk are the same. If your frosting seems too stiff, add milk a tiny bit at a time (1/2 teaspoon increments) until it’s perfectly pipeable. If it’s too thin, add a tablespoon or two more powdered sugar.
- Consider Store-Bought Short-Cut: For busy times, remember my note: you can use store-bought sugar cookie dough and pre-made frosting! Just ensure you chill the store-bought dough for 15-20 minutes before forming cups, as it can be softer than homemade.
Recipe Variations & Customizations
One of the joys of baking is making a recipe your own! These Sugar Cookie Cups are incredibly versatile. Here are a few ideas to get your creative juices flowing, some even touching on that “healthy-ish” angle by adding fresh elements or mindful flavor choices:
- Flavorful Frosting Swaps:
- Lemon Zest Buttercream: Add 1-2 teaspoons of fresh lemon zest and a squeeze of lemon juice to your buttercream for a bright, tangy twist.
- Cream Cheese Frosting: Substitute cream cheese for half the butter in the frosting for a richer, tangier experience.
- Chocolate Buttercream: Incorporate 1/4 cup of unsweetened cocoa powder into the powdered sugar mixture for a delicious chocolate version.
- Matcha Green Tea: For an earthy, subtle flavor, add a teaspoon of culinary-grade matcha powder to your frosting.
- Creative Topping Ideas:
- Fresh Fruit: A single raspberry, blueberry, or a slice of strawberry adds a beautiful pop of color and natural sweetness, contributing to a “healthy-ish” feel.
- Mini Chocolate Chips or Sprinkles: Classic choices that always delight.
- Toasted Coconut: A sprinkle of toasted coconut flakes adds texture and a tropical hint.
- Chopped Nuts: Finely chopped pecans or walnuts provide a delightful crunch.
- Caramel or Chocolate Drizzle: A luxurious finish for an extra decadent treat.
- Holiday & Themed Cups:
- Christmas: Use red and green food coloring for the frosting, then top with festive sprinkles or mini candy canes.
- Halloween: Orange and purple frosting with spooky sprinkles or candy eyeballs.
- Valentine’s Day: Pink or red frosting with heart sprinkles.
- Baby Shower: Pastel-colored frosting with coordinating sprinkles.
- Add Extracts to the Dough: Experiment with different extracts in the cookie dough itself, such as orange, peppermint, or even a touch of rum extract for adult palates.
Serving Suggestions
These mini Sugar Cookie Cups are the ultimate versatile dessert. Here are some ways Sophie loves to serve them:
- Dessert Platter: Arrange them beautifully on a platter for parties, potlucks, or family gatherings. Their small size makes them easy for guests to grab and enjoy.
- Coffee & Tea Companion: They pair wonderfully with a hot cup of coffee, tea, or even hot cocoa for a cozy afternoon treat.
- Kid’s Party Favorite: A guaranteed hit with children! They love the vibrant colors and the fun, bite-sized nature.
- Edible Gifts: Package them in small boxes or cellophane bags tied with a ribbon for thoughtful homemade gifts during the holidays or as a ‘thank you’ present.
- After-Dinner Treat: A perfect single bite of sweetness to end a meal without feeling too indulgent.
Make Ahead & Storage Tips
These Sugar Cookie Cups are fantastic for making ahead, which is a huge plus when you’re planning for events or just want to have treats on hand.
- Cookie Dough: You can prepare the sugar cookie dough up to 3 days in advance. Store it tightly wrapped in plastic wrap in the refrigerator. Before using, let it come to room temperature for about 15-20 minutes so it’s easier to roll and shape.
- Baked Cookie Cups (Unfrosted): The baked and cooled cookie cups can be stored in an airtight container at room temperature for up to 5 days, or frozen for up to 3 months. If freezing, make sure they are completely cool, then arrange them in a single layer in an airtight container or freezer bag. Thaw at room temperature before frosting.
- Buttercream Frosting: The buttercream can be made up to 3 days in advance and stored in an airtight container in the refrigerator. Before using, let it come to room temperature for about 30 minutes, then re-whip it with your stand mixer for a minute or two until it’s light and fluffy again.
- Assembled Cookie Cups: Once frosted and decorated, store your Sugar Cookie Cups in an airtight container at room temperature for up to 3 days. For longer storage (up to 5 days), you can refrigerate them. If refrigerating, let them sit at room temperature for 15-20 minutes before serving to ensure the cookie base is soft and the frosting is creamy. If stacking, place a piece of parchment paper between layers to prevent the frosting from sticking.
Common Questions About Sugar Cookie Cups (FAQ)
Can I use store-bought sugar cookie dough and frosting for this recipe?
Absolutely! My recipe notes specifically mention that you can use store-bought sugar cookie dough and pre-made frosting to save time. Just follow the instructions for forming the cups and assembling them as outlined in the recipe. For best results with store-bought dough, I recommend chilling it for 15-20 minutes before rolling and pressing into the muffin tin cups, which helps prevent excessive spreading during baking.
How should I store Sugar Cookie Cups, and how long do they last?
Once decorated, store your Sugar Cookie Cups in an airtight container at room temperature for up to 3 days, or in the refrigerator for up to 5 days. If refrigerating, allow them to come to room temperature for about 15-20 minutes before serving for the best texture and flavor. To prevent frosting from sticking, you can place a piece of parchment paper between layers if stacking.
Can I make these Sugar Cookie Cups ahead of time?
Yes, these cookie cups are perfect for making ahead! You can bake the cookie cups and prepare the frosting separately up to 2-3 days in advance. Store the cooled cookie cups in an airtight container at room temperature, and the frosting in an airtight container in the refrigerator. When you’re ready to serve, bring the frosting to room temperature (you might need to re-whip it for a minute or two if it’s too stiff) then pipe into the cups and decorate. This makes entertaining a breeze!
What are some fun variations for Sugar Cookie Cups?
The possibilities are endless! You can switch up the frosting flavor (lemon, cream cheese, chocolate), add different toppings like mini chocolate chips, chopped nuts, fresh berries, or a drizzle of caramel. For holidays, use colored food coloring in the frosting and themed sprinkles. You can also experiment with different extracts in the cookie dough, like lemon or orange, for a zesty twist!
The Undeniable Comfort of Homemade Cookies
There’s a reason why cookies are a timeless comfort food, especially for family gatherings. The aroma wafting from the oven, the simple act of sharing a sweet treat, the memories created around a dessert platter – it all contributes to a sense of warmth and belonging. These Sugar Cookie Cups capture that essence perfectly. They’re not just a dessert; they’re an experience, a little piece of joy that brings smiles to faces. By making them at home, you infuse them with extra love, making them truly special. The mini size adds to their charm, allowing everyone to enjoy a taste of that homemade goodness without feeling overwhelmed. It’s my absolute pleasure to share this beloved recipe with you, hoping it brings as much comfort and delight to your home as it does to mine.
More SweetCraft Recipes You’ll Love
If you’ve enjoyed making these delightful Sugar Cookie Cups, you’re in for a treat! SweetCraft Recipes specializes in indulgent, comforting, and sometimes surprisingly simple desserts that elevate your baking game. If you’re looking to expand your cookie repertoire or just find another fantastic recipe to try, consider exploring some of our other popular creations:
- For the Ultimate Stuffed Cookie Experience: Dive into our Stuffed Red Velvet Cookies Recipe. Rich, vibrant, and incredibly decadent.
- Craving a Bakery-Style Masterpiece? You’ll adore our Pistachio NYC Cookies Recipe. Learn the secrets to those perfectly thick, chewy giants.
- A Nutty & Chocolatey Dream: Don’t miss the irresistible combination in our Peanut Butter Nutella Cookie Recipe. Pure bliss in every bite!
- Simple Elegance with a Surprise Center: Discover the magic of our White Chocolate Stuffed Cookies. A classic cookie with a delightful white chocolate core.
Each of these recipes brings its own unique flavor and baking adventure. Happy baking from Sophie and the SweetCraft Recipes team!
Ready to Bake Your New Favorite Treat?
There you have it – everything you need to bake a batch of truly irresistible Easy Sugar Cookie Cups. From the foundational dough to the creamy frosting and endless customization ideas, you’re now equipped to create a dessert that will earn rave reviews. Remember, I’ve put these through their paces over nine times to ensure you have a seamless baking experience.
Whether you’re celebrating a special occasion, bringing a comforting dish to a family gathering, or simply want to treat yourself to a perfect bite of sweetness, these Sugar Cookie Cups are the answer. So, gather your ingredients, fire up your oven, and get ready to enjoy the pure delight of homemade comfort food. Happy baking!
PrintEasy Sugar Cookie Cups Recipe

These delightful sugar cookie cups are a mini dessert dream! Soft, buttery sugar cookie bases are baked to golden perfection in a mini muffin tin, then filled with a luscious, creamy homemade buttercream frosting. They’re incredibly easy to make, perfect for any occasion from casual family gatherings to elegant parties, and are guaranteed to be a crowd-pleaser. Plus, Sophie has tested this recipe over 9 times to ensure flawless results every time!
- Prep Time: 20
- Cook Time: 10
- Total Time: 45
- Yield: 36 mini cookie cups
- Category: Dessert, Cookies
- Method: Bake
- Cuisine: American
Ingredients
3/4 cup salted butter softened
3/4 cup sugar
1 egg
1 teaspoon vanilla
1/4 teaspoon almond extract optional
1/2 teaspoon baking powder
2 cups flour
1/4 cup salted butter softened (for frosting)
1 1/3 cups powdered sugar
1/2 teaspoon vanilla (for frosting)
1 tablespoon milk or heavy whipping cream
Food coloring optional
Sprinkles optional
Instructions
1. Preheat oven to 350F (175C) and generously grease 36 mini muffin cups with cooking spray. This is crucial for easy removal!
2. In the bowl of a stand mixer, beat the butter and sugar until light, fluffy, and well-combined (about 2-3 minutes).
3. Stir in the egg, vanilla and almond extract (if using) until just combined.
4. In a separate bowl, whisk together the baking powder and flour. Gradually add the dry ingredients to the wet, stirring on low speed until just combined. Be careful not to overmix.
5. Scoop the dough by rounded tablespoons (about 1″ in diameter or 2 tsp) and roll into a ball. Place one in each muffin tin cup and flatten gently with your fingers (no need to form a “cup”….just flatten into a disc).
6. Bake for about 10 minutes, or until golden brown around the edges. The centers may still look a bit soft.
7. Immediately after removing from the oven, use the cap of a bottle (I use the cap of my vanilla extract bottle) or a mini tart tamper to gently press into the center of each warm cookie to form a “cup.”
8. Let cool for 5 minutes in the pan and then carefully remove to a wire cooling rack to cool completely.
9. While the cookie cups cool, make the frosting. In the bowl of a stand mixer, beat the softened butter until smooth.
10. Add the powdered sugar and vanilla and stir on low speed to incorporate, then beat on medium-high until smooth and creamy.
11. Add the milk (or cream) and beat until smooth and fluffy. Add an additional 1/2 – 1 tablespoon of milk, if needed, for desired piping consistency. Stir in food coloring, if desired.
12. Scoop the frosting into a piping bag fitted with your favorite tip (like a star tip or round tip) or a resealable baggie with a corner snipped off. Pipe the frosting into each of the completely cooled cookie cups.
13. Top with sprinkles, if desired, for a festive touch!
Notes
*You can also make these using store-bought sugar cookie dough and store-bought frosting. You’ll follow the recipe just as you would once the dough has been made. For best results with store-bought dough, chill it for 15-20 minutes before rolling and pressing into the muffin tin cups to prevent excessive spreading.