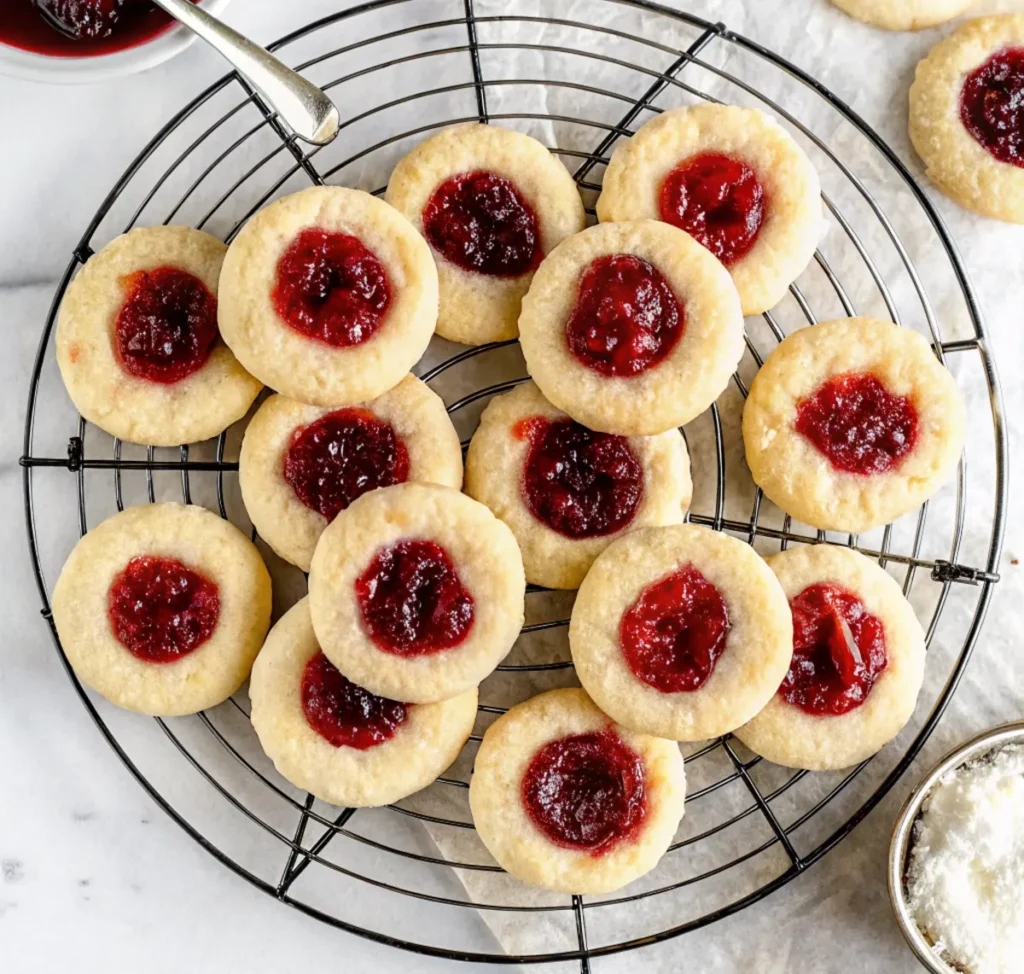
There are some cookies that just transport you back to simpler times – and for me, these Soft and Buttery Raspberry Thumbprint Cookies are absolutely one of them. Imagine a delicate, melt-in-your-mouth shortbread-style cookie, ever so slightly crisp from a roll in sparkling granulated sugar, and then filled with a vibrant burst of sweet-tart raspberry jam. Pure comfort in every bite!
As a dedicated recipe developer here at SweetCraft Recipes, I’m always on the hunt for those timeless treats that bring joy without endless fuss. And this recipe? It’s a true gem. I’ve tested these thumbprint cookies no less than nine times – yes, nine! – to ensure every measurement, every instruction, leads you to perfect results, every single time. My goal was a cookie that was quick to make (hello, 30-minute total time!), incredibly tender, and bursting with classic flavor. After many batches, I can confidently say this is the recipe you’ll come back to again and again.
Whether you’re looking for an easy dessert to impress at a family gathering, a delightful treat for your weeknight coffee, or a cozy baking project on a chilly afternoon, these raspberry thumbprint cookies fit the bill. They’re wonderfully customizable, forgiving, and utterly delicious. Let’s dive into making this comforting classic!
Why You’ll Absolutely Adore These Raspberry Thumbprint Cookies
What makes this recipe a standout in a sea of cookie recipes? Let me count the ways:
- Lightning Fast: From start to finish, you’re looking at about 30 minutes! Perfect for those last-minute cravings or unexpected guests.
- Irresistibly Buttery & Soft: The dough is a dream – soft, tender, and truly melts in your mouth.
- Customizable Filling: While raspberry is my go-to, the “thumbprint” invites endless jam possibilities.
- Sparkling Sweetness: Rolling in granulated sugar before baking adds a beautiful sparkle and a delightful textural contrast.
- Make-Ahead Friendly: The dough freezes beautifully, making future cookie baking a breeze.
- Family Favorite: A classic that appeals to all ages, sure to become a staple in your recipe collection.
These aren’t just cookies; they’re little bites of happiness that bring warmth and nostalgia to any occasion.
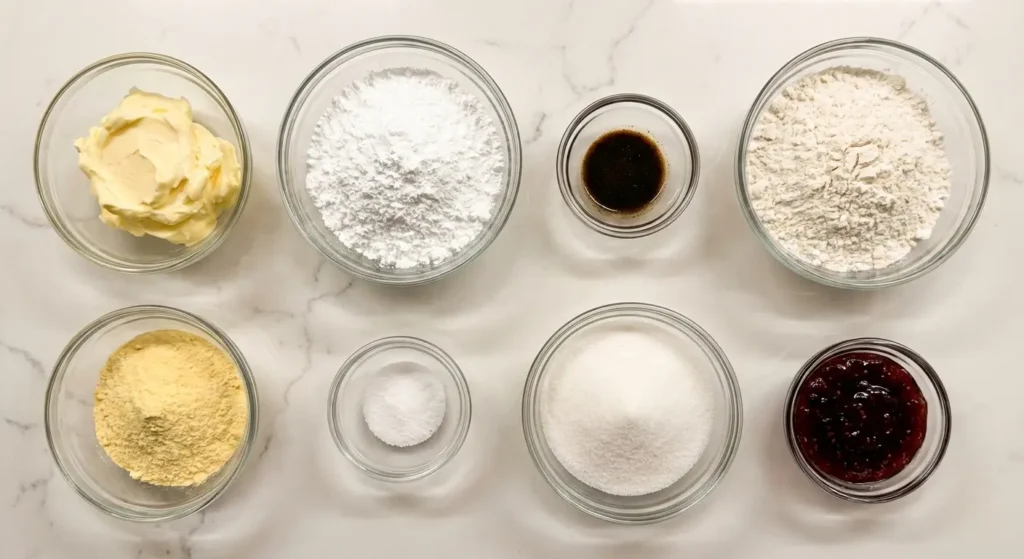
The Simple Power of Key Ingredients
One of the beauties of thumbprint cookies is their reliance on simple, wholesome ingredients you likely already have in your pantry. But don’s underestimate the power of quality and proper preparation when it comes to these foundational elements!
Unsalted Butter, at Room Temperature (180g)
This is the star of our show! Butter provides that rich, tender texture and incredible flavor. Using unsalted butter gives you control over the salt content in your cookies. The “at room temperature” part is crucial:
- Experience Tip from Sophie: If your butter is too cold, it won’t cream properly with the sugar, leading to a denser cookie. If it’s too warm or melted, your dough will be greasy and your cookies will spread excessively. It should be soft enough to leave an indentation when pressed, but still hold its shape.
Powdered Sugar (70g)
Also known as confectioner’s sugar or icing sugar, powdered sugar is what gives these cookies their signature delicate crumb. Unlike granulated sugar, its fine texture dissolves easily into the butter, contributing to that melt-in-your-mouth quality without any grittiness.
Vanilla Extract or Vanilla Bean Paste (½ tsp)
Vanilla is the flavor backbone here, enhancing the buttery notes. Vanilla bean paste offers a richer, more pronounced vanilla flavor and beautiful flecks of vanilla bean, but a good quality vanilla extract works perfectly.
All-Purpose Flour (190g)
The structure of our cookie. Measure your flour correctly!
- Expert Tip: Use a kitchen scale for precise measurements (like 190g). If you don’t have one, fluff the flour in its container, then spoon it lightly into a measuring cup and level off with a straight edge. Don’t pack it down! Too much flour makes cookies dry and crumbly.
Custard Powder or Corn Starch (20g)
This is my secret weapon for extra tenderness! Custard powder (which is corn starch with added flavor and color, common in places like New Zealand and the UK) helps create an incredibly soft, almost powdery crumb. If you’re in North America, plain corn starch works identically for texture.
- Substitution: If you don’t have either, you can substitute with an equal amount of all-purpose flour. The cookies will still be delicious, but they might be slightly less tender. It’s a small detail, but I find it makes a big difference!
Salt (¼ tsp)
Salt balances the sweetness and enhances all the other flavors. If you’re using salted butter, you might want to reduce this to just a pinch. I generally prefer unsalted butter for baking to control the salt content.
Granulated Sugar for Rolling
This adds a lovely crunchy texture and a beautiful sparkle to the outside of the cookies. Don’t skip it!
Raspberry Jam (or jam of your choice), approx. 130g
The vibrant heart of these cookies! Raspberry jam is a classic choice, offering a wonderful balance of sweet and tart.
- Choosing Your Jam: Opt for a good quality jam or preserve. Thicker jams work best as they are less prone to bubbling over and leaking during baking. I like to use a seedless raspberry jam for a smooth finish, but homemade jam with seeds works beautifully too!
How to Bake Your Perfect Raspberry Thumbprint Cookies
Ready to get baking? Here’s a detailed, step-by-step guide to ensure your cookies turn out perfectly.
Step 1: Prep Your Oven and Pans
Preheat your oven to 325°F (165°C). Line 1-2 baking sheets with parchment paper. I find I can fit all 24 cookies on one standard 18″x13″ half-sheet pan, but if your pans are smaller, you might need two. Parchment paper ensures easy cleanup and prevents sticking.
Step 2: Cream Butter, Sugar, and Vanilla
In a medium bowl, combine the room temperature unsalted butter, powdered sugar, and vanilla extract (or paste). Use an electric hand mixer (or a stand mixer with the paddle attachment) to whip them together until the mixture is light, fluffy, and pale in color. Make sure to scrape down the sides of the bowl frequently to ensure everything is thoroughly combined. This step incorporates air, which contributes to the cookies’ tenderness.
Step 3: Mix in Dry Ingredients
Add the measured all-purpose flour, custard powder (or corn starch), and salt to the butter mixture. Mix on low speed until just combined. Be careful not to overmix, as this can develop the gluten in the flour, leading to tougher cookies. The dough will be quite soft – this is normal!
Step 4: Scoop the Dough Balls
Using a 1 Tablespoon scoop (or simply measure about 18g per ball if you have a scale), scoop uniform balls of dough onto your prepared baking sheet. Consistency in size helps ensure even baking.
Step 5: Roll and Shape
Place some granulated sugar in a separate small bowl. Roll each dough ball gently in the granulated sugar until it’s evenly coated. Place the sugared balls back on the baking sheet and lightly press down on each one to flatten it into a “hockey puck” shape. This helps prevent excessive spreading and gives a nice base for the indentation. Remember to leave a little room between cookies as they will spread slightly.
Step 6: Create the Thumbprints
This is where the “thumbprint” comes in! I prefer to use a round teaspoon-sized measuring spoon or a similar rounded object to make the indentations. It gives a more uniform shape than a thumb. If your spoon is sticking, dip it into the granulated sugar first. Press firmly enough to create a distinct well, but not so deep that you go all the way through the cookie.
Step 7: Fill with Jam
Now for the best part! Carefully spoon your raspberry jam into each cavity. I typically use about a teaspoon per cookie, filling it almost to the top.
- Sophie’s Warning: Don’t overfill! Too much jam can cause it to bubble over and leak out during baking, making a sticky mess on your pan.
Step 8: Bake to Perfection
Bake your thumbprint cookies for 13-14 minutes. They are ready when the edges are lightly set and just starting to turn a very pale golden, and the jam is almost bubbling (some jams might not bubble much, depending on their consistency). Don’t wait for them to turn deeply golden, as these are meant to be soft, pale cookies.
Step 9: Cool and Store
Remove the cookies from the oven. Allow them to cool completely on the baking pan set on a wire rack. This is crucial as they are very delicate when warm. Once cooled, store your delightful cookies in an airtight container at room temperature for up to a week.
Variations & Customizations: Your Jam, Your Way!
One of the most delightful aspects of thumbprint cookies is their adaptability. While raspberry is a classic, don’t be afraid to get creative!
- Jam Variety:
- Strawberry or Cherry: Sweet and fruity, always a hit.
- Apricot: Offers a lovely tangy counterpoint to the rich butter cookie.
- Orange Marmalade: For a sophisticated, slightly bitter citrus note.
- Lemon Curd: A brighter, zippier option that’s fantastic.
- Chocolate Ganache/Nutella: Not traditional jam, but a delicious, decadent alternative (add after baking for best results).
- Nutty Roll: Instead of granulated sugar, roll the dough balls in finely chopped nuts (like pecans, walnuts, or almonds) for added texture and flavor.
- Citrus Zest: Add ½ teaspoon of lemon or orange zest to the cookie dough along with the vanilla for a brighter flavor profile.
- Glaze Drizzle: Once cooled, you could drizzle a simple vanilla or almond glaze over the top for extra sweetness and visual appeal.
- Dust with Powdered Sugar: For a more classic shortbread look, dust the cooled cookies with a little extra powdered sugar, especially around the edges.
Looking for other cookie inspiration? You might love these unique options from SweetCraft Recipes:
- For a truly decadent experience, try our Stuffed Red Velvet Cookies Recipe.
- If you’re a fan of rich, chunky cookies, our Pistachio NYC Cookies Recipe is a must-try.
- For a nostalgic combination of flavors, don’t miss our Peanut Butter Nutella Cookie Recipe.
- And if you can’t get enough of stuffed cookies, these White Chocolate Stuffed Cookies are incredibly indulgent.
Make-Ahead and Storage Instructions
One of the great things about these thumbprint cookies is how well they store and how easily you can prep them in advance.
Storing Baked Cookies
Once completely cooled, store your Soft and Buttery Raspberry Thumbprint Cookies in an airtight container at room temperature for up to 1 week. If you stack them, you might want to place a piece of parchment paper between layers to prevent them from sticking or the jam from transferring.
Freezing Baked Cookies
These cookies freeze beautifully! Once completely cooled, arrange them in a single layer on a baking sheet and freeze until solid (about 1-2 hours). Then, transfer them to a freezer-safe airtight container or bag. They’ll keep well for up to 2-3 months. Thaw at room temperature before serving.
Freezing Cookie Dough (Unbaked)
This is a fantastic option for future baking!
- Form and Freeze: Prepare the cookie dough as instructed up to the point of rolling the balls. Roll them into balls and place them on a parchment-lined baking sheet. Freeze until solid.
- Store: Transfer the frozen dough balls to a freezer-safe bag or container. Label with the date. They can be stored for up to 3 months.
- Bake from Frozen: When you’re ready to bake, you don’t even need to thaw them completely. Just take out the desired number of dough balls, roll them in granulated sugar, press the indentation, fill with jam, and bake as usual. You might need to add an extra 2-4 minutes to the baking time. This method is perfect for having fresh-baked cookies on demand!
Serving Suggestions
These raspberry thumbprint cookies are wonderful on their own, but they also pair beautifully with a few simple accompaniments:
- With Coffee or Tea: The classic pairing! The buttery cookie and sweet jam are perfect with a hot beverage.
- Dessert Platter: Add them to a holiday cookie platter or a dessert spread for a pop of color and classic flavor.
- Afternoon Treat: A delightful pick-me-up for an afternoon snack.
- Ice Cream Topping: Crumble a few over a scoop of vanilla bean ice cream for an instant dessert upgrade.
Frequently Asked Questions (FAQs)
Can I use other types of jam for thumbprint cookies?
Absolutely! While raspberry jam is a classic choice, thumbprint cookies are incredibly versatile. Feel free to experiment with strawberry, apricot, cherry, or even a citrus marmalade. Just ensure the jam isn’t too runny, as this can cause it to leak during baking. For best results, use a thicker preserve or spread.
How can I prevent my thumbprint cookies from spreading too much?
Over-spreading is a common issue! Ensure your butter is at a cool room temperature, not overly soft or melted. Chilling the dough for 15-30 minutes before baking can also help. Make sure your oven temperature is accurate – if it’s too low, the butter melts before the cookie sets. Using the precise amount of flour is also key; too little flour leads to a softer, more spreadable dough. I’ve found that pressing them into a ‘hockey puck’ shape as instructed also helps them maintain their form.
Can I make the thumbprint cookie dough ahead of time?
Yes, this recipe is perfect for make-ahead convenience! You can prepare the dough and refrigerate it for up to 3 days. Simply wrap it tightly in plastic wrap. When ready to bake, let it sit at room temperature for about 15-20 minutes to soften slightly before scooping and shaping. You can also freeze the raw dough balls (without jam) for up to 3 months; just thaw slightly and then fill and bake as usual, possibly adding a minute or two to the bake time.
What can I use if I don’t have custard powder or corn starch?
Custard powder (or corn starch, as it’s known in NZ/Australia) is added to give these cookies an extra tender, melt-in-your-mouth texture. If you don’t have it, you can simply substitute it with an equal amount of all-purpose flour. The cookies will still be delicious, though they might have a slightly less delicate crumb. It’s a small touch that makes a big difference in texture, but not a deal-breaker!
Why did my jam leak out of the thumbprint cookies during baking?
Jam leakage usually occurs if the indentation is too shallow or if too much jam is added. Make sure to create a distinct, deep-enough well in the cookie dough. Also, fill the cavity almost to the top, but avoid overfilling. Some thinner jams are more prone to bubbling over, so consider a thicker preserve if you’ve had issues in the past. My personal testing has shown that about a teaspoon per cookie is usually the perfect amount.
Time to Bake Some Comfort!
These Soft and Buttery Raspberry Thumbprint Cookies truly embody everything I love about homemade baking: simple ingredients, a straightforward process, and an utterly delightful result. They’re a testament to the power of a classic recipe, refined and tested to ensure your success in the kitchen.
Whether you’re baking them for a special occasion, a quiet afternoon, or simply because you deserve a treat, I promise these cookies will bring a smile to your face. Give them a try, and let me know which jam you choose for your perfect batch! Happy baking, from my kitchen to yours.
PrintRaspberry Thumbprint Cookies

These quick-baked thumbprint cookies can be made in about 30 minutes. They have a soft and buttery dough, are rolled in a sparkly sugar, and then filled with your choice of jam. Thumbprint cookies can be made fresh, or the dough can be prepared and frozen ahead of time.
- Prep Time: 15
- Cook Time: 15
- Total Time: 30
- Yield: 24
- Category: Cookies
- Method: Baking
- Cuisine: American
Ingredients
180g unsalted butter, at room temperature
70g powdered sugar
½ tsp vanilla extract or vanilla bean paste
190g all-purpose flour
20g custard powder or corn starch
¼ tsp salt (use a little less if you are using table salt rather than kosher salt)
Granulated sugar for rolling
Raspberry Jam or jam of your choice – I used about 130g for 24 cookies
Instructions
1. Preheat the oven to 325°f / 165°c. Line 1-2 baking sheets with parchment paper (I can fit 24 cookies all on one half sheet pan which is 18″x13″ /45cm x33cm ).
2. In a medium bowl, whip together the butter, powdered sugar and vanilla with an electric hand mixer until light and fluffy, stopping to scrape the edges of the bowl to ensure it is all well mixed. This step can also be done in a stand mixer fitted with the paddle attachment.
3. Add the flour, custard powder, and salt, and mix until combined with the mixer. The dough will be quite soft.
4. Using a 1 Tbsp scoop, scoop balls of dough onto the prepared baking sheet. The dough balls will weigh about 18g each.
5. Place the granulated sugar in a bowl. Roll each piece of dough into a ball, then roll in the granulated sugar until evenly coated. Place onto the sheet pan, and press down lightly to make it into a hockey puck shape. They do spread a little in the oven so make sure that you leave room for this.
6. Using a round teaspoon sized measuring spoon or something with a rounded bottom of a similar size, make indentations in the cookies. If the spoon is sticking, dip it into the sugar first. You can also use your finger if you like but I prefer the uniform shape of something round.
7. Fill each cavity you have just created with jam – I do this using a teaspoon and fill almost to the top. You do not want to add too much or your thumbprint cookies can leak in the oven.
8. Bake the cookies for 13-14 minutes, until they are set around the edges and the jam is almost bubbling (it may not depending on the kind of jam that you use).
9. Remove the cookies from the oven and leave to cool completely on the pan – place the pan on a wire rack to ensure that it has enough airflow underneath.
10. Store cookies in an airtight container at room temperature for up to a week.
Notes
If you use salted butter you can omit the salt, or just add a pinch.
Powdered sugar is the same thing as confectioner’s sugar or icing sugar – they just use different names in different places.
Corn Starch if you are from NZ etc is what we call cornflour.