These Gluten Free Brownies are moist, fudgy, and absolutely indulgent—made with a combination of almond flour and rice flour for a heavenly texture that rivals any traditional brownie. Packed with rich dark chocolate and studded with milk chocolate chips, these brownies prove that gluten-free baking can be just as delicious (if not more so) than the original. Perfect for anyone following a gluten-free diet or simply craving the ultimate chocolate experience.
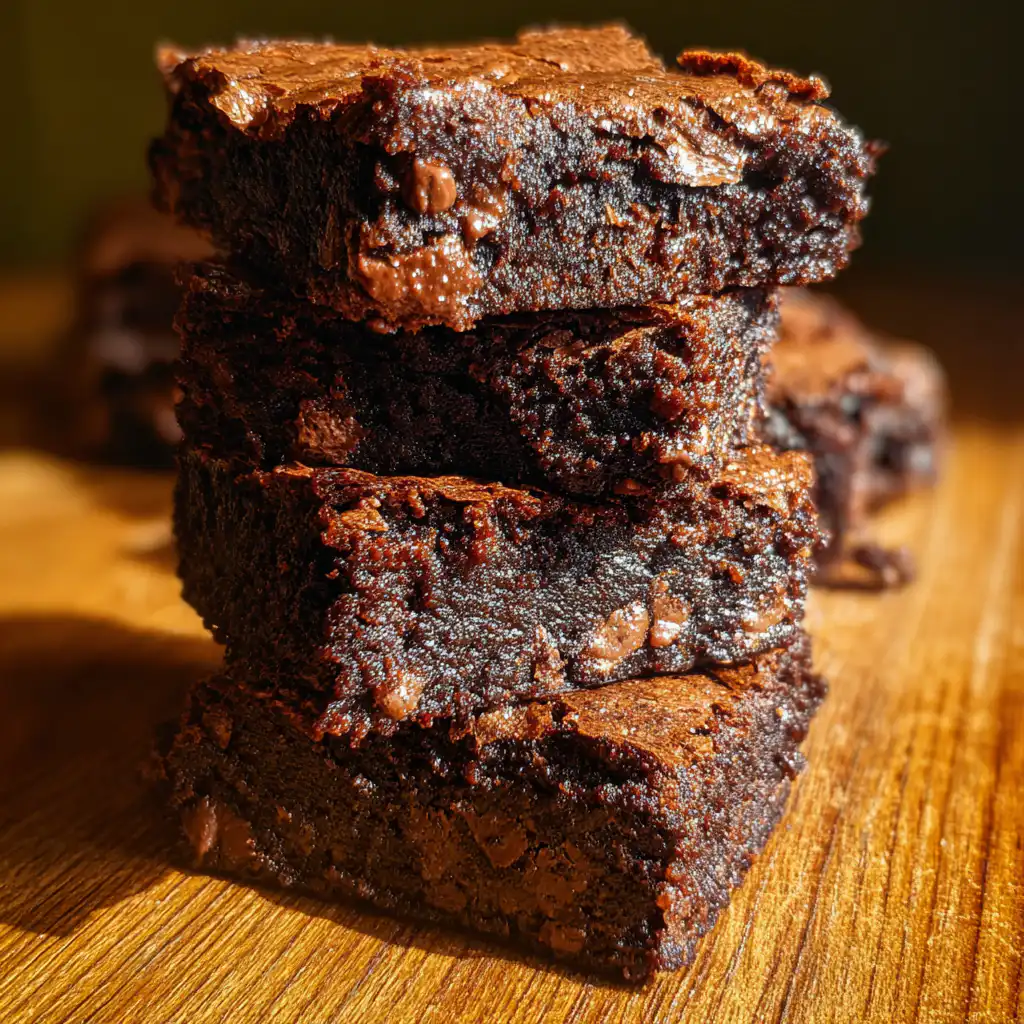
I grew up between two worlds—Moroccan warmth and American comfort—shaped by the scent of cinnamon and orange blossom water drifting from my dad’s kitchen and the buttery aroma of classic chocolate chip cookies cooling in my mom’s oven. That blend of cultures is where my love for baking first took root. When I started developing gluten-free recipes, brownies were my testing ground—they needed to be fudgy, not cakey, with that signature crackly top and dense, chocolatey interior. After countless batches, I discovered that almond flour adds moisture and richness while rice flour provides structure without the grittiness. Using high-quality dark chocolate (I swear by 70% Lindt) makes all the difference—it creates that deep, complex chocolate flavor that makes these brownies absolutely irresistible. Whether you’re gluten-free by necessity or choice, these brownies will become your new standard.
Ingredients
Yield: 16 squares
For the Brownies:
- 200g (7 oz) dark chocolate, chopped (70% cacao recommended, Lindt is excellent)
- 85g (6 tablespoons) unsalted butter
- ¼ teaspoon salt
- 150g (¾ cup packed) brown sugar
- 1 teaspoon vanilla extract
- 2 large eggs, room temperature
- 60g (½ cup) almond flour
- 35g (¼ cup) rice flour (white rice flour works best)
- 160g (1 cup) milk chocolate chips
Substitution Tips: No rice flour? You can use an equal amount of oat flour (certified gluten-free if needed) or tapioca starch, though the texture will vary slightly. For dairy-free, use dairy-free chocolate and vegan butter. Want extra decadence? Add ½ cup chopped walnuts or pecans. For a deeper chocolate flavor, add 2 tablespoons cocoa powder to the batter.
Step-by-Step Instructions
Preparation:
- Preheat your oven to 160°C (320°F). This lower temperature ensures fudgy brownies that don’t overbake.
- Prepare the pan: Grease an 8-inch square baking pan thoroughly with butter or cooking spray. Line with parchment paper, leaving an overhang on two sides for easy removal. The overhang acts as handles to lift the brownies out cleanly.
Making the Brownie Batter:
- Melt chocolate and butter: In a medium microwave-safe bowl, combine the chopped dark chocolate, butter, and salt. Microwave on 50% power in 30-second bursts, stirring thoroughly between each interval, until the mixture is completely melted and smooth. Don’t rush this—overheating can cause the chocolate to seize.
- Cool slightly: Set the chocolate mixture aside for 5 minutes to cool slightly. This prevents the eggs from cooking when you add them.
- Add sugar, vanilla, and eggs: Add the brown sugar, vanilla extract, and eggs to the chocolate mixture. Whisk vigorously for about 1 minute until the mixture is smooth, glossy, and slightly thickened. This step incorporates air and creates that signature crackly top.
- Fold in flours: Add the almond flour and rice flour. Using a spatula, gently fold the flours into the chocolate mixture until just combined with no flour streaks visible. Don’t overmix—fold just until incorporated to maintain that fudgy texture.
- Add chocolate chips: Fold in the milk chocolate chips, reserving a small handful to sprinkle on top if desired. Mix until evenly distributed throughout the batter.
Baking:
- Pour into pan: Transfer the brownie batter to your prepared pan, using a spatula to spread it into an even layer and smooth the top. If you reserved chocolate chips, scatter them over the surface now.
- Bake: Place in the preheated oven and bake for exactly 25 minutes. The brownies are done when the edges look set and slightly pulling away from the sides, but the center still has a slight jiggle. For the fudge test: insert a wooden skewer into the center—it should come out moist with a few crumbs clinging to it, but no wet batter.
- Cool completely in the pan: This is crucial! Remove from the oven and let the brownies cool completely in the pan on a wire rack. They will continue to cook and set as they cool. Cutting them warm will result in a gooey mess—patience is key!
Cutting and Serving:
- Remove from pan: Once completely cool (this takes about 1-2 hours), use the parchment paper overhang to lift the entire brownie slab out of the pan and onto a cutting board.
- Cut into squares: Using a large, sharp knife, cut into 16 squares (4×4 grid). For the cleanest cuts, wipe the knife clean between each slice, or dip it in hot water and dry it off.
- Enjoy: Serve these fudgy brownies as is, or warm them slightly in the microwave for 10-15 seconds for an extra gooey center!
Serving Suggestions
- Classic Style: Serve at room temperature with a tall glass of cold milk or a scoop of vanilla ice cream
- Brownie Sundae: Warm a brownie, top with vanilla ice cream, drizzle with hot fudge and caramel sauce, and finish with whipped cream
- Dessert Platter: Cut into smaller pieces and arrange on a platter with peanut butter Nutella cookies, stuffed red velvet cookies, and white chocolate stuffed cookies for variety
- Coffee Pairing: Serve alongside espresso or cappuccino for an elegant afternoon treat
- Gift Boxes: Stack in clear cellophane bags tied with ribbon—these make thoughtful gifts for gluten-free friends or anyone who loves chocolate
Storage & Make-Ahead Tips
Room Temperature: Store brownies in an airtight container at room temperature for up to 4 days. They’ll stay fudgy and delicious.
Refrigeration: Refrigerate in an airtight container for up to 1 week. The brownies will become firmer when cold—let them sit at room temperature for 15-20 minutes before serving, or warm slightly in the microwave.
Freezing: These brownies freeze beautifully for up to 3 months. Wrap individual squares in plastic wrap, then place in a freezer bag or container. Thaw at room temperature for 1-2 hours or warm in the microwave for 20-30 seconds.
Make-Ahead Strategy: Bake brownies 1-2 days ahead and store at room temperature—they actually improve as the flavors meld. You can also prepare the batter (up to step 7) and refrigerate overnight, then pour into the pan and bake the next day.
Tips & Tricks
Quality Chocolate Matters: Since chocolate is the star ingredient, use the best quality you can afford. 70% cacao dark chocolate (like Lindt Excellence) provides the perfect balance of bitterness and sweetness. Avoid chocolate chips for melting—they contain stabilizers that can affect texture.
Don’t Overbake: The single biggest mistake with brownies is overbaking. They should look slightly underdone when you remove them from the oven. The residual heat continues cooking them as they cool, resulting in that perfect fudgy texture. If you overbake, they’ll be dry and cakey.
Room Temperature Eggs: Cold eggs can cause the melted chocolate to seize and harden. Let eggs sit at room temperature for 30 minutes before using, or place them in warm water for 5 minutes.
The Cooling Process is Essential: I know it’s tempting to cut into warm brownies, but letting them cool completely allows the structure to set properly. Warm brownies will fall apart and won’t have those clean, bakery-style edges.
Common Mistakes to Avoid
Using Pre-Ground Almond Flour That’s Old: Almond flour can go rancid quickly due to its high fat content. Always smell your almond flour before using—it should smell fresh and nutty, not bitter or off. Store in the refrigerator or freezer to extend shelf life.
Overheating the Chocolate: Microwaving chocolate on high power can cause it to burn or seize. Always use 50% power and stir frequently. If it does seize (becomes grainy and clumpy), you can sometimes save it by stirring in a teaspoon of vegetable oil.
Cutting Too Soon: This cannot be stressed enough—cutting into warm brownies creates a crumbly mess. The brownies need time to set up completely. If you’re in a hurry, refrigerate the pan for 30-45 minutes to speed up the cooling process.
Substituting Flours Without Understanding: Almond flour and rice flour each serve specific purposes in this recipe. Random substitutions can result in brownies that are too dense, too crumbly, or have an off texture. Stick to the recipe for best results.
Chef’s Advice
Flavor Variations:
- Espresso Brownies: Add 1 tablespoon instant espresso powder to the melted chocolate for a mocha flavor that enhances the chocolate
- Mint Chocolate: Add ½ teaspoon peppermint extract and fold in Andes mints or chopped peppermint patties
- Salted Caramel: Swirl 3 tablespoons caramel sauce into the batter and sprinkle with flaky sea salt before baking
- Raspberry Swirl: Drop spoonfuls of raspberry jam on top of the batter and swirl with a knife before baking
Ingredient Substitutions:
- Coconut sugar: Can replace brown sugar for a refined sugar-free version (use same amount)
- Oat flour: Substitute rice flour with certified gluten-free oat flour for a slightly heartier texture
- Dairy-free: Use Enjoy Life chocolate chips and vegan butter for completely dairy-free brownies
- Nut-free: Replace almond flour with sunflower seed flour or additional rice flour (texture will differ)
Presentation Ideas:
- Dust with powdered sugar just before serving for an elegant look
- Drizzle with melted chocolate or caramel sauce in a crosshatch pattern
- Top with a dollop of whipped cream and fresh raspberries for individual plated desserts
- Cut into small 1-inch squares and serve on decorative skewers for parties
- Sandwich vanilla ice cream between two brownie squares for brownie ice cream sandwiches
- Add a sprinkle of flaky sea salt on top before baking for sweet-salty contrast
History and Cultural Significance
Brownies are a uniquely American invention, first appearing in cookbooks in the late 1800s. The first chocolate brownies as we know them today appeared in the 1896 Boston Cooking-School Cook Book by Fannie Farmer. The Palmer House Hotel in Chicago claims to have created brownies in 1893 for the World’s Columbian Exposition. Whether cakey or fudgy has been debated for over a century—this recipe firmly falls in the fudgy camp, which many chocolate purists consider superior. The rise of gluten-free baking in the 21st century has revolutionized how we approach classic recipes. Almond flour, once a specialty ingredient, has become mainstream thanks to paleo and gluten-free movements. What’s remarkable about gluten-free brownies is that the absence of wheat flour actually creates a superior texture—denser, fudgier, and more intensely chocolatey. These brownies prove that dietary restrictions can lead to culinary innovation, creating desserts that everyone—gluten-free or not—will love.
Final Thoughts
These Gluten Free Brownies are proof that you don’t need wheat flour to create an exceptional brownie. The combination of almond flour and rice flour produces a texture that’s incredibly fudgy, moist, and rich—exactly what a brownie should be. Whether you’re gluten-free by necessity or simply love great brownies, this recipe delivers every time. The intense chocolate flavor from quality dark chocolate, combined with pockets of melty milk chocolate chips, creates a brownie experience that rivals (and often exceeds) traditional recipes. The best part? They’re actually quite simple to make—no complicated techniques or hard-to-find ingredients. Just melt, mix, and bake. These brownies have converted many skeptics who thought gluten-free baking meant sacrificing flavor or texture. Keep the ingredients on hand and you’ll always be ready to satisfy chocolate cravings or impress guests with a homemade treat that happens to be gluten-free. Whether you serve them plain, à la mode, or dressed up for a special occasion, these brownies will disappear fast. Trust the process, resist cutting them too early, and prepare for compliments. Happy baking!
Nutrition Information
| Serving Size | Calories | Protein | Carbs | Fat | Fiber | Sugar |
|---|---|---|---|---|---|---|
| 1 square | 236 | 3g | 24g | 15g | 2g | 18g |
Disclaimer: Nutrition information is estimated using standard online calculation tools and may vary based on ingredients and preparation methods. For accurate dietary advice, consult a qualified nutrition professional.