There is something inherently magical about the combination of cool peppermint and deep, velvety dark chocolate. It’s a flavor profile that transports me straight back to holiday gatherings and cozy evenings by the fire. But let’s be honest: finding a mousse that is light enough to be refreshing yet rich enough to satisfy a serious chocolate craving is no easy feat.
I’ve personally tested this recipe over 9 times in my own kitchen at Sweet Craft Recipes, tweaking the ratios of cream to chocolate until the texture was exactly like a silk cloud. My kids call these “Minty Clouds,” and they’ve become the most requested dessert for our Sunday family dinners. If you are looking for a show-stopping, no-bake dessert that looks like it came from a high-end bistro but is deceptively simple to pull off, you’ve found it. Let’s dive into these Peppermint Chocolate Mousse Pots.
Why You’ll Love This Recipe
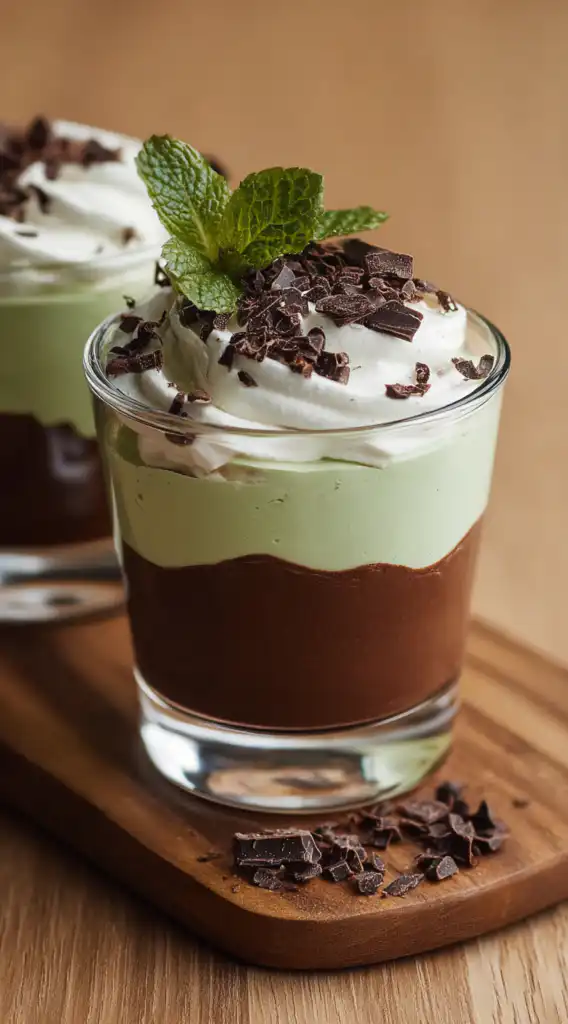
You are going to fall in love with these mousse pots for so many reasons. First, they are entirely no-bake, making them the perfect solution for when your oven is occupied by a roast or a batch of cookies. Second, the visual appeal is off the charts. The vibrant green mint layer contrasted against the dark, moody chocolate layer is an instant conversation starter.
Third, the flavor balance is sophisticated. By using 72% extra dark chocolate, we avoid that cloying sweetness often found in store-bought puddings. It is an elevated comfort food classic that feels modern and fresh. Plus, it’s incredibly versatile—you can serve these in tiny espresso cups for a large party or in elegant wine glasses for a romantic dinner.
What Is a Layered Peppermint Mousse?
At its core, this recipe is a dual-layered aerated dessert. The bottom layer is a decadent dark chocolate ganache-style mousse, infused with high-quality vanilla bean. The top layer is a whimsical white chocolate and peppermint mousse, naturally stabilized by the cocoa butter in the white chocolate.
Unlike traditional French mousses that rely on raw egg whites, this version uses a stabilized whipped cream technique. This makes it much safer for sharing at family gatherings where children or the elderly might be present. It’s a sturdy, reliable mousse that holds its shape for hours, yet melts the moment it hits your tongue. It’s the kind of “wow” dessert that makes people think you spent all day in the kitchen, when really, it’s all about the temperature and the fold.
Ingredients Overview: Choosing Quality
To get that “Sophie-approved” finish, the quality of your ingredients is paramount. We aren’t using just any chocolate here; we are using Dr. Oetker 72% Extra Dark Chocolate. This high cocoa content provides the necessary structural integrity for the bottom layer. For the mint layer, the 26% White Chocolate offers a creamy sweetness that acts as the perfect canvas for the American Peppermint Extract.
You’ll also need Double Cream (or heavy whipping cream). The high fat content (around 36-40%) is what allows the mousse to whip into those gorgeous soft peaks. Don’t forget the Taylor & Colledge Vanilla Bean Extract—the little black flecks add a touch of gourmet flair that bottled essence just can’t match. For the color, I always reach for Extra Strong Food Colour Gel. It gives that iconic minty hue without thinning out the cream.
Ingredient Substitutions & Tips
If you can’t find extra dark chocolate, you can swap it for a high-quality milk chocolate, though I recommend reducing the icing sugar if you do. For those who love a bit of a surprise texture, you could even fold in some crushed peppermint bark.
If you’re looking for something with a bit more “bite” to serve alongside these pots, I often find that my guests love having a variety of treats. For instance, these stuffed red velvet cookies offer a similar decadent vibe but with a chewy, baked texture that complements the creamy mousse beautifully. If you prefer to keep the mint theme subtle, you can omit the green gel for a pure white “snow” look, which is equally elegant.
Step-by-Step Instructions: The Secret to Perfect Layers
1. The Mint Mousse Foundation
Start by melting your white chocolate with 65ml of the cream. Use a bain-marie (a bowl over simmering water) to ensure the chocolate doesn’t seize. Once smooth, set it aside to cool. This is the step most people rush—do not fold warm chocolate into cold cream! It will deflate the air you’ve worked so hard to incorporate. While that cools, whip your remaining mint-layer cream with the peppermint extract and green gel. Carefully fold the whipped cream into the cooled white chocolate in three stages.
2. The Dark Chocolate Depth
Repeat the process with the 72% dark chocolate and 80ml of cream. This layer will be thicker and richer. Add the vanilla bean extract and a tiny pinch of icing sugar to the remaining cream before whipping. Folding this dark mixture requires a gentle hand. Think of it as “massaging” the air into the chocolate rather than stirring it. If you’re a fan of rich fillings, you might find the technique similar to how I handle the centers of my peanut butter nutella cookies.
3. Precision Layering
Spoon the dark mousse into the bottom of your glasses. To get those perfectly level lines, give the glass a gentle tap on the counter. Pop them in the freezer for 5-10 minutes. This “flash chill” creates a firm surface so the mint layer doesn’t bleed into the dark layer. Top with the peppermint mousse and level it off.
Expert Baking Tips for Success
- Temperature Control: I can’t stress this enough—your melted chocolate must be at room temperature. If it’s too hot, it melts the cream. If it’s too cold, it will create “chips” of chocolate in the mousse instead of a smooth blend.
- The Bowl Matters: Use a metal or glass bowl for whipping your cream. Plastic bowls can retain oily residues that prevent the cream from reaching maximum volume.
- Don’t Over-Whip: You want soft peaks, not stiff ones. If the cream looks grainy, you’ve gone too far. If this happens, stir in a tablespoon of un-whipped cream to smooth it back out.
- Setting Time: While an hour is the minimum, these truly reach their peak flavor after 4 hours in the fridge.
The Science of a Healthier Twist: Dark Chocolate Power
I love this recipe because it uses a high percentage of dark chocolate. The 72% cocoa isn’t just for flavor; it’s packed with antioxidants and has less sugar than standard baking chocolate. It provides a “satiety factor” that means you feel satisfied after a smaller portion.
If you want to make this even lighter, you can serve these in smaller 2-ounce ramekins. It’s a great way to enjoy a “comfort food favorite” without feeling weighed down. Interestingly, the air bubbles we fold into the mousse increase the volume without adding calories, giving you a larger-looking dessert that is actually quite light. This same principle of “perceived indulgence” is something I explore with my white chocolate stuffed cookies, where a little bit of high-quality filling goes a long way!
Serving Suggestions
Presentation is everything with a dessert this beautiful. I like to top mine with a generous dollop of freshly whipped cream just before serving. Use a microplane to grate some extra dark chocolate over the top—the fine “snow” of chocolate looks incredibly professional. A sprig of fresh mint and a few Dr. Oetker Glamour & Sparkle Sprinkles add that final touch of magic. Serve these with a small silver spoon for an ultra-luxe experience.
Storage & Make-Ahead Tips
These mousse pots are a host’s best friend because they must be made ahead of time. They will stay perfectly fresh in the refrigerator for up to 3 days. Just make sure to cover them with plastic wrap so they don’t pick up any “fridge smells.” I don’t recommend freezing the finished mousse for long-term storage, as the texture can become slightly grainy once thawed, but they are perfect for making the night before a party!
FAQs
1. Can I use peppermint oil instead of extract?
Peppermint oil is much stronger than extract. If you use oil, start with just 1-2 drops and taste as you go. The extract used in this recipe is more forgiving for home bakers.
2. Why is my mousse runny?
This usually happens if the cream wasn’t whipped enough or if the chocolate was too warm when added. Make sure you hit those “soft peaks” before folding.
3. Can I make this dairy-free?
You can substitute the double cream with a high-fat coconut cream (the solid part from the top of the can) and use dairy-free chocolate alternatives. The setting time may take longer.
4. How do I get clean layers without a mess?
Use a piping bag! Piping the mousse into the bottom of the glass prevents the sides from getting smeared, giving you those crisp, professional lines.
5. Is the food coloring necessary?
Not at all! The green gel is purely for that classic “mint” aesthetic. Without it, you’ll have a beautiful white-on-brown layered dessert that tastes exactly the same.
Final Thoughts
Making these Peppermint Chocolate Mousse Pots is as much about the process as it is about the result. There is something so therapeutic about folding cream into chocolate and watching those silky swirls take shape. Whether you’re celebrating a holiday or just want to treat your family to something special, this recipe is a guaranteed winner. I hope you enjoy making (and eating!) these as much as I do. Happy whisking!
PrintPeppermint Chocolate Mousse Pots
Peppermint chocolate mousse pots are a no-bake, layered dessert made with rich dark chocolate mousse and a light peppermint white chocolate mousse. Tested over nine times, this recipe delivers silky texture, clean layers, and a refreshing balance of cool mint and deep chocolate flavor.
- Prep Time: 25 minutes
- Cook Time: 0 minutes
- Total Time: 4 hours 25 minutes
- Yield: 6 mousse pots
- Category: Desserts
- Cuisine: American
Ingredients
**Dark Chocolate Mousse**
72% extra dark chocolate – 150 g
Double cream (heavy whipping cream) – 200 ml
Vanilla bean extract – 1 teaspoon
Icing sugar – 1 tablespoon
**Peppermint Mousse**
White chocolate – 120 g
Double cream (heavy whipping cream) – 200 ml
Peppermint extract – ½ teaspoon
Green food color gel – optional, 1–2 drops
**Optional Garnish**
Whipped cream
Grated dark chocolate
Fresh mint leaves
Instructions
**Prepare Peppermint Mousse**
Melt white chocolate with 65 ml of the cream using a bain-marie until smooth. Set aside to cool to room temperature. Whip remaining cream with peppermint extract and food coloring to soft peaks. Gently fold whipped cream into cooled white chocolate in three additions. Set aside.
**Prepare Dark Chocolate Mousse**
Melt dark chocolate with 80 ml of the cream until smooth. Cool to room temperature. Whip remaining cream with vanilla and icing sugar to soft peaks, then gently fold into cooled chocolate until silky.
**Layer the Mousse**
Spoon dark chocolate mousse into serving glasses and tap gently to level. Chill in freezer for 5–10 minutes to firm slightly.
**Add Peppermint Layer**
Carefully spoon peppermint mousse over the dark layer and smooth the top.
**Chill**
Refrigerate mousse pots for at least 1 hour, preferably 4 hours, to fully set.
**Serve**
Top with whipped cream, grated dark chocolate, and fresh mint just before serving.
Notes
• Chocolate must cool to room temperature before folding into cream to prevent deflation.
• Whip cream only to soft peaks for the lightest texture.
• Use gel food coloring to avoid thinning the mousse.
• Flash chilling the first layer ensures clean, defined layers.
• Best flavor and texture develop after several hours of chilling.