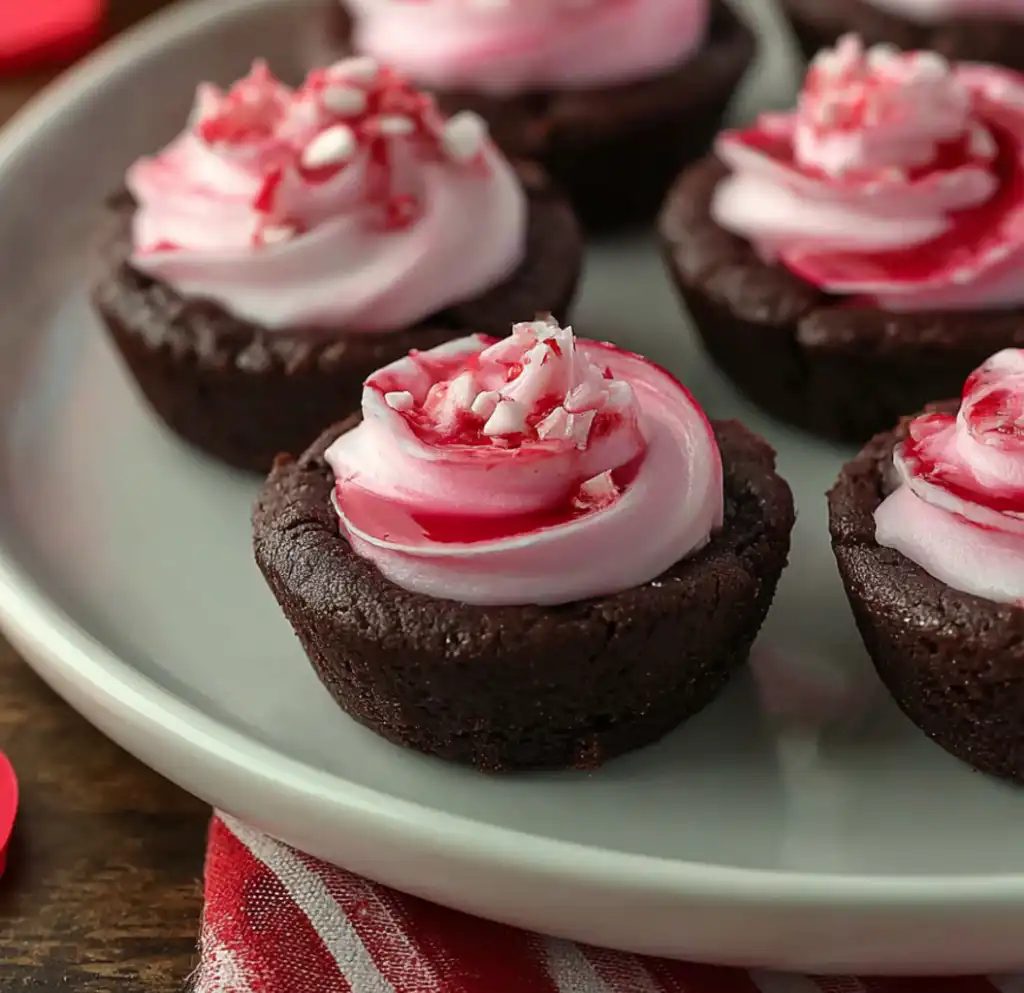
There is something truly magical about the combination of deep, rich chocolate and the bright, tart zing of fresh raspberries. These Raspberry Mousse Brownie Cups are the epitome of elegance and indulgence, packaged in a perfectly portioned, bite-sized format. Whether you are hosting a sophisticated bridal shower, looking for the perfect Valentine’s Day dessert, or simply want to impress your family on a Sunday afternoon, these mini delights are a guaranteed showstopper. The fudgy, chewy brownie base provides a sturdy “cup” that holds a cloud-like, airy raspberry mousse. It is a texture play that dances on the tongue—starting with the density of the brownie and finishing with the light-as-air sweetness of the fruit. Best of all, they look like they came from a high-end patisserie, yet they are surprisingly simple to master in your own kitchen.
Why You’ll Love This Recipe
You will fall in love with these brownie cups because they offer the perfect balance of flavors and textures in every single bite. Unlike a heavy slice of cake, these mini treats provide just enough sweetness to satisfy a craving without feeling overwhelming. The recipe is incredibly versatile; you can make the brownie bases ahead of time, making them a stress-free option for entertaining. Furthermore, the visual appeal is undeniable. The contrast between the dark chocolate cup and the vibrant pink mousse, topped with a delicate drizzle of chocolate or syrup, creates a professional aesthetic. It’s a sophisticated dessert that uses pantry staples, proving that you don’t need exotic ingredients to create something extraordinary.
What Is a Raspberry Mousse Brownie Cup?
A Raspberry Mousse Brownie Cup is a hybrid dessert consisting of two distinct components. The first is a “mini brownie cup,” which is essentially a fudgy brownie baked in a mini muffin tin. While the brownie is still warm, a “well” is pressed into the center, creating a small edible vessel. The second component is a light raspberry mousse, typically made from a mixture of raspberry puree, gelatin (or a stabilizer), and whipped cream. When combined, the brownie acts as a rich, chocolatey foundation for the fluffy, fruit-infused mousse. This dessert is designed to be eaten in one or two bites, making it a favorite for dessert tables and parties.
Ingredients Overview
To achieve the best results, selecting quality ingredients is paramount. For the brownie cups, you will need unsalted butter, which provides a rich, creamy base. Using unsweetened cocoa powder is essential; I recommend a high-quality Dutch-processed cocoa for a deeper color and smoother chocolate flavor. The granulated sugar provides sweetness and helps create that classic crackly brownie top.
You’ll also need three large eggs, which act as the binding agent and provide structure to the cup so it doesn’t crumble when filled. All-purpose flour gives the brownies their body, while a touch of baking powder ensures they rise just enough to be soft but remain fudgy. For the mousse, the star of the show is the raspberry flavor. Using a half-batch of stabilized raspberry mousse ensures the filling holds its shape even at room temperature. Finally, the vanilla extract and salt are the unsung heroes that enhance the chocolate and fruit flavors, making them pop.
Ingredient Substitutions & Tips
If you need to adapt this recipe for dietary needs, there are several successful substitutions. For a gluten-free version, a high-quality 1:1 gluten-free baking flour blend works remarkably well because the brownies rely more on fat and sugar for texture than gluten structure. If you don’t have raspberries, you can easily substitute with a strawberry mousse or even a blackberry reduction. For a richer flavor, swap the raspberry syrup garnish for a dark chocolate ganache. If you find yourself out of cocoa powder, you can use melted bittersweet chocolate, though you will need to adjust the butter and sugar ratios accordingly to maintain the proper consistency for the “cups.”
Step-by-Step Instructions
- Prep the Pan: Start by preheating your oven to 350°F (175°C). Use a pastry brush or baking spray to thoroughly grease a mini muffin tin. Lightly dust with flour or cocoa powder to ensure the brownies pop out easily.
- Mix the Base: In a large mixing bowl, combine your melted butter, sugar, and cocoa powder. Whisk vigorously until the mixture looks shiny and cohesive.
- Incorporate Wet Ingredients: Add the eggs one at a time, followed by the vanilla extract. Mixing well after each egg helps develop the structure of the brownie.
- Dry Ingredients: Gently fold in the flour, salt, and baking powder. Stop as soon as the last streak of flour disappears. Overmixing will lead to a cakey brownie rather than a fudgy one.
- Bake: Scoop about one tablespoon of batter into each cup. Bake for 14-16 minutes. You want the edges set but the center still slightly soft.
- Create the Wells: This is the most critical step. Let the brownies cool for only 5 minutes. While still warm, take the end of a small rolling pin or a measuring spoon and press firmly into the center of each brownie to create a cup shape.
- Cool and Remove: Once completely cool to the touch, gently twist each brownie cup to release it from the tin.
- Fill and Garnish: Use a piping bag to fill each well with your raspberry mousse. For a professional look, use a star tip. Drizzle with melted chocolate or raspberry jam.
- Set: Place the finished cups in the refrigerator for at least 4 hours. This allows the mousse to set firmly and the flavors to meld.
Expert Baking Tips
To ensure your brownie cups are perfect every time, pay attention to the temperature. Using melted butter that has cooled slightly ensures you don’t scramble the eggs upon contact. When making the “well” in the brownies, do not wait too long; if the brownies cool completely, they will crack instead of molding. If you have trouble removing the cups from the pan, place the bottom of the tin in an inch of hot water for 30 seconds to loosen the butter. Lastly, always pipe the mousse just before the setting period to ensure it fills every nook and cranny of the chocolate base.
The Secret to Perfect Raspberry Mousse
The key to a successful mousse filling is stability. Since these brownies are often served at room temperature during parties, your mousse needs to be more than just whipped cream and jam. Using a stabilized whipped cream method—either with a bit of gelatin or mascarpone cheese—prevents the mousse from weeping or deflating. When folding your raspberry puree into the cream, use a light hand. You want to maintain the air bubbles you worked so hard to create. If the mousse feels too soft after mixing, give it 30 minutes in the fridge before piping it into the brownie cups.
Serving Suggestions
Serve these Raspberry Mousse Brownie Cups on a white marble slab or a tiered cupcake stand to highlight their vibrant colors. They look stunning when garnished with a single fresh raspberry on top or a tiny sprig of fresh mint for a pop of green. For an extra touch of luxury, a light dusting of powdered sugar just before serving adds a beautiful “snowy” effect that contrasts perfectly with the dark chocolate and pink mousse.
Storage & Make-Ahead Tips
These treats are excellent for making ahead. You can bake the brownie cups up to two days in advance and store them in an airtight container at room temperature. However, once filled with mousse, they must be refrigerated. They will stay fresh and delicious for up to 5 days in the fridge. If you need to store them longer, the unfilled brownie cups freeze beautifully for up to three months; just thaw and fill when ready!
FAQs
Q: Can I use a boxed brownie mix for this recipe?
A: Yes! You can use a store-bought mix. Just follow the “fudgy” instructions on the box and reduce the baking time to about 12-15 minutes for the mini muffin tin.
Q: How do I prevent the brownies from sticking to the pan?
A: Grease the pan heavily with butter and a dusting of cocoa powder. Also, ensure you wait the full 5 minutes before making the well, but don’t let them cool completely in the pan.
Q: Can I use frozen raspberries for the mousse?
A: Absolutely. Thaw them completely and strain out the excess liquid and seeds to create a smooth puree before adding it to your mousse base.
Q: Why did my brownie cups crack when I pressed the well?
A: This usually happens if the brownies are overbaked or if they cooled down too much before you pressed the well. Try pressing them while they are still quite warm.
Raspberry Mousse Brownie Cups are more than just a dessert; they are a decadent experience in a tiny package. By combining a rich, fudgy base with a light, fruity topping, you create a dessert that appeals to everyone. They are easy enough for a beginner baker but look sophisticated enough for the most formal event. Give this recipe a try for your next gathering, and watch them disappear in minutes! Enjoy the process of creating these beautiful, delicious gems.
PrintRaspberry Mousse Brownie Cup
Decadent mini brownie cups with a fudgy center and a light-as-air raspberry mousse filling. These bite-sized treats are the ultimate crowd-pleaser for parties, holidays, or Valentine’s Day.
- Prep Time: 25 minutes
- Cook Time: 15 minutes
- Total Time: 4 hours 40 minutes
- Yield: 30 mini cups
- Cuisine: American
Ingredients
Butter (melted) – 3/4 cup
Unsweetened Cocoa Powder – 1/2 cup
Granulated Sugar – 1 1/2 cups
Vanilla Extract – 2 tsp
Large Eggs – 3
Salt – 1/2 tsp
Baking Powder – 1/2 tsp
All-purpose Flour – 1 1/4 cups
Easy Raspberry Mousse – 1/2 batch
Raspberry topping or melted chocolate – 1/4 cup
Instructions
Preheat your oven to 350°F (175°C). Lightly grease and flour a mini muffin tin.
In a large bowl, whisk together the melted butter, cocoa powder, and sugar until smooth.
Add the vanilla extract and eggs, mixing until well combined.
Gently fold in the flour, salt, and baking powder. Mix only until no white streaks remain—do not overmix.
Scoop approximately 1 tablespoon of batter into each mini muffin cup.
Bake for 14-16 minutes or until a toothpick inserted into the edge comes out clean.
Let the brownies cool for exactly 5 minutes. Use a small rolling pin or a rounded tablespoon to press a “well” into the center of each brownie.
Carefully remove the brownie cups from the pan and let them cool completely on a wire rack.
Fit a ziplock bag or piping bag with a 1/4 inch hole and fill with the prepared raspberry mousse.
Pipe the mousse into the cooled brownie cups and drizzle with raspberry syrup or melted chocolate.
Chill for 4-6 hours to allow the mousse to set before serving.
Notes
• Use a room-temperature egg to ensure a smooth batter.
• For the “well,” ensure you press down while the brownies are still warm and soft.
• These are best enjoyed within 48 hours of assembly.
• You can make the brownie cups 2 days in advance and store in an airtight container.