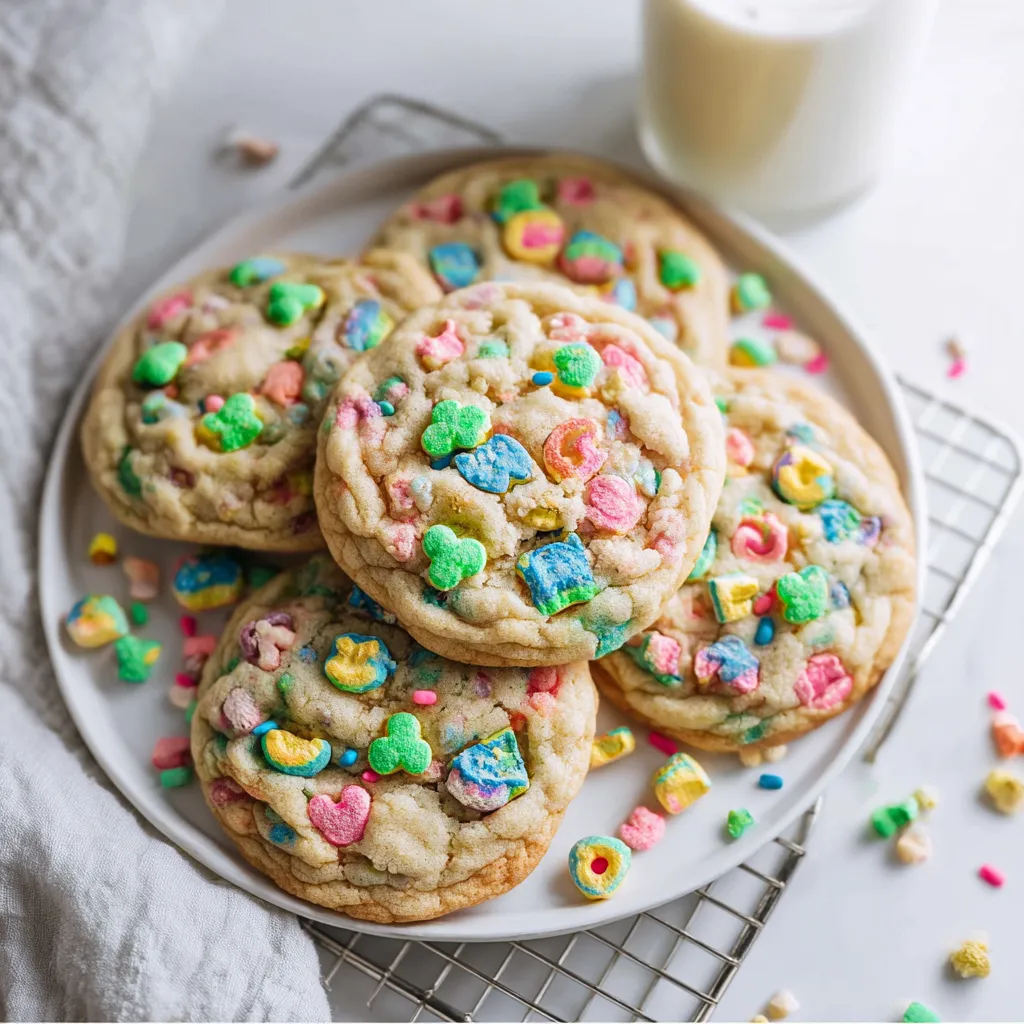
If you are looking for a dessert that captures the whimsical joy of childhood while delivering a professional, bakery-style texture, look no further than these Lucky Charms Cookies. There is something undeniably nostalgic about those colorful “marbits”—the dehydrated marshmallows found in our favorite cereal—that makes any treat feel like a celebration. Whether you are prepping for a St. Patrick’s Day party, a school bake sale, or simply a fun weekend activity with the kids, these cookies are a guaranteed hit. They feature a soft, buttery sugar cookie base that serves as the perfect canvas for the vibrant pink hearts, yellow stars, and green clovers we all know and love. In this guide, I will show you exactly how to achieve that perfect chewy center with a slight crunch on the edges, ensuring your cookies look just as “magically delicious” as they taste.
Why You’ll Love This Recipe
You will fall in love with this recipe because it balances ease and impressive results perfectly. First, the texture is phenomenal; by using a high butter-to-flour ratio and just the right amount of leavening, these cookies stay soft for days. Second, it is a versatile “base” recipe that can be adapted for any holiday just by swapping the marshmallow type. Third, the method of adding marshmallows after baking ensures they don’t melt into sugary puddles, maintaining their iconic shapes and bright colors. It is a visually stunning dessert that requires no fancy decorating skills—just a scoop, a sheet, and a box of cereal. Plus, the smell of toasted vanilla and butter wafting through your kitchen is simply irresistible.
What Is a Lucky Charms Cookie?
A Lucky Charms cookie is an elevated twist on a classic American sugar cookie, specifically designed to incorporate cereal marshmallows (known technically as marbits). Unlike a standard cookie that might use chocolate chips, this version utilizes the unique crunch and concentrated sweetness of dehydrated marshmallows. The dough itself is a “no-chill” variety, meaning you can go from craving to eating in less than 20 minutes. Historically, cereal-infused desserts gained popularity through “milk and cereal” trends in boutique bakeries, but this specific cookie focuses on the marshmallow component to provide a pop of color and a unique texture that bridges the gap between a chewy cookie and a crunchy snack.
Ingredients Overview
To create the perfect batch, you will need a few pantry staples and, of course, the star of the show.
- Unsalted Butter: Ensure your butter is softened to room temperature. This is crucial for the “creaming” process, where air is incorporated into the fat and sugar to create a light, tender crumb.
- Granulated Sugar: We use 1 1/4 cups to provide sweetness and help the edges crisp up slightly.
- Large Egg: Use a room-temperature egg so it emulsifies properly with the creamed butter.
- Vanilla Extract: High-quality pure vanilla extract is recommended to enhance the nostalgic “marshmallow” flavor profile.
- All-Purpose Flour: This provides the structure. Make sure to spoon and level your flour rather than scooping directly with the measuring cup to avoid dry, crumbly cookies.
- Baking Soda & Baking Powder: This dual-leavening approach ensures a soft rise and a beautiful golden-brown finish.
- Salt: Never skip the salt! It balances the sweetness of the marshmallows and sugar.
- Lucky Charms Marshmallows: You will need 2 cups total. You can buy bags of “cereal marshmallows” online or spend a few minutes picking them out of your cereal box—it’s a great task for little helpers!
Ingredient Substitutions & Tips
If you find yourself missing an ingredient, don’t worry. You can substitute the granulated sugar with a mix of half brown sugar if you prefer a deeper, more molasses-forward flavor, though this will change the color of the cookie. For a gluten-free version, a high-quality 1:1 gluten-free baking flour works remarkably well here because the marshmallows provide so much of the textural interest. If you want even more cereal flavor, you can crush up some of the oat cereal pieces from the box and replace 1/4 cup of the flour with cereal “dust.” This adds a subtle toasted oat flavor that mimics the experience of eating a bowl of milk and cereal.
Step-by-Step Instructions
- Preparation and Oven Setup: Begin by preheating your oven to 350°F (175°C). Proper preheating is essential for the cookies to spread correctly. Line two large baking sheets with parchment paper. This prevents sticking and makes cleanup a breeze.
- Creaming the Base: In your stand mixer fitted with the paddle attachment (or using a hand mixer), combine the softened butter and granulated sugar. Beat them on medium-high speed for at least 2-3 minutes. You are looking for the mixture to turn a pale ivory color and look noticeably fluffy.
- Incorporating Wet Ingredients: Lower the speed and add the room-temperature egg and vanilla extract. Beat until the egg is fully incorporated and the batter looks smooth.
- Mixing Dry Ingredients: In a separate bowl, whisk together the flour, baking soda, baking powder, and salt. Gradually add this dry mixture to the wet ingredients. Mix on the lowest setting just until no streaks of white flour remain.
- The First Marshmallow Fold: Gently fold in exactly 1 cup of the Lucky Charms marshmallows. Doing this by hand with a spatula prevents the delicate marshmallows from breaking or crushing.
- Portioning the Dough: Use a 2-tablespoon cookie scoop (Size 40) to create uniform balls of dough. This ensures they all bake at the same rate. Space them at least 2 inches apart on your prepared sheets.
- The Bake: Slide the trays into the center of the oven and bake for 9 to 11 minutes. You want the edges to be just barely set and the tops to look slightly underbaked.
- The Finishing Touch: This is the pro-tip! As soon as you pull the cookies out of the oven, take the remaining 1 cup of marshmallows and gently press 3-5 of them into the top of each warm cookie. This makes them look professional and keeps the top marshmallows crunchy.
- Cooling: Let the cookies rest on the hot pan for 5 minutes. This allows the centers to finish setting. Transfer them to a wire rack to cool completely.
Expert Baking Tips
To take these cookies from “good” to “bakery-quality,” follow these two trade secrets. First, use the “Scoot Technique.” If your cookies come out of the oven in slightly irregular shapes, place a large circular glass or cookie cutter over the hot cookie and gently “scoot” it in a circular motion. This rounds out the edges for a perfect circle. Second, temperature matters. If your kitchen is very warm and the dough feels oily, pop the portioned dough balls into the fridge for 10 minutes before baking. This prevents excessive spreading and ensures a thick, chewy bite every time.
The Secret to Perfectly Visible Marshmallows
Many bakers struggle with cereal marshmallows melting into “sugar holes” during the baking process. Because these marshmallows are essentially pure sugar and air, the high heat of the oven can cause them to dissolve. The secret to the vibrant, iconic look of these cookies is the divided marshmallow method. By folding some into the dough, you get pockets of sweetness throughout the cookie. However, by reserving half to press into the tops immediately after the cookies leave the oven, the residual heat “glues” the marshmallows to the surface without melting them. This preserves their bright colors and ensures that classic “crunch” that contrasts so well with the soft cookie.
Serving Suggestions
These cookies are best served with a cold glass of milk, naturally! They are a fantastic addition to a St. Patrick’s Day dessert board alongside green-tinted treats. For an extra indulgent experience, you can use two cookies to make an ice cream sandwich with vanilla or cereal-milk flavored ice cream. They also look beautiful packaged in clear cellophane bags with a green ribbon for gifting to teachers, friends, or neighbors during the spring season.
Storage & Make-Ahead Tips
Store your baked cookies in an airtight container at room temperature for up to 5 days. To keep them extra soft, place a small piece of white bread in the container; the cookies will absorb the moisture from the bread. If you want to make them ahead of time, you can freeze the unbaked dough balls for up to 3 months. Simply bake them directly from the freezer, adding one extra minute to the total bake time.
FAQs
Can I use the oat cereal pieces in the dough too?
While you can, the oat pieces tend to get quite hard or sometimes stale-feeling when baked inside a moist dough. For the best texture, we recommend using only the marshmallows. If you want oat flavor, try crushing the cereal into a fine flour and replacing a small portion of the all-purpose flour.
Where can I buy just the Lucky Charms marshmallows?
Many grocery stores now sell “Marshmallow Only” pouches in the baking aisle. Alternatively, large bags are available through online retailers like Amazon. Of course, the classic way is to sift through a box of cereal!
Why did my marshmallows melt inside the cookie?
Marshmallows are sugar-based, so they will naturally soften and “melt” slightly into the dough as it bakes, creating gooey pockets. This is normal! To ensure you still see the shapes, always follow the tip of pressing fresh marshmallows onto the tops after baking.
Do I need to chill this dough?
No, this recipe is designed to be a “no-chill” dough. However, if you prefer a thicker, taller cookie, chilling the dough for 30 minutes will reduce the spread in the oven.
Can I make these cookies vegan?
Yes! Use a vegan butter stick (like Miyoko’s) and a flax egg. Be sure to check that your cereal marshmallows are gelatin-free, as standard Lucky Charms marshmallows contain pork gelatin.
Final Thoughts
These Lucky Charms Cookies are more than just a sweet treat; they are a conversation starter and a dose of pure joy. With their soft centers, crispy edges, and iconic marshmallow crunch, they satisfy every dessert craving. Don’t wait for a holiday to whip up a batch—bring a little magic to your kitchen today! If you enjoyed this recipe, be sure to share it with a friend who loves all things cereal. Happy baking!
PrintLucky Charms Cookies

These Lucky Charms Cookies are soft, buttery, and exploding with nostalgia. By using a classic sugar cookie base and folding in those iconic dehydrated marshmallows, you get a treat that is both visually stunning and incredibly delicious. Perfect for St. Patrick’s Day or a whimsical weekend baking project!
- Prep Time: 10 minutes
- Cook Time: 10 minutes
- Total Time: 20 minutes
- Yield: 24 cookies
- Cuisine: American
Ingredients
Unsalted butter, softened – 1 cup
Granulated sugar – 1 1/4 cups
Large egg, room temperature – 1
Vanilla extract – 2 teaspoons
All-purpose flour – 2 1/2 cups
Baking soda – 1/2 teaspoon
Baking powder – 1/2 teaspoon
Salt – 1/4 teaspoon
Lucky Charms marshmallows, divided – 2 cups
Instructions
Preheat your oven to 350°F (175°C) and line a large baking sheet with parchment paper or a silicone baking mat.
In a stand mixer with the paddle attachment, cream the softened butter and granulated sugar on medium-high speed for 2-3 minutes until the mixture is pale and fluffy.
Add the egg and vanilla extract, beating until fully incorporated. Scrape down the sides of the bowl to ensure even mixing.
In a separate bowl, whisk together the flour, baking soda, baking powder, and salt.
Slowly add the dry ingredients to the wet ingredients, mixing on low speed until just combined. Do not overmix.
Gently fold in 1 cup of the Lucky Charms marshmallows by hand.
Use a size 40 cookie scoop to form 2-tablespoon sized balls. Place them 2 inches apart on the baking sheet.
Bake for 9-11 minutes, or until the edges are barely golden and the tops look set.
Remove from the oven and immediately press the remaining 1 cup of marshmallows into the tops of the warm cookies.
Cool on the pan for 5 minutes before transferring to a wire rack to cool completely.
Notes
• Store the Lucky Charms cookies in an airtight container for 4-5 days at room temperature.
• To freeze dough: Roll into balls, flash freeze on a tray, then transfer to a bag for up to 3 months. Bake from frozen for an extra 60 seconds.
• Note: Marshmallows on top stay crunchy, while those inside become soft and gooey.
• Use only the cereal marshmallows (marbits) for the best texture and appearance.