Spring has officially sprung, and there is no better way to celebrate the season of renewal than with a kitchen full of flour, sugar, and whimsical decorations. If you are looking for the ultimate centerpiece for your holiday brunch or a fun weekend activity to share with the kids, these Easter Bunny Cupcakes are the answer. Combining the deep, cocoa-rich flavor of chocolate cake with a cloud-like vanilla buttercream, these treats are as delicious as they are photogenic. By using a clever box-mix shortcut, we save time on the base so we can focus all our creative energy on those iconic bunny features. Whether you are a seasoned baker or a novice looking for a fail-proof “wow” factor, this recipe delivers maximum cuteness with minimal stress. Let’s hop right into the details of making these festive delights!
Why You’ll Love This Recipe
You are going to fall in love with these Easter Bunny Cupcakes because they strike the perfect balance between convenience and “wow” factor. First, the use of a high-quality box mix ensures a moist, consistent crumb every single time, removing the guesswork from baking. Second, the homemade buttercream frosting elevates the flavor profile, giving it that high-end bakery taste that store-bought frostings simply can’t match. They are also incredibly customizable; you can swap the chocolate cake for vanilla or lemon depending on your preference. Most importantly, the decorating process is a joy. It’s an engaging, tactile experience that encourages kids to get involved, making it more than just a recipe—it’s a cherished holiday memory in the making.
What Is an Easter Bunny Cupcake?
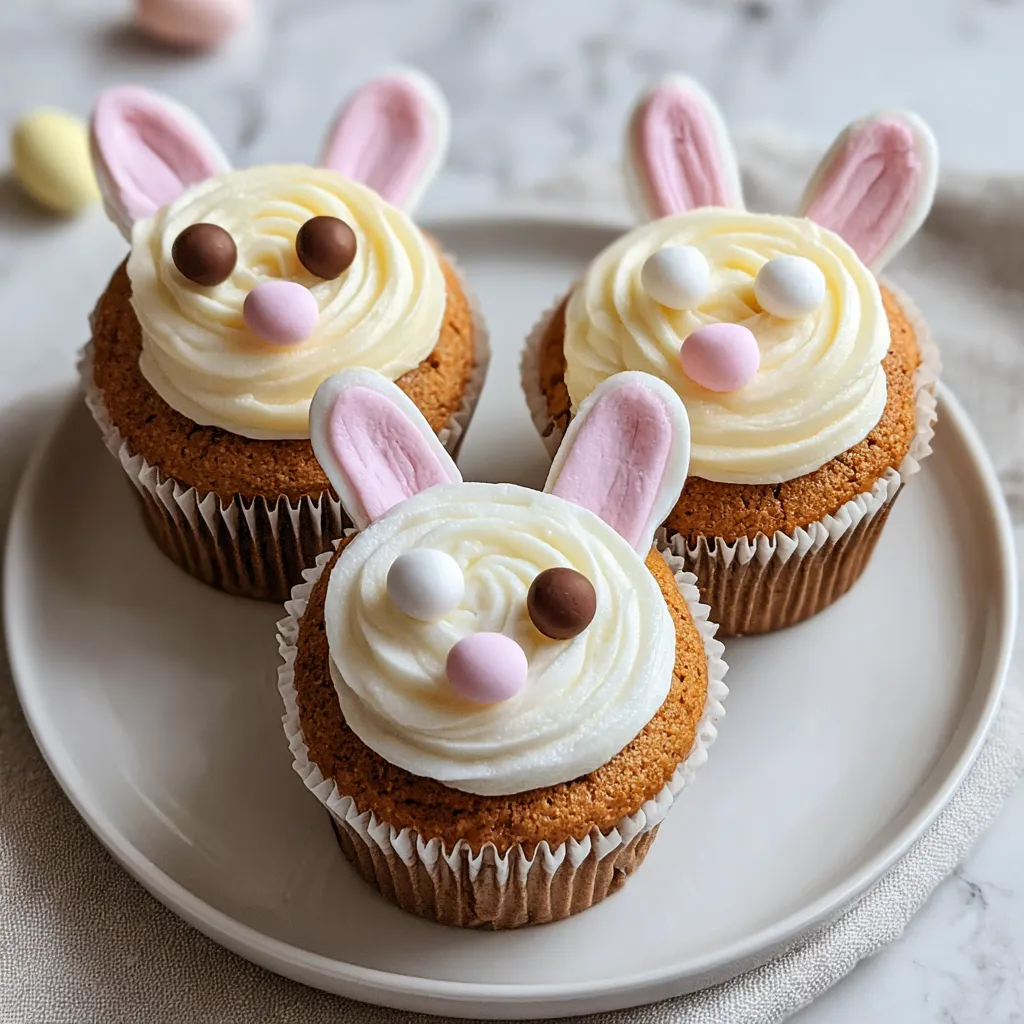
An Easter Bunny Cupcake is a themed dessert designed to mimic the appearance of a rabbit, the classic symbol of the Easter holiday. Unlike a standard cupcake, these are characterized by their “ears,” which are usually fashioned from candy melts, marshmallows, or fondant. The frosting is often applied in a thick, textured mound to simulate fluffy fur, and the addition of a mini marshmallow “tail” on the back completes the 360-degree look. While many versions exist, our version focuses on a “peeking bunny” or “bunny face” aesthetic, using pink and white candy melts for a sturdy, edible ear that stands tall without wilting, even in warmer spring weather. It’s a playful, modern take on traditional holiday confectionery.
Ingredients Overview
To create these festive masterpieces, you will need a combination of pantry staples and specialty decorating items. The base begins with one box of your favorite chocolate cake mix. To ensure it tastes “from scratch,” check the box requirements—usually eggs, oil, and water.
For the frosting, we are making a classic American Buttercream. You’ll need one cup of unsalted butter, which must be properly softened to room temperature to avoid lumps. Four cups of powdered sugar provide the structure and sweetness, while a quarter cup of whole milk thins it to the perfect piping consistency. A teaspoon of pure vanilla extract adds that essential aromatic depth.
The character details are where the magic happens. Mini marshmallows serve as the perfect “cottontails.” For the ears, you will need pink and white candy melts; these are preferred over white chocolate because they set faster and offer more stability. Finally, edible eyes or small chocolate chips give our bunnies their charming expressions. Using high-quality ingredients, particularly for the butter and vanilla, will make a world of difference in the final taste of your cupcakes.
Ingredient Substitutions & Tips
If you find yourself missing an ingredient, don’t worry! You can easily substitute the chocolate cake mix for a gluten-free alternative or even a strawberry mix for a pink “springtime” look inside. If you don’t have candy melts for the ears, you can use large marshmallows cut diagonally and dipped in pink sanding sugar to create a similar effect. For a vegan-friendly version, swap the butter for a high-quality plant-based stick butter and use almond or oat milk in the frosting. A pro-tip for the buttercream: always sift your powdered sugar. It might seem like an extra step, but it is the secret to achieving that smooth, professional finish that makes the “fur” look perfectly fluffy.
Step-by-Step Instructions
- Bake the Base: Begin by preheating your oven according to the instructions on the cake mix box. Line a standard 12-cup muffin tin with paper liners. Prepare the batter, ensuring no large lumps remain, and fill each liner about 2/3 full. Bake until a toothpick inserted in the center comes out clean.
- Cool Completely: This is the most critical step. Transfer the cupcakes to a wire cooling rack. If they are even slightly warm, the buttercream will melt, and your bunny ears will slide right off.
- Whip the Frosting: While the cupcakes cool, beat the softened butter for 3–5 minutes until it is pale and airy. Gradually mix in the powdered sugar, milk, and vanilla. Once incorporated, whip on high speed for another 2 minutes.
- Craft the Ears: Melt your white candy melts in the microwave in 30-second bursts. Using a piping bag or a zip-top bag with the corner snipped, pipe 24 long “bunny ear” shapes onto a sheet of parchment paper. Melt the pink candy melts and pipe a smaller stripe down the center of each white ear. Let them harden in the refrigerator for 10 minutes.
- The Assembly: Use a piping bag or a spatula to apply a generous, rounded mound of frosting to each cupcake.
- Final Touches: Gently press two candy ears into the top of the frosting. Place the edible eyes toward the front and a mini marshmallow on the opposite side to serve as the tail. Your bunnies are now ready to hop onto the dessert table!
Expert Baking Tips
To achieve the “E-E-A-T” level of perfection, pay close attention to your butter temperature. It should be soft enough to leave a fingerprint when pressed but should not be greasy or melting. If your kitchen is warm, your frosting might become too soft to hold the heavy candy ears. If this happens, simply pop the frosting in the fridge for 10 minutes before piping. Another expert trick is to use a “grass tip” (Wilton #233) if you want the frosting to look like actual bunny fur. This adds a level of professional detail that will have your guests asking which bakery you visited. Finally, always tap your cupcake tin on the counter before baking to release any trapped air bubbles.
Decorating Mastery: The Perfect Bunny Ears
The ears are the focal point of this recipe, and getting them right is easier than it looks. The key is the “parchment template.” If you aren’t confident in free-handing the ear shapes, you can draw a template on a piece of paper, place the parchment on top, and simply trace the shapes with your melted candy. When piping the pink “inner ear,” wait about 60 seconds after piping the white base. This prevents the colors from bleeding too much while still allowing them to bond together. If an ear snaps, don’t panic! A little “glue” made of extra melted candy can fuse the pieces back together seamlessly.
Serving Suggestions
Present these Easter Bunny Cupcakes on a large platter lined with green shredded paper or edible “Easter grass” to mimic a meadow. They look spectacular as a centerpiece for a dessert table. For a “boozy brunch” version for adults, serve these alongside a chilled Moscato or a light strawberry mimosa. If you are serving them at a kids’ party, pair them with cold glasses of milk or a sparkling fruit punch. They are best served at room temperature to ensure the buttercream is soft and creamy.
Storage & Make-Ahead Tips
These cupcakes can be made in stages to save time. The cake bases can be baked up to two days in advance and stored in an airtight container at room temperature. The candy ears can also be made a week ahead and kept in a cool, dry place. Once fully assembled, the cupcakes are best enjoyed within 24 hours but will stay fresh in the refrigerator for up to 3 days. If refrigerating, let them sit at room temperature for 30 minutes before serving so the frosting softens.
FAQs
Can I use store-bought frosting?
Yes, but store-bought frosting is often softer than homemade buttercream. You may need to add a half-cup of powdered sugar to it to give it the structural integrity needed to hold the candy ears upright.
How do I prevent the candy ears from falling over?
Ensure you insert the ears at least half an inch into the frosting mound. If they still feel wobbly, you can chill the cupcakes for 15 minutes immediately after assembly to “set” the ears in place.
Can I make these gluten-free?
Absolutely. Simply use a gluten-free chocolate cake mix. Most other ingredients, like butter, sugar, and candy melts, are naturally gluten-free, but always check your labels to be safe.
What if I don’t have a piping bag?
A simple gallon-sized freezer bag works perfectly. Just snip off a small corner for the candy ears and a larger corner for the frosting mounds.
Final Thoughts
These Easter Bunny Cupcakes are a testament to the fact that you don’t need a culinary degree to create something truly magical. By combining smart shortcuts with thoughtful, homemade touches, you create a dessert that appeals to both the palate and the heart. This holiday season, let your creativity run wild and bring a little extra joy to your table with these hopping treats. Happy baking, and may your Easter be filled with sweetness and fun!
PrintEasy Easter Bunny Cupcakes
Celebrate spring with these whimsical Easter Bunny Cupcakes. A shortcut chocolate base meets a rich, homemade vanilla buttercream for a dessert that looks professional but is simple enough for the whole family to assemble.
- Prep Time: 20 minutes
- Cook Time: 20 minutes
- Total Time: 40 minutes
- Yield: 12 cupcakes
- Cuisine: American
Ingredients
1 box chocolate cake mix – 15.25 oz
1 cup unsalted butter – softened
4 cups powdered sugar – sifted
1/4 cup whole milk – room temperature
1 teaspoon vanilla extract – pure
12 mini marshmallows – for bunny tails
1/2 cup pink candy melts – for inner ears
1/2 cup white candy melts – for outer ears
24 edible eyes – or chocolate chips
Instructions
Preheat your oven to the temperature specified on the cake mix box. Line a 12-cup muffin tin with festive liners.
Prepare the chocolate cake mix according to the package instructions, adding water, oil, and eggs as required.
Fill the cupcake liners about two-thirds full and bake as directed. Transfer to a wire rack to cool completely.
In a large mixing bowl, beat the softened butter on medium-high speed until creamy and pale (about 3 minutes).
Gradually add powdered sugar one cup at a time, alternating with small splashes of milk and the vanilla extract.
Beat the frosting on high for another 2 minutes until it reaches a fluffy, pipeable consistency.
Melt the white candy melts in the microwave in 30-second intervals. Pipe tall ‘ear’ shapes onto parchment paper.
Melt the pink candy melts and pipe a smaller ‘inner ear’ shape inside the white ones. Let them set in the fridge for 10 minutes.
Pipe a tall mound of frosting onto each cooled cupcake.
Press two candy ears into the top, add edible eyes to the front, and place a mini marshmallow on the back for the tail.
Notes
• Ensure cupcakes are 100% cool before frosting or the ‘ears’ will slide off.
• Use a toothpick to swirl the pink and white candy melts for a marbled ear look.
• If the frosting is too soft, add 1/4 cup more powdered sugar until stiff peaks form.