There is something undeniably nostalgic about the combination of peanut butter and crispy cereal. It takes us back to childhood lunchboxes and after-school snacks, but this recipe for Peanut Butter Rice Krispie Cups elevates those classic flavors into something sophisticated enough for a dinner party yet simple enough for a Tuesday night. If you are looking for a dessert that requires zero oven time and only a handful of pantry staples, you have found it. These cups offer a satisfying “crunch” followed by a layer of smooth, decadent chocolate that snaps when you bite into it. Whether you are a seasoned baker or a kitchen novice, this recipe is virtually foolproof. In this guide, I will show you how to achieve the perfect ratio of salty to sweet while ensuring your cereal stays crispy and your chocolate stays glossy.
Why You’ll Love This Recipe
You are going to fall in love with these Peanut Butter Rice Krispie Cups for several reasons. First, they are incredibly convenient; with only five ingredients, you likely already have everything you need in your pantry. Second, the texture profile is elite. You get the airy crunch of the toasted rice cereal paired with the creamy, rich weight of the peanut butter and honey binder. Unlike traditional Rice Krispie treats that use marshmallows, these use honey and peanut butter, providing a deeper flavor and a slightly more “grown-up” sweetness. They are also naturally portable, making them the perfect addition to a picnic, a potluck, or a kid’s birthday party. Plus, they are easily customizable to fit various dietary needs.
What Is a Peanut Butter Rice Krispie Cup?
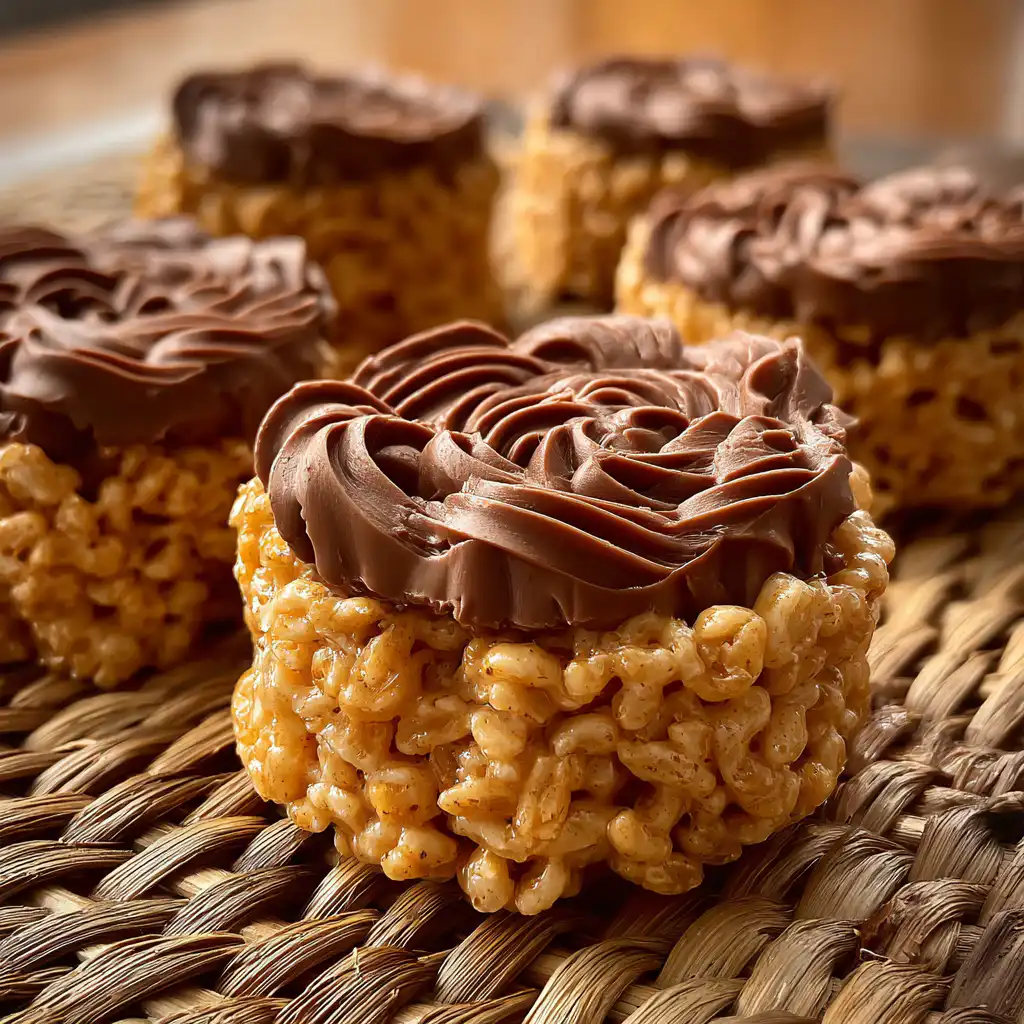
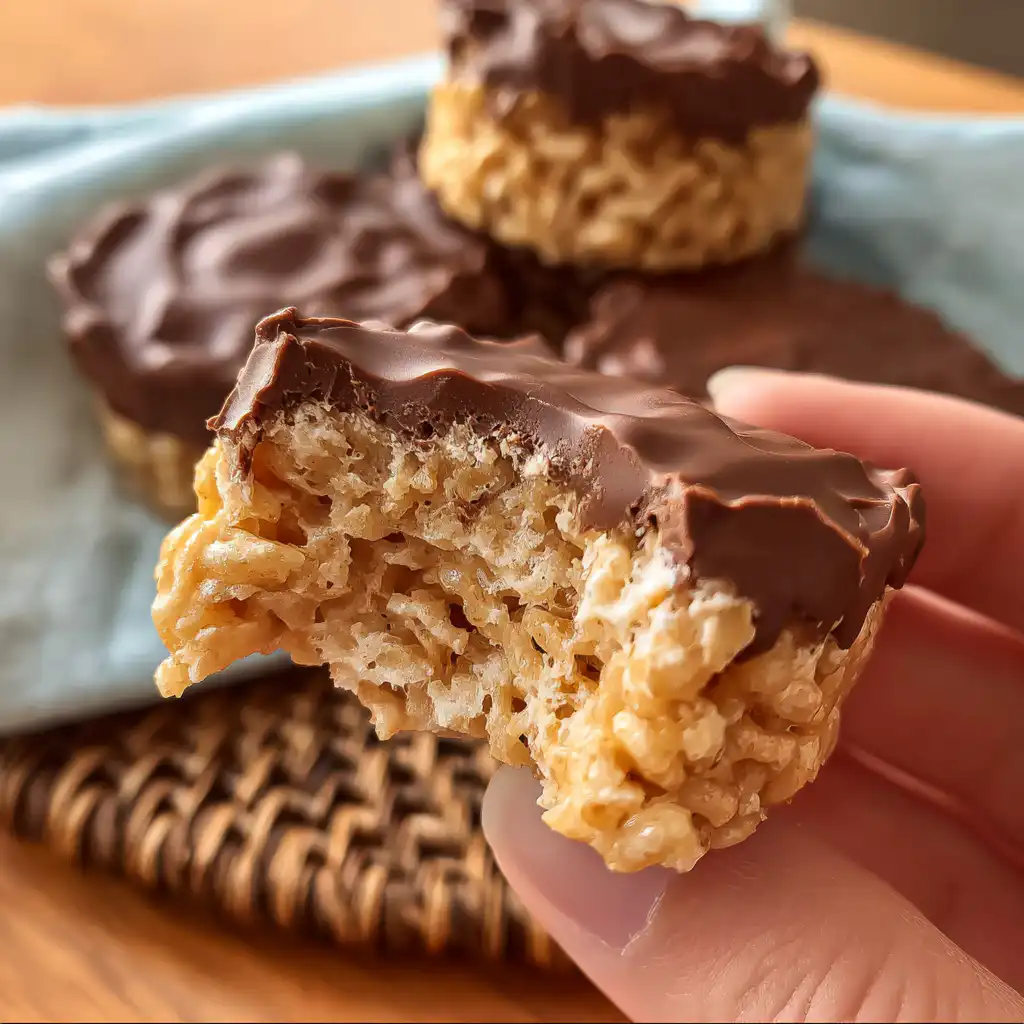
At its core, a Peanut Butter Rice Krispie Cup is a hybrid between a traditional puffed rice cereal treat and a classic Reese’s Peanut Butter Cup. Instead of a soft peanut butter center, we use a mixture of Rice Krispies bound together with a heated blend of honey and peanut butter. This creates a sturdy, crunchy base that doesn’t collapse. The whole thing is then crowned with a thick layer of melted semi-sweet chocolate. It is essentially a “no-bake” bar condensed into a handheld, individual serving size. By using a muffin tin, you ensure perfectly portioned treats that are easy to store and even easier to eat on the go.
Ingredients Overview
To make these successfully, quality matters. Here is a breakdown of what you’ll need:
- Peanut Butter (1 Cup): I recommend using a standard creamy peanut butter like Jif or Skippy for the best structural integrity. If you use “natural” peanut butter (the kind you have to stir), ensure it is very well-mixed, or the cups may become too oily.
- Honey (6 Tablespoons): This acts as our liquid gold binder. It provides sweetness and stickiness without the need for processed marshmallows.
- Salt (1 Pinch): Never skip the salt! It balances the sugars and enhances the roasted notes of the peanut butter.
- Rice Krispies Cereal (3 Cups): Any puffed rice cereal works here, but the name brand tends to hold its “snap” longer once coated in the warm syrup.
- Chocolate Chips (2 Cups): Semi-sweet is the gold standard here to prevent the dessert from becoming cloyingly sweet. However, dark chocolate chips (60% cacao or higher) provide a wonderful bitterness that pairs beautifully with the honey.
Ingredient Substitutions & Tips
If you have dietary restrictions or simply a different pantry stock, here are some easy swaps. You can replace the honey with maple syrup or agave nectar for a vegan-friendly version, though the texture will be slightly softer. For those with nut allergies, sunflower seed butter (SunButter) is a fantastic 1:1 replacement for peanut butter. If you want to go gluten-free, ensure your puffed rice cereal is certified gluten-free, as some mainstream brands contain malt flavoring derived from barley. For the chocolate topping, you can add a teaspoon of coconut oil to the chocolate chips before melting; this creates a “magic shell” effect that is easier to bite through without the chocolate cracking.
Step-by-Step Instructions
- Preparation: Start by lining a 12-cup muffin tin with paper liners. This is crucial for easy removal. If you don’t have liners, grease the tin heavily with butter or a neutral cooking spray.
- The Binding Syrup: In a small saucepan over medium-low heat, combine your peanut butter, honey, and salt. Use a silicone spatula to stir constantly. You aren’t trying to boil it—you just want it to become a singular, pourable liquid. This usually takes about 3-5 minutes.
- The Mix: Measure your Rice Krispies into a large bowl. Pour the warm peanut butter mixture over the cereal. Stir gently from the bottom up. You want every single piece of cereal to be glistening.
- The Press: Scoop the mixture into your prepared muffin cups. Use the back of a spoon (or a greased measuring cup) to press the mixture down firmly. The harder you press, the better they will hold together once set.
- The Topping: Melt your chocolate chips. I prefer the microwave method: 30 seconds, stir, then 15-second intervals until smooth. Spoon the chocolate over the cereal bases and tilt the pan slightly to help the chocolate level out.
- The Set: Place the pan in the refrigerator. Patience is key here! Give them at least an hour to fully firm up before attempting to peel off the liners.
Expert Baking/Cooking Tips
For the best results, avoid overheating the peanut butter and honey. If the mixture gets too hot, the sugars in the honey can crystallize, leading to a grainy texture rather than a smooth one. When it comes to the chocolate, ensure your bowl and spoon are completely dry; even a single drop of water can cause the chocolate to “seize” and turn into a clumpy mess. If you want a professional look, tap the muffin tin firmly against the counter after adding the chocolate. This releases air bubbles and creates a perfectly flat, glass-like surface on top of your cups.
The Secret to the Perfect No-Bake Crunch
The biggest complaint with no-bake cereal treats is that they can sometimes turn “soggy.” The secret to preventing this is the temperature of your binder. By melting the peanut butter and honey just until combined and then mixing immediately, the cereal is coated in a protective fatty layer that prevents moisture from softening the rice puffs. Additionally, storing these in the refrigerator keeps the fats in the peanut butter solid, which maintains that satisfying “snap.” If you leave them on a warm counter, the oils will soften, and the cereal will lose its structural integrity. Always serve them cold for the maximum crunch factor!
Serving Suggestions
These cups are rich, so they pair perfectly with a cold glass of milk or a hot cup of black coffee. For a fancy touch, sprinkle a few flakes of Maldon sea salt over the chocolate before it sets. If you are serving these at a party, you can use mini-muffin tins to create “bite-sized” versions. They also look beautiful on a dessert board alongside fresh strawberries or raspberries, which provide a tart contrast to the dense peanut butter.
Storage & Make-Ahead Tips
These are the ultimate make-ahead treat. They stay fresh in an airtight container in the refrigerator for up to two weeks. If you want to keep them longer, they freeze beautifully! Simply wrap the individual cups in plastic wrap and store them in a freezer bag for up to three months. When you’re ready to eat, let them thaw in the fridge for an hour, or eat them straight from the freezer for a super-firm, chilled snack.
FAQs
Can I use chunky peanut butter?
Absolutely! Chunky peanut butter adds an extra layer of texture and actual nut pieces which many people prefer.
How do I prevent the chocolate from cracking when I bite it?
Mix 1-2 teaspoons of coconut oil or vegetable shortening into the chocolate chips while melting. This softens the chocolate just enough so it remains slightly flexible.
Can I make these vegan?
Yes. Swap the honey for brown rice syrup or maple syrup and ensure your chocolate chips are dairy-free.
Why did my cereal mixture turn out crumbly?
This usually happens if the mixture wasn’t pressed down firmly enough into the tin, or if there wasn’t enough honey to bind the dry cereal. Make sure to pack them in tight!
Is it okay to use dark chocolate instead?
Yes, dark chocolate is a fantastic choice and helps cut through the sweetness of the honey and peanut butter.
Final Thoughts
Peanut Butter Rice Krispie Cups are a testament to the fact that you don’t need a long list of ingredients to create a world-class dessert. By focusing on texture and temperature, you can turn basic pantry items into a treat that tastes like it came from a high-end confectionery. They are quick, customizable, and guaranteed to be a hit with everyone who tries them. Give this recipe a shot today, and don’t be surprised when it becomes a permanent resident in your dessert rotation!
PrintNo-Bake Peanut Butter Rice Krispie Cups (5 Ingredients!)
A decadent yet simple no-bake dessert that tastes like a gourmet peanut butter cup with an added crunch. Perfect for meal prep snacks or party treats.
- Prep Time: 15 minutes
- Cook Time: 5 minutes
- Total Time: 20 minutes
- Yield: 12 servings
- Cuisine: American
Ingredients
Peanut butter (creamy or chunky) – 1 cup
Honey – 6 tablespoons
Salt – 1 pinch
Rice Krispies cereal – 3 cups
Semi-sweet chocolate chips – 2 cups
Instructions
Line a standard muffin pan with paper liners or lightly grease with non-stick spray.
In a small saucepan, combine the peanut butter, honey, and salt over medium heat. Stir constantly until the mixture is fully melted and smooth.
Place the Rice Krispies cereal in a medium mixing bowl. Pour the warm peanut butter mixture over the cereal.
Stir gently but thoroughly with a spatula until every piece of cereal is coated in the peanut butter mixture.
Distribute the mixture evenly among the 12 muffin cups. Press down firmly with the back of a spoon to ensure they hold their shape.
Melt the chocolate chips in a microwave-safe bowl in 30-second increments, stirring between each, until silky smooth.
Spoon approximately 1-2 tablespoons of melted chocolate over each cup, spreading it to the edges.
Place the tray in the refrigerator for at least 30-60 minutes until the chocolate is firm. Serve chilled.
Notes
• Use high-quality chocolate chips for the smoothest melting experience.
• If the mixture is too sticky, slightly dampen your spoon before pressing the cereal into the tin.
• Store these in the fridge to prevent the chocolate from blooming or softening in warm weather.