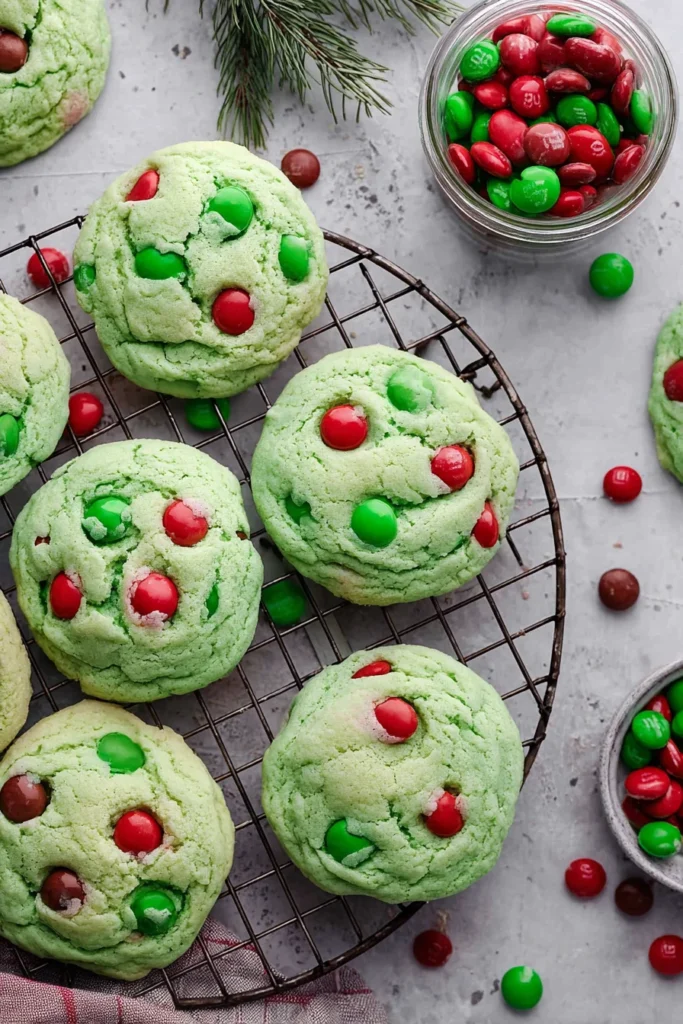
When the holiday season rolls around, nothing captures the magic of Christmas quite like a tray of freshly baked, vibrant cookies. These Christmas Green M&M Cookies are a showstopper, combining a stunning emerald hue with the classic, nostalgic crunch of candy-coated chocolate. Whether you are hosting a Grinch-themed holiday party or participating in a competitive neighborhood cookie swap, these treats are designed to stand out. The secret lies in their incredible texture—soft, pillowy, and slightly chewy—contrasted by the festive snap of red and green M&Ms. In this guide, I’ll walk you through the professional techniques required to achieve that perfect “bakery-style” finish right in your home kitchen. Get ready to fill your home with the scent of butter and vanilla!
Why You’ll Love This Recipe
There is so much to adore about these cookies beyond their striking appearance. First, the texture is unparalleled; thanks to a specific ratio of leavening agents and a hint of cornstarch, they stay soft for days. Second, they are incredibly kid-friendly. Children love helping to “stud” the warm cookies with extra M&Ms, making it a wonderful family activity. Third, this recipe is remarkably consistent. Unlike many sugar cookies that spread into thin puddles, these maintain a beautiful, thick shape that looks professional every time. Finally, the flavor is a sophisticated take on a classic butter cookie, elevated by a generous tablespoon of high-quality vanilla extract.
What Are Christmas Green M&M Cookies?
At their core, these are enriched butter cookies, often referred to in the baking world as “Drop Sugar Cookies.” However, they are distinguished by two main features: their vibrant green color and the inclusion of festive M&Ms. While they share some DNA with a traditional chocolate chip cookie, they lack brown sugar, which allows the green food coloring to remain bright and pure rather than turning a muddy olive color. The result is a cookie that looks like it came straight from Whoville. They represent the intersection of fun, festive aesthetics and high-quality baking science, ensuring they taste even better than they look.
Ingredients you will need
To achieve the best results, every ingredient in this list plays a vital role.
- Unsalted Butter (1 cup): Ensure your butter is truly softened at room temperature. It should yield to a gentle press but not be oily or melting. This creates the aeration needed for a light cookie.
- Sugar (1 2/3 cup): We use purely granulated sugar here. This helps maintain the bright green color and provides a slight crispness to the edges.
- Large Eggs (2): These act as the binder. Using room-temperature eggs ensures they emulsify perfectly with the creamed butter.
- Vanilla Extract (1 tablespoon): A high volume of vanilla is key to that “bakery” flavor profile.
- Green Food Coloring (6+ drops): Use a high-quality gel or liquid color. I recommend starting with six drops and adjusting until the dough is one shade darker than your desired baked result.
- All-Purpose Flour (3 cups): This provides the structural foundation.
- Cornstarch (1 teaspoon): The “secret weapon” for a soft, tender crumb that melts in your mouth.
- Baking Powder & Soda (1 tsp each): This dual-leavening approach ensures a good rise and a tender interior.
- Salt (1 teaspoon): Essential to balance the sweetness of the M&Ms.
- Red and Green M&Ms (2 cups total): Use 1 1/2 cups in the dough and save 1/2 cup for pressing onto the tops.
Step-by-Step Instructions
- Preparation is Key: Start by preheating your oven to 350°F (175°C). Line two large baking sheets with parchment paper or silicone baking mats. This prevents sticking and ensures the bottoms of the cookies don’t brown too quickly.
- Creaming the Base: In a large bowl or the bowl of a stand mixer, combine the softened butter and sugar. Beat on medium-high speed for at least 60 seconds. The mixture should change from a yellow, gritty paste to a pale, fluffy cloud. This step is crucial for the cookie’s final texture.
- The Emulsion: Add your eggs one at a time. Beat for 30 seconds after the first egg before adding the second. This builds a strong emulsion. Pour in the vanilla and the green food coloring, mixing until the color is uniform.
- Dry Ingredient Integration: In a separate medium bowl, whisk together the flour, cornstarch, baking powder, baking soda, and salt. Turn your mixer to its lowest setting and gradually add the dry mixture to the wet. Stop as soon as you see no more streaks of white flour.
- The Mix-Ins: Use a sturdy spatula to fold in 1 1/2 cups of the M&Ms by hand. This prevents the mixer from cracking the candy shells.
- Scooping and Shaping: Use a 1 1/2 tablespoon cookie scoop to portion out the dough. For a perfectly professional look, roll each scoop between your palms to create a smooth ball. Space them 2 inches apart on the sheet.
- Baking: Bake for 11 to 13 minutes. The edges should be set, but the centers should still look slightly soft and “puffed.”
- The Finishing Touch: Immediately after removing them from the oven, press the reserved M&Ms into the tops of the warm cookies. Let them cool on the sheet for at least 10 minutes to firm up.
Expert Baking Tips
To ensure your cookies look like the photos, follow these expert tips. First, don’t overmix the dough once the flour is added; overmixing develops gluten, which makes for a tough, bread-like cookie rather than a tender one. Second, use a digital scale if possible to measure your flour (3 cups is roughly 375-380 grams). Scooping flour directly with a measuring cup often packs it down, leading to dry cookies. Lastly, if your kitchen is very warm, chill the rolled dough balls for 15 minutes before baking to prevent excessive spreading. This keeps them thick and chewy.
The Science of the Soft Cookie: Why Cornstarch?
You might wonder why a cookie recipe calls for cornstarch. In professional pastry arts, cornstarch is used to “soften” the harsh proteins found in all-purpose flour. When combined with flour, it interferes with the gluten-bonding process, resulting in a more tender, delicate crumb. It also helps the cookies retain moisture, which is why these cookies stay soft for three to four days after baking, whereas standard sugar cookies might turn hard or crunchy. It’s a small addition that makes a massive difference in the “mouthfeel” of the final product.
Serving Suggestions
These cookies are the perfect companion for a cold glass of milk, but for a truly festive experience, serve them alongside a homemade hot cocoa bar. They also look stunning when arranged on a tiered dessert stand with white powdered donuts and red velvet cupcakes. If you’re gifting them, place them in a clear cellophane bag tied with a red ribbon for a simple, elegant presentation that highlights the vibrant green color of the dough.
Storage & Make-Ahead Tips
Store your baked cookies in an airtight container at room temperature for up to 5 days. To keep them extra soft, place a single slice of white bread in the container; the cookies will absorb the moisture from the bread. You can also freeze the baked cookies for up to 3 months. If you prefer to bake fresh, you can freeze the raw dough balls. Simply bake them directly from the freezer, adding 2 minutes to the total bake time.
FAQs
1. Why did my cookies turn brown on the edges?
This usually happens if they are overbaked or if your oven runs hot. To keep them perfectly green, pull them out when the centers are still slightly domed and soft. They will continue to “carry-over cook” on the hot pan.
2. Can I use liquid food coloring instead of gel?
Yes, though gel coloring is more concentrated. If using liquid, you may need a few extra drops to achieve a deep green, as liquid colors can fade slightly during the baking process.
3. Why are my M&Ms bleeding color into the dough?
This typically happens if the dough is overworked or if the M&Ms are low quality. Folding them in gently by hand at the very end is the best way to prevent the shells from cracking and leaking dye.
4. Do I really need to use unsalted butter?
Unsalted butter allows you to control the exact amount of salt in the recipe. If you only have salted butter, reduce the added salt in the recipe to 1/2 teaspoon.
5. How do I get perfectly round cookies?
If your cookies come out slightly misshapen, use a large circular glass or cookie cutter to “scoot” the cookie into a circle immediately after they come out of the oven while they are still malleable.
Christmas Green M&M Cookies Recipe
These vibrant Green M&M Cookies are the star of any holiday dessert table. With a soft, melt-in-your-mouth texture thanks to a secret touch of cornstarch and a pop of festive color, they are as delicious as they are beautiful. Perfect for Grinch-themed parties or classic Christmas exchanges.
- Prep Time: 15 minutes
- Cook Time: 12 minutes
- Total Time: 27 minutes
- Yield: 24 cookies
- Cuisine: American
Ingredients
Unsalted butter, softened – 1 cup
Granulated sugar – 1 2/3 cup
Large eggs – 2
Vanilla extract – 1 tablespoon
Green food coloring – 6 drops
All-purpose flour – 3 cups
Cornstarch – 1 teaspoon
Baking powder – 1 teaspoon
Baking soda – 1 teaspoon
Salt – 1 teaspoon
Red and green M&Ms – 2 cups
Instructions
Preheat oven to 350°F and line cookie sheets with parchment paper.
Cream butter and sugar with an electric mixer for 1 minute until fluffy.
Add eggs one at a time, beating well after each addition.
Mix in vanilla and green food coloring until the desired hue is reached.
In a separate bowl, whisk flour, cornstarch, baking powder, baking soda, and salt.
Slowly add dry ingredients to the wet mixture on low speed until just combined.
Fold in 1 1/2 cups of M&Ms by hand.
Scoop 1 1/2 tablespoon portions, roll into balls, and place on the tray.
Bake for 11-13 minutes; top with remaining M&Ms while warm.
Cool completely on the cookie sheet to allow the centers to set.
Notes
• Ensure butter is softened but not melted for the best rise.
• Use gel food coloring for a more intense green without thinning the dough.
• Do not overbake; the cookies should look slightly underdone when pulled out.