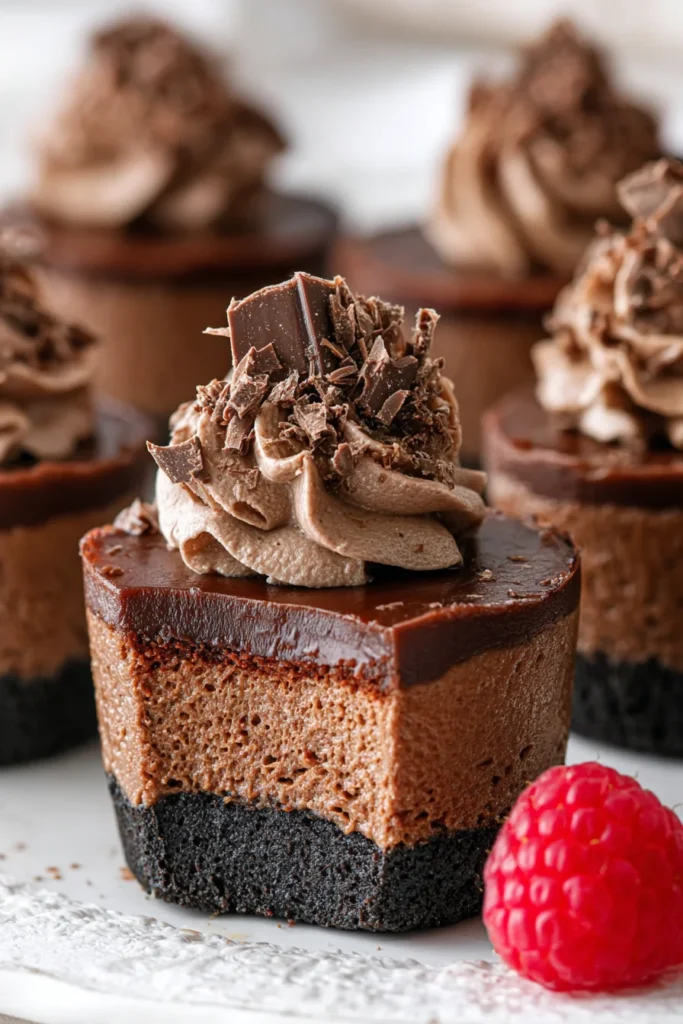
Imagine biting into a dessert that combines the crunch of a dark cocoa cookie, the silky-smooth richness of a chocolate truffle, and the airy lightness of homemade whipped cream. These Mini Chocolate Cheesecakes are the epitome of indulgent baking. While large cheesecakes can be intimidating—requiring water baths and long bake times—this mini version is approachable, fast, and yields a perfectly portioned result every time. Whether you are hosting a sophisticated dinner party, a holiday gathering, or simply satisfying a deep chocolate craving, these bite-sized wonders are designed to impress. The triple-layer chocolate approach ensures a variety of textures and depths of cocoa flavor that will leave your guests asking for the recipe. Let’s dive into how to create these professional-level treats in your own kitchen.
Why You’ll Love This Recipe
There is so much to adore about these mini treats beyond their adorable appearance. First, the texture is unparalleled; by using room-temperature ingredients and a gentle baking method, we achieve a dense, fudge-like consistency that mimics high-end patisserie. Second, this recipe is a time-saver. Traditional cheesecakes need hours in the oven and overnight cooling, but these minis bake in just 15 minutes and chill significantly faster. Finally, the triple chocolate threat—Oreo crust, chocolate filling, and chocolate ganache—provides a complex flavor profile that isn’t just sweet, but deeply chocolatey. They are also incredibly easy to serve, requiring no slicing or messy plating, making them the ultimate host-friendly dessert.
What Is a Mini Chocolate Cheesecake?
A mini chocolate cheesecake is an individual-sized version of the classic baked New York-style cheesecake, infused with high-quality chocolate. Unlike “no-bake” versions that rely on gelatin or heavy cream to set, these are oven-baked, which creates a much richer, more stable crumb. The structure consists of a pressed cookie base (using Oreos for that iconic dark cocoa punch), a baked custard-style filling made of cream cheese and cocoa, and a decadent topping. By using a standard muffin or cupcake tin, we create a “crust-to-filling” ratio that ensures every single bite has the perfect balance of crunch and creaminess. It’s a concentrated burst of dessert excellence.
Ingredients Overview
To achieve the best results, the quality of your ingredients is paramount. For the Crust, we use 134g of finely crushed Oreo crumbs. You can use a food processor to ensure they are fine enough to bond with the 2 tablespoons of melted butter.
For the Cheesecake Filling, you need 12 ounces of full-fat cream cheese. Avoid “light” or spreadable versions, as they contain more water and will prevent the cheesecake from setting properly. We use a combination of natural unsweetened cocoa powder and melted semi-sweet chocolate. This dual-chocolate approach provides both a bright cocoa note and a deep, fudgy richness.
The Sour Cream is a secret weapon here; its acidity softens the proteins in the cream cheese, leading to a creamier mouthfeel. Finally, the Eggs provide the necessary structure. Ensure your eggs and cream cheese are at room temperature (around 65-70°F) before mixing. This is the single most important factor for a smooth, lump-free batter.
Ingredient Substitutions & Tips
- The Crust: If you don’t have Oreos, chocolate graham crackers or even crushed chocolate wafers work beautifully. For a gluten-free version, simply use gluten-free chocolate sandwich cookies.
- The Chocolate: You can swap the semi-sweet chocolate for bittersweet (60% cocoa or higher) if you prefer a less sweet, more intense flavor. I do not recommend milk chocolate for the filling as it can make the texture too soft.
- The Cream: For the ganache and whipped cream, ensure you are using heavy whipping cream (at least 36% fat). Lower fat milks will not thicken the ganache correctly or hold the peaks for the topping.
Step-by-Step Instructions
1. Prepare the Base
Start by preheating your oven to 325°F (162°C). Line a standard 12-cup cupcake tin with paper liners. In a small bowl, combine your Oreo crumbs and melted butter until the mixture resembles wet sand. Distribute the crumbs evenly among the 12 liners and press down firmly using the bottom of a small glass or a spoon. Bake for 5 minutes to “set” the crust, then remove and allow to cool.
2. The Cream Cheese Base
Lower the oven temperature to 300°F (148°C). In a large mixing bowl, beat the room-temperature cream cheese, sugar, and cocoa powder. Pro tip: Use the lowest speed on your hand mixer or stand mixer. High speeds incorporate air bubbles, which cause cheesecakes to rise and سپس crack as they cool. Scrape the sides frequently to ensure no lumps of cream cheese remain.
3. Emulsifying the Filling
Add the sour cream and vanilla extract, beating on low until just combined. Next, add the eggs one at a time. Mix until the yellow of the yolk just disappears, then stop. Over-mixing at the egg stage is the leading cause of “souffléing” (where the cake puffs up too much). Finally, fold in the melted chocolate with a spatula until the color is uniform and glossy.
4. The Gentle Bake
Fill each cupcake liner about 3/4 of the way full. Bake for 15 minutes. The edges should be set, but the centers should still have a slight jiggle. Turn off the oven but do not open the door. Let them sit in the residual heat for 10 minutes. This gradual temperature change prevents the cheesecake from shrinking too quickly.
5. Cooling and Topping
Crack the oven door and let them cool for another 20 minutes before moving them to a wire rack. Once at room temperature, chill in the fridge for at least 3 hours. Top with the 2-ingredient ganache and a swirl of cocoa whipped cream before serving.
Expert Baking Tips for Success
The biggest challenge with cheesecake is cracking. To avoid this, never skip the cooling steps. Moving a hot cheesecake directly to a cold fridge causes a thermal shock that pulls the cake apart. Additionally, ensure your melted chocolate has cooled slightly before adding it to the cream cheese mixture; if it’s too hot, it can “cook” the eggs or melt the fats in the cream cheese, leading to a grainy texture. Lastly, always use a digital scale for the Oreo crumbs and cream cheese. Baking is a science, and precision in weight ensures your crust isn’t too greasy and your filling isn’t too soft.
The Science of the Perfect Cheesecake Texture
Why do we use both cocoa powder and melted chocolate? It’s all about the fat-to-solid ratio. Cocoa powder provides intense flavor and “structure” because it is a dry solid. Melted chocolate, however, contains cocoa butter, which solidifies at room temperature, giving the cheesecake a luxurious, truffle-like melt-on-the-tongue quality. By combining both, we get the best of both worlds: a deep, dark color and a texture that is firm enough to hold its shape but soft enough to be creamy. The addition of sour cream adds a subtle tang that cuts through the richness of the fats, balancing the palate.
Serving Suggestions
For a truly professional presentation, pipe the chocolate whipped cream using a star tip (like the Wilton 1M). You can garnish each mini cheesecake with a small piece of a chocolate bar, a dusting of extra cocoa powder, or even a fresh raspberry for a pop of color. These are best served slightly chilled, about 10-15 minutes after taking them out of the refrigerator, to allow the chocolate flavors to fully bloom.
Storage & Make-Ahead Tips
These cheesecakes are excellent make-ahead desserts. They store perfectly in an airtight container in the refrigerator for up to 4 days. If you need to store them longer, they actually freeze beautifully! Freeze them without the whipped cream topping for up to 2 months. Simply thaw in the refrigerator overnight and add the fresh whipped cream and ganache right before you plan to serve your guests.
FAQs
Q: Can I make these without a cupcake liner?
A: It is highly recommended to use liners. Cheesecake is delicate and sticky; without liners, you would need to heavily grease the pan and potentially use a hot water bath to release them, which risks breaking the cakes.
Q: My cheesecakes sank in the middle. What happened?
A: This usually happens if too much air was whipped into the batter or if the cheesecakes were over-baked. When air bubbles heat up, they expand; as they cool, they collapse. Stick to low mixing speeds!
Q: Do I need a water bath for mini cheesecakes?
A: No! One of the benefits of mini cheesecakes is that they are small enough to cook through evenly without the protection of a water bath, provided you use the “low and slow” oven method described.
Q: Can I use bottled lemon juice instead of sour cream?
A: While lemon juice provides acidity, it doesn’t provide the fat and creaminess of sour cream. If you must substitute, use full-fat Greek yogurt.
Mastering the art of the Mini Chocolate Cheesecake is a rewarding journey for any home baker. By following these steps—especially the emphasis on room-temperature ingredients and gentle mixing you’ll produce a dessert that rivals any high-end bakery. The combination of the dark Oreo base and the triple-layer chocolate finish makes these an absolute showstopper. Give this recipe a try for your next celebration, and watch how quickly these “mini” treats make a massive impact!
PrintMini Chocolate Cheesecakes
These Mini Chocolate Cheesecakes are a chocolate lover’s dream. Featuring a crunchy Oreo base, a dense and creamy chocolate cheesecake center, a layer of silky ganache, and topped with chocolate whipped cream. They are perfectly portioned for parties and impressively professional in appearance.
- Prep Time: 30 minutes
- Cook Time: 15 minutes
- Total Time: 75 minutes
- Yield: 12 Mini Cheesecakes
- Cuisine: American
Ingredients
Oreo cookie crumbs – 1 cup (134g)
Unsalted butter, melted – 2 tbsp
Cream cheese, room temperature – 12 ounces (339g)
Granulated sugar – 1/2 cup (104g)
Natural unsweetened cocoa powder – 2 tbsp (14g)
Sour cream, room temperature – 1/4 cup (58g)
Vanilla extract – 1/2 tsp
Large eggs, room temperature – 2
Semi-sweet chocolate, melted – 4 oz
Semi-sweet chocolate chips (for ganache) – 3 oz (85g)
Heavy whipping cream (for ganache) – 1/4 cup (60ml)
Heavy whipping cream (for topping) – 3/4 cup (180ml)
Powdered sugar – 3 tbsp (22g)
Natural cocoa powder (for topping) – 3 tbsp (14g)
Vanilla extract (for topping) – 1/2 tsp
Instructions
Preheat oven to 325°F (162°C) and line a cupcake pan with liners.
Combine Oreo crumbs and melted butter; press firmly into the bottom of each liner.
Bake crusts for 5 minutes, then remove and cool. Lower oven temperature to 300°F (148°C).
In a large bowl, beat room temperature cream cheese, sugar, and cocoa powder on low speed until smooth.
Mix in sour cream and vanilla extract until combined.
Add eggs one at a time, beating slowly and scraping the bowl between additions to avoid air bubbles.
Gently stir in the 4 oz of melted chocolate until the batter is uniform.
Fill each cupcake liner nearly to the top with the cheesecake mixture.
Bake for 15 minutes. Turn off the oven and leave the door closed for 10 minutes.
Crack the oven door slightly and let them cool for 20 minutes before transferring to the fridge.
Make the ganache by pouring heated heavy cream over chocolate chips; whisk until smooth and spread over cooled cakes.
Whip the remaining cream, powdered sugar, cocoa, and vanilla to stiff peaks; pipe onto cheesecakes.
Notes
• Ensure all refrigerated ingredients (eggs, cream cheese, sour cream) are at true room temperature to prevent lumps.
• Use low speed on your mixer to prevent incorporating air, which causes the cheesecakes to crack or puff up and then sink.
• For the cleanest removal, ensure the cheesecakes are fully chilled (at least 4 hours) before peeling off the liners.
• Use high-quality baking chocolate bars for the melted chocolate section rather than chips for a smoother texture.