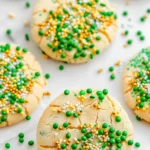
When the calendar turns to March, everything starts to feel a bit luckier. Whether you are hosting a festive party or looking for a fun activity to do with the kids, these St. Patrick’s Day Sugar Cookies are the perfect way to celebrate. These aren’t just your standard sugar cookies; they are a vibrant, emerald green, buttery, and topped with a decadent layer of melted chocolate and “lucky” sprinkles.

The secret to a great holiday cookie lies in the balance between texture and flavor. This recipe yields a cookie that is soft to the bite but sturdy enough to hold its shape—ideal for using those shamrock-shaped cookie cutters! In this guide, I’ll walk you through how to achieve that perfect green hue and how to handle the dough like a pro.
Why You’ll Love This Recipe
This recipe is a holiday favorite for several reasons. First, the vibrant green color is baked right into the dough, making them stand out on any dessert table without requiring a mountain of messy frosting. Second, the no-fail texture—thanks to a specific chilling process, these cookies won’t spread into shapeless blobs in the oven.
Finally, the decoration is incredibly beginner-friendly. Instead of temperamental royal icing, we use melted chocolate wafers which provide a rich flavor and a professional-looking finish with half the effort. It’s a versatile recipe that delivers high-impact results with simple, pantry-staple ingredients.
What Is a St. Patrick’s Day Sugar Cookie?
A St. Patrick’s Day Sugar Cookie is a festive variation of the classic American sugar cookie. Traditionally, these are “cut-out” cookies, meaning the dough is rolled thin and shaped with cutters. What sets this version apart is the addition of green food coloring and the use of green chocolate melts as a topping.
The flavor profile is dominated by high-quality butter and vanilla, providing a nostalgic, “bakery-style” taste. Unlike drop cookies, these are designed to be uniform and aesthetic, celebrating the symbols of the Irish holiday like shamrocks, leprechaun hats, or pots of gold.
Ingredients Overview
To get the best results, every ingredient plays a vital role in the chemistry of the bake:
- Unsalted Butter: Use real butter, not margarine. Softened butter (room temperature) is essential for creaming with the sugar to create air pockets that keep the cookie light.
- Granulated Sugar: Provides sweetness and helps with the slightly crisp edges.
- Eggs: Act as the binder. Ensure they are at room temperature so they incorporate smoothly into the fat.
- Vanilla Extract: Use pure vanilla for the best depth of flavor.
- All-Purpose Flour: The structure of our cookie. Be sure to measure using the “spoon and level” method to avoid dry cookies.
- Baking Powder: Just enough to give a tiny bit of lift without making them “cakey.”
- Green Food Coloring: I recommend gel food coloring because it provides a much more intense color than liquid drops without adding extra moisture to the dough.
- Green Chocolate Melts: Brands like Wilton work best because they melt smoothly and harden with a nice sheen.
Ingredient Substitutions & Tips
If you find yourself missing an ingredient, here are a few ways to pivot:
- Extracts: Swap vanilla for almond extract for a “wedding cake” flavor profile that pairs beautifully with the sugar.
- Butter: If you only have salted butter, omit the extra teaspoon of salt from the recipe.
- Flour: You can use a 1:1 Gluten-Free flour blend (like King Arthur or Cup4Cup) if you need a celiac-friendly option.
- Chocolate: If you can’t find green melts, use white chocolate chips and add a drop of oil-based candy coloring (do not use water-based coloring in melted chocolate, or it will seize!).
Step-by-Step Instructions
1. Creaming the Base
Start by placing your 1.5 sticks of softened butter and 1 cup of sugar in a large mixing bowl. Use a hand mixer or stand mixer to beat them on medium-high for about 2-3 minutes. You are looking for a pale, fluffy texture. This step is crucial for the final “bite” of the cookie.
2. Adding the Color and Wet Ingredients
Beat in the two eggs one at a time, followed by the vanilla. Now, add your green food coloring. Start with a few drops (or a toothpick-full of gel) and mix. Continue adding until you reach a shade slightly darker than your desired result, as the color will lighten slightly once the white flour is added.
3. Mixing the Dry Ingredients
In a separate medium bowl, whisk together the 2.5 cups of flour, salt, and baking powder. This ensures the leavening agent is evenly distributed.
4. Combining the Dough
Turn your mixer to low and slowly add the flour mixture to the wet ingredients. Mix just until the white streaks of flour disappear. Over-mixing at this stage will develop the gluten and result in a tough cookie.
5. The Essential Chill
This is the most important part: wrap the dough in plastic wrap or cover the bowl and refrigerate for at least 2 hours. Chilling the fats prevents the cookies from spreading in the oven and makes the dough much easier to roll.
6. Rolling and Cutting
Preheat your oven to 350°F. On a floured surface, roll the dough to about 1/4 inch thickness. Use your shamrock or circular cutters. If the dough is too sticky, roll a small ball, flatten it in your hand, and use the cutter directly on your palm.
7. The 8-Minute Bake
Place cookies on a greased or parchment-lined sheet. Bake for exactly 8 minutes. They will look slightly underdone, but they will firm up on the hot pan.
8. Decorating
Once cooled, melt the green chocolate in the microwave. Use a spoon to spread a thin layer on each cookie, then immediately shower them with St. Paddy’s Day sprinkles before the chocolate sets.
Expert Baking Tips
- Temperature Matters: If your kitchen is hot, keep half the dough in the fridge while you work with the other half. Warm dough is the enemy of sharp cookie shapes.
- The “Spoon and Level” Method: Never scoop flour directly with the measuring cup; it packs it down. Instead, spoon it into the cup and level it off with a knife.
- Fresh Baking Powder: Ensure your baking powder isn’t expired, or your cookies will feel heavy.
- Don’t Overbake: These cookies do not brown. If the edges are turning brown, they are overcooked! They should look matte and set.
Planning a St. Patrick’s Day Party?
These cookies are a fantastic “make-ahead” treat for school parties or office potlucks. Because they are decorated with chocolate melts rather than soft frosting, they stack beautifully once set. You can place them in clear cellophane bags tied with a green ribbon for a “Pot of Gold” party favor. They also look stunning on a dessert charcuterie board alongside green grapes, kiwi, and chocolate-covered pretzels.
Serving Suggestions
Serve these cookies with a cold glass of milk (you can even add a drop of green food coloring to the milk for the kids!). They also pair wonderfully with an afternoon cup of Irish breakfast tea or a festive “Green Freakshake” topped with whipped cream and extra cookie crumbles.
Storage & Make-Ahead Tips
- Room Temperature: Store in an airtight container for up to 5 days.
- Freezing Dough: You can freeze the raw dough discs for up to 3 months. Thaw in the fridge overnight before rolling.
- Freezing Baked Cookies: These freeze exceptionally well! Freeze them in a single layer before stacking in a freezer bag. They will stay fresh for up to 2 months.
FAQs
Why did my cookies spread so much?
Usually, this happens because the dough wasn’t chilled long enough or the butter was too soft (melted) when you started. Ensure the dough is cold to the touch before it hits the oven.
Can I use liquid food coloring?
Yes, but you will need more of it, and it may make the dough slightly stickier. Gel is always the preferred choice for vibrant holiday baking.
What is the best way to melt the chocolate?
Use a microwave-safe bowl and go in 20-second bursts. Stirring is key! Even if the chips look whole, the residual heat will melt them as you stir.
Do I have to use a cookie cutter?
Not at all. You can roll them into balls, flatten them with the bottom of a glass, and bake them as “green coins.”
Can I use royal icing instead of chocolate?
Absolutely. If you are skilled with royal icing, it provides a beautiful finish, but chocolate melts are much faster for a quick holiday treat.
Soft and Festive St. Patrick’s Day Sugar Cookies

These festive St. Patrick’s Day Sugar Cookies are the ultimate holiday treat. Featuring a soft, buttery base tinted a vibrant green and topped with smooth melted chocolate and themed sprinkles, they are as delicious as they are lucky!
Ingredients
1½ sticks unsalted butter (¾ cup), softened
1 cup granulated sugar (plus extra for dusting)
2 large eggs
1 tsp vanilla extract
1 tsp salt
2½ cups all-purpose flour
1 tsp baking powder
Green food coloring (gel preferred)
Green chocolate melts (Wilton brand recommended)
St. Patrick’s Day themed sprinkles
Instructions
1. In a large bowl, combine softened butter and sugar until creamy and pale.
2. Add in eggs, vanilla, and food coloring. Blend well until the color is uniform.
3. In a separate bowl, whisk together flour, salt, and baking powder.
4. Gradually blend the dry ingredients into the wet mixture, beating with a mixer until a thick dough forms.
5. Cover the dough and refrigerate for at least 2 hours to ensure it is easy to handle.
6. Preheat your oven to 350°F (175°C) and prepare a greased baking sheet.
7. Dust your work surface with flour. Roll out the chilled dough into a thin layer and use cookie cutters to form shapes.
8. Alternatively, roll small amounts of dough into balls, dust with sugar, flatten in your palm, and use a cutter before transferring to the sheet.
9. Bake for exactly 8 minutes. The cookies should be set but not browned.
10. Transfer to a wire rack to cool completely.
11. Melt green chocolate chips in the microwave in 20-second intervals, stirring until smooth.
12. Spread a small amount of chocolate over each cookie and immediately top with sprinkles.
Notes
Don’t skip the chilling step! It prevents the cookies from spreading too much.
Use gel food coloring for the most vibrant green color without altering the dough consistency.
Store in an airtight container to keep them soft for up to 5 days.