As the flowers begin to bloom and the air turns sweet with the scent of spring, there is no better way to celebrate than with a batch of homemade cookies. These Easter Bunny M&M Cookies are more than just a dessert; they are a festive craft and a delicious treat rolled into one. Featuring a buttery, soft-baked sugar cookie base and a clever arrangement of pastel candies, these cookies look like they came straight from a high-end bakery. Whether you are hosting an Easter brunch, looking for a rainy-day activity with the kids, or need a standout addition to your spring bake sale, these adorable “bunny” treats are guaranteed to bring smiles. They offer that classic chewy texture we all crave, combined with the whimsical charm of the holiday season.
Why You’ll Love This Recipe
There is so much to love about these Easter Bunny M&M Cookies beyond their Instagram-worthy appearance. First and foremost, the texture is impeccable—soft in the center with slightly crisp edges. Secondly, the recipe uses pantry staples you likely already have on hand, meaning no emergency trips to the grocery store. The “bunny” design is deceptively simple; it requires no piping bags or difficult frosting techniques, making it accessible for bakers of all skill levels. Finally, the pastel color palette of the M&Ms brings an instant brightness to your dessert table, capturing the essence of spring in every bite. It is a foolproof recipe that delivers high impact with minimal effort.
What Is An Easter Bunny M&M Cookie?
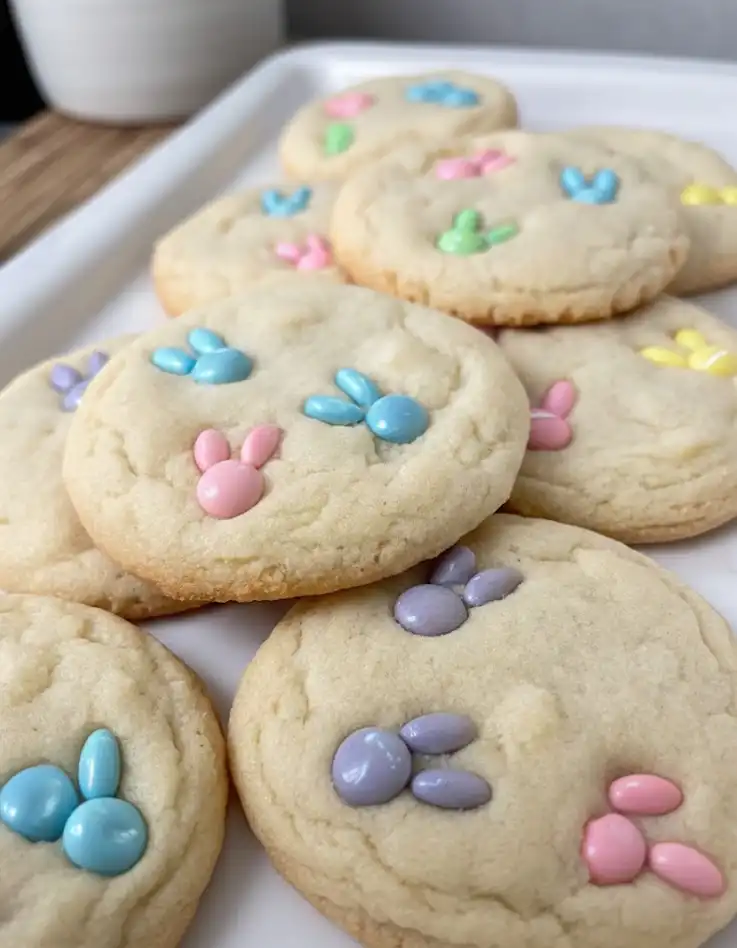
At its heart, this recipe is a premium sugar cookie modified for the perfect thickness and chew. Unlike a traditional drop cookie that might spread thin, this dough is formulated to hold its shape, providing a sturdy yet soft “stage” for the M&M decorations. The “bunny” element comes from a creative assembly technique: a single whole M&M serves as the bunny’s head, while two halved M&Ms are placed above it to mimic long, floppy ears. By using the seasonal “Pastel” or “Easter” editions of M&Ms, you get beautiful soft pinks, blues, yellows, and greens that make the bunnies look perfectly themed for the holiday.
Ingredients needed
To achieve the best results, the quality and temperature of your ingredients matter significantly.
- Butter (1 cup): Use unsalted butter softened to room temperature. You should be able to indent it with your thumb, but it shouldn’t be greasy or melting.
- White Granulated Sugar (1 ½ cups): This provides sweetness and helps the edges get that slight, delicious crunch.
- Large Egg: Ensure your egg is at room temperature to help it emulsify perfectly into the creamed butter.
- Pure Vanilla Extract (1 tsp): A high-quality vanilla makes a world of difference in a sugar cookie base.
- All-Purpose Flour (2 ¾ cups): The backbone of the cookie. Ensure you measure using the “spoon and level” method to avoid dry cookies.
- Baking Powder (1 tsp) & Baking Soda (½ tsp): This combination ensures the cookies rise slightly but stay dense enough to support the candy.
- Salt (½ tsp): A crucial ingredient to balance the sugar and enhance the butter flavor.
- Pastel M&M’s: Look for the seasonal bags. You will need whole ones for the faces and sliced ones for the ears.
Ingredient Substitutions & Tips
If you find yourself missing an ingredient, there are a few easy swaps. You can replace the vanilla extract with almond extract for a “birthday cake” flavor profile. If you need a gluten-free version, a high-quality 1-to-1 gluten-free flour blend works well here, provided it contains xanthan gum. For those who prefer a deeper flavor, you can swap half of the white sugar for light brown sugar, though this will result in a darker, slightly moister cookie. If you can’t find pastel M&Ms, regular M&Ms work just as well for a vibrant, year-round “bunny” cookie.
Step-by-Step Instructions
- Prep the Candy: Before you even turn on the mixer, prepare your bunny ears. Take a sharp paring knife and carefully slice several M&Ms in half. It is best to do this beforehand because the assembly window after baking is quite short.
- Preheat and Prepare: Set your oven to 350°F. Line your baking sheets with parchment paper. This ensures the cookies don’t stick and helps them bake evenly without over-browning the bottoms.
- Cream the Base: Using a stand mixer or hand mixer, cream the butter and sugar for at least 2-3 minutes. You want the mixture to look pale and fluffy, which indicates enough air has been incorporated.
- Incorporate Wet Ingredients: Add the egg and vanilla extract. Mix on medium speed until the batter looks smooth and glossy.
- Mix Dry Ingredients: In a separate bowl, whisk together the flour, baking powder, baking soda, and salt. This ensures the leavening agents are distributed evenly, preventing any “salty pockets.”
- Combine: Slowly add the dry ingredients to the mixer on low speed. Stop as soon as the last streak of flour disappears.
- Shape and Flatten: Scoop 2 tablespoons of dough, roll into a ball, and place on the sheet. Use the bottom of a glass to flatten them into disks. This ensures they bake into a uniform circle.
- Bake: Bake for 9-11 minutes. They are done when the centers no longer look “wet” and the tops spring back when touched.
- The Bunny Assembly: Let the cookies cool for 1-2 minutes on the pan. While still soft, press one whole M&M into the cookie, then place two halves above it for ears.
Expert Baking Tips
The most critical tip for this recipe is the cooling window. If you place the M&Ms on the cookies the second they come out of the oven, the residual heat will cause the chocolate inside the M&Ms to expand, cracking the beautiful pastel shells. However, if you wait too long (more than 3-4 minutes), the cookie will set, and the candy won’t “stick” to the surface. Aim for that 90-second to 120-second mark. Another tip: use a serrated knife with a gentle sawing motion to cut the M&Ms; pressing straight down often shatters the shell.
Perfecting the Bunny Ear Technique
To make your bunnies look professional, pay attention to the orientation of the ears. For a “classic” bunny look, place the halved M&Ms with the cut side facing inward toward each other. This creates a teardrop shape that mimics a rabbit’s ear perfectly. If you want a “floppy ear” look, tilt one of the halves at a 45-degree angle. You can also mix and match colors—a blue face with pink ears can look very whimsical! If the M&Ms aren’t sticking, you can use a tiny dot of white icing as “glue” once the cookies are completely cool, though the warm-press method is much faster.
Serving Suggestions
These cookies are a visual delight, so serve them on a flat white platter or a rustic wooden board to let the pastel colors pop. They pair wonderfully with a cold glass of milk or a hot cup of tea during an afternoon spring break. For a festive Easter dessert table, nestle the cookies in a bed of edible “grass” (shredded coconut dyed with green food coloring) and surround them with small chocolate eggs. They also make wonderful party favors when tucked into individual cellophane bags tied with a soft ribbon.
Storage & Make-Ahead Tips
These cookies stay fresh and soft for up to 5 days when stored in an airtight container at room temperature. If you need to stack them, place a sheet of parchment paper between the layers to prevent the M&M bunnies from dislodging or marking the cookie underneath. You can also freeze the unadorned baked cookies for up to 3 months; simply thaw them and use a tiny bit of frosting to attach the M&M bunnies before serving.
FAQs
Q: Can I use different candies?
A: Absolutely! While M&Ms are the easiest to slice, you can use Reese’s Pieces for a peanut butter version or even small jelly beans for the faces.
Q: Why did my cookies spread too much?
A: This usually happens if the butter was too warm or melted. Ensure your butter is “cool room temperature.” If your kitchen is very warm, chill the dough balls for 15 minutes before baking.
: How do I stop the M&Ms from cracking?
A: The cracking is caused by heat. Ensure you wait at least 60-90 seconds after the cookies come out of the oven before applying the candy.
Q: Can I make the dough in advance?
A: Yes, the dough can be refrigerated for up to 48 hours. Just let it sit at room temperature for 20 minutes before rolling so it’s easy to handle.
Q: How many cookies does this make?
A: Using a standard 2-tablespoon scoop, this recipe yields approximately 24-26 cookies.
These Easter Bunny M&M Cookies are the quintessential springtime bake. They combine the nostalgic flavor of a classic sugar cookie with a creative twist that delights both the young and the young at heart. By following the simple assembly tips and honoring the “cooling window,” you’ll create a batch of treats that are as beautiful as they are delicious. Happy baking, and may your Easter be filled with sweetness and joy!