
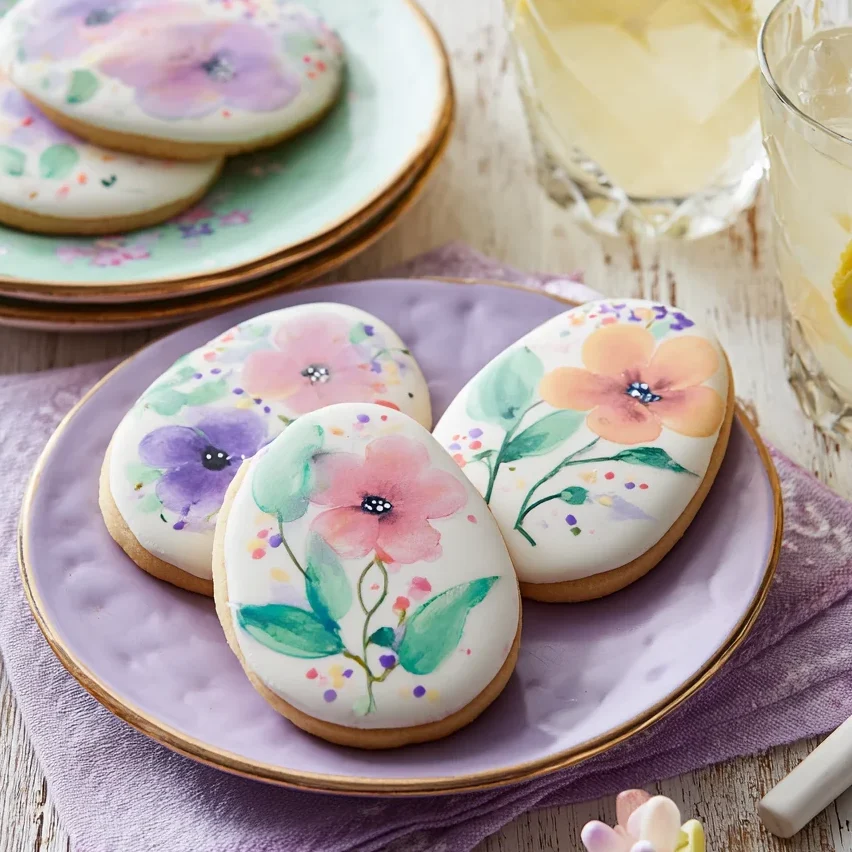
When spring arrives, there is a distinct desire to bring the vibrant, waking colors of nature into our kitchens. These Hand-Painted Watercolor Easter Egg Cookies are the ultimate marriage of fine art and confectionery. Unlike traditional royal icing cookies that require hours of precision piping and drying time between layers, the watercolor technique on fondant offers a loose, impressionistic aesthetic that is both forgiving for beginners and deeply impressive to recipients. By using fondant as a canvas and food coloring thinned with lemon extract as your “paint,” you can create edible masterpieces that look like they belonged in a boutique bakery window. Whether you are hosting an Easter brunch or looking for a creative project with the family, these cookies provide a sophisticated touch to the holiday table.
Why You’ll Love This Recipe
You will fall in love with this recipe because it transforms a standard sugar cookie into a high-end work of art with minimal technical equipment. The beauty of the watercolor style lies in its imperfections; messy edges and blended colors only add to the “hand-painted” charm. It is also an incredibly efficient way to decorate. Because the lemon extract evaporates quickly, the drying time is a fraction of what you would experience with flooded royal icing. Furthermore, this method is highly customizable. You can adapt the floral patterns to match your spring décor or change the shapes for birthdays, weddings, or garden parties throughout the year.
What Is Hand-Painted Watercolor Decorating?
Hand-painted watercolor decorating is a cake and cookie technique where gel food coloring is diluted with a high-proof spirit (like vodka) or a clear, alcohol-based extract (like lemon extract) to create a translucent medium. This “paint” is applied to a dried fondant surface using food-safe brushes. Because fondant is primarily sugar and cornstarch, it acts similarly to high-quality watercolor paper. The alcohol in the extract acts as a vehicle for the pigment but evaporates almost instantly, preventing the moisture from dissolving the sugar-based fondant. This results in a beautiful, matte, painterly finish that is completely dry to the touch and safe to stack.
Ingredients you will need
To achieve the best results, selecting the right materials is crucial for both the flavor and the visual impact of your cookies.
- White Fondant (24 oz): Use a high-quality, vanilla-flavored fondant. This serves as your blank white canvas. It should be rolled very thin (1/16 inch) so it doesn’t overwhelm the flavor of the cookie.
- Icing Colors: This recipe uses a specific palette of Wilton Icing Colors, including Lemon Yellow, Golden Yellow, Violet, Pink, Creamy Peach, Kelly Green, and Sky Blue. Gel colors are preferred over liquid grocery store colors because they are highly concentrated, allowing for vibrant hues without adding excessive moisture.
- Pure Lemon Extract (2 oz): This is the “secret ingredient.” The high alcohol content is necessary for the painting process. Avoid using water, as water stays wet too long and will turn your fondant into a sticky mess.
- Roll-Out Cookie Dough: Any sturdy sugar cookie or shortbread recipe that holds its shape during baking will work.
- Apricot Glaze or Piping Gel: This acts as the “glue” that secures the fondant to the cookie. Apricot glaze adds a nice fruity tang, while piping gel is flavor-neutral and perfectly clear.
- FoodWriter Markers: These edible markers allow you to add fine details and “sketchy” lines that define the watercolor shapes.
Ingredient Substitutions & Tips
If you don’t have lemon extract on hand, any clear, high-proof alcohol like vodka or everclear will work perfectly for mixing your paints; the alcohol evaporates, leaving no taste behind. For those avoiding alcohol entirely, you can use specialized oil-based candy colors, though the watercolor effect is harder to achieve. If you prefer not to use fondant, you can achieve a similar effect on dried, matte royal icing (the “crust” must be completely hard). For the cookie base, while vanilla is classic, try adding lemon zest or almond extract to the dough to complement the floral theme of the decorations.
Step-by-Step Instructions
1. Bake the Foundation
Begin by preparing your favorite roll-out cookie dough. On a surface lightly dusted with flour, roll the dough to exactly 1/16 inch thickness. Use the egg-shaped cutter from your set to cut the shapes. Place them on a 14×20 aluminum cookie sheet and bake according to your recipe’s instructions. Once baked, move them immediately to a non-stick cooling grid. They must be completely cold before you attempt to apply the fondant.
2. Prepare the Canvas
Knead your white fondant until it is soft and pliable. Roll it out on a surface lightly dusted with cornstarch to 1/16 inch thickness. You want it thin enough to be delicate but thick enough to handle being painted. Keep the fondant in a large sheet rather than cutting the eggs out first; this allows you to paint a “pattern” across the entire surface.
3. Mix the Edible Paints
In a clean palette or small bowls, place a tiny dot of each icing color. Add a few drops of pure lemon extract to each. Mix them until they have the consistency of traditional watercolors. For the specific shades in this recipe, combine Lemon Yellow with Golden Yellow for a rich sunshine hue, and mix Violet with a touch of Pink for a soft lavender.
4. Paint the Floral Designs
Using your food-safe brushes, paint loose, rounded flower shapes approximately 1.5 inches in diameter. Don’t worry about being perfect; the goal is an organic look. While the flower is still wet, drop a different color into the center to let them bleed together. Add 1-2 green leaves per flower using the Kelly Green mixture.
5. Add Details and Assemble
Let the paint dry for about 5 minutes. Use the black FoodWriter marker to draw rough, sketchy outlines around the petals and leaves. Use the egg cutter to cut shapes out of the painted fondant. Brush a thin layer of apricot glaze or piping gel onto the back of the fondant or the top of the cookie, then press them together gently.
Expert Baking Tips
To ensure your cookies look like they came from a professional studio, pay close attention to the thickness of your fondant. Rolling it too thick makes the cookie cloying and difficult to bite through. Always use a “dab and move” technique with your brush; if you saturate the fondant with too much lemon extract in one spot, it can create a “pit” in the sugar. If your edible marker starts to clog, wipe the tip with a clean, damp paper towel; sometimes sugar dust from the fondant can build up on the nib. Lastly, always work in a cool, dry environment, as humidity is the enemy of fondant.
The Secret to Perfect Edible Watercolor Art
The “special sauce” of this technique is the layering. To get depth in your watercolor, start with a very light, diluted wash of color for the base of the flower. Once that layer is slightly tacky (about 60 seconds later), add a more concentrated version of the same color to the shadows or centers. This creates a multi-dimensional look that mimics professional watercolor paper. If you make a mistake, you can sometimes “erase” it by dipping a clean brush in pure lemon extract and gently lifting the pigment, though you must be careful not to scar the surface of the fondant.
Serving Suggestions
These cookies are so beautiful they often serve as the centerpiece of a dessert table. Arrange them on a white ceramic platter interspersed with fresh sprigs of mint or edible pansies to emphasize the garden theme. They also make exquisite party favors; place a single egg cookie in a clear cellophane bag, tie it with a silk lavender ribbon, and add a small name tag for a personalized touch at an Easter brunch setting.
Storage & Make-Ahead Tips
These cookies are excellent for making ahead of time. The baked cookies can be made 3 days in advance. Once the fondant is applied, store the cookies in a single layer in an airtight container at room temperature. Do not refrigerate decorated fondant cookies, as the cold and subsequent condensation will cause the “paint” to run and the fondant to become sticky. They will stay fresh and beautiful for up to 5 days.
FAQs
Q: Can I use water instead of lemon extract?
A: It is not recommended. Water dissolves the sugar in the fondant, making it pitted and sticky. Alcohol-based extracts evaporate quickly, keeping the fondant surface smooth and dry.
Q: Do I need to be an artist to do this?
A: Absolutely not! The watercolor style is meant to be messy and abstract. The black edible marker does the “heavy lifting” by providing structure to the loose blobs of color.
Q: Can I use store-bought cookie dough?
A: Yes, as long as it is a “roll-out” variety. Standard drop-cookie dough (like chocolate chip) will spread too much and won’t provide the flat surface needed for the fondant eggs.
Q: How long does it take for the “paint” to dry?
A: Because of the lemon extract, the surface will be dry to the touch in about 10–15 minutes, depending on the humidity in your kitchen.
Q: Is the lemon flavor overpowering?
A: No. The alcohol evaporates, leaving behind only a very faint, pleasant citrus scent that actually complements the sugar cookie base.
Creating Hand-Painted Watercolor Easter Egg Cookies is a meditative and rewarding process that elevates holiday baking into a true artistic endeavor. By following these steps, you’ll produce treats that are almost too pretty to eat—almost! Don’t be afraid to experiment with your color palette and floral shapes. Each cookie is a unique piece of art, perfectly capturing the delicate beauty of spring. Happy baking and painting!


