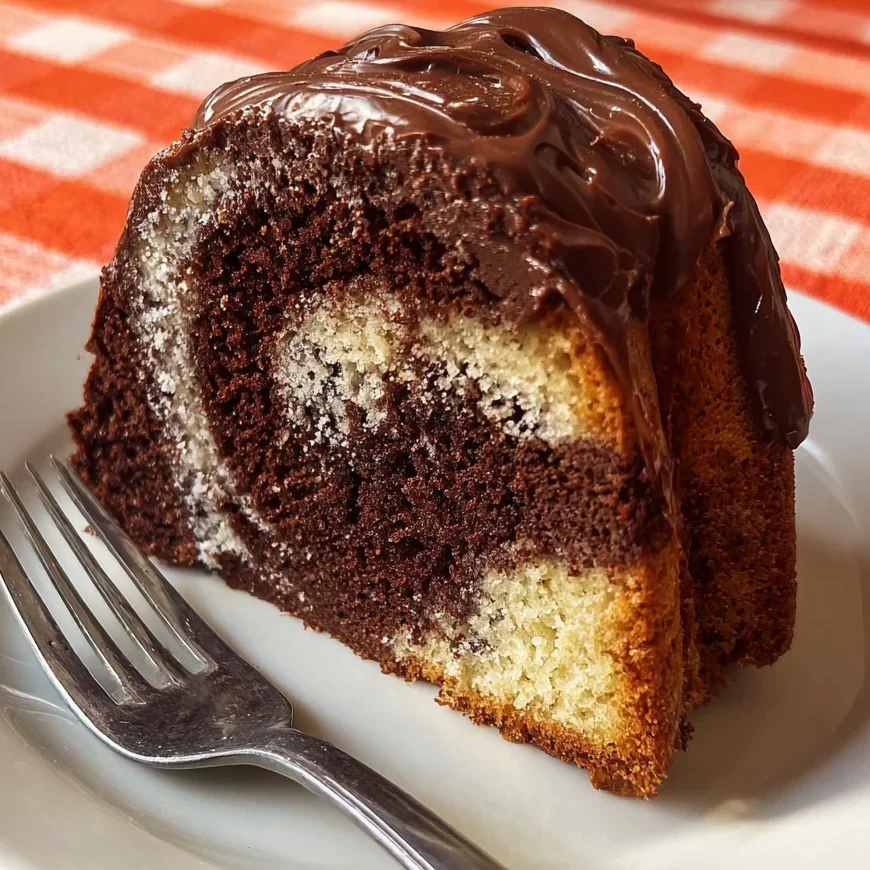
There is something undeniably nostalgic and comforting about a perfectly baked Bundt cake sitting on a cooling rack. But when you cut into that golden crust to reveal an intricate, artistic swirl of deep chocolate and creamy vanilla, it elevates a simple tea cake into a show-stopping masterpiece. This Marble Bundt Cake isn’t just about looks, though. It features a dense yet tender crumb, a rich buttery base, and the sophisticated punch of real melted bittersweet chocolate. Whether you are hosting a weekend brunch, a sophisticated dinner party, or simply want a reliable treat to go with your afternoon coffee, this recipe delivers consistent, bakery-quality results every single time. Get ready to master the art of the “marble” and bring a touch of vintage charm back to your kitchen with this foolproof guide.
Why You’ll Love This Recipe
You will fall in love with this Marble Bundt Cake because it offers the best of both worlds without compromise. Unlike many recipes that use cocoa powder for the chocolate swirl, this version utilizes real melted bittersweet chocolate and a touch of baking soda, resulting in a fudgy, moist texture that contrasts beautifully with the airy vanilla batter. The use of extra-large eggs provides a superior structure and a rich, golden hue to the crumb. It is incredibly versatile; you can serve it plain, with a simple dusting of powdered sugar, or topped with a glossy ganache. Plus, the marbling process is surprisingly therapeutic and much easier than it looks!
What Is Marble Bundt Cake?
The Marble Bundt Cake, known in Germany as Marmorkuchen, has been a staple in European and American bakeries for generations. Historically, the “marbling” effect was achieved by mixing spices or molasses into a portion of the batter, but by the late 19th century, chocolate became the preferred medium for creating those signature dark streaks. The “Bundt” aspect refers to the specific fluted ring pan, popularized in the 1950s by Nordic Ware. The shape allows for even heat distribution in dense cakes and provides a beautiful, architectural silhouette that requires very little decoration. It’s a marriage of German baking tradition and American mid-century kitchen innovation.
Ingredients Overview
To achieve the perfect balance of flavor and texture, the quality of your ingredients is paramount.
- All-Purpose Flour: Provides the necessary structure. Using 2-3/4 cups ensures the cake is sturdy enough to hold its shape after being unmolded.
- Unsalted Butter: At room temperature, butter creams with sugar to create tiny air pockets, leading to a light, velvety crumb.
- Granulated Sugar: Provides sweetness and contributes to the golden-brown exterior.
- Extra-Large Eggs: These provide the lecithin and fat needed for a moist, emulsified batter.
- Bittersweet Chocolate: This is the “secret sauce.” Using 4 ounces of high-quality melted bittersweet chocolate (around 60% cacao) creates a sophisticated, deep flavor that isn’t overly sugary.
- Baking Powder and Soda: The baking powder does the heavy lifting for the whole cake, while the baking soda is added specifically to the chocolate portion to neutralize the acidity of the chocolate and deepen the dark color.
- Milk: Adds moisture and helps thin the batter to a consistency that is easy to swirl.
- Vanilla Extract: Enhances the buttery notes of the vanilla batter.
Ingredient Substitutions & Tips
If you find yourself missing an ingredient, there are a few ways to pivot without ruining the cake. You can substitute the milk with whole-milk yogurt or sour cream for a tangier, even moister crumb. If you don’t have extra-large eggs, use 5 large eggs instead to maintain the correct liquid-to-dry ratio. For the chocolate, if bittersweet is too intense for your palate, semi-sweet chocolate works beautifully as well. However, avoid using chocolate chips for melting, as they often contain stabilizers that can affect the texture; a high-quality chocolate bar is always the better choice for baking.
Step-by-Step Instructions
- Preparation: Begin by preheating your oven to 350°F (175°C). The key to a Bundt cake is the pan preparation. Use a pastry brush to apply softened butter into every nook and cranny of a 10-inch Bundt pan, then dust lightly with flour, tapping out the excess.
- Dry Ingredients: In a medium bowl, whisk together the flour, baking powder, and salt. Whisking ensures no lumps and evenly distributes the leavening agents.
- The Creaming Method: In your stand mixer, beat the butter and sugar for a full 3 to 4 minutes. Do not rush this; the mixture should look pale, almost white, and very fluffy.
- Emulsify: Add the vanilla, then the eggs one by one. Ensure each egg is fully incorporated before adding the next to keep the batter from breaking.
- Combine: Alternately add the dry ingredients and the milk, starting and ending with the dry. Mix until just combined—overmixing at this stage leads to a tough cake.
- Create the Chocolate Batter: Transfer about half of your vanilla batter to a separate bowl. Stir in the melted (and slightly cooled) bittersweet chocolate and the baking soda until the color is uniform.
- Layer and Swirl: Dollop the batters into the pan. Think of it like a checkerboard. Use a butter knife or a skewer to swirl through the batter in a figure-eight motion.
- Bake: Place in the center of the oven and bake for 60 to 75 minutes. The cake is done when a skewer inserted into the thickest part comes out clean or with just a few moist crumbs.
Expert Baking Tips
The biggest fear with Bundt cakes is the “stick.” To ensure a clean release, let the cake cool in the pan for exactly 10-15 minutes—no more, no less. If it sits too long, the sugar starts to act like glue as it cools. Another tip is to ensure your melted chocolate isn’t hot when you add it to the batter; it should be just barely warm to the touch. If it’s too hot, it will cook the eggs in the batter and ruin the texture. Finally, always use “room temperature” ingredients. Cold milk or eggs will cause the creamed butter to seize, resulting in a lumpy, uneven batter.
The Art of the Perfect Marble Swirl
The secret to a stunning marble effect is restraint. It is tempting to keep swirling the knife through the batter, but “over-marbling” will simply result in a muddy, light-brown cake rather than distinct sections of chocolate and vanilla. Aim for about three to four passes with your knife in a gentle zigzag or circular motion. Additionally, when dropping the batter into the pan, use two separate spoons and alternate the colors both horizontally (around the ring) and vertically (as you build layers). This ensures that every single slice has a unique and beautiful pattern.
Serving Suggestions
This Marble Bundt Cake is beautiful enough to stand on its own, but a few small touches can make it spectacular. A light dusting of powdered sugar is the classic choice, highlighting the fluted edges of the pan. For a more decadent dessert, drizzle a simple chocolate ganache (equal parts hot cream and chocolate) over the top, letting it drip down the sides. It pairs exceptionally well with a dollop of lightly sweetened whipped cream or a scoop of premium vanilla bean ice cream.
Storage & Make-Ahead Tips
This cake actually tastes better the second day as the flavors have time to meld. Store it in an airtight cake dome or wrap it tightly in plastic wrap at room temperature for up to 3 days. For longer storage, you can freeze individual slices wrapped in foil and placed in a freezer bag for up to 3 months. To serve from frozen, let the cake thaw at room temperature for about an hour.
FAQs
Can I use cocoa powder instead of melted chocolate?
While you can, the texture will be different. Melted chocolate provides a fudgy richness that cocoa powder lacks. If you must use cocoa, mix 1/2 cup cocoa powder with a tablespoon of melted butter and a splash of boiling water to make a paste before adding it to the batter.
How do I prevent my Bundt cake from sticking?
Beyond greasing and flouring, try using a “baking spray” that contains flour. Also, ensure you are using a high-quality non-stick pan that isn’t scratched.
Why did my cake crack on the bottom?
Cracks on the bottom (which becomes the base) are normal for dense Bundt cakes. It’s a sign of a good rise. If the crack is excessive, your oven might be too hot.
What size Bundt pan should I use?
This recipe is designed for a standard 10-inch (10-12 cup) Bundt pan. If your pan is smaller, do not fill it more than 3/4 full, or it will overflow.
Final Thoughts
Baking a Marble Bundt Cake is a rewarding experience that brings a touch of elegance to your kitchen. With its striking appearance and rich, dual-flavor profile, it’s a recipe that appeals to both chocolate lovers and vanilla purists alike. By following these steps and paying attention to the temperature of your ingredients, you’ll produce a moist, beautiful cake that is sure to become a family favorite. Happy baking!
PrintMarble Bundt Cake
This Marble Bundt Cake is the perfect marriage of rich, melted bittersweet chocolate and a tender, buttery vanilla crumb. It’s an elegant yet simple dessert that never goes out of style.
Ingredients
2–3/4 cups all-purpose flour
2–1/4 teaspoons baking powder
1 teaspoon table salt
1 cup (2 sticks) unsalted butter, at room temperature
1–3/4 cups granulated sugar
1 teaspoon vanilla extract
4 extra-large eggs
3/4 cup milk
4 ounces bittersweet chocolate, melted
1/4 teaspoon baking soda
Instructions
1. Preheat oven to 350°. Grease a 10-inch Bundt or tube pan thoroughly.
2. Whisk together the flour, baking powder, and salt in a medium bowl. Set aside.
3. In a large bowl, cream the butter and sugar until light and fluffy (3-4 minutes). Add vanilla, then eggs one at a time, mixing well after each.
4. Add one-third of the dry ingredients, followed by half the milk. Repeat, scraping the bowl, and finish with the last of the dry ingredients.
5. Divide the batter into two bowls. Stir melted chocolate and baking soda into one bowl.
6. Drop heaping tablespoons of alternating batters into the pan. Bang the pan on the counter to level.
7. Swirl a thin knife through the batter several times for the marble effect.
8. Bake for 60 to 75 minutes. Let cool completely before unmolding.
Notes
Ensure your eggs and milk are at room temperature to prevent the batter from curdling.
Use high-quality bittersweet chocolate (at least 60% cacao) for the best flavor profile.