There is something about the first bloom of spring that makes me want to pull out every pastel color in my pantry. If you’re looking for the perfect centerpiece for your Easter brunch or a bright, cheery treat for a spring potluck, you’ve just found it. This Easter Poke Cake is a total showstopper, but I’ll let you in on a little secret: it starts with a box of cake mix.
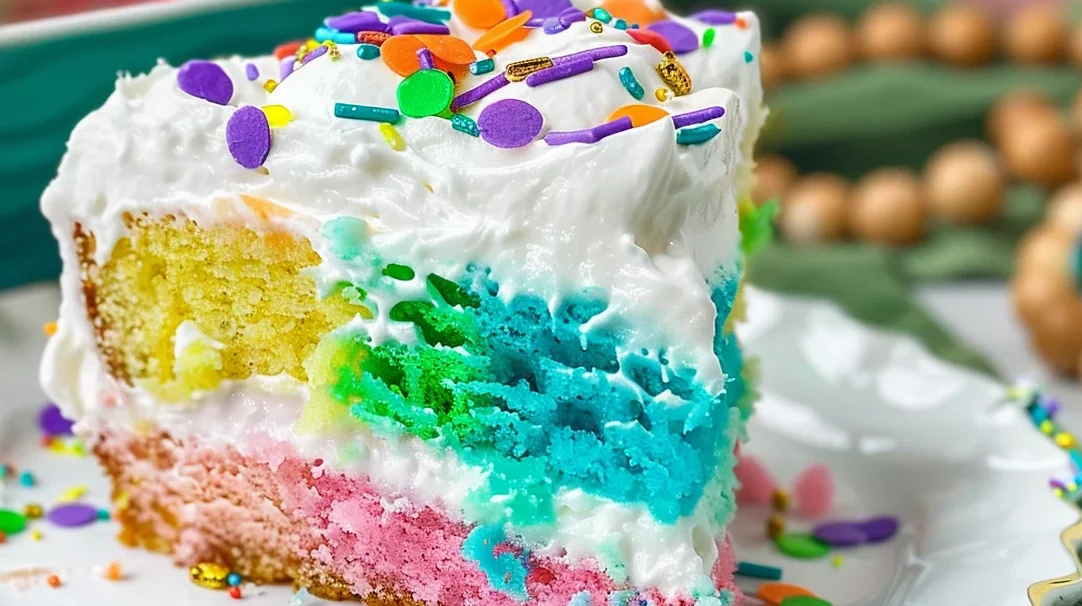
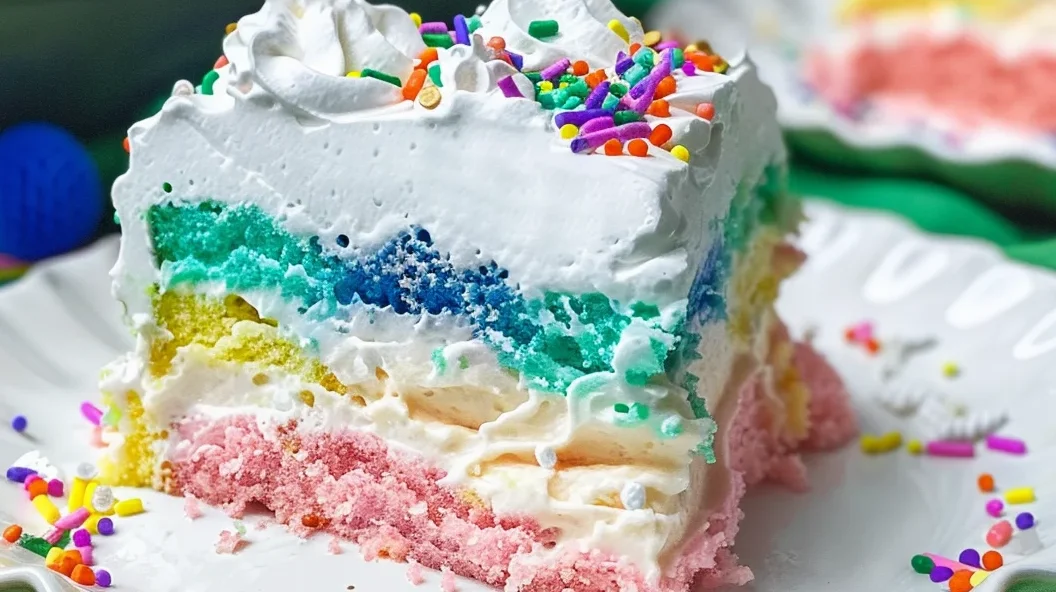
I’ve always loved a good poke cake because they are virtually impossible to mess up. They stay incredibly moist, they’re easy to transport, and that first slice always reveals a beautiful, colorful surprise. This version uses a vibrant “drop and swirl” method to create a marbled pastel base that looks like it came from a high-end bakery, but it takes less than ten minutes of active prep time.
Whether you’re hosting the whole family or just want a festive weekend baking project with the kids, this cake hits all the right notes. It’s light, creamy, and just sweet enough to satisfy that spring sugar craving!
Why You’ll Love This Recipe
- Incredibly Moist: Because we “poke” the cake and fill it with vanilla pudding, every single bite is silky and melt-in-your-mouth soft.
- Total Crowd-Pleaser: It’s bright, colorful, and nostalgic. Kids love the sprinkles; adults love the light, whipped topping.
- Make-Ahead Magic: This cake actually tastes better after sitting in the fridge for a few hours, making it the perfect stress-free dessert for hosting.
- Highly Customizable: You can swap the pastel colors for any holiday—think red and blue for the 4th of July or orange and purple for Halloween!
- Budget-Friendly: Uses simple pantry staples like white cake mix and instant pudding.
Ingredient Notes
To get that perfect “professional” look with a boxed mix, a few small details matter. Here is what you need to know about the ingredients:
- White Cake Mix: I recommend a “White” mix over “Yellow” or “French Vanilla” for this specific recipe. The white base allows the food coloring to stay true to tone—pink stays pink rather than turning coral!
- Melted Butter (The Secret Swap): Most box mixes call for oil. By swapping the oil for melted unsalted butter, you give the cake a much richer, “homemade” crumb and flavor.
- Whole Milk: For the pudding layer, use real dairy milk. Plant-based milks (like almond or oat) often fail to set instant pudding properly, which can lead to a runny cake.
- Instant Vanilla Pudding: Double-check your box! It must say “Instant.” The “Cook and Serve” variety won’t thicken correctly when poured over the cake.
- Cool Whip: This provides that iconic, stabilized whipped topping that won’t melt or weep while the cake sits on your Easter table.
Step-by-Step Instructions
1. Prep and Mix
Preheat your oven to 350°F. In a large mixing bowl, combine the white cake mix, melted butter, water, and eggs. Whisk by hand or use an electric mixer on medium speed until the batter is smooth and lump-free.
2. Create the Colors
Divide your batter evenly into four small bowls. This is where the fun starts! Add a few drops of food coloring to each bowl. I love using mint green, soft yellow, baby pink, and sky blue for that classic Easter egg aesthetic. Stir until the color is vibrant and even.
3. The “Drop” Technique
Spray your 9×13 baking dish generously with nonstick spray. Using a large spoon, drop random dollops of each color across the bottom of the dish. Don’t worry about being too neat—the colors will naturally expand as they bake. Once all the batter is in, gently tap the dish on the counter to level it out.
4. Bake and Poke
Bake for 22–25 minutes (or according to your specific package instructions). Once the cake comes out, let it cool for just a few minutes. While it’s still warm, take the back of a wooden spoon and poke about 50 holes across the surface, roughly 1 inch apart.
5. The Pudding Fill
Whisk your milk and instant pudding for about 2 minutes. While it’s still slightly liquid (before it fully sets into a firm pudding), pour it evenly over the cake, making sure it gets into all those holes.
6. Chill and Topping
Cover the cake and let it chill in the refrigerator for at least 30 minutes. This allows the pudding to set and the cake to absorb all that moisture. Finally, spread the Cool Whip over the top in an even layer and go wild with the Easter sprinkles!
Expert Tips for Best Results
- Don’t Poke Too Deep: Try to poke about 3/4 of the way down. If you go all the way to the bottom of the pan, the pudding can sometimes cause the bottom layer to stick.
- The “Clean Spoon” Trick: When dropping the colored batter, use a clean spoon for each color or wipe your spoon in between to keep the pastels “clean” and prevent them from looking muddy.
- Wait for the Cool: Ensure the cake is completely chilled before adding the Cool Whip. If the cake is even slightly warm, the whipped topping will deflate and turn into a glaze.
- Use Gel Colors: If you have them, gel food colors provide a much more intense pigment without thinning out the cake batter.
Variations and Substitutions
- Homemade Whipped Cream: If you aren’t a fan of Cool Whip, you can make a stabilized whipped cream. Beat 2 cups of heavy whipping cream with 1/2 cup of powdered sugar and 1 teaspoon of vanilla until stiff peaks form.
- Fruit Topping: Instead of sprinkles, try topping the cake with fresh halved strawberries or blueberries for a more “grown-up” look.
- Flavor Swap: Want a different profile? Use Lemon cake mix with Lemon pudding for a zesty, bright spring flavor!
Storage and Freezing
To Store: Because of the dairy in the pudding and the whipped topping, this cake must be kept refrigerated. It stays fresh and delicious for up to 3 days when covered tightly with plastic wrap or a lid.
To Freeze: You can freeze the baked and “poked” cake (before the pudding and topping) for up to a month. However, I do not recommend freezing the fully assembled cake, as the texture of the pudding and Cool Whip can change significantly upon thawing.
FAQ
Q: Can I use a different flavored pudding? A: Absolutely! Cheesecake pudding or White Chocolate pudding are fantastic alternatives that still allow the colorful cake to shine.
Q: Why is my pudding too thick to pour? A: You have to work quickly! As soon as the 2 minutes of whisking is up, pour it immediately. If it sets too much, you can whisk in a tablespoon of milk to loosen it back up.
Q: My cake colors blended together. What happened? A: This usually happens if you try to swirl the batter with a knife. For this specific look, “dropping” the batter in spoonfuls and letting it bake as-is provides the best color separation.
This Easter Poke Cake is proof that you don’t need to spend hours in the kitchen to create something memorable. It’s fun, it’s festive, and it’s a total nostalgia trip in every bite. I hope this becomes a new tradition in your home like it has in mine!
Easter Poke Cake
Prep time: 15 mins | Cook time: 25 mins | Chill time: 30 mins | Total time: 1 hour 10 mins
Ingredients
- 1 box White Cake Mix
- 1/2 cup Unsalted Butter, melted
- 3 Eggs
- 1 cup Water
- 2 cups Whole Milk
- 1 box (3.4 oz) Instant Vanilla Pudding
- Assorted food coloring (Pink, Yellow, Green, Blue)
- 2 containers (8 oz each) Cool Whip, thawed
- Easter sprinkles
Instructions
Top: Spread Cool Whip over the top and add sprinkles. Serve chilled.
Prep: Preheat oven to 350°F and grease a 9×13 pan.
Mix: Combine cake mix, melted butter, water, and eggs. Whisk until smooth.
Color: Divide batter into 4 bowls; tint each with a different food color.
Layer: Drop spoonfuls of colored batter randomly into the pan. Tap to level.
Bake: Bake for 22–25 mins.
Poke: Poke ~50 holes in the warm cake using a wooden spoon handle.
Fill: Whisk milk and pudding for 2 mins. Pour immediately over the cake.
Chill: Refrigerate for 30–60 minutes.