There is something deeply nostalgic about the smell of butter and sugar creaming together in a warm kitchen. Whether it’s a rainy Sunday afternoon or you’re preparing a batch of treats for a school bake sale, Classic Vanilla Biscuits are the backbone of any home baker’s repertoire.

These aren’t just any cookies; they are the kind of biscuits that hold their shape perfectly, making them the ultimate canvas for icing, sprinkles, or just a simple dusting of sugar. If you’ve ever struggled with “spreading” cookies that lose their cute shapes in the oven, this recipe is about to become your new best friend.
In this guide, I’ll walk you through the simple science of the perfect short-crust biscuit dough, share my favorite decorating tips, and show you how to get that professional, bakery-style finish right in your own kitchen.
Why You’ll Love This Recipe
- Pantry Staples: You likely already have everything you need: butter, sugar, flour, eggs, and vanilla.
- Holds Its Shape: Thanks to the specific chilling process, these biscuits won’t spread into blobs. Your fluted edges and star shapes will stay sharp!
- Kid-Friendly: This is a fantastic “first recipe” for children to help with, especially the rolling and cutting parts.
- Perfect for Decorating: Whether you love royal icing, glace icing, or melted chocolate, these biscuits are sturdy enough to handle it all.
- Versatile: Keep them plain for a tea-dunking treat or dress them up for holidays.
Ingredient Notes
To get that melt-in-the-mouth texture, quality and temperature matter. Here’s what you need to know about your ingredients:
- Unsalted Butter: Ensure your butter is “softened” but not greasy. You should be able to press it with your thumb and leave an indentation, but it shouldn’t be shiny or melting.
- Caster Sugar: (Known as Superfine Sugar in the US). Its fine crystals dissolve more easily into the butter, creating a smoother dough.
- Plain White Flour: Avoid self-rising flour here. We want a dense, crisp biscuit, not a cakey one.
- Vanilla Extract: This is the star of the show. I highly recommend using a high-quality extract like Nielsen-Massey. Avoid “essence,” which is synthetic; the real deal provides those beautiful tiny black flecks and a deep, floral aroma.
- Large Free Range Egg: Make sure it’s at room temperature so it incorporates into the creamed butter without curdling.
Step-by-Step Instructions
1. Creaming for Success
Start by placing your softened butter and caster sugar into a large mixing bowl. Using an electric hand mixer or a sturdy wooden spoon, beat them together until the mixture looks pale and fluffy. This “creaming” process introduces tiny air bubbles that give the biscuit its delicate snap. Once creamy, beat in your egg and that fragrant vanilla extract.
2. The Flour Fold
Sift your flour into the bowl. Sifting is a small step that makes a big difference in ensuring no lumps end up in your dough. Using your hands, gently bring the mixture together. You aren’t kneading bread here—just push the ingredients together until a cohesive dough forms. Stop as soon as the flour disappears!
3. The Secret Step: Chilling
Flatten the dough into a disc (this makes it easier to roll later), wrap it tightly in cling film, and pop it in the fridge. Don’t skip the 30-minute chill! This allows the gluten to relax and the butter to firm up, which is exactly what prevents the biscuits from spreading in the oven.
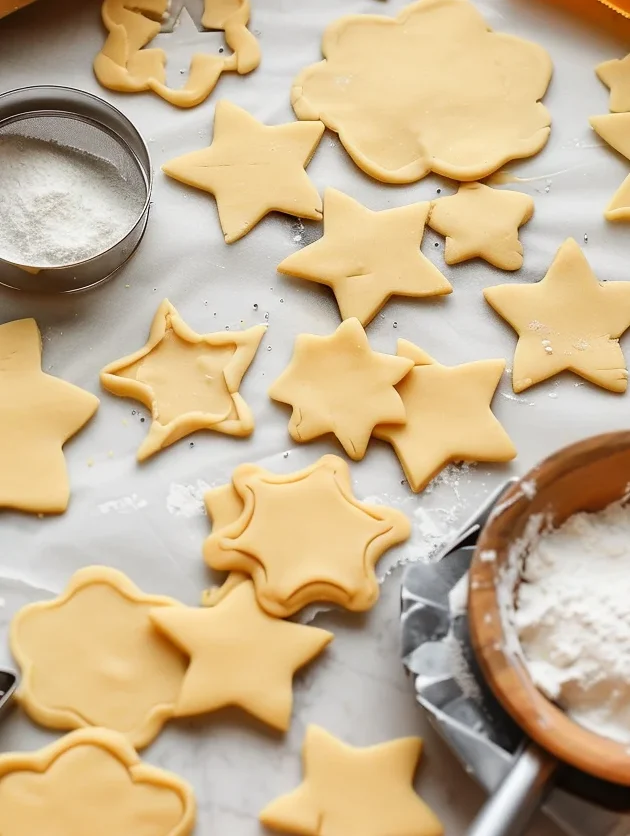
4. Roll and Cut
On a lightly floured surface, roll the dough to about 0.5cm thickness. If the dough is too cold and cracks, let it sit for 5 minutes. Use a 7cm fluted cutter for a classic look. Pro-tip: Roll the dough between two sheets of parchment paper to prevent sticking without adding too much extra flour.
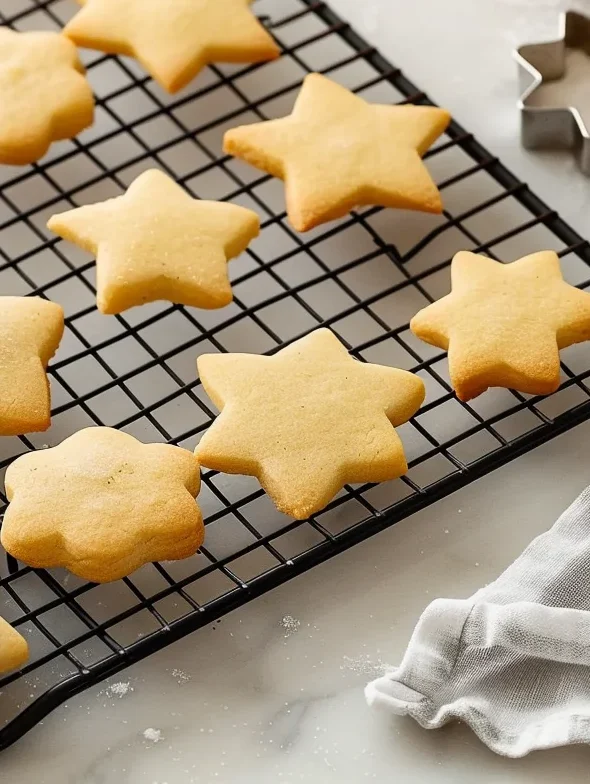
5. Bake to Golden Perfection
Preheat your oven to 180°C (160°C fan). Bake for 12-15 minutes. You are looking for a very light golden brown around the edges. They will still feel slightly soft to the touch, but they will firm up as they cool.
Expert Tips for Best Results
- Don’t Overwork the Dough: The more you handle the dough, the tougher the biscuits will be. Work quickly and gently.
- Keep it Cool: If your kitchen is very warm, put the cut-out shapes back in the fridge for 10 minutes before sliding them into the oven.
- Even Thickness: Use “rolling pin rings” or two wooden dowels on either side of your dough to ensure every single biscuit is exactly 0.5cm thick. This ensures they all bake at the same rate.
- The Sift Matters: Sifting the flour doesn’t just remove lumps; it aerates the flour, contributing to a lighter texture.
Variations and Substitutions
- Lemon or Orange: Add the zest of one lemon or orange to the butter/sugar mixture for a citrusy twist.
- Almond Biscuits: Swap the vanilla extract for 0.5 tsp of almond extract.
- Chocolate Dipped: Once cooled, dip half of each biscuit into melted dark chocolate and sprinkle with sea salt.
- Spiced: Add 1 tsp of ground cinnamon or ginger to the flour for a cozy autumn version.
Storage and Freezing
Storing: Keep these in an airtight container at room temperature. They are at their absolute best within 2-3 days, though they will stay safe to eat for up to a week (they just lose a bit of that fresh “snap”).
Freezing Dough: This is a great “make-ahead” recipe. Wrap the raw dough disc in a double layer of cling film and freeze for up to 2 months. Thaw it overnight in the fridge before rolling.
Freezing Baked Biscuits: You can freeze the baked, un-iced biscuits for up to a month. Thaw at room temperature before decorating.
FAQ
Why are my biscuits hard instead of crisp?
This usually happens if the dough was overworked (developing too much gluten) or if too much extra flour was added during the rolling process.
Can I use granulated sugar instead of caster?
You can, but the texture will be slightly grainier, and the biscuits may have tiny “pockmarks” on the surface where the larger sugar crystals didn’t dissolve.
How do I get a perfectly smooth icing?
If using glace icing (powdered sugar and a splash of water/milk), ensure it is thick enough to coat the back of a spoon. If it’s too runny, it will transparently soak into the biscuit.
These Classic Vanilla Biscuits are a testament to the fact that sometimes, the simplest recipes are the most rewarding. Whether you’re cutting them into hearts for Valentine’s Day, stars for Christmas, or simple rounds for a Monday morning coffee, they never fail to please.
Happy baking, and don’t forget to tag me in your photos if you give these a try! I love seeing your creative icing designs.
PrintClassic Vanilla Biscuits

These classic vanilla biscuits are the ultimate pantry-staple treat. Buttery, crisp, and infused with rich vanilla, they are perfect for decorating or enjoying with a cup of tea.
- Prep Time: 15
- Cook Time: 12
- Total Time: 57
- Yield: 24
- Category: Dessert
- Method: Baking
- Cuisine: British
Ingredients
150g Butter (unsalted, softened)
150g Caster Sugar
1 Large free range egg
1.5 tsp Vanilla Extract (Nielsen-Massey recommended)
300g Plain White Flour
Instructions
1. Put the butter and sugar in a bowl and beat with an electric beater until soft and creamy. Beat in the egg and vanilla.
2. Sift the flour into the creamed mixture then bring together with your hands until a dough forms.
3. Flatten into a disc, wrap in cling film, and chill in the fridge for at least 30 minutes.
4. Preheat oven to 180°C (160°C fan/Gas Mark 4). Roll dough on a floured surface to 0.5cm thick.
5. Cut out biscuits using a 7cm cutter and place on a lined baking sheet. Re-roll trimmings to use all dough.
6. Bake for 12-15 minutes until golden. Cool on the tray slightly before moving to a wire rack.
Notes
For a glossy finish, use glace icing once the biscuits are completely cool.
Store in an airtight container for 2-3 days.
You can freeze the raw dough for up to 2 months.