There is something inherently nostalgic about a custard pie. It reminds me of Sunday afternoons at my grandmother’s house, where the air was always thick with the scent of toasted coconut and warm vanilla. But let’s be honest making a perfect, flaky pie crust can be a daunting task, even for the most seasoned home bakers.
That is where this Crustless Coconut Custard Pie comes in to save the day.
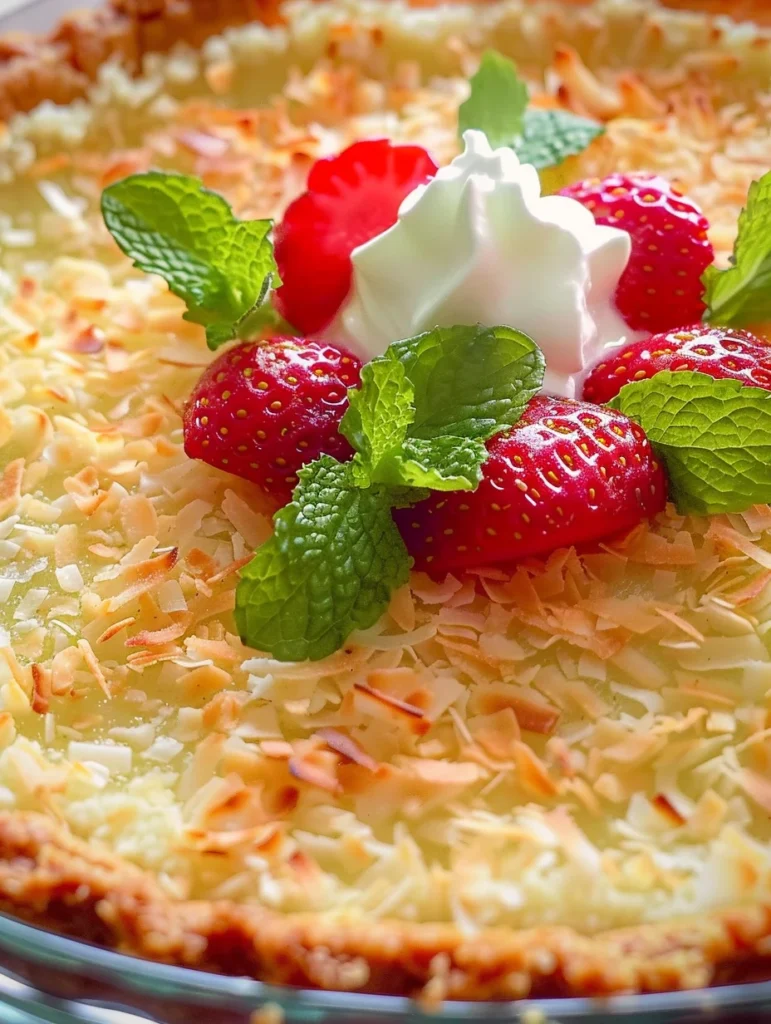
This recipe is what I like to call “magic in a dish.” It’s an old-fashioned, “impossible-style” pie that requires no rolling pins, no chilling of dough, and absolutely zero stress. As it bakes, the coconut rises to the top to create a golden, chewy “crust,” while the bottom transforms into a silky, rich custard. It’s elegant enough for a holiday table but simple enough for a Tuesday night craving.
Why You’ll Love This Recipe
- One-Bowl Wonder: You don’t need a stand mixer or a sink full of dishes. Just a bowl and a whisk.
- Pantry Staples: Aside from the coconut, you likely have every single ingredient in your kitchen right now.
- Perfect Texture: It strikes the ideal balance between a creamy flan and a traditional coconut cream pie.
- Naturally “Crustless”: The tiny bit of flour in the batter helps the pie set firmly enough to slice, while the coconut creates its own textured topping.
- Crowd-Pleaser: It’s light, refreshing, and just the right amount of sweet.
Ingredient Notes for the Perfect Custard
To get that bakery-quality finish, the quality and temperature of your ingredients matter. Here is what you need:
- Evaporated Milk: This is the “secret sauce.” Don’t substitute this with regular milk; evaporated milk has a lower water content, which creates a much richer, creamier custard that doesn’t get “weepy.”
- Shredded Coconut: I prefer using sweetened shredded coconut for that classic dessert flavor, but if you want to control the sugar, unsweetened desiccated coconut works too.
- Eggs: Use large, room-temperature eggs. They incorporate much better into the melted butter and sugar, ensuring your custard doesn’t have any lumpy bits.
- Melted Butter: Make sure your butter is melted but not boiling hot when you add it to the sugar, or you might accidentally scramble your eggs!
- Flour: Just two tablespoons of all-purpose flour act as the stabilizer. It’s what gives the pie its “body” without needing a traditional pastry crust.
Step-by-Step Instructions
1. Prep Your Pan:
Start by preheating your oven to 325°F (165°C). This is a “low and slow” bake, which is essential for a smooth custard. Generously grease and flour your 9-inch pie plate. Even though it’s crustless, we want those slices to lift out perfectly!
2. The Dry Base:
In a medium mixing bowl, whisk together the sugar, flour, and salt. This ensures the flour is evenly distributed so you don’t end up with clumps in the finished pie.
3. The Liquid Gold:
Stir in your melted butter and vanilla extract. Now, add the eggs one at a time. I like to whisk vigorously after each egg; this builds just a tiny bit of structure.
4. The Coconut Magic:
Slowly pour in the evaporated milk while whisking. Finally, fold in the shredded coconut. The mixture will look very thin and liquid—don’t panic! This is exactly how it should look.
5. The Bake:
Pour the mixture into your prepared pie plate. Place it in the center of the oven and bake for 35 to 40 minutes.
6. The “Jiggle” Test:
You’ll know it’s done when the edges are golden brown and the center has a slight, firm jiggle (like Jello), but isn’t liquid. A knife inserted near the center should come out clean.
Expert Tips for Best Results
- Don’t Overbake: Custard continues to cook as it cools (carry-over cooking). If you leave it in until it’s completely stiff, it may crack or become rubbery.
- The Chill Factor: While it smells amazing warm, this pie is infinitely better after it has chilled in the refrigerator for at least 2–4 hours. This allows the custard to fully set and the flavors to meld.
- Grease Well: Since there is no pastry crust to act as a barrier, the custard can stick to the dish. Use butter or a high-quality baking spray to ensure a clean release.
- Toasting the Top: If you want a darker, crunchier top, you can turn on the broiler for the last 60 seconds of baking—but watch it like a hawk! Coconut burns in the blink of an eye.
Variations and Substitutions
- Tropical Twist: Add a teaspoon of lime zest to the batter for a “Coconut Lime” vibe.
- Almond Joy Style: Replace the vanilla extract with almond extract and fold in a handful of mini chocolate chips.
- Gluten-Free: You can easily swap the 2 tablespoons of all-purpose flour for a 1-to-1 gluten-free flour blend. Since the amount is so small, it won’t affect the texture.
- Dairy-Free: While I recommend the richness of evaporated milk, some readers have had success using full-fat canned coconut milk for an even deeper coconut flavor.
Storage and Freezing
To Store: Keep the pie covered with plastic wrap or foil in the refrigerator for up to 4 days. It’s a great make-ahead dessert!
To Freeze: You can freeze custard pie, though the texture may change slightly upon thawing. Wrap it tightly in plastic wrap and then foil. Freeze for up to 2 months. Thaw slowly in the refrigerator before serving.
FAQ
Why did my coconut custard pie separate?
Actually, separation is a good thing here! This recipe is designed so the coconut floats to the top and the flour settles slightly to the bottom, creating a “crust-like” layer. If the custard itself separated or looks curdled, the oven might have been too hot.
Can I use fresh coconut?
Yes! If you use fresh grated coconut, you may want to add an extra tablespoon of sugar, as fresh coconut isn’t as sweet as the bagged shredded variety.
Can I bake this in a square pan?
Absolutely. An 8×8 square baking dish works perfectly if you prefer “custard bars” over pie slices.
The Perfect Slice Awaits
This Crustless Coconut Custard Pie is a testament to the fact that you don’t need fancy techniques to create a show-stopping dessert. It’s humble, comforting, and deeply satisfying. Whether you’re serving it at a backyard BBQ or as a light finish to a heavy holiday meal, it always earns rave reviews.
Give it a try this weekend, and don’t forget to let it chill—patience is the final ingredient for the perfect custard!
PrintCoconut Custard Pie

A vintage-style custard pie that is naturally crustless. The coconut settles into a beautiful toasted topping while the base becomes a silky, rich custard.
Ingredients
1 cup white sugar
2 tablespoons all-purpose flour
1/4 teaspoon salt
6 tablespoons butter, melted
1 teaspoon vanilla extract
3 eggs
1 (12 fluid ounce) can evaporated milk
1 cup shredded coconut
Instructions
1. Preheat oven to 325 degrees F (165 degrees C). Generously grease and flour a 9-inch pie plate.
2. In a medium bowl, mix together sugar, flour, and salt. Stir in melted butter and vanilla extract.
3. Add eggs one at a time, mixing well after each addition.
4. Mix in evaporated milk followed by coconut. Pour mixture into the prepared pie plate.
5. Bake in preheated oven for 35 to 40 minutes, or until custard is nearly set and a knife inserted near the center of the pie comes out clean.
6. Let cool to room temperature, then refrigerate before serving for the best texture.
Notes
For a more toasted flavor, use sweetened shredded coconut.
Ensure your eggs are at room temperature for a smoother custard.
Don’t skip the refrigeration; it allows the custard to set properly for clean slices.