Have you ever scrolled through Pinterest and seen those breathtaking cakes with intricate patterns baked right into the sponge? You know the ones—delicate florals, whimsical polka dots, or even complex characters that look far too beautiful to eat. For a long time, I thought these were only possible in high-end Parisian patisseries.
But here is a little secret: you can make a Decorative Patterned Sponge Cake right in your own kitchen.
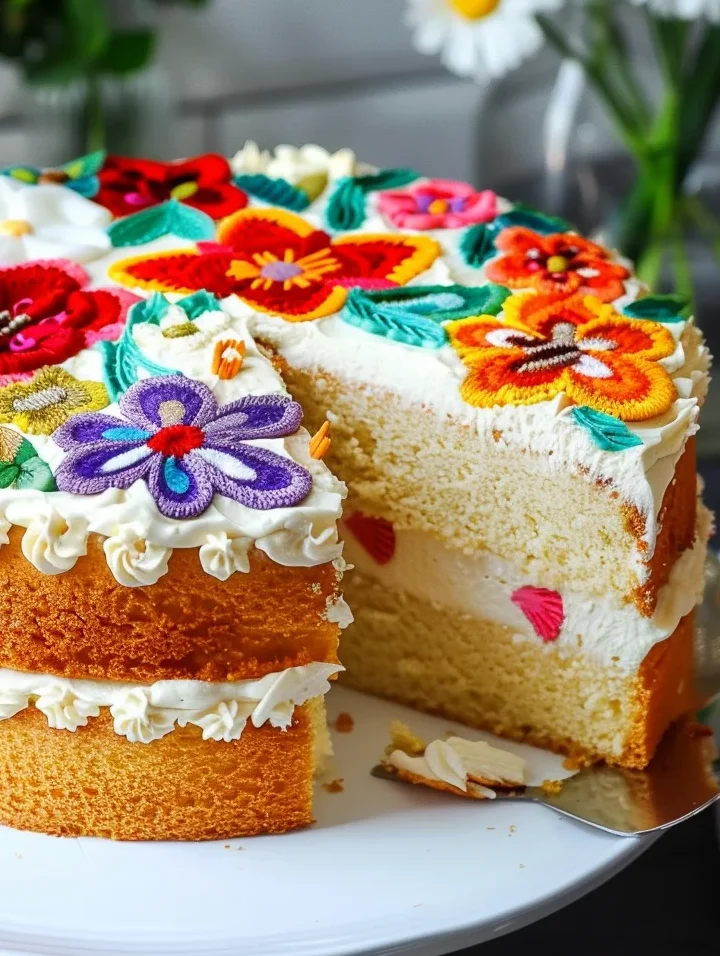
This isn’t just a cake; it’s a creative project. Whether you’re celebrating a birthday, a baby shower, or just want to level up your weekend baking game, this patterned cake technique is a total showstopper. The base is a light, airy chiffon-style sponge that melts in your mouth, paired with a cloud-like whipped cream filling.
Get your piping bags ready—we’re about to turn a simple sponge into a masterpiece!
Why You’ll Love This Recipe
- Total Customization: From elegant marble swirls to festive holiday patterns, you are only limited by your imagination.
- Light & Airy Texture: Unlike dense butter cakes, this sponge is incredibly fluffy thanks to the whipped egg white (meringue) base.
- The “Wow” Factor: There is nothing quite as satisfying as peeling back the parchment paper to reveal your hidden design.
- Not Too Sweet: The whipped cream filling provides a clean, sophisticated sweetness that lets the cake shine.
Ingredient Notes for Success
Before we start whisking, let’s talk about the key players in this Decorative Patterned Sponge Cake.
- Egg Yolks & Whites: Separation is key. Ensure not a single drop of yolk gets into your whites, or they won’t whip into the stiff peaks we need for structure.
- Vegetable Oil: This keeps the sponge moist even after it’s been refrigerated. Avoid olive oil as the flavor is too strong.
- Cornstarch: This is my “secret weapon” for a tender crumb. It softens the proteins in the all-purpose flour, giving it a texture closer to cake flour.
- Food Dye Gel: This is non-negotiable! Liquid food coloring will water down your batter and cause your designs to bleed. Gel provides vibrant color without changing the chemistry of the cake.
- Vinegar: A tiny amount helps stabilize the egg whites, ensuring your meringue doesn’t collapse while you’re piping your art.
Step-by-Step Instructions
1. Prepare Your Canvas
Preheat your oven to 375°F (190°C). This recipe moves fast once the batter is ready, so preparation is everything. Grease an 8-inch circular pan and line the bottom with parchment paper.
Pro Tip: Use an edible marker to draw your design on the parchment first. Then, flip the paper over so the ink is on the bottom—you’ll still be able to see the guide, but the ink won’t touch your food!
2. Mix the Base Batter
In a large bowl, whisk together the egg yolks, sugar, oil, milk, and vanilla. Once combined, sift in your flour and cornstarch. Whisking until smooth is important here; we want to eliminate any lumps before we introduce the delicate egg whites.
3. Achieve the Perfect Meringue
In a clean, grease-free bowl, whip your egg whites until frothy. Slowly stream in the vinegar and sugar. Continue whipping until you reach stiff peaks. You’ll know you’re there when you lift the whisk and the peak stands straight up without drooping.
4. The Gentle Fold
Carefully fold the meringue into the yolk batter. Use a “cut and fold” motion with a spatula. If you stir too vigorously, you’ll deflate the air bubbles, and your cake will turn out like a pancake instead of a cloud.
5. Piping Your Design
This is the fun part! Take small portions of the batter (about a tablespoon or two) and dye them with your gel colors. Transfer them to small piping bags. Trace your design onto the parchment paper in the pan.
Crucial Step: Put the pan in the fridge for 5-8 minutes. This “sets” the design so that when you pour the rest of the batter over it, the colors don’t smear.
6. The Big Bake
Pour the remaining uncolored batter over your chilled design. Smooth the top and bake for 8-9 minutes. It’s a quick bake!
7. The Reveal
As soon as the cake comes out, flip it onto a wire rack and peel the parchment paper off immediately. This prevents the paper from sticking to your beautiful design.
Expert Tips for Best Results
- Room Temperature Eggs: Cold eggs are easier to separate, but room temperature whites whip up to a much larger volume.
- Don’t Over-Bake: Because this sponge is thin, it can dry out quickly. Start checking at the 7-minute mark.
- The Fridge Trick: If you are doing a very intricate design with multiple colors, pop the pan in the freezer for 2 minutes between colors to prevent them from running into each other.
- Clean Bowls: Even a speck of fat or oil in your whisking bowl will prevent the egg whites from peaking. Wipe your bowl with a little lemon juice or vinegar before starting.
Variations and Substitutions
- Fruit Infusions: Add a layer of sliced strawberries or raspberries into the whipped cream filling for a fresh pop of flavor.
- Chocolate Pattern: Use cocoa powder to dye a portion of the batter brown for a natural, chocolate-flavored design.
- Citrus Zest: Add lemon or orange zest to the yolk batter for a bright, summery twist.
- Jam Swirl: Instead of plain whipped cream, spread a thin layer of apricot or strawberry jam before adding the cream.
Storage and Freezing
To Store: This cake loves the fridge! Because of the whipped cream, it should be kept in an airtight container in the refrigerator for up to 3 days.
To Freeze: You can freeze the sponge layers (without filling) for up to a month. Wrap them tightly in plastic wrap and then foil. Thaw in the fridge before assembling with fresh whipped cream.
FAQ
Why did my design peel off with the parchment paper?
This usually happens if the cake is underbaked or if you waited too long to peel the paper. Make sure the cake springs back when touched, and peel while it’s still hot!
Can I use this for a Swiss Roll?
Yes! This exact batter works perfectly for a patterned jelly roll. Just bake it in a rectangular sheet pan and roll it while warm.
Can I use store-bought frosting?
You can, but a homemade stabilized whipped cream (like the one in this recipe) is much lighter and complements the delicate sponge better than heavy buttercream.
Making a Decorative Patterned Sponge Cake is one of those rare baking projects that is just as rewarding to look at as it is to eat. It’s a way to put your heart on a plate—literally! Whether you’re drawing hearts for Valentine’s Day or snowflakes for the holidays, this technique will make you the star of the dessert table.
Happy baking, and don’t forget to tag me in your beautiful cake creations!
PrintHow to Make a Decorative Patterned Sponge Cake
This stunning Decorative Patterned Sponge Cake is as much a work of art as it is a delicious dessert. With a light-as-air chiffon texture and a fresh whipped cream center, it’s the perfect canvas for your creativity.
Ingredients
6 egg yolks
4 Tbsp. sugar
4 Tbsp. vegetable oil
4 Tbsp. whole milk
2 tsp. vanilla extract
1 cup all-purpose flour
6 egg whites
2 Tbsp. cornstarch
1/2 tsp. vinegar
4 Tbsp. sugar (for meringue)
Food dye gel (not liquid)
2 cups heavy whipping cream (filling)
5 Tbsp. confectioners sugar (filling)
Dash of salt
2 tsp. vanilla (filling)
Fresh fruit or jam (optional)
Instructions
1. Preheat the oven to 375 degrees, then grease an 8″ circular pan with cooking spray. Cut out parchment paper to fit inside the pan perfectly. Using an edible marker, trace your design onto the piece of parchment paper.
2. Separate the egg yolks and egg whites. Place yolks in a large bowl and whites in a medium bowl.
3. Whisk together the egg yolks, sugar, vegetable oil, milk, and vanilla.
4. Sift in the flour and cornstarch to the wet ingredients. Whisk until smooth.
5. In a stand mixer, whisk egg whites until frothy. Slowly add vinegar and sugar while whipping.
6. Continue whisking egg whites until stiff peaks form. This is crucial for height.
7. Fold the egg whites into the yolk batter gently until combined. Do not over-mix.
8. Remove a few teaspoons of batter and use food gel to dye colors for your design.
9. Place colored batter into piping bags and pipe your design onto the parchment.
10. Chill the designed parchment in the fridge for 5-8 minutes to set the pattern.
11. Pipe the uncolored batter over the design. Bake for 8-9 minutes.
12. Flip the cake out immediately and peel off parchment. Bake remaining batter for extra layers.
13. Prepare whipped cream by whisking cream, sugar, and vanilla until stiff.
14. Assemble with plain layers on bottom, whipped cream in middle, and designed layer on top.
Notes
Always use gel food coloring to avoid changing the batter consistency.
Ensure your mixing bowl for egg whites is completely grease-free.
Peel the parchment paper while the cake is still warm for the cleanest design.