There is something undeniably magical about a Rainbow Ice Cream Jello Mold. It’s the kind of dessert that immediately transports you back to Sunday potlucks, grandma’s kitchen, and summer block parties. While “Jello salads” might feel like a vintage relic from the 1950s, this creamy, layered version is having a major comeback on Pinterest—and for good reason!
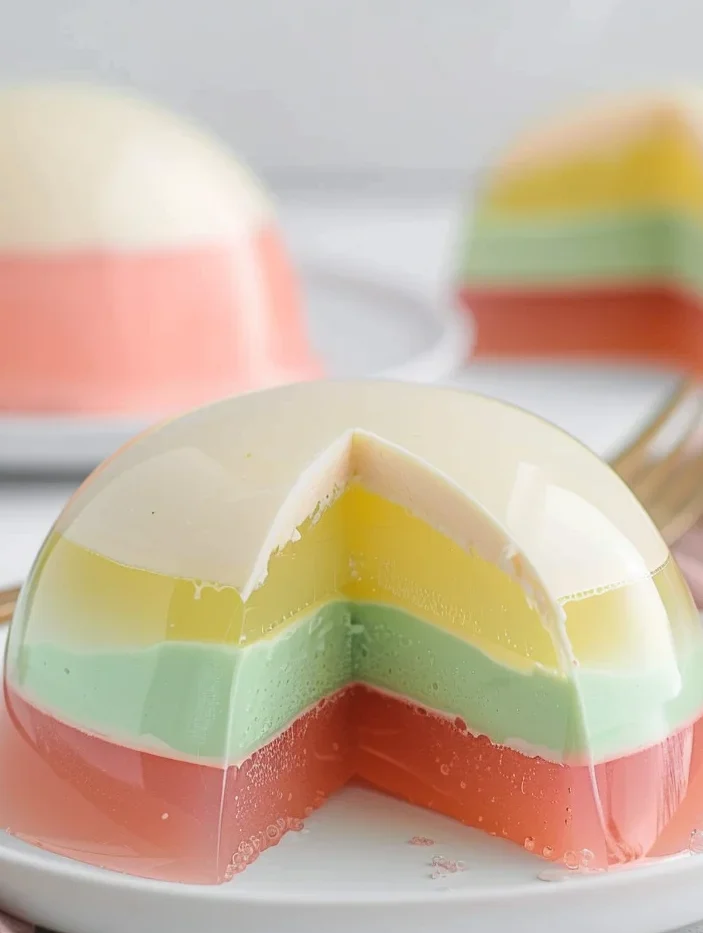
Unlike traditional clear gelatin, this recipe uses vanilla ice cream to create an opaque, pastel-hued, and velvety texture that tastes more like a fruit-flavored panna cotta than a wiggly box of Jello. It’s cool, refreshing, and honestly? It’s a total showstopper on any dessert table.
Whether you are looking for a fun project to do with the kids or you need a “set it and forget it” dessert for a crowd, this layered ice cream jello is your new secret weapon.
Why You’ll Love This Recipe
- Only 3 Main Ingredients: All you need is gelatin mix, water, and vanilla ice cream.
- No Bake & Stress-Free: Perfect for those hot summer days when you can’t even think about turning on the oven.
- The Wow Factor: The vibrant, clean layers look like they took hours of professional work, but the process is actually quite simple.
- Totally Customizable: You can swap the flavors for any holiday or theme—think red and blue for the 4th of July or pink and red for Valentine’s Day.
- Make-Ahead Friendly: This dessert actually needs to be made ahead of time, taking the pressure off your hosting duties.
Ingredient Notes
To get that perfect, sliceable consistency, you want to be mindful of your ingredients. Here is what you’ll need:
- Vanilla Ice Cream: I recommend using a standard “full-fat” vanilla bean or French vanilla ice cream. Low-fat or “frozen dairy desserts” may not set as firmly or provide that rich, creamy mouthfeel we’re looking for. Make sure it’s slightly softened before you start so it incorporates smoothly.
- Gelatin Mix: You’ll need four 3-ounce boxes. We used Orange, Lime, Lemon, and Cherry for that classic rainbow look. However, feel free to use Grape, Raspberry, or Pineapple!
- Boiling Water: This is crucial for fully dissolving the gelatin granules. If the gelatin isn’t fully dissolved, you’ll end up with a grainy texture at the bottom of your mold.
Step-by-Step Instructions
Making a layered jello mold is more about patience than skill. Here is the foolproof way to get those clean, crisp lines.
1. Prepare Your Mold
Don’t skip the grease! Lightly spray a Bundt pan or a decorative gelatin mold with non-stick cooking spray. Use a paper towel to wipe out the excess so there are no puddles of oil. You want a very thin film to help the mold release later.
2. Mix the First Layer
In a medium heat-proof bowl, whisk the orange gelatin with 1 cup of boiling water. Stir for at least 2 minutes. Once dissolved, stir in 12 ounces of vanilla ice cream. It will melt into the hot liquid, creating a creamy orange mixture.
3. The First Chill
Pour the mixture into your mold. Place it in the fridge for about 15–20 minutes. Pro Tip: You don’t want it completely firm yet. It should be “tacky” to the touch (like Scotch tape). This helps the next layer stick to it so they don’t slide apart when you slice it.
4. Repeat the Layers
Repeat the process with the Lime, Lemon, and Cherry layers. Pour each new layer gently over the back of a large spoon to break the fall and prevent the new layer from “drilling” a hole into the one beneath it.
5. The Long Soak
Once the final layer is added, let the mold set in the refrigerator for at least 4 hours, but overnight is even better for the best structural integrity.
Expert Tips for Best Results
- The Spoon Trick: To keep your layers perfectly flat, always pour the liquid over the back of a spoon. This distributes the weight of the liquid and prevents the layers from mixing.
- Wipe the Bowl: Between layers, make sure to wash and dry your mixing bowl and whisk. You don’t want green flecks showing up in your yellow layer!
- Don’t Over-Chill Between Layers: If you let a layer get too hard in the fridge before adding the next one, the layers might separate when you try to unmold or slice it. 15–20 minutes is usually the “sweet spot.”
- Unmolding Hack: If the mold is being stubborn, dip the bottom of the pan in a sink filled with warm water for just 5–10 seconds. This slightly melts the very outer edge, allowing it to slide right out.
Variations and Substitutions
- Sherbet Version: For an extra fruity punch, replace the vanilla ice cream with orange, lime, or raspberry sherbet that matches the gelatin flavor.
- The 9×13 Method: If you don’t have a Bundt pan, you can make this in a glass 9×13 baking dish. It’s easier to slice into squares and great for casual potlucks.
- Whipped Topping: Some people prefer to use Cool Whip instead of ice cream. It results in a fluffier, more “mousse-like” texture, though it won’t be quite as firm.
- Low Sugar: You can use sugar-free gelatin and a low-carb vanilla ice cream for a lighter version of this treat.
Storage and Freezing
To Store: Keep your Jello mold in the refrigerator, covered with plastic wrap, for up to 5 days. It actually stays quite stable!
To Freeze: Unfortunately, I do not recommend freezing this recipe. The texture of the gelatin changes significantly when frozen and thawed, becoming watery and losing its creamy consistency.
FAQ
How do I know when the layer is ready for the next one?
Touch the top gently with your finger. If it leaves a slight fingerprint but doesn’t stick to your skin, it’s ready. If it’s still liquid, give it 5 more minutes.
My Jello mold is stuck! What do I do?
Don’t panic! Use a thin knife to gently pull the gelatin away from the center tube and the outer edges of the pan to break the vacuum seal. If that fails, the warm water dip (5-10 seconds) works every time.
Can I use fresh fruit in the layers?
You can, but be careful! Fresh pineapple, kiwi, and papaya contain enzymes that prevent gelatin from setting. If you want to use fruit, stick to canned versions or berries.
A Bright & Creamy Finish
This Rainbow Ice Cream Jello Mold is more than just a dessert; it’s a conversation starter. There’s something so joyful about slicing into those bright layers and seeing the smiles on everyone’s faces. It’s affordable, easy to scale for a crowd, and tastes like a creamy dream.
If you make this for your next gathering, be sure to take a photo and tag me! I love seeing your colorful creations. Happy chilling!
Recipe Summary
Prep time: 20 mins | Chill time: 5 hours | Total time: 5 hours 20 mins
Yields: 12 servings
Ingredients:
- 48 oz Vanilla Ice Cream
- 1 box Orange Gelatin (3 oz)
- 1 box Lime Gelatin (3 oz)
- 1 box Lemon Gelatin (3 oz)
- 1 box Cherry Gelatin (3 oz)
- 4 cups Boiling Water
Instructions:
- Grease your mold.
- Dissolve orange gelatin in 1 cup boiling water; stir in 12 oz ice cream.
- Pour into mold and chill 15-20 mins.
- Repeat for Lime, Lemon, and Cherry layers.
- Chill for 4+ hours. Unmold and serve!