There is something truly magical about a perfectly decorated sugar cookie. Whether it’s for a holiday exchange, a birthday party, or just a rainy Tuesday afternoon, a beautiful cookie brings an instant smile. But let’s be honest: royal icing can be intimidating. Between the meringue powder, the precise whipping times, and the fear of raw egg whites, many home bakers shy away from that professional look.

That is exactly why I fell in love with this Sugar Cookie Glaze.
This recipe is my absolute “holy grail” for cookie decorating. It’s incredibly simple to whip up, uses pantry staples, and results in a high-gloss, bakery-style finish that dries hard enough to stack. If you’ve ever wondered how to get that smooth, porcelain-like finish on your cookies without the fuss of traditional royal icing, you are in the right place!
Why You’ll Love This Sugar Cookie Glaze
If you are looking for the perfect finishing touch for your baking, here is why this recipe is a total game-changer:
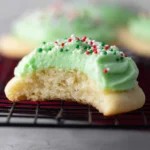
- High-Gloss Shine: Thanks to the light corn syrup, this glaze has a beautiful sheen that stays glossy even after it dries.
- Dries Hard for Stacking: Unlike simple buttercream, this glaze sets firm. You can stack these cookies in tins or mail them to loved ones without ruining the design.
- No Meringue Powder Needed: No specialty ingredients here! You likely have everything you need in your pantry right now.
- Kid-Friendly: It’s thick enough for dipping but easy enough for kids to use with a paintbrush or spoon.
- Customizable Flavor: The hint of almond extract gives it that “wedding cake” flavor that everyone raves about.
Ingredient Notes
While the list is short, the quality and preparation of your ingredients make all the difference in achieving that perfectly smooth Sugar Cookie Glaze.
- Confectioners’ Sugar: Also known as powdered sugar. Pro tip: Always sift your sugar! Even small lumps can clog a piping tip or leave “freckles” on your smooth cookie surface.
- Milk: This is your thinning agent. You can use dairy milk, almond milk, or even water. I find that whole milk provides the best opacity.
- Light Corn Syrup: This is the secret ingredient. It provides the elasticity and the beautiful shine. Without it, the glaze will look matte and can be more brittle.
- Almond Extract: This provides that classic professional bakery flavor. If you have an allergy or prefer a different profile, clear vanilla extract is a fantastic substitute. Using clear vanilla ensures your white glaze stays bright white!
- Food Coloring: I highly recommend gel food coloring over liquid. Liquid coloring can change the consistency of the glaze, whereas gel is highly concentrated and won’t thin your icing out.
Step-by-Step Instructions
Ready to decorate? Follow these simple steps to get the perfect consistency every time.
1. Sift and Stir
Start by sifting your 1 cup of confectioners’ sugar into a medium-sized bowl. Add the 2 teaspoons of milk and stir with a whisk or a fork. At first, it might look like there isn’t enough liquid—keep stirring! It will eventually turn into a thick, paste-like consistency.
2. Add the “Magic” Ingredients
Add in the 2 teaspoons of light corn syrup and the almond extract. Whisk vigorously. You will notice the mixture transform from a dull paste into a beautiful, glossy glaze.
3. Check Consistency
Lift your whisk. The glaze should ribbon off the whisk and disappear back into the bowl within about 5-10 seconds.
- Too thick? Add more corn syrup, 1/4 teaspoon at a time.
- Too thin? Add a tablespoon more of powdered sugar.
4. Color Your World
Divide the glaze into small bowls or ramekins. Use a toothpick to add a tiny amount of gel food coloring to each bowl and stir until the color is even.
5. Decorate
You can dip the tops of the cookies directly into the glaze for a smooth, flooded look, or use a small paintbrush to create intricate designs. If you want to pipe edges, make a slightly thicker batch of glaze first to act as your “border.”
Expert Tips for Best Results
- The 10-Second Rule: For the perfect “flood” consistency, the icing should take exactly 10 seconds to smooth out after you drop a bit back into the bowl.
- Pop the Bubbles: After stirring in your color, let the glaze sit for a few minutes. If you see air bubbles rise to the top, gently pop them with a toothpick before you start decorating.
- Let it Dry: While the glaze feels dry to the touch in about an hour, it needs a full 24 hours to “hard set” if you plan on stacking the cookies.
- Cookie Temperature: Never glaze a warm cookie! Your glaze will melt and run right off the edges. Ensure your cookies are completely cool to the touch.
Variations and Substitutions
One of the best things about this Sugar Cookie Glaze is how easy it is to tweak!
- Lemon Glaze: Swap the almond extract for fresh lemon juice and add a pinch of lemon zest.
- Peppermint Glaze: Perfect for candy cane shapes! Swap almond extract for 1/8 teaspoon of peppermint extract (it’s strong, so go easy!).
- Chocolate Glaze: Sift in 1 tablespoon of cocoa powder and add an extra teaspoon of milk.
- Sparkling Glaze: While the glaze is still wet, sprinkle with sanding sugar or edible glitter for a festive look.
Storage and Freezing
Storing the Glaze: If you have leftover glaze, place it in an airtight container. Press a piece of plastic wrap directly onto the surface of the glaze before sealing the lid to prevent a “crust” from forming. It will stay fresh at room temperature for up to 3 days.
Storing Decorated Cookies: Once the cookies are fully dried (24 hours), store them in an airtight container at room temperature. I recommend placing a sheet of parchment paper between layers to prevent any sticking.
Can you freeze glazed cookies? Yes! Once the glaze is completely hard, you can freeze the decorated cookies for up to 3 months. Thaw them at room temperature inside the container to prevent condensation from ruining the finish.
FAQ
Does this glaze dry hard?
Yes! While it doesn’t get quite as “rock hard” as traditional royal icing, it sets firm enough to be handled, stacked, and packaged in bags without smearing.
Can I leave out the corn syrup?
You can, but the glaze will be much flatter in appearance (matte) and will be more prone to cracking. The corn syrup is what gives it that professional, flexible shine.
Why is my glaze transparent?
If your glaze looks “see-through” on the cookie, it is likely too thin. Add a bit more powdered sugar to increase the opacity. Using milk instead of water also helps create a whiter, more solid base.
How do I stop the colors from bleeding?
The key to preventing color bleed is to let the first color dry significantly before adding a second color next to it. Also, ensure your glaze isn’t too thin, as runny glaze is more likely to migrate.
Happy Baking!
There is no better feeling than gifting a box of cookies that look like they came straight from a high-end bakery. This Sugar Cookie Glaze is the secret weapon every home baker needs. It’s forgiving, delicious, and absolutely stunning.
I can’t wait to see your creations! Whether you’re making spooky Halloween treats or elegant Christmas stars, this glaze will make your hard work shine—literally. Happy decorating!
PrintSugar Cookie Glaze

The ultimate easy sugar cookie glaze! This recipe creates a beautiful, professional shine that dries firm enough for stacking and gifting. Perfect for Christmas cookies, sugar cookies, and shortbread.
Ingredients
1 cup confectioners’ sugar
2 teaspoons milk, or more if needed
2 teaspoons light corn syrup
¼ teaspoon almond extract
assorted food coloring (optional)
Instructions
1. Sift the confectioners’ sugar into a medium mixing bowl to ensure there are no lumps.
2. Add the milk and stir until the mixture is smooth and combined.
3. Whisk in the light corn syrup and almond extract. Continue beating until the icing looks smooth, glossy, and thick enough to coat a spoon.
4. If the icing feels too thick, add a tiny bit more corn syrup. If too thin, add a tablespoon more of sugar.
5. Divide the glaze into small bowls and stir in food coloring until you reach your desired shades.
6. Dip your cooled cookies into the glaze or use a pastry brush or piping bag to decorate. Allow to dry for 24 hours for a full hard set.
Notes
For best results, always sift your sugar first. If you have a nut allergy, swap the almond extract for clear vanilla extract. Store leftover glaze in an airtight container at room temperature for up to 3 days.