There is a specific kind of nostalgia that only comes around once a year. It’s the smell of damp grass, the sight of pastel-colored wicker baskets, and the absolute thrill of finding that one specific candy: the chocolate-covered marshmallow egg.
But let’s be honest the store-bought versions often leave something to be desired. They can be overly sweet, a bit rubbery, and the “chocolate” coating sometimes tastes more like wax than cocoa.
That is exactly why I set out to master the Homemade Marshmallow Easter Egg. This recipe uses a traditional candy-making technique—the flour mold—to create perfectly shaped, pillowy clouds of marshmallow encased in a snappy, dark chocolate shell. It’s an heirloom-style project that will make your Easter dessert table truly unforgettable.
Why You’ll Love This Recipe
- Superior Texture: Unlike mass-produced candy, these are incredibly light and airy with a fresh vanilla flavor.
- The “Wow” Factor: Using flour to create your own candy molds is a classic confectioner’s trick that always impresses.
- Customizable: You can use dark, milk, or white chocolate and decorate them to match your holiday theme.
- Preservative-Free: You know exactly what’s going into your treats—no artificial stabilizers here!
Ingredient Notes
To make these professional-grade marshmallow eggs, you’ll need a few specific items. Don’t be intimidated by the list—most are likely already in your pantry!
- All-Purpose Flour: You aren’t actually baking with all 25 cups of this flour. It acts as a “bed” to create the egg-shaped impressions. This is how old-school candy shops made shapes before silicone molds existed!
- Unflavored Gelatin: This provides the structure for our marshmallows. Make sure to “bloom” it in cold water first to ensure a smooth texture.
- Light Corn Syrup: This is essential for preventing sugar crystallization, giving the marshmallow its iconic glossy sheen and “stretch.”
- Candy Coating (Compound Chocolate): For the dipping process, I recommend a high-quality candy coating or “melting wafers.” They set up firmly at room temperature and provide that satisfying snap when you bite into the egg.
The Secret Technique: The Flour Mold
If you’ve never made a flour mold before, you’re in for a treat. By filling large pans with flour and pressing a sanitized, real egg into the surface, you create a natural, non-stick cavity.
Pro Tip: Be sure to wash your “stamp” egg in a very diluted bleach solution as instructed in the recipe card. This ensures everything stays hygienic since the egg is touching the flour that will house your marshmallow mixture.
Step-by-Step Instructions
1. Prepare Your “Egg Bed”
Fill your pans with the flour and smooth the surface. Gently press your prepared egg into the flour to create 36 little “nests.” This is a great task for keeping the kids occupied while you handle the hot sugar!
2. The Sugar Syrup
This is the heart of the recipe. You’ll combine sugar, half of the corn syrup, and hot water. You are looking for the “Soft-Ball Stage,” which is exactly 238°F. A candy thermometer is non-negotiable here! Once it hits that temp, stir in the remaining corn syrup to stop the temperature from rising further.
3. Whipping the Magic
This is where the liquid syrup transforms into fluffy marshmallow. Be patient—it takes about 10 minutes of high-speed beating. You’ll see it turn from clear to opaque, then thick and snowy white.
4. Filling and Setting
Spoon the mixture into your flour impressions. Don’t worry if it’s not perfectly smooth; a little dusting of flour on top helps them set without sticking. Let them rest for at least 3-4 hours. They need this time to develop a “skin” so they can be handled.
5. The Chocolate Dip
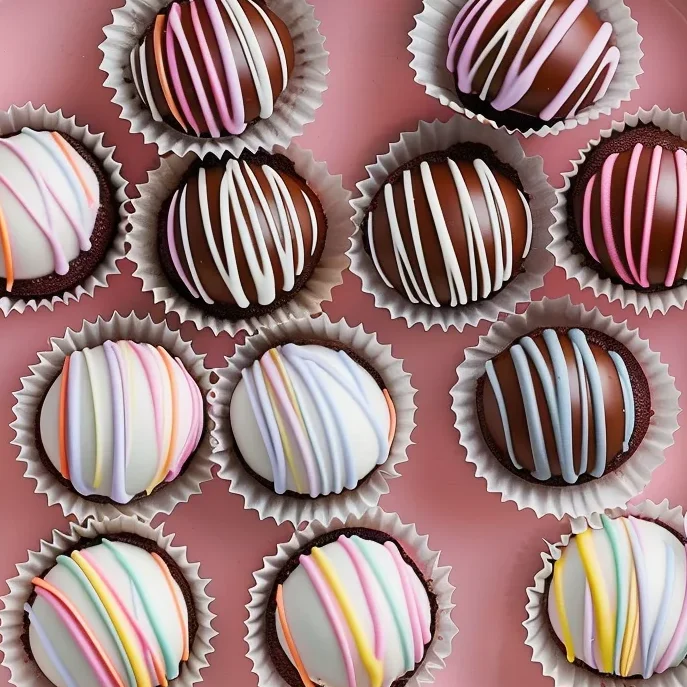
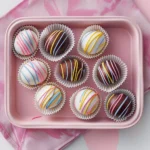
Once set, brush off the excess flour. It’s okay if a tiny bit remains—it actually helps the chocolate adhere! Dip them into your melted dark chocolate coating and let them set on waxed paper.
Expert Tips for Best Results
- Sift Your Flour: Before making the molds, sift the flour into the pans to ensure there are no lumps, resulting in smoother egg shapes.
- Don’t Over-Whip: You want the marshmallow to be thick but still “pourable” or “spoonable.” if it becomes too stiff, it won’t settle smoothly into the molds.
- Humidity Matters: Marshmallows hate humidity! Try to make these on a dry day, or keep your kitchen cool and dry to help them set properly.
- Reusing Flour: After you’ve finished, sift the flour to remove any marshmallow bits. You can absolutely use this flour for baking cookies or bread later—no waste!
Variations and Substitutions
- Flavor Extracts: While vanilla is classic, try substituting 1 teaspoon of the vanilla for almond extract, peppermint, or even a drop of oil-based strawberry flavoring.
- Chocolate Types: If you prefer a sweeter egg, use milk chocolate coating. For a gourmet twist, use a high-quality white chocolate and top with crushed freeze-dried raspberries.
- Hidden Centers: For a fun surprise, place a tiny dollop of peanut butter or a single jelly bean in the center of the mold before the marshmallow fully sets!
Storage and Freezing
Storage: These eggs keep beautifully at room temperature in an airtight container for up to 2 weeks. Place parchment paper between layers to prevent any sticking.
Freezing: I do not recommend freezing homemade marshmallow eggs. The freezing and thawing process can cause the marshmallow to weep moisture, which will make the chocolate shell bloom (turn grey) or become sticky.
FAQ
Q: Why do I need 25 cups of flour?
A: The flour isn’t an ingredient in the marshmallow; it’s the material for the mold. It provides a steady, breathable environment for the marshmallow to set in a perfect 3D shape.
Q: Can I use silicone molds instead?
A: Yes! If you have egg-shaped silicone molds, you can skip the flour step. Just lightly grease the molds with a neutral oil or dust them with cornstarch before filling.
Q: My marshmallow is too sticky to handle, what did I do wrong?
A: It likely didn’t sit long enough or the sugar didn’t reach the full 238°F. Make sure they rest in a cool, dry place for the full 4 hours.
A Sweet Easter Tradition
Making your own Homemade Marshmallow Easter Eggs is more than just a recipe; it’s a kitchen event. There is so much joy in seeing the flour molds transform into beautiful, professional-looking candies. Whether you’re tucking these into a child’s basket or serving them at a spring brunch, they are guaranteed to be the star of the show.
Happy Easter and happy candy making!
PrintOld-Fashioned Homemade Marshmallow Easter Eggs
These old-fashioned Homemade Marshmallow Easter Eggs are light, fluffy, and worlds better than the ones you find in the plastic grass at the store. Using a traditional flour-mold technique, you get that perfect egg shape and a thick, snappy chocolate shell.
Ingredients
25 cups all-purpose flour (about 8 pounds) – Note: used for molds, not the recipe itself
1 large egg (used as a stamp)
2 tablespoons unflavored gelatin
1/2 cup cold water
2 cups sugar
1 cup light corn syrup (divided into 1/2 cup portions)
3/4 cup hot water
2 teaspoons vanilla extract
1 pound dark chocolate candy coating, melted
Candy coating disks, multiple colors, melted (for decorating)
Instructions
1. Prepare the Molds: Spread 7 cups flour into each of three 13×9-in. pans and 4 cups flour into a 9-in. square pan. Wash the egg in a mild bleach solution (1 tsp bleach to 1 qt warm water) and dry thoroughly. Press the egg halfway into the flour to form an impression. Repeat 35 times, spacing them 2 inches apart.
2. Bloom Gelatin: In a small bowl, sprinkle gelatin over cold water and let it sit.
3. Cook the Syrup: In a large saucepan, combine sugar, 1/2 cup corn syrup, and hot water. Bring to a boil over medium heat, stirring constantly, until a candy thermometer reads 238°F (soft-ball stage).
4. Finish Syrup: Remove from heat and stir in the remaining 1/2 cup corn syrup.
5. Whip the Marshmallow: Pour the hot mixture into a large bowl. Add gelatin, 1 tablespoon at a time, beating on high speed until thick, fluffy, and lukewarm (about 10 minutes). Beat in vanilla.
6. Fill Molds: Spoon the lukewarm mixture into the flour depressions. Dust the tops with a little flour. Let stand for 3-4 hours or until set.
7. Dip and Decorate: Brush excess flour off the set marshmallow eggs. Dip each egg in melted chocolate candy coating. Place flat side down on waxed paper. Once set, drizzle with melted colored candy disks.
Notes
Do not throw away the flour! You can sift it and use it for baking later since it was only used as a mold.
Ensure your candy thermometer is accurate by testing it in boiling water (should read 212°F).
If the marshmallow gets too stiff while filling molds, you can gently warm the bowl over a pot of simmering water.