Easter morning is always a whirlwind of hidden eggs, colorful baskets, and the excitement of a new season. Between the early morning wake-up calls and the frantic search for that one missing golden egg, the last thing any of us wants to do is spend three hours in the kitchen kneading yeast dough.
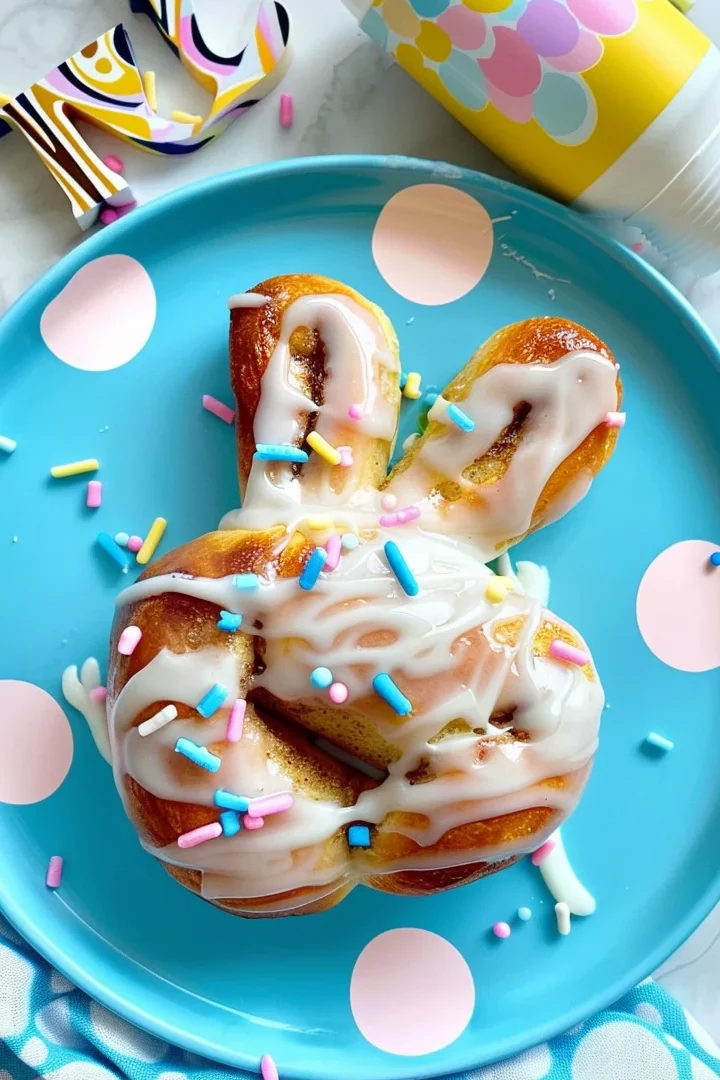
That’s where these Easter Bunny Cinnamon Rolls come in.
I’m a firm believer that holiday magic doesn’t have to be difficult. You don’t need a culinary degree or a sourdough starter to make your kids’ faces light up at the breakfast table. With just a can of Pillsbury Grands and a handful of candy, you can create a Pinterest-worthy breakfast that looks like it came from a high-end bakery.
These cute little bunnies are sweet, gooey, and—most importantly—totally stress-free. Whether you’re hosting a massive Easter brunch or just want a cozy morning with your family, this recipe is a guaranteed winner.
Why You’ll Love This Recipe
- 3-Ingredient Simplicity: All you really need are cinnamon rolls, sprinkles, and some candy for faces.
- Kid-Friendly Activity: This is a fantastic “kitchen helper” recipe. Kids love pulling the dough to shape the ears and choosing the jelly bean colors for the bunny noses.
- Maximum “Wow” Factor: They look incredibly festive on a platter, making them perfect for your Easter Pinterest boards or Instagram feed.
- Quick Cleanup: One baking sheet, no messy flour on the counters, and breakfast is served in under 30 minutes.
Ingredient Notes
Before we dive into the steps, let’s talk about the stars of the show.
- Pillsbury Grands Cinnamon Rolls: It is essential to use the “Grands” variety. Why? The dough is thicker and sturdier. Regular-sized cinnamon rolls are often too thin to hold the weight of the ears, and they tend to lose their shape more easily in the oven.
- The Icing: Use the cream cheese icing or the standard vanilla icing that comes in the can. If you want to get fancy, you can add a drop of pink food coloring to a small portion of the icing to paint the inside of the bunny ears!
- Jelly Beans: These are the perfect size for bunny noses and eyes. I like using pink for the nose and blue or green for the eyes.
- Sprinkles: Pastel “quacker” sprinkles or simple sanding sugar adds that extra sparkle that makes these feel like a true holiday treat.
Step-by-Step Instructions
Shaping these bunnies is easier than it looks! Follow these simple steps for the perfect bunny silhouette.
1. Prep and Preheat
Start by preheating your oven to 350°F (175°C). While the oven is warming up, line a large baking sheet with parchment paper or a silicone baking mat. This ensures the cinnamon sugar doesn’t stick to the pan and makes cleanup a breeze.
2. The Shaping Secret
Pop open your can of Pillsbury Grands and place the five rolls on the cookie sheet. Make sure to leave about 3 inches of space between each roll—they are going to expand!
Locate the “tail end” of the dough spiral. Gently pull that outer end away from the roll and fold it upwards to form a loop. This is your first ear. Now, reach just slightly further down the spiral to pull a second section up to create the second ear.
3. The Pinch
This is the most important part! Use your thumb and forefinger to firmly pinch the base of the ears where they meet the “head” of the bunny. You want the dough to fuse together so the ears don’t go wandering off during the baking process.
4. The Halfway Check
Slide the pan into the oven. Bake as directed on the package (usually about 13-17 minutes). However, set a timer for 7 minutes. At the halfway point, take the pan out and quickly re-pinch those ear bases. The dough rises rapidly, and the ears often start to “drift.” A quick pinch mid-bake keeps them looking like bunnies and not blobs!
5. Decorate with Love
Once they are golden brown, remove them from the oven. Let them cool for just a minute or two. While they are still warm (but not melting hot), drizzle the included icing over the center. Use your jelly beans to create a face: two for eyes and one for a nose. Finish with a flourish of sprinkles.
Expert Tips for Best Results
- Don’t Over-Bake: Cinnamon rolls can go from “perfectly gooey” to “dry and crunchy” in about 60 seconds. Keep a close eye on them during the last few minutes of baking.
- Use Toothpicks: If your bunny ears are being particularly stubborn and won’t stay upright, you can insert a toothpick through the ear and into the head before baking. Just be sure to remove them before serving to children!
- Cooling is Key: If you apply the icing while the rolls are piping hot, it will turn into a clear glaze. If you want that thick, white, “furry” look, let them cool for about 5 minutes before icing.
Variations and Substitutions
- The “Lop-Ear” Bunny: For a cute variation, fold one of the ears over to the side to create a “lop-ear” bunny look.
- Homemade Icing: If you find the canned icing too sweet, a simple mix of cream cheese, powdered sugar, and a splash of milk creates a decadent topping that balances the cinnamon.
- Fruit Faces: If you want to cut back on the sugar, use blueberries for eyes and a small slice of strawberry for the nose!
- Bacon Whiskers: Want to go savory-sweet? Add two small pieces of crispy bacon as whiskers!
Storage and Freezing
While these are best served fresh and warm, you can certainly store leftovers.
- To Store: Keep them in an airtight container at room temperature for up to 2 days.
- To Reheat: A quick 10-15 seconds in the microwave will bring back that soft, gooey texture.
- Freezing: I don’t recommend freezing these after they are decorated, as jelly beans can get “sweaty” and weird when thawed. However, you can freeze the baked, un-iced rolls for up to a month.
FAQ
Q: Can I use the small cinnamon rolls instead of the Grands?
A: You can, but they are much harder to shape. The dough is thinner, and the ears often flop over or break off. If you use the smaller ones, you’ll likely need to reduce the baking time by 3-4 minutes.
Q: Can I make these the night before?
A: You can shape them and place them on the baking sheet, cover them tightly with plastic wrap, and keep them in the fridge overnight. In the morning, let them sit at room temperature for 15 minutes before baking.
Q: My ears keep falling off! What am I doing wrong?
A: You likely aren’t pinching hard enough! Don’t be afraid to really mash the dough together at the base of the ears. Also, remember the “halfway pinch” trick—it’s a lifesaver.
Happy Easter Morning!
There is nothing quite like the smell of cinnamon and sugar wafting through the house on a holiday morning. These Easter Bunny Cinnamon Rolls are a reminder that the best traditions don’t have to be complicated. They just have to be made with love (and maybe a little extra icing).
I hope these cute bunnies bring a smile to your family’s faces this year. If you make them, be sure to tag me on Instagram or pin this recipe to your Easter Brunch board!
Happy Baking!
PrintEasy Easter Bunny Cinnamon Rolls
These adorable Easter Bunny Cinnamon Rolls are a festive, stress-free way to celebrate Easter morning. Using a simple Pillsbury hack, you can have a cute, homemade-ish breakfast on the table in under 30 minutes. Perfect for kids and brunch parties!
Ingredients
1 can Pillsbury Grands refrigerated cinnamon rolls (5 count)
Sprinkles (pastel or spring-themed)
Jelly beans (for eyes and noses)
Instructions
1. Preheat your oven to 350°F (175°C) and line a large baking sheet with parchment paper.
2. Unroll the package of cinnamon rolls and place the 5 rolls on the cookie sheet, leaving plenty of room between them for the ears.
3. Locate the outer end of each cinnamon roll. Gently pull a section of the dough away from the center and fold it upwards to create a loop/ear. Repeat with another section of dough to create the second ear on top.
4. Pinch the base of the ears firmly into the head of the bunny to ensure they stay attached during baking.
5. Place in the oven and bake according to the package directions (usually 13-17 minutes). IMPORTANT: At the 7-minute mark, briefly remove the pan and re-pinch the base of the ears if they are starting to pull away.
6. Remove from the oven and let cool for 2-3 minutes on the pan.
7. Drizzle the included icing over the warm rolls. Use jelly beans for the eyes and nose, and add sprinkles for extra festive flair!
Notes
Use the ‘Grands’ size cinnamon rolls for better structural integrity.
If the ears keep popping off, use a toothpick (remove before eating) to secure them while baking.
For the best faces, wait until the icing is slightly set so the jelly beans don’t slide off.