There is nothing quite as heartbreaking in the baking world as spending an hour meticulously cutting out beautiful stars, hearts, or snowflakes, only to pull a tray of “blobs” out of the oven. We’ve all been there the dough spreads, the edges blur, and your festive shapes become unrecognizable.
That is exactly why I am sharing the best cut out sugar cookie recipe I have ever developed. This is the “holy grail” of sugar cookies. They are buttery, soft in the center, slightly crisp on the edges, and—most importantly—they hold their shape perfectly every single time.
Whether you are preparing for a holiday cookie swap, a birthday party, or just a cozy afternoon of baking with the kids, these cookies are a total game-changer. Let’s dive into why this recipe works and how you can achieve bakery-quality results at home.
Why You’ll Love This Recipe
- No Spreading: Thanks to a specific chilling technique and the perfect ratio of flour to butter, these cookies stay exactly the shape you cut them.
- Simple Ingredients: You likely already have everything you need in your pantry.
- Amazing Flavor: The addition of a tiny bit of almond extract elevates the flavor from “standard” to “professional bakery.”
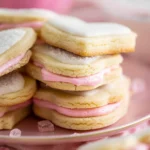
- Perfect for Decorating: The flat, sturdy surface is ideal for royal icing, glaze, or thick buttercream.
- Make-Ahead Friendly: You can prep the dough days in advance, making your party prep a breeze.
Ingredient Notes
Before you preheat that oven, let’s talk about the key players in this recipe. Using the right ingredients (and the right temperature) is the secret to success.
- All-Purpose Flour: Make sure to use the “spoon and level” method. If you scoop the flour directly with the measuring cup, you’ll pack it down and end up with too much, leading to dry, crumbly cookies.
- Unsalted Butter: You want this “softened to room temperature.” It should be cool to the touch and indent slightly when pressed, but it shouldn’t be oily or melty.
- The Egg: A room-temperature egg incorporates much more smoothly into the creamed butter and sugar.
- Pure Vanilla & Almond Extract: Vanilla is the base, but almond extract is the secret weapon. It gives that classic “sugar cookie” aroma that everyone loves.
- Baking Powder: Just a touch (1/2 teaspoon) gives the cookies a little lift without causing them to puff up or lose their shape.
Step-by-Step Instructions
1. Cream the Butter and Sugar
In your stand mixer (or using a handheld mixer), beat the softened butter and granulated sugar on high speed. Don’t rush this! You want it to look light, fluffy, and pale—usually about 3 full minutes. This creates the structure of the cookie.
2. Add Wet Ingredients
Lower the speed and add your egg, vanilla, and almond extract. Scrape down the sides of the bowl to ensure every bit of egg is fully incorporated.
3. Mix in Dry Ingredients
Slowly add the flour, baking powder, and salt. Mix on low just until the white streaks of flour disappear. If the dough feels excessively sticky (which can happen if your kitchen is warm), add one more tablespoon of flour.
4. The “Roll Before You Chill” Method
Most recipes tell you to chill the dough in a ball, then roll it out. Pro tip: Roll the dough first while it’s soft. Divide the dough, place it between two sheets of parchment paper, and roll it to 1/4-inch thickness. Stack these flat sheets in the fridge. This makes cutting shapes much easier later!
5. The Big Chill
Chill the rolled dough for at least 2 hours. This is non-negotiable! Chilling the fats prevents the cookies from spreading in the hot oven.
6. Cut and Bake
Preheat your oven to 350°F. Cut your shapes and place them on a parchment-lined sheet. Bake for 11–12 minutes. You aren’t looking for dark brown cookies; you want the edges to be just barely golden.
Expert Tips for Best Results
- Use Silicone Mats: If you find the bottoms of your cookies are browning too fast, switch to silicone baking mats (like Silpat). They insulate the dough from the direct heat of the metal pan.
- The 3-Inch Rule: Space your cookies about 3 inches apart. Even though these are “no-spread,” they still need airflow to bake evenly.
- Don’t Overwork Scraps: When you reroll the dough scraps, try to do it quickly. The more you handle the dough, the tougher the cookies will become as the gluten develops.
- Thickness Matters: Use “rolling pin rings” or an adjustable rolling pin to ensure every single cookie is exactly 1/4 inch thick. This ensures they all finish baking at the exact same time.
Variations and Substitutions
While this is the best cut out sugar cookie recipe in its classic form, you can definitely get creative!
- Lemon Zest: Add 1 tablespoon of fresh lemon zest and swap the almond extract for lemon extract for a bright, summery vibe.
- Warm Spices: For autumn, add 1 teaspoon of cinnamon and a pinch of nutmeg to the flour mixture.
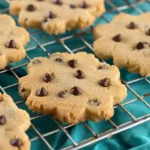
- Chocolate Chip: Use mini chocolate chips in the dough for a “chippy” cut-out cookie.
- Gluten-Free: You can substitute the all-purpose flour with a high-quality 1:1 gluten-free baking flour blend (ensure it contains xanthan gum).
Storage and Freezing
At Room Temperature: Once decorated and set, store cookies in an airtight container for up to 5 days.
In the Refrigerator: These stay fresh for up to 10 days if kept tightly sealed.
Freezing the Dough: Wrap the dough discs tightly in plastic wrap and place in a freezer bag for up to 3 months. Thaw in the fridge overnight.
Freezing Baked Cookies: You can freeze the baked (un-iced) cookies for up to 3 months. Layer them with parchment paper so they don’t stick together.
FAQ
Why did my sugar cookies spread?
Usually, this is because the butter was too soft to begin with, or the dough wasn’t chilled long enough. Make sure your dough is cold when it enters the oven!
Can I use salted butter?
Yes, just omit the 1/4 teaspoon of salt called for in the recipe.
How do I get the icing to look so smooth?
I recommend using Royal Icing. It dries hard and flat, which is perfect for stacking. If you’re a beginner, an “Easy Glaze” made of powdered sugar, milk, and corn syrup is a great starting point.
Baking should be fun, not stressful. With this best cut out sugar cookie recipe, you can reclaim the joy of holiday baking. These cookies are sturdy enough for little hands to decorate but delicious enough to serve at a high-end party.
Happy baking, and don’t forget to tag me in your cookie photos on Instagram! I love seeing your creative shapes and designs.
PrintCut Out Sugar Cookie Recipe
This is the best cut out sugar cookie recipe for anyone who wants sharp edges and a soft, buttery bite. These cookies don’t spread in the oven, making them the ultimate canvas for royal icing or buttercream decorating.
- Prep Time: 20
- Cook Time: 12
- Total Time: 152
- Yield: 24
- Category: Dessert
- Method: Baking
- Cuisine: American
Ingredients
2 and 1/4 cups (281g) all-purpose flour (spooned & leveled)
1/2 teaspoon baking powder
1/4 teaspoon salt
3/4 cup (170g) unsalted butter, softened to room temperature
3/4 cup (150g) granulated sugar
1 large egg, at room temperature
2 teaspoons pure vanilla extract
1/4 teaspoon almond extract (optional)
Royal Icing, Easy Glaze, or Buttercream for decorating
Assorted sprinkles
Instructions
1. In a medium bowl, whisk the flour, baking powder, and salt together. Set aside.
2. In a large bowl, beat the butter and sugar together on high speed until light and creamy, about 3 minutes.
3. Add the egg, vanilla, and almond extract. Beat on high until combined. Scrape down the bowl as needed.
4. Add the dry ingredients and mix on low until combined. If dough is too sticky, add 1 more tablespoon of flour.
5. Divide dough in half. Roll each half out to 1/4-inch thickness between two sheets of parchment paper.
6. Stack the rolled dough and refrigerate for at least 2 hours (up to 2 days).
7. Preheat oven to 350°F (177°C). Line baking sheets with parchment paper.
8. Cut dough into shapes and place 3 inches apart on baking sheets.
9. Bake for 11–12 minutes until edges are very lightly browned. Let cool for 5 minutes on the sheet before moving to a wire rack.
10. Decorate once completely cooled.
Notes
Freezing: Dough can be frozen for up to 3 months. Thaw in the fridge overnight.
Room Temp: Ensure your butter is cool to the touch, not melty, for the best texture.
Flavor: Swap almond extract for lemon or peppermint for seasonal variations.