Table of Contents
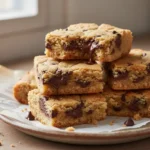
There’s nothing quite like the smell of warm cookies filling your kitchen. But let’s be honest, scooping out individual cookies can feel like a chore sometimes. That’s where Chocolate Chip Cookie Bars come in. This recipe is my absolute go-to for a quick, fuss-free dessert that tastes just like your favorite chocolate chip cookie, but in an easy-to-cut bar.
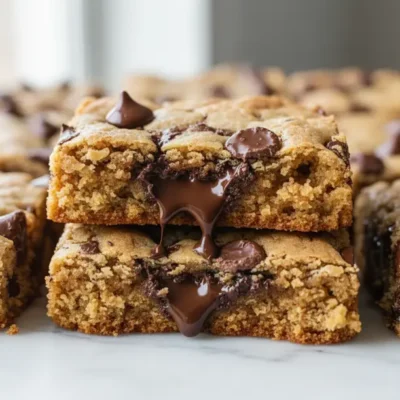
These bars deliver that perfect balance of soft, chewy centers and slightly crisp edges. They’re incredibly simple to make and always disappear fast. Whether you’re making them for a weeknight treat, a potluck, or just because, these cookie bars are guaranteed to be a hit. Get ready to bake a batch that will impress everyone, including yourself!
What Makes This Dish Worth Making
These Chocolate Chip Cookie Bars are a true lifesaver when you crave homemade cookies without the effort. The biggest win? No scooping! You just press the dough into one pan, bake it, and then slice it. This saves you so much time compared to baking multiple trays of individual cookies.
Because they bake in a single pan, the center of each bar stays wonderfully soft and gooey, almost like cookie dough. The edges get a lovely golden crispness, giving you the best of both worlds in every bite. They’re fantastic for feeding a crowd because they’re easy to transport and serve. Just cut them into squares, and you’re done. Plus, the minimal cleanup is a major bonus.
I’ve found this recipe to be incredibly reliable. It consistently produces rich, buttery, and perfectly sweet bars every time. They’re a guaranteed crowd-pleaser and often taste even better the next day, once the flavors have had a chance to meld. If you want maximum flavor with minimum fuss, these are your new best friend.
Ingredients You Will Need
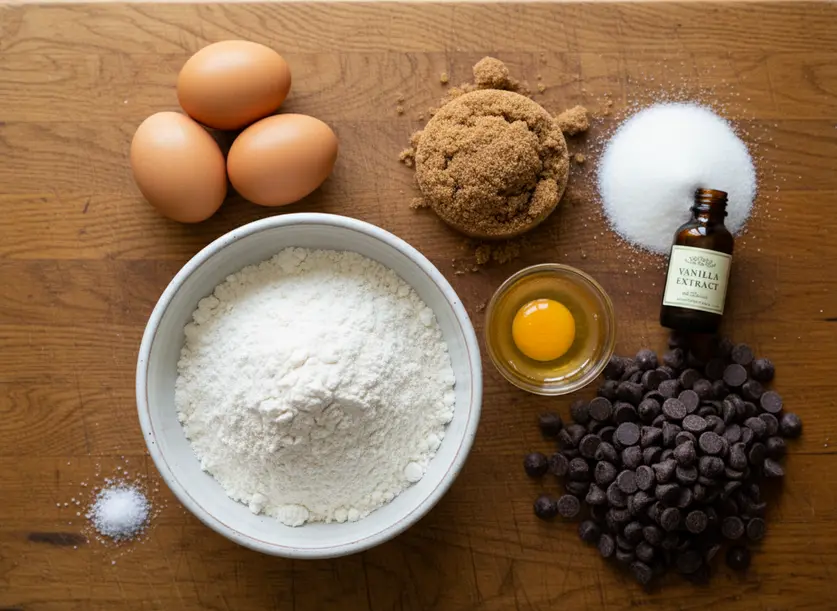
You’ll be happy to know that these amazing cookie bars come together with simple ingredients you probably already have in your pantry. We start with all-purpose flour, the backbone of our dough. Make sure to whisk it with baking soda for lift and a pinch of salt to balance the sweetness. I always use kosher salt, but if you only have table salt, just use a quarter teaspoon.
For the fat, melted and slightly cooled butter is key. It contributes to that perfect chewiness. While I haven’t personally tested many substitutes, a good quality plant-based butter might work in a pinch for dietary needs. Next, we combine brown sugar for moisture and a deeper flavor, along with white sugar for classic sweetness. Large eggs bind everything together, and a generous splash of vanilla extract really brings out all those warm, delicious notes.
Of course, it wouldn’t be Chocolate Chip Cookie Bars without chocolate chips! You can use any kind you love—semi-sweet, milk, dark, or even a mix. I often lean towards semi-sweet or dark chocolate chips to keep them from being overly sweet. Finally, optional toffee bits can be sprinkled on top for an extra layer of crunch and flavor. They don’t mix well into the dough as they melt, so a sprinkle on top is best.
How to Make It Step by Step
Making these delicious cookie bars is straightforward. Just follow these steps, and you’ll have a fantastic treat ready in no time.
- Preheat your oven to 350°F (175°C). Line a 9×13 inch baking pan with parchment paper or foil, leaving an overhang on the sides. This makes it super easy to lift the whole slab out later. If you don’t have parchment, you can lightly grease the pan instead.
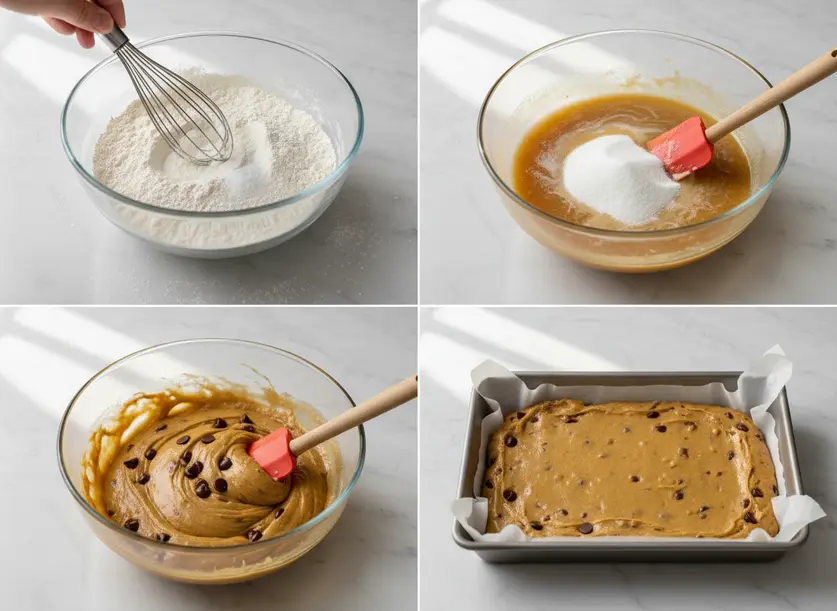
- In a medium bowl, whisk together the all-purpose flour, baking soda, and salt. Set this mixture aside.
- In a large mixing bowl, combine the melted and slightly cooled butter with both the packed brown sugar and white sugar. Mix thoroughly until they are well combined and smooth. This creates the sugary foundation for our bars.
- Add the eggs to the sugar-butter mixture, one at a time, mixing well after each addition. Stir in the vanilla extract until it’s fully incorporated. The mixture should look creamy and light.
- Gradually add the dry flour mixture to the wet ingredients. Mix on low speed, or by hand, until just combined. Be careful not to overmix the dough, as this can lead to tough bars.
- Fold in the chocolate chips. If you’re using optional toffee bits, don’t mix them into the dough yet; save them for the top.
- Press the dough evenly into your prepared 9×13 inch baking pan. Use the back of a spoon or your hands to get an even layer. If using toffee bits, sprinkle them evenly over the top of the pressed dough now.
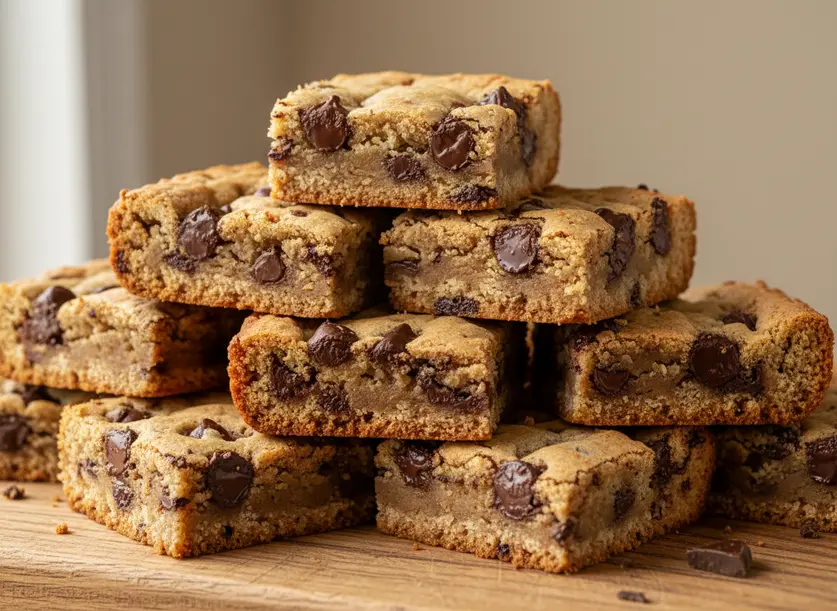
- Bake for 25-35 minutes, or until the edges are golden brown and the center looks set but still slightly soft. Remember, the center will firm up as it cools, so don’t overbake them!
- Remove the pan from the oven and place it on a wire rack to cool completely. This is the hardest part, but it’s crucial! If you cut them while warm, they’ll be very gooey and fall apart. Let them cool fully to room temperature before lifting them out of the pan using the parchment paper overhang and cutting into squares.
Tips for the Best Results
Getting perfect Chocolate Chip Cookie Bars every time is easy if you keep a few things in mind. First, don’t overmix your dough. Once the dry ingredients are just incorporated, stop mixing. Overmixing develops the gluten in the flour, which can make your bars tough instead of tender and chewy.
Baking time is also crucial. Keep a close eye on your oven, as baking times can vary. Your bars are done when the edges are lightly golden brown, but the very center still looks a bit soft and slightly underbaked. Trust me, they will continue to set as they cool. An underbaked bar is better than an overbaked, dry one.
Cooling completely is non-negotiable. I know, it’s agonizing to wait, but cutting into warm bars will result in a messy, crumbly experience. If you can, let them cool for at least two hours, or even chill them in the fridge for quicker setting. Once fully cooled, they will hold their shape beautifully when cut.
For storage, keep your cookie bars in an airtight container at room temperature for up to 3-4 days. For longer storage, they freeze wonderfully. Wrap individual bars or the entire slab tightly in plastic wrap, then aluminum foil, and freeze for up to 3 months. Thaw at room temperature when you’re ready for a sweet treat.
Variations to Try
These Chocolate Chip Cookie Bars are fantastic as-is, but they’re also a great canvas for your creativity. Feel free to experiment with different mix-ins to make them uniquely yours. Instead of just chocolate chips, try a mix of different chocolates. White chocolate chips, milk chocolate chunks, or even dark chocolate shavings can add lovely complexity.
Feeling nutty? Stir in a half-cup of chopped walnuts, pecans, or almonds with the chocolate chips. The crunch of nuts adds a wonderful texture contrast to the soft bars. For an extra sweet and salty twist, drizzle cooled bars with a homemade or store-bought salted caramel sauce before serving. A sprinkle of sea salt flakes on top would be amazing too.
You can also get creative with other candy. Think M&M’s, peanut butter chips, or chopped up candy bars. Just fold them into the dough the same way you would the chocolate chips. For a fun seasonal twist, add a teaspoon of pumpkin pie spice or cinnamon to the dry ingredients for autumn-inspired bars. The possibilities are endless!
FAQ
Can I make these Chocolate Chip Cookie Bars ahead of time?
Absolutely! These cookie bars are perfect for making ahead. You can bake them up to 24 hours in advance and store them at room temperature in an airtight container. In fact, many people find they taste even better the next day as the flavors deepen.
Why are my cookie bars crumbly or dry?
If your cookie bars are crumbly or dry, it’s usually due to overbaking or too much flour. Make sure to measure your flour correctly, preferably by weight, or spoon it into the measuring cup and level it. Also, pull the bars from the oven when the edges are golden but the center still looks slightly soft, as they continue to cook as they cool.
Can I freeze Chocolate Chip Cookie Bars?
Yes, these bars freeze beautifully! Once completely cooled, wrap individual bars or the entire slab tightly in plastic wrap, then in aluminum foil. They can be frozen for up to three months. Just thaw them at room temperature when you’re ready to enjoy.
Chocolate Chip Cookie Bars
Ingredients
- 2 1/4 cups all-purpose flour
- 1 tsp baking soda
- 1/2 tsp salt (use 1/4 tsp if using table salt)
- 1 cup unsalted butter melted and slightly cooled
- 3/4 cup packed light brown sugar
- 1/2 cup granulated sugar
- 2 large eggs
- 2 tsp vanilla extract
- 1 1/2 cups chocolate chips semi-sweet, milk, or dark
- 1/4 cup toffee bits optional, for topping
Instructions
- Preheat your oven to 350°F (175°C). Line a 9x13 inch baking pan with parchment paper or foil, leaving an overhang on the sides. This makes it super easy to lift the whole slab out later. If you don't have parchment, you can lightly grease the pan instead.
- In a medium bowl, whisk together the all-purpose flour, baking soda, and salt. Set this mixture aside.
- In a large mixing bowl, combine the melted and slightly cooled butter with both the packed brown sugar and white sugar. Mix thoroughly until they are well combined and smooth. This creates the sugary foundation for our bars.
- Add the eggs to the sugar-butter mixture, one at a time, mixing well after each addition. Stir in the vanilla extract until it's fully incorporated. The mixture should look creamy and light.
- Gradually add the dry flour mixture to the wet ingredients. Mix on low speed, or by hand, until just combined. Be careful not to overmix the dough, as this can lead to tough bars.
- Fold in the chocolate chips. If you’re using optional toffee bits, don't mix them into the dough yet; save them for the top.
- Press the dough evenly into your prepared 9x13 inch baking pan. Use the back of a spoon or your hands to get an even layer. If using toffee bits, sprinkle them evenly over the top of the pressed dough now.
- Bake for 25-35 minutes, or until the edges are golden brown and the center looks set but still slightly soft. Remember, the center will firm up as it cools, so don't overbake them!
- Remove the pan from the oven and place it on a wire rack to cool completely. This is the hardest part, but it’s crucial! If you cut them while warm, they'll be very gooey and fall apart. Let them cool fully to room temperature before lifting them out of the pan using the parchment paper overhang and cutting into squares.