There is something truly magical about the aroma of fresh bread wafting through the house. It’s a scent that signals comfort, family, and a meal made with love. If you’ve ever been intimidated by working with yeast, let this be the recipe that changes your mind. These Homemade Dinner Rolls are the gold standard pillowy, buttery, and incredibly soft.

Whether you are preparing a massive Thanksgiving feast, a Christmas ham, or just a simple Sunday roast, these rolls are always the star of the show. Forget the store-bought “brown and serve” versions; once you taste a roll that is fresh from your own oven, brushed with shimmering melted butter, there is no going back.
Why You’ll Love This Recipe
- Pillowy Texture: Thanks to the addition of milk and an egg, these rolls have an enriched crumb that stays soft for days.
- Beginner Friendly: I’ve broken down the yeast process so even a first-timer can achieve a perfect rise.
- Make-Ahead Magic: These rolls freeze beautifully, meaning you can prep them weeks before a big holiday.
- Perfectly Sweet & Salty: The 1/3 cup of sugar provides just enough sweetness to compliment the savory butter and salt.
Ingredient Notes
To get that bakery-quality result at home, the quality and temperature of your ingredients matter.
- Active Dry Yeast: Make sure your yeast isn’t expired! If it doesn’t foam up in the milk, your rolls won’t rise.
- Warm Milk: This is the “Goldilocks” step. The milk should be between 105°F and 110°F. If it’s too hot, it kills the yeast. If it’s too cold, the yeast stays dormant.
- Unsalted Butter: Using unsalted butter allows you to control the salt content. Make sure your butter for the dough is at room temperature so it incorporates smoothly.
- All-Purpose Flour: While bread flour works, all-purpose flour keeps these rolls tender and light rather than chewy.
- The Egg: A room-temperature egg incorporates better into the dough, helping with the rise and the rich, golden color.
Step-by-Step Instructions
1. Bloom the Yeast
In a small bowl, combine your warm milk and sugar. Sprinkle the yeast over the top and give it a gentle stir. Let it sit for about 5 minutes. You’re looking for a “foamy” or “puffy” appearance. If it stays flat, your yeast might be dead, and it’s best to start over.
2. Mix the Dough
In a large mixing bowl (or the bowl of a stand mixer), combine the yeast mixture, room temperature butter, egg, salt, and 2 cups of the flour. Beat this on medium speed until the batter is smooth and elastic.
3. Add Flour and Knead
Gradually add the remaining flour. You want a dough that is tacky, but not sticky. If the dough is sticking to your fingers like glue, add more flour one tablespoon at a time. Increase the mixer speed to medium-high and “knead” for 2-3 minutes. The dough should pull away from the sides of the bowl cleanly.
4. The First Rise
Place the dough in a lightly greased bowl. Cover it with a clean, warm dish towel and place it in a draft-free spot. Let it rise until it has doubled in size (usually 45-60 minutes).
5. Shape the Rolls
Punch the dough down gently to release the air. Turn it out onto a lightly floured surface. Roll it out into a 12×8 inch rectangle. Use a sharp knife or a pizza cutter to cut even pieces—I usually get about 24 to 30 rolls out of one batch.
6. The Second Rise and Bake
Place the shaped rolls on a baking sheet lined with parchment or a silicone mat. Cover them again and let them rise for another 45-60 minutes. This second rise is crucial for that “airiness.” Preheat your oven to 350°F and bake for 12-15 minutes until the tops are a beautiful golden brown.
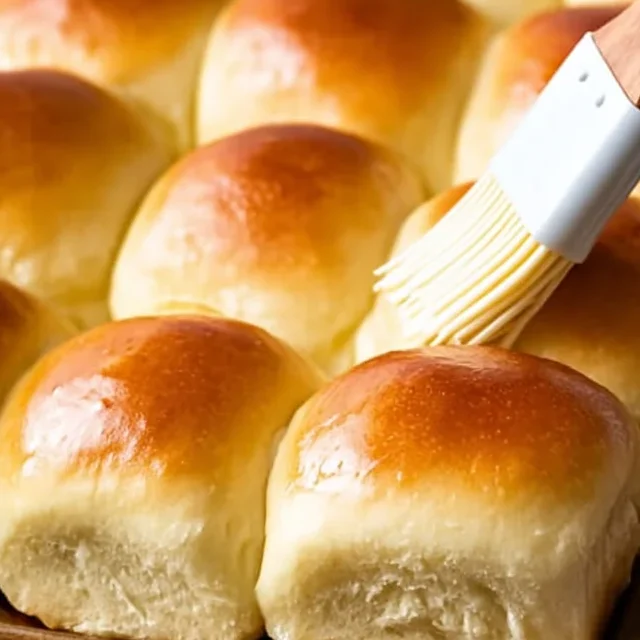
7. The Finishing Touch
As soon as they come out of the oven, brush them generously with the melted butter. This keeps the crust soft and gives them that irresistible shine.
Expert Tips for Best Results
- The Finger Test: To see if your dough has risen enough, gently poke it with your finger. If the indentation stays or springs back very slowly, it’s ready.
- Don’t Over-Flour: It is tempting to keep adding flour so the dough isn’t sticky, but too much flour leads to dense, dry rolls. Aim for “tacky”—it should feel like a Post-it note.
- Warm Spot Ideas: If your house is cold, turn your oven on for 1 minute, then turn it OFF. Place your dough inside the slightly warmed oven (with the door cracked) for the perfect rising environment.
- Weigh Your Dough: For perfectly even rolls that look professional, use a kitchen scale to weigh the dough pieces before shaping.
Variations and Substitutions
- Honey Butter Rolls: Swap the granulated sugar for honey for a deeper, floral sweetness.
- Garlic Herb Rolls: Add 1 teaspoon of garlic powder to the dough and mix dried parsley or rosemary into the melted butter topping.
- Whole Wheat: You can substitute up to 50% of the all-purpose flour with whole wheat flour, though the rolls will be slightly denser.
Storage and Freezing
To Store: Keep rolls in an airtight container or Ziploc bag at room temperature for up to 3 days.
To Freeze (Baked): Allow the rolls to cool completely. Place them in a freezer-safe bag and freeze for up to 3 months. To reheat, wrap them in foil and bake at 300°F for 10 minutes.
To Freeze (Dough): After shaping the rolls (before the second rise), place them on a tray and freeze until solid. Transfer to a bag. When ready to bake, let them thaw and rise in a warm spot (this may take 3-5 hours) before baking as directed.
FAQ
Why didn’t my dough rise?
The most common culprit is the yeast. Check the expiration date! Also, ensure your milk wasn’t too hot (killing the yeast) or too cold (leaving it dormant). If your room is very chilly, the rise will take significantly longer.
Can I use Rapid Rise (Instant) Yeast?
Yes! If using Instant Yeast, you can skip the “blooming” step and mix the yeast directly into the dry ingredients. Note that your rise times will be about 15-20 minutes faster.
It’s been an hour and the dough hasn’t doubled. What now?
Don’t panic! Yeast is a living organism and works on its own timeline. If your kitchen is cold, just give it more time. You can also move the bowl to a warmer spot like the top of the refrigerator.
Conclusion
Making your own Homemade Dinner Rolls is a rewarding experience that elevates any meal from ordinary to extraordinary. There is no substitute for the soft, buttery texture of a roll fresh from the oven. Grab your flour and yeast, and give this recipe a try this week—your family will thank you!
PrintThe Best Soft and Fluffy Homemade Dinner Rolls

These pillowy-soft homemade dinner rolls are the ultimate addition to any meal. Buttery, slightly sweet, and incredibly fluffy, they are surprisingly easy to make from scratch!
Ingredients
1 packet active dry yeast
1 ¼ cups warm milk (about 105–110 degrees F)
⅓ cup granulated sugar
¼ cup unsalted butter, room temperature (½ stick)
1 large egg, room temperature
1 teaspoon kosher salt
3 ½ – 4 cups all-purpose flour plus more for kneading
3 Tablespoon unsalted butter, melted for topping
Instructions
1. In a small bowl, add milk and sugar, sprinkle yeast over it. Let the yeast set until foamy, about 5 minutes.
2. Add the yeast mixture to a large mixing bowl. Then add ¼ cup butter, egg, salt, and 2 cups flour. Beat the mixture on medium speed until batter is smooth.
3. Gradually add flour until a soft ball of dough forms. Then increase speed on mixer to medium-high and beat for 2-3 minutes longer. Dough should be tacky, but not sticky.
4. Lightly grease a large bowl and place dough in ball, turning once to coat. Cover and set in a warm place to rise until doubled, about 45-60 minutes.
5. Punch the dough down gently. Lightly flour work surface and turn dough out. Knead lightly if necessary.
6. Roll dough out to a 12×8 inch rectangle, ½ inch thick. Cut into 24-30 even pieces.
7. Transfer rolls to prepared baking sheets. Cover and let rise until almost doubled, about 45-60 minutes.
8. Preheat oven to 350°F. Bake for 12-15 minutes or until golden brown. Remove and brush with melted butter.
Notes
Ensure your milk is between 105-110°F; too hot will kill the yeast, too cold won’t activate it.
If your kitchen is cold, let the dough rise in an oven that is turned OFF with the light on.
Store leftovers in an airtight bag for up to 3 days.