
Table of Contents
There’s nothing quite like biting into a perfect brownie. You know the kind: intensely chocolatey, with a delicate crinkly top and a melt-in-your-mouth, super fudgy center. If you’ve been searching for that ultimate Fudgy Brownies recipe, your quest ends here. I’ve perfected a simple method that delivers unbelievably delicious results every single time.
These Fudgy Brownies are not just easy to make; they become a staple in your baking repertoire. Forget dry, cakey imposters. We’re talking rich, gooey decadence that will have everyone asking for your secret. Get ready to experience the pure joy of homemade chocolate perfection without any fuss or complicated techniques.
What Makes These Fudgy Brownies Worth Making
These brownies stand out because they hit all the right notes for a truly indulgent treat. First, the texture is paramount. We’re aiming for that deeply fudgy, almost gooey center that distinguishes a great brownie from a good one. You’ll get a lovely chewiness around the edges too, providing a satisfying contrast. Then there’s the signature crinkly top, a hallmark of well-made brownies, adding visual appeal and a delicate textural crunch.
The chocolate flavor here is rich and profound, thanks to a careful balance of ingredients. This recipe avoids the pitfall of cakey brownies by controlling flour content and baking time. It’s designed to be simple, using mostly pantry staples, which means you can whip up a batch whenever a craving strikes. It’s a foolproof method that consistently delivers bakery-quality results, making it an absolute must-have in your recipe collection.
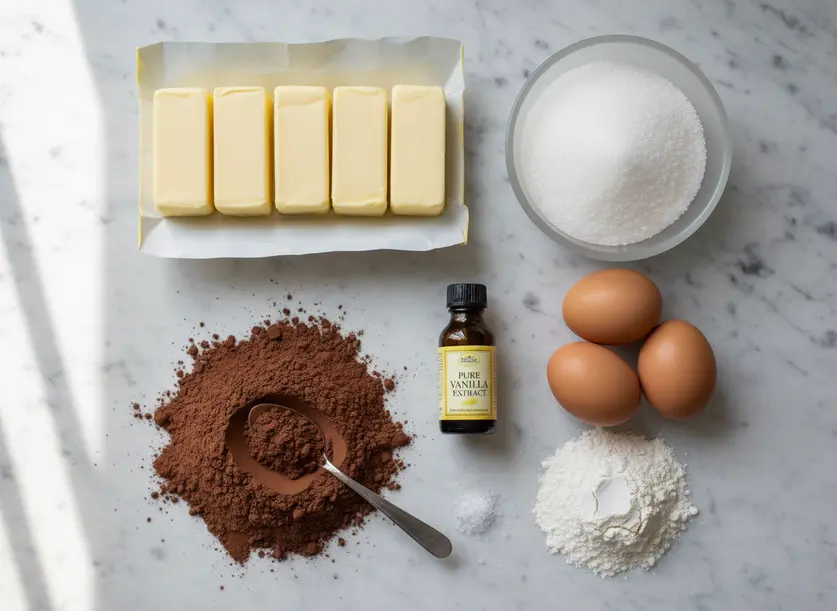
Ingredients You Will Need
Creating these delightful Fudgy Brownies starts with a few key ingredients, each playing a crucial role. You will need unsalted butter, which gives us control over the overall saltiness; if you only have salted butter, simply omit the additional salt called for. Granulated sugar is essential for achieving that iconic crinkly top and balancing the cocoa’s bitterness; avoid substituting brown sugar in this recipe, as it can alter the texture and add an unwanted molasses flavor.
Large eggs add richness and structure without making the brownies cakey, and there’s no need to bring them to room temperature beforehand. Unsweetened cocoa powder is our primary chocolate source; natural cocoa powder offers a classic, rich chocolate flavor, while Dutch-processed yields a darker color and a milder, less acidic taste, similar to an Oreo. All-purpose flour provides just enough structure; keeping it minimal ensures maximum fudginess, and many bakers have success using a 1:1 gluten-free flour blend for this recipe. Finally, a touch of vanilla extract enhances the chocolate notes, and a pinch of salt elevates all the flavors.
How to Make It Step by Step
- Prepare your oven and pan: Position an oven rack in the middle and preheat your oven to 325°F (160°C). Line an 8×8-inch or 9×9-inch metal baking pan with parchment paper, allowing an overhang on two sides to easily lift the brownies out later. Lightly grease the exposed pan sides if not fully covered.
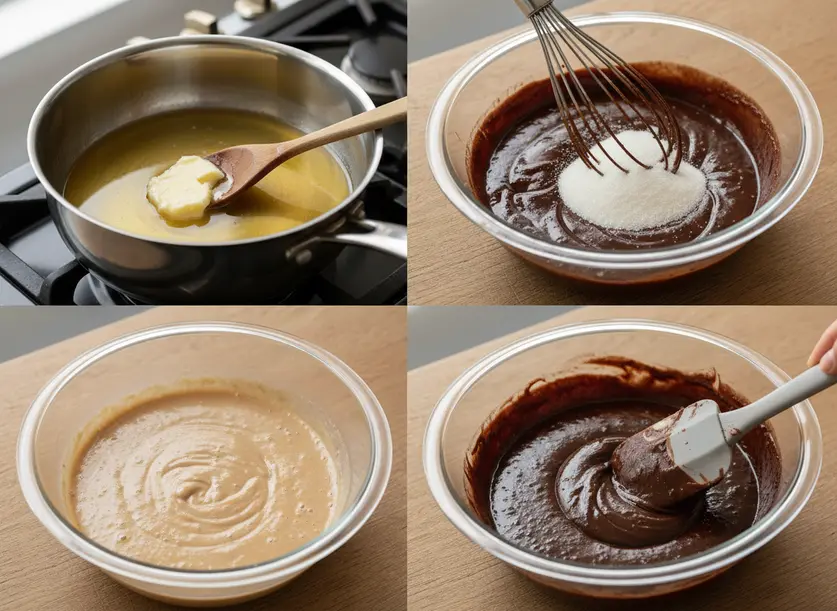
- Melt the butter: Place the unsalted butter in a medium saucepan over medium-low heat. Cook until it’s completely melted, then immediately remove the pan from the heat. Avoid browning the butter, as this can change the flavor profile.
- Combine with sugar and cocoa: While the butter is still hot, stir in the granulated sugar, cocoa powder, vanilla extract, and salt. Mix vigorously until the mixture is well blended and smooth. The hot butter helps dissolve the sugar, which contributes to the crinkly top.
- Cool slightly: Let the mixture cool down in the saucepan for about 5 to 10 minutes. It should still be warm to the touch but not hot enough to scramble the eggs. This step is important for proper egg incorporation.
- Add the eggs: Crack the large eggs directly into the slightly cooled mixture, one at a time. Whisk vigorously after each addition until fully incorporated and the batter looks glossy. This aeration is key for achieving that beautiful, shiny top.
- Incorporate the flour: Add the all-purpose flour to the batter. Using a rubber spatula or wooden spoon, fold it in gently until just combined. Stop mixing as soon as you see no more dry streaks of flour to prevent developing too much gluten, which leads to cakey brownies.
- Stir in mix-ins (optional): If you’re adding chocolate chips, chopped nuts, or other inclusions, gently fold them into the batter at this stage until evenly distributed.
- Bake the brownies: Pour the thick batter into your prepared pan. Use the spatula to spread it evenly into the corners. Bake for 25 to 30 minutes, or until the edges are set and the center still looks slightly soft or jiggly when gently shaken. A toothpick inserted into the center should come out with moist crumbs, not wet batter.
- Cool completely: This is a crucial step! Place the pan on a wire rack and let the brownies cool completely in the pan before attempting to slice them. This can take 2 to 3 hours, but it allows them to set properly and ensures a fudgy texture and clean cuts.
- Slice and serve: Once fully cooled, use the parchment paper overhang to lift the entire brownie slab from the pan. Place it on a cutting board and slice into squares using a sharp knife, wiping the blade clean between each cut for perfect edges.
Tips for the Best Results
Achieving perfect Fudgy Brownies consistently involves a few key techniques. First, don’t overbake them. This is the most common mistake. Pull them from the oven when the edges are set but the center still seems slightly underdone. They continue to cook from residual heat as they cool, so trust that slightly wobbly center; it will firm up beautifully into a fudgy delight. Overbaked brownies will always turn out dry and cakey.
Another critical tip is to cool them completely in the pan. Resist the urge to cut into warm brownies. Cooling allows the fats and sugars to re-solidify, setting the texture and making them easier to slice cleanly. If you try to cut them warm, they will crumble and lose their fudgy integrity.
Your pan choice affects bake time. Metal pans conduct heat more efficiently than glass or ceramic, which can require longer baking times. If using glass, start checking for doneness 5-10 minutes earlier than suggested and be prepared to extend baking if needed. For storage, keep cooled brownies in an airtight container at room temperature for 3-4 days. For longer storage, wrap individual brownies tightly in plastic wrap and freeze them for up to 3 months; thaw at room temperature when ready to enjoy.
Variations to Try
Once you master the basic Fudgy Brownies, you can easily adapt them to create new favorites. For Nutty Brownies, fold in about 2/3 cup of chopped walnuts, pecans, or almonds with the flour. The nuts add a wonderful crunch and depth of flavor.
If you’re a serious chocolate lover, try a Chocolate Chip Overload variation. Increase the chocolate chips to a full cup, or use a mix of milk chocolate, dark chocolate, and even white chocolate chips for diverse flavor notes. You can also press extra chocolate chips on top before baking for a visual flourish.
For an elegant twist, make Salted Caramel Swirl Brownies. After pouring half the batter into the pan, dollop spoonfuls of store-bought or homemade caramel sauce on top, then add the remaining batter and dollop more caramel. Swirl gently with a knife, then sprinkle with flaky sea salt before baking. The salt beautifully complements the sweet caramel and rich chocolate. Lastly, adding 1 teaspoon of espresso powder with the cocoa powder will deepen the chocolate flavor without making the brownies taste like coffee.
Fudgy Brownies FAQ
Why are my brownies cakey and not fudgy?
Cakey brownies are often the result of either overbaking, using too much flour, or overmixing the batter. Ensure you remove your brownies from the oven when the center is still slightly soft. Also, measure your flour accurately using the spoon-and-level method, and mix the dry ingredients into the wet ones only until just combined to avoid developing too much gluten.
Can I make these fudgy brownies gluten-free?
Yes, many bakers have successfully made these brownies gluten-free. Substitute the all-purpose flour with a 1:1 gluten-free baking blend, such as those from King Arthur Flour or Bob’s Red Mill. The texture might be slightly different, but you can still achieve a wonderfully fudgy result.
How can I get that perfect crinkly top?
The crinkly top comes from a combination of factors. First, heating some of the sugar with the butter helps dissolve it and create a glossy surface. Second, vigorously whisking the eggs into the warm (but not hot) batter incorporates air and builds a stable emulsion. Finally, cooling the brownies completely helps set that delicate, shiny crust.


Fudgy Brownies
Ingredients
- 1/2 cup unsalted butter if using salted butter, omit the additional salt called for
- 1 cup granulated sugar do not substitute brown sugar
- 2 large eggs no need to bring to room temperature
- 3/4 cup unsweetened cocoa powder natural cocoa powder for classic flavor, Dutch-processed for darker color and milder taste
- 1/2 cup all-purpose flour can substitute with a 1:1 gluten-free flour blend
- 1 teaspoon vanilla extract
- 1/2 teaspoon salt
Instructions
- Prepare your oven and pan: Position an oven rack in the middle and preheat your oven to 325°F (160°C). Line an 8x8-inch or 9x9-inch metal baking pan with parchment paper, allowing an overhang on two sides to easily lift the brownies out later. Lightly grease the exposed pan sides if not fully covered.
- Melt the butter: Place the unsalted butter in a medium saucepan over medium-low heat. Cook until it's completely melted, then immediately remove the pan from the heat. Avoid browning the butter, as this can change the flavor profile.
- Combine with sugar and cocoa: While the butter is still hot, stir in the granulated sugar, cocoa powder, vanilla extract, and salt. Mix vigorously until the mixture is well blended and smooth. The hot butter helps dissolve the sugar, which contributes to the crinkly top.
- Cool slightly: Let the mixture cool down in the saucepan for about 5 to 10 minutes. It should still be warm to the touch but not hot enough to scramble the eggs. This step is important for proper egg incorporation.
- Add the eggs: Crack the large eggs directly into the slightly cooled mixture, one at a time. Whisk vigorously after each addition until fully incorporated and the batter looks glossy. This aeration is key for achieving that beautiful, shiny top.
- Incorporate the flour: Add the all-purpose flour to the batter. Using a rubber spatula or wooden spoon, fold it in gently until just combined. Stop mixing as soon as you see no more dry streaks of flour to prevent developing too much gluten, which leads to cakey brownies.
- Stir in mix-ins (optional): If you're adding chocolate chips, chopped nuts, or other inclusions, gently fold them into the batter at this stage until evenly distributed.
- Bake the brownies: Pour the thick batter into your prepared pan. Use the spatula to spread it evenly into the corners. Bake for 25 to 30 minutes, or until the edges are set and the center still looks slightly soft or jiggly when gently shaken. A toothpick inserted into the center should come out with moist crumbs, not wet batter.
- Cool completely: This is a crucial step! Place the pan on a wire rack and let the brownies cool completely in the pan before attempting to slice them. This can take 2 to 3 hours, but it allows them to set properly and ensures a fudgy texture and clean cuts.
- Slice and serve: Once fully cooled, use the parchment paper overhang to lift the entire brownie slab from the pan. Place it on a cutting board and slice into squares using a sharp knife, wiping the blade clean between each cut for perfect edges.


