
Table of Contents
There’s nothing quite like biting into a warm, gooey cookie, especially when it’s one of my favorite Chocolate Raspberry Cookies. These aren’t just any cookies; they’re a truly decadent experience. I’m going to share my absolute best recipe for these treats, guaranteeing crisp edges, a soft, fudgy middle, and those irresistible bursts of tangy raspberry flavor. The secret? Perfectly browned butter that adds incredible depth. The best part? You don’t need an electric mixer, and there’s no chilling required for this dough, so you can enjoy these amazing Chocolate Raspberry Cookies sooner than you think. Get ready for your new go-to recipe for these delightful cookies.
What Makes These Cookies Worth Making
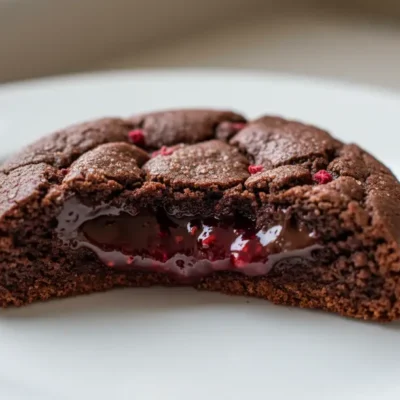
These aren’t your average chocolate chip cookies; my recipe for Chocolate Raspberry Cookies takes a few simple tweaks to elevate them into something truly special. The secret truly lies in browning the butter. This step adds an incredible depth of nutty, caramel like flavor that complements the chocolate beautifully. It also removes excess moisture, which is crucial when you’re adding juicy raspberries to the dough. This clever trick ensures your cookies are never cakey or soggy, a common issue with fruit in baking. The result is a cookie that boasts perfectly crisp edges, giving way to an unbelievably soft and fudgy center, much like a gourmet brownie, but in cookie form. Plus, the convenience is unmatched. You don’t need to wait for the dough to chill in the fridge for hours, and a simple whisk is all you need for mixing. It’s a quick, easy, and undeniably delicious win for your sweet tooth.
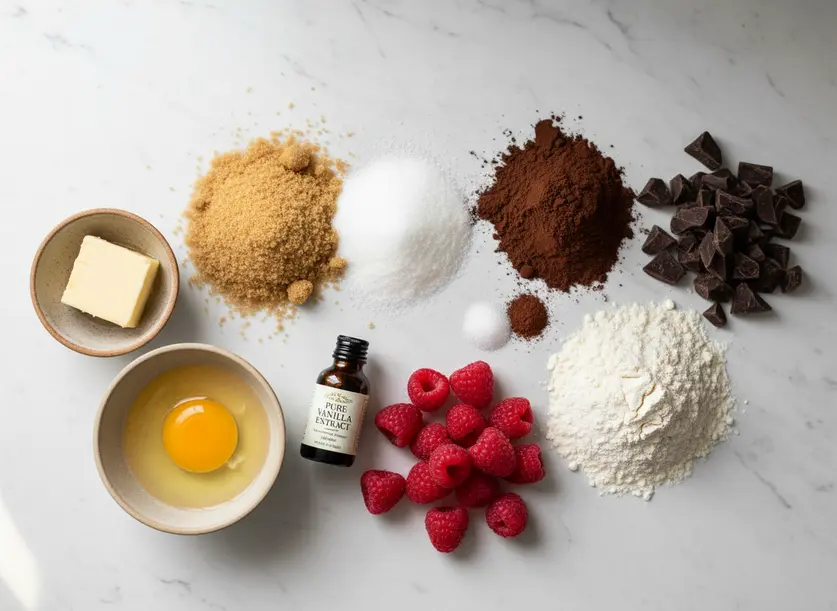
Ingredients You Will Need
The best Chocolate Raspberry Cookies start with quality ingredients. Gathering them is the first step to deliciousness, and quality really shines through here. You’ll start with unsalted butter; browning it is key for both flavor and an ideal texture. For sugars, we’ll use a precise mix of brown sugar for chewiness and granulated sugar for that delightful crispness. A large egg binds everything together, and a touch of pure vanilla extract enhances all the sweet notes. For the dry ingredients, you’ll need all purpose flour – always weigh it for precision, or spoon and level carefully to avoid dense cookies. Natural cocoa powder gives us that deep chocolate color and flavor without being too acidic. Don’t forget baking soda for lift and a pinch of sea salt to balance the sweetness and intensify the rich chocolate. For the stars of the show, pick a good quality dark chocolate (chips or chopped bars work best) and fresh or frozen raspberries. If using frozen, absolutely do not defrost them! You can even add a bit of milk chocolate or a specialty raspberry dark chocolate bar for extra complexity.
How to Make Chocolate Raspberry Cookies Step by Step
Let’s get baking! Follow these steps carefully for perfect results every single time.
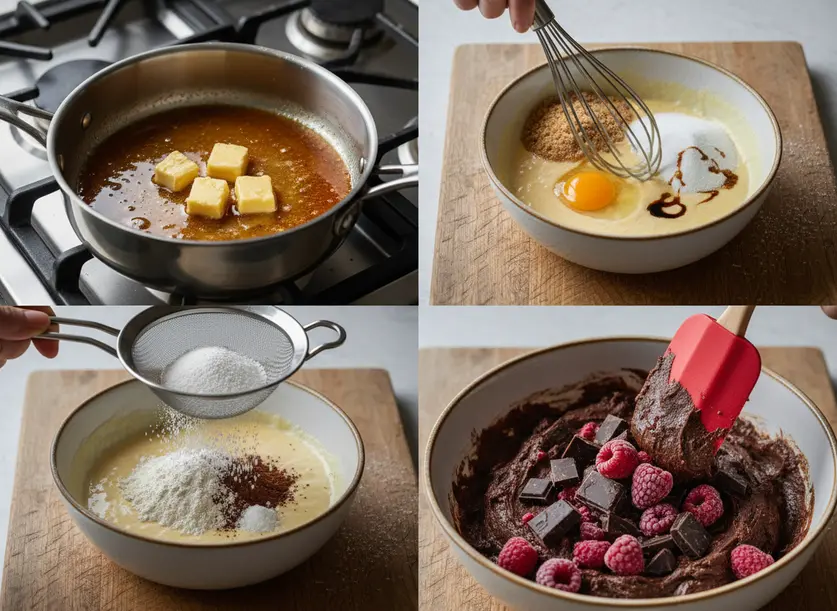
- Preheat and Prep: Preheat your oven to 355°F (180°C). Line a sturdy baking sheet with parchment paper; this prevents sticking and simplifies cleanup.
- Brown the Butter: Place unsalted butter in a light-colored saucepan over medium heat. Melt, then continue cooking, stirring frequently, until it turns amber with nutty brown bits at the bottom (5-8 minutes). Immediately pour into a separate heatproof bowl to stop cooking.
- Cool the Butter: Let the browned butter cool completely to room temperature. This is critical for cookie texture and prevents the egg from cooking. An ice bath can speed this up.
- Combine Wet Ingredients: In a large mixing bowl, vigorously whisk together the cooled brown butter, brown sugar, and granulated sugar until lightened and creamy.
- Add Egg and Vanilla: Whisk in the large egg, sea salt, and pure vanilla extract until the mixture is super creamy and thoroughly combined.
- Sift Dry Ingredients: Sift the all purpose flour, natural cocoa powder, and baking soda directly into the wet mixture.
- Form Dough: Using a rubber spatula, gently stir the dry ingredients into the wet until just combined and a thick, uniform dough forms. Avoid overmixing to prevent tough cookies.
- Fold in Inclusions: Add most of your chopped dark chocolate and the fresh or frozen (undeffrosted!) raspberries. Reserve about ¼ cup of chocolate for topping. Gently fold until evenly distributed.
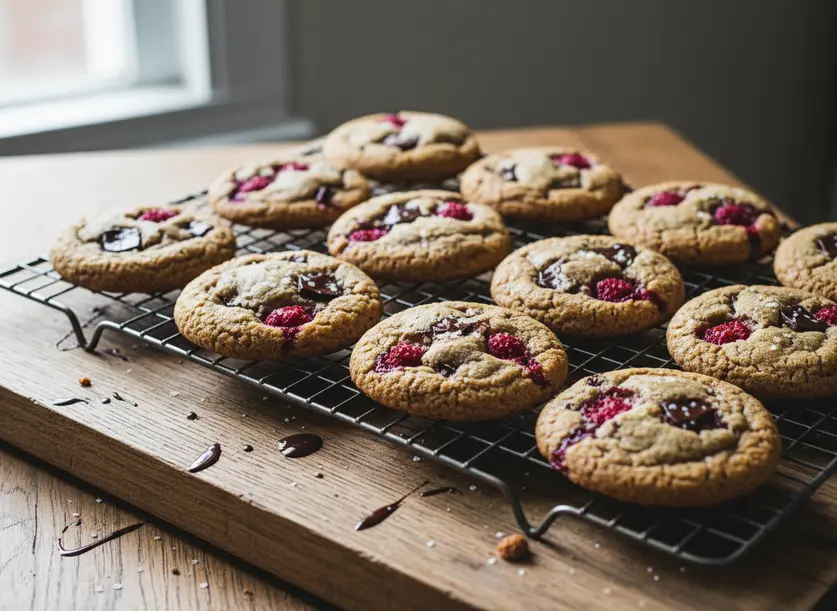
- Scoop and Top: Use a medium cookie scoop to portion dough into balls. Place on the prepared baking sheet, leaving 2-3 inches between each. Press reserved chocolate pieces onto the tops for a beautiful finish.
- Bake: Bake for 8-10 minutes. For fudgier cookies, aim for 8 minutes; edges should be set, but centers will still look soft.
- Cool and Finish: Remove the sheet and let cookies set for a few minutes. Transfer to a wire rack to cool completely. Sprinkle with flaky sea salt while still warm, if desired.
Tips for the Best Results
Achieving perfect Chocolate Raspberry Cookies every time is easier with these expert tips.
- Don’t Burn the Butter: Keep a close eye on your butter as it browns. Stir frequently, and remove it from the heat as soon as you see those amber bits and smell a nutty aroma. Burnt butter will have a bitter taste and black specks, which you definitely don’t want.
- Cool the Brown Butter Completely: This is non-negotiable. Warm butter will melt your sugars and make your cookies spread excessively. Allow it to come to room temperature before combining with other ingredients. An ice bath is your friend here for speed.
- Weigh Your Flour: Baking is a science, and precision matters. Using a kitchen scale to measure your flour (and other dry ingredients) ensures consistent results every time. If you don’t have one, fluff the flour in its container, then spoon it into your measuring cup and level it off without packing.
- Frozen Raspberries Stay Frozen: If you’re using frozen raspberries, do not defrost them before adding them to the dough. Adding them frozen helps them maintain their shape and prevents them from bleeding too much moisture into the dough, which could make your cookies cakey or soggy.
- Underbake for Fudgy Centers: For that coveted fudgy, brownie like texture with crisp edges, slightly underbake your cookies. They might look a little soft in the center when you pull them from the oven, but they will continue to set as they cool on the baking sheet.
- Storage and Make Ahead: Store baked cookies in an airtight container at room temperature for up to 3 days, or in the fridge for up to 5 days. For make ahead convenience, portion the dough balls and freeze them on a parchment-lined baking sheet. Once solid, transfer them to a freezer safe bag for up to 3 months. Bake from frozen, adding 1-2 minutes to the bake time.
Variations to Try
Once you master the classic Chocolate Raspberry Cookies, feel free to get creative with these delicious variations.
- White Chocolate Raspberry Cookies: Swap out the dark chocolate for good quality white chocolate chips or chunks. The sweetness of the white chocolate pairs wonderfully with the tartness of the raspberries, creating a beautiful contrast in flavors and colors. You can even add a touch of lemon zest to brighten it further.
- Mixed Berry Delight: While raspberries are fantastic, don’t limit yourself! Try substituting half the raspberries with other frozen berries like blueberries, chopped strawberries, or blackberries. Just ensure they are kept frozen before adding to the dough. Each berry will bring its unique flavor profile to the cookie.
- Nutty Crunch: For an added layer of texture and flavor, fold in about ½ cup of chopped toasted nuts like pecans, walnuts, or almonds along with the chocolate and raspberries. The nutty crunch will complement the fudgy cookie and soft berries beautifully. A sprinkle of sea salt on top really makes the nuts pop.
FAQ
Here are answers to some common questions about making my Chocolate Raspberry Cookies.
Fresh vs. Frozen Raspberries: Which is Better?
For these Chocolate Raspberry Cookies, frozen raspberries are often preferred, especially if you want them to hold their shape better and prevent excessive moisture release. If you use fresh raspberries, be extra gentle when folding them in. The most important rule for either is not to defrost frozen raspberries before mixing them into the dough.
Why is Browning the Butter Important?
Browning the butter is crucial for two main reasons. Firstly, it infuses the cookies with a rich, nutty, and complex flavor that plain butter can’t match. Secondly, the browning process removes some of the moisture from the butter. This is especially important when baking with high moisture ingredients like raspberries, as it helps prevent the cookies from becoming soggy or cakey, ensuring that perfect fudgy texture.
Can I Skip Chilling the Dough?
Absolutely! One of the best features of this Chocolate Raspberry Cookies recipe is that it’s designed to be baked immediately. Thanks to the carefully balanced ingredients and the browned butter, the dough holds its shape beautifully without any chilling. This means you can go from mixing to warm cookies in under 30 minutes, making it perfect for those sudden cravings.
Chocolate Raspberry Cookies
Ingredients
- Not Specified unsalted butter for browning
- Not Specified brown sugar for chewiness
- Not Specified granulated sugar for crispness
- Not Specified large egg
- Not Specified pure vanilla extract
- Not Specified all-purpose flour weigh for precision, or spoon and level carefully
- Not Specified natural cocoa powder
- Not Specified baking soda for lift
- Not Specified sea salt to balance sweetness and intensify chocolate
- Not Specified dark chocolate chips or chopped bars, reserve about ¼ cup for topping
- Not Specified fresh or frozen raspberries do not defrost frozen; can substitute other berries
- Not Specified milk chocolate optional, for complexity
- Not Specified specialty raspberry dark chocolate bar optional, for complexity
- Not Specified flaky sea salt optional, for sprinkling while warm
- Not Specified white chocolate chips or chunks optional, for variation
- Not Specified lemon zest optional, for white chocolate variation
- Not Specified chopped toasted nuts optional, like pecans, walnuts, or almonds, for nutty crunch
Instructions
- Preheat your oven to 355°F (180°C). Line a sturdy baking sheet with parchment paper; this prevents sticking and simplifies cleanup.
- Place unsalted butter in a light-colored saucepan over medium heat. Melt, then continue cooking, stirring frequently, until it turns amber with nutty brown bits at the bottom (5-8 minutes). Immediately pour into a separate heatproof bowl to stop cooking.
- Let the browned butter cool completely to room temperature. This is critical for cookie texture and prevents the egg from cooking. An ice bath can speed this up.
- In a large mixing bowl, vigorously whisk together the cooled brown butter, brown sugar, and granulated sugar until lightened and creamy.
- Whisk in the large egg, sea salt, and pure vanilla extract until the mixture is super creamy and thoroughly combined.
- Sift the all-purpose flour, natural cocoa powder, and baking soda directly into the wet mixture.
- Using a rubber spatula, gently stir the dry ingredients into the wet until just combined and a thick, uniform dough forms. Avoid overmixing to prevent tough cookies.
- Add most of your chopped dark chocolate and the fresh or frozen (undeffrosted!) raspberries. Reserve about ¼ cup of chocolate for topping. Gently fold until evenly distributed.
- Use a medium cookie scoop to portion dough into balls. Place on the prepared baking sheet, leaving 2-3 inches between each. Press reserved chocolate pieces onto the tops for a beautiful finish.
- Bake for 8-10 minutes. For fudgier cookies, aim for 8 minutes; edges should be set, but centers will still look soft.
- Remove the sheet and let cookies set for a few minutes. Transfer to a wire rack to cool completely. Sprinkle with flaky sea salt while still warm, if desired.


