
There is something truly magical about the combination of cool, refreshing mint and deep, indulgent chocolate. When you wrap those flavors into a velvety, melt-in-your-mouth cream cheese base, you get something far superior to a standard cookie. These Chocolate Mint Cream Cheese Buttons are a show-stopping dessert that requires absolutely no oven time, making them a savior during the busy holiday season or hot summer months. Whether you are looking for a sophisticated addition to a wedding dessert table or a fun weekend project with the kids, these “buttons” offer a professional look with surprisingly little effort. The soft, pastel green mint base paired with a glossy dark ganache makes for a visual contrast that is as striking as it is delicious. Get ready to have everyone asking for your “secret” recipe!
Why You’ll Love This Recipe
You will fall in love with these Chocolate Mint Cream Cheese Buttons for several reasons. First, the texture is unparalleled—it’s a cross between a soft-set fudge and a traditional wedding mint. Second, the no-bake factor means you can whip these up without heating your kitchen, saving time and energy. The recipe is also incredibly customizable; while we love the classic mint green, you can adapt the colors and flavors for any holiday. Finally, they are the perfect make-ahead dessert. Because they require chilling time to set, you can prepare them a day or two in advance, leaving you free to focus on your guests or other party preparations. They are bite-sized perfection that satisfies a sweet tooth instantly.
What Is a Cream Cheese Button?
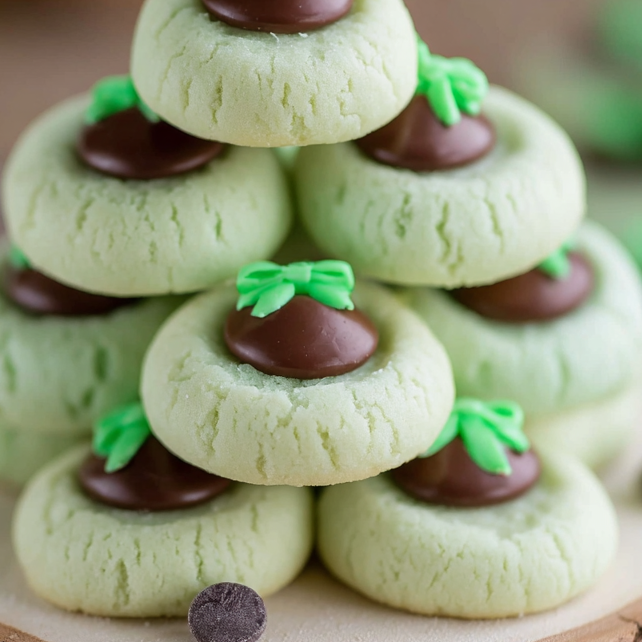
At its heart, a Cream Cheese Button is an elevated version of the classic “cream cheese mint” often found at weddings and baby showers. Traditional mints are usually just cream cheese, sugar, and flavoring pressed into a mold. However, these “buttons” take the concept a step further by creating a thumbprint-style well in the center, which is then filled with a decadent, homemade chocolate ganache. The “button” shape refers to the small, round, and indented appearance of the candy. Unlike hard candies or crumbly cookies, these are soft and creamy throughout, providing a rich mouthfeel that feels much more like a high-end truffle than a simple sugar candy.
you will need
To achieve the perfect Chocolate Mint Cream Cheese Button, quality and temperature of ingredients are paramount.
- Cream Cheese: Ensure your 4 oz of cream cheese is completely softened to room temperature. This prevents lumps and ensures the powdered sugar integrates smoothly. Full-fat cream cheese provides the best structural integrity.
- Powdered Sugar: Use 4 1/2 cups of finely sifted powdered sugar. This acts as the “flour” in this no-bake dough, providing the sweetness and the structure needed to hold the shape.
- Mint Extract: A little goes a long way. Use a high-quality mint extract for a clean, refreshing flavor. Be careful not to use spearmint unless you want a “gum” flavor; “mint” or “peppermint” is usually preferred for desserts.
- Gel Food Coloring: Gel is essential here. Liquid food coloring adds too much moisture, which can make the dough sticky and difficult to handle.
- Heavy Whipping Cream & Semi-Sweet Chocolate Chips: These two combine to create the ganache. The high fat content in the cream ensures the chocolate remains silky and pipeable even after it has set. Semi-sweet chips provide the perfect balance against the very sweet mint base.
Ingredient Substitutions & Tips
If you find yourself missing an ingredient, there are a few ways to pivot. For the chocolate, you can substitute dark chocolate chips (60% cacao or higher) if you prefer a less sweet, more intense chocolate flavor. If you are sensitive to dairy, a dairy-free cream cheese and coconut cream can work, though the texture may be slightly softer.
Pro Tip: If you want a different flavor profile entirely, try using almond extract and pink food coloring with a white chocolate ganache center. The possibilities for customization are endless! Always remember to add your powdered sugar gradually; depending on the humidity in your kitchen, you might need slightly more or less than the called-for 4 1/2 cups.
Step-by-Step Instructions
- Prepare the Base: In a stand mixer fitted with the paddle attachment, or using a hand mixer, beat the 4 oz of softened cream cheese with the first cup of powdered sugar. Start on low speed to avoid a sugar cloud, then increase to medium until the mixture is creamy.
- Flavor and Color: Add the 1/2 teaspoon of mint extract and a few drops of green gel food color. Mix until the color is vibrant and perfectly even.
- Build the Dough: Gradually add the remaining 3 1/2 cups of powdered sugar. As the dough gets thicker, your mixer might struggle. This is the point where I usually ditch the machine and use my hands to knead the dough until it feels like smooth play-dough.
- Shape the Buttons: Line a large sheet with parchment paper. Scoop about a teaspoon of dough and roll it between your palms to form a 1-inch ball. Place it on the sheet and repeat.
- Create the Indentation: Using the back of a round 1/4 teaspoon measuring spoon or a wooden spoon handle, gently press into the center of each ball to create a well. If the dough sticks, dip your tool in powdered sugar first.
- The First Chill: Place the tray in the refrigerator for at least one hour. This “sets” the shape so they don’t flatten when you add the warm ganache.
- Make the Ganache: Heat 1 cup of heavy cream until it just begins to simmer (look for small bubbles around the edges). Pour it over 10 oz of chocolate chips. Let it sit for 2 minutes, then whisk gently starting from the center until it’s a glossy, dark liquid.
- Thicken and Pipe: Pour the ganache into a Ziploc bag and let it sit at room temperature for about 30 minutes until it reaches a yogurt-like consistency. Snip a tiny corner off the bag and carefully pipe the chocolate into each mint indentation.
- Final Set: Return the buttons to the fridge for one more hour to allow the ganache to firm up completely.
Expert Baking/Cooking Tips
Achieving that “pro-bakery” look comes down to the details. First, temperature control is your best friend. If the dough feels too soft while rolling, pop the whole bowl in the fridge for 15 minutes. Second, when making the ganache, do not over-stir initially. Let the heat of the cream do the work to avoid incorporating air bubbles, which can dull the shine of your chocolate. Third, for perfectly uniform buttons, use a small cookie scoop (size 100) to ensure every ball of dough is exactly the same size. This creates a beautiful, symmetrical look on your serving platter.
The Art of the Perfect Ganache
The ganache is the crown jewel of this recipe. To ensure it is velvety smooth, always use high-quality chocolate chips or chopped baking bars. If your ganache appears “broken” or oily, it usually means the cream was too hot or it was stirred too vigorously. You can often fix this by whisking in a teaspoon of cold heavy cream. For these buttons, the ganache needs to be “pipeable.” If you pipe it while it is too thin, it will overflow the “button” and look messy. If it’s too thick, you’ll get peaks that don’t settle into a smooth surface. Aim for that “thick yogurt” stage for the best results.
Serving Suggestions
These mint buttons look stunning when arranged on a white ceramic platter or a tiered dessert stand. For a festive touch, garnish the tray with fresh mint leaves or a light dusting of cocoa powder. They are quite rich, so serving them alongside a tart fruit platter or a cup of dark roast coffee provides an excellent balance. They also make wonderful “edible gifts” when placed in small paper candy liners and tucked into a decorative tin.
Storage & Make-Ahead Tips
Since these contain cream cheese and heavy cream, they must be refrigerated. Store them in a single layer in an airtight container to prevent the ganache from sticking to the bottom of the next layer. They will stay fresh for up to two weeks in the fridge. You can also freeze these for up to two months! Just thaw them in the refrigerator overnight before serving to maintain the best texture.
FAQs
Can I use liquid food coloring?
It is not recommended. Liquid food coloring can make the cream cheese dough too soft and sticky to roll. Gel coloring provides a more intense color without altering the moisture levels.
How do I prevent the dough from sticking to my hands?
If the dough is sticky, you can lightly dust your palms with powdered sugar. However, if it’s very sticky, it likely needs more powdered sugar or a quick 15-minute chill in the refrigerator.
Why did my ganache never set up?
This usually happens if the ratio of cream to chocolate is off or if the cream didn’t reach a simmer. Ensure you are using heavy whipping cream (not milk) and measuring your chocolate accurately.
Can I make these without a mixer?
Yes! While a mixer makes the initial cream cheese and sugar stage easier, you can absolutely mix and knead this dough by hand in a large bowl.
Do these need to be kept cold?
Yes, for safety and texture, keep them refrigerated until about 15 minutes before you plan to serve them.
Chocolate Mint Cream Cheese Buttons are more than just a candy; they are a delightful experience of textures and flavors. With their vibrant green hue and rich chocolate centers, they bring a touch of elegance to any gathering without requiring hours of baking. Once you master the simple dough and the silky ganache, you’ll find yourself making these for every holiday. Give this recipe a try and enjoy the “cool” side of indulgence!
PrintChocolate Mint Cream Cheese Buttons

These Chocolate Mint Cream Cheese Buttons are a delightful hybrid between a traditional wedding mint and a gourmet chocolate truffle. The cool, velvety cream cheese base melts in your mouth, perfectly complementing the rich, silky chocolate ganache center. These are ideal for holiday platters, baby showers, or any occasion where you need a stunning, no-bake dessert.
- Prep Time: 30 minutes
- Cook Time: 0 minutes
- Total Time: 30 minutes
- Yield: 6 servings
- Cuisine: American
Ingredients
Cream cheese, softened – 4 oz
Powdered sugar – 4 1/2 cups
Mint extract – 1/2 teaspoon
Green gel food color – several drops
Heavy whipping cream – 1 cup
Semi-sweet chocolate chips – 10 oz
Instructions
1. In a large mixing bowl, beat the softened cream cheese with 1 cup of powdered sugar until smooth.
2. Mix in the mint extract and green gel food color until the color is uniform.
3. Gradually add the remaining powdered sugar, mixing until a stiff dough forms. You may need to use your hands for the final integration.
4. Roll teaspoon-sized portions of dough into smooth balls and place them on a parchment-lined baking sheet.
5. Use the back of a small measuring spoon or a wooden spoon handle to press an indentation into the center of each ball.
6. Refrigerate the mint buttons for at least 1 hour to firm up.
7. To make the ganache, place chocolate chips in a heat-proof bowl.
8. Heat heavy cream until simmering, then pour over the chocolate. Let sit for 2 minutes before stirring until smooth.
9. Allow the ganache to thicken in a Ziploc bag for 30 minutes.
10. Snip the corner of the bag and pipe the ganache into the centers of the chilled mints.
11. Chill for another hour until the ganache is set.
Notes
• Use gel food coloring rather than liquid to avoid changing the consistency of the dough.
• If the dough is too sticky to roll, add an extra tablespoon of powdered sugar.
• Dust your thumb or spoon with powdered sugar before making indentations to prevent sticking.
• Store these in an airtight container in the refrigerator for up to two weeks.


