
There is something undeniably nostalgic about a classic coconut cream pie, but let’s be honest—serving a traditional pie at a potluck or family gathering can be a messy endeavor. Enter the Coconut Cream Pie Bar. These bars take everything you love about the classic diner dessert—the silky custard, the cloud-like whipped cream, and the toasted tropical crunch—and transform them into a sturdy, sliceable, and utterly decadent finger food. Imagine a buttery vanilla wafer crust topped with a hidden “cheesecake” layer that adds a tangy depth most pies lack. Whether you are a coconut fanatic or just looking for a show-stopping dessert that travels well, these bars are the answer. In this guide, we will walk through the science of a perfect custard and the secrets to keeping your crust crisp, ensuring every bite is a masterclass in texture.

Why You’ll Love This Recipe
You’ll love this recipe because it solves the “floppy pie” problem with sophisticated layering. Unlike a standard pie, these bars feature a stabilizing cream cheese layer that acts as a moisture barrier, ensuring the crust stays crunchy even after 24 hours in the fridge. The use of high-quality dairy, like AE Dairy Whole Milk and Heavy Cream, provides a richness that lower-fat alternatives simply cannot match. Furthermore, the addition of sour cream to the whipped topping provides a subtle tang that cuts through the sweetness of the coconut, creating a perfectly balanced flavor profile. It’s an “elevated” dessert that looks professional but relies on simple, wholesome ingredients you likely already have in your pantry.
What Is a Coconut Cream Pie Bar?
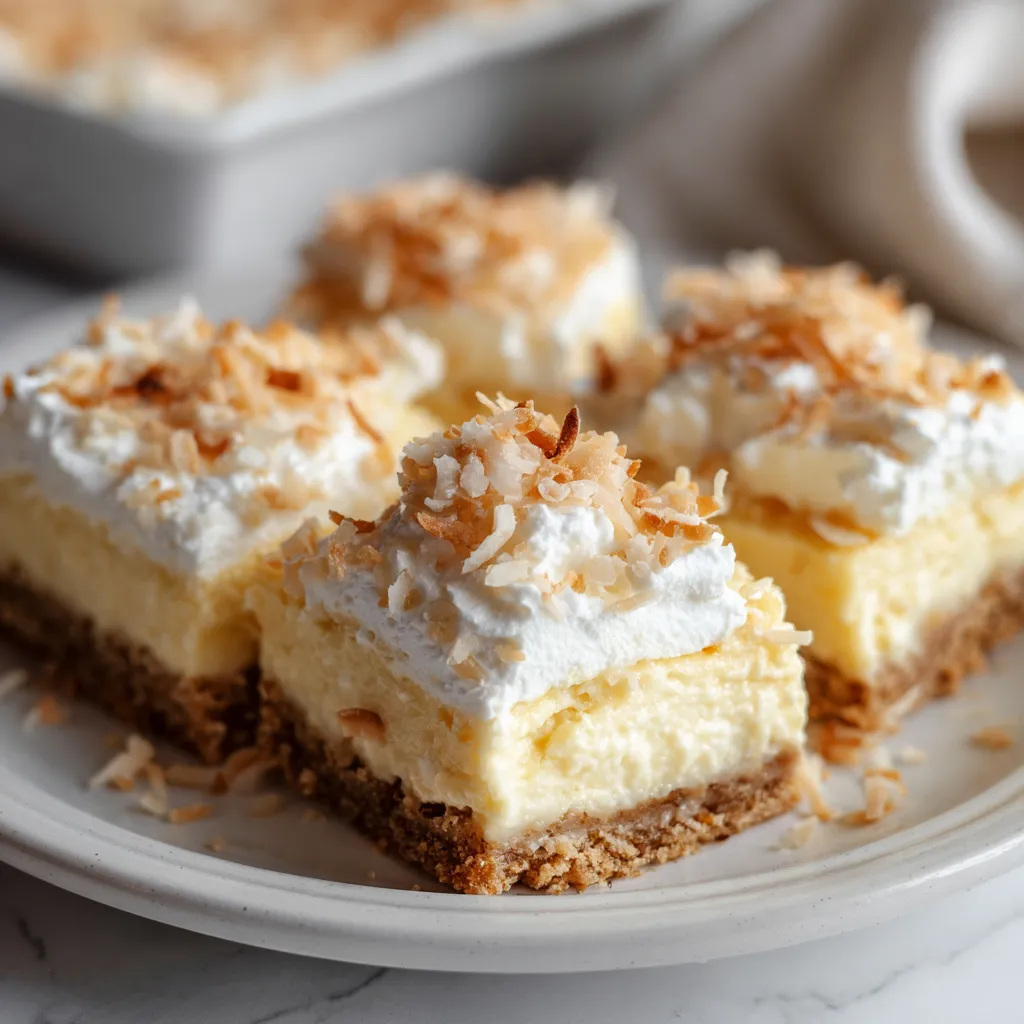
A Coconut Cream Pie Bar is a multi-layered dessert designed for portability and portion control. While a traditional pie relies on a flaky pastry crust and a high volume of custard that often requires a fork and a plate, these bars are built on a dense, buttery vanilla wafer base. The structure is reinforced by a thin layer of sweetened cream cheese, followed by a thick, stove-top coconut custard. The final flourish is a stable whipped cream topping garnished with deeply toasted coconut. By setting the dessert in a 9×13 pan, you achieve uniform squares that are much easier to serve to a crowd than wedge-shaped pie slices.
Ingredients
To achieve the best results, ingredient quality is paramount. Here is what you will need:
- AE Dairy Whole Milk & Heavy Cream: The foundation of the custard and topping. Whole milk is essential for the fat content required to set the cornstarch properly.
- Vanilla Wafer Crumbs: These provide a sweeter, more aromatic base than standard graham crackers.
- Egg Yolks: Six yolks provide the golden color and emulsification needed for a “bakery-style” custard.
- Cornstarch: This is our thickening agent. Using 7 tablespoons ensures the bars are “sliceable” rather than “scoopable.”
- Vanilla Bean Paste: While extract works, the tiny black flecks of bean paste add a visual cue of high quality and a deeper aroma.
- Sweetened Flaked Coconut: We toast this to unlock a nutty, complex flavor that balances the sugar.
- Cream Cheese: This provides the “secret” layer that stabilizes the entire dessert.
- Sour Cream: Just a tablespoon in the whipped cream prevents it from tasting overly cloying.
Ingredient Substitutions & Tips
If you find yourself missing an ingredient, don’t panic. You can substitute Graham cracker crumbs for vanilla wafers, though you may want to add an extra tablespoon of sugar to the crust. For a dairy-free version, full-fat canned coconut milk can replace the whole milk in the custard, though the texture will be slightly softer. If you are short on time, you can use two packages of instant vanilla pudding mix whisked with 3 cups of milk, but you will lose the depth of the cooked egg yolks. For those who aren’t fans of coconut, this recipe transforms beautifully into a Banana Cream Bar—simply omit the coconut and layer sliced bananas over the cream cheese before adding the custard.
Step-by-Step
1. The Toasted Foundation
Begin by preheating your oven to 350°F. Spread your coconut on a sheet tray. Bake for 7-10 minutes, watching it like a hawk. Coconut transitions from white to burnt in seconds. Once golden and fragrant, remove and cool.
2. The Crust
Pulse vanilla wafers in a food processor until fine. Combine with melted butter, sugar, and 1/4 cup of the toasted coconut. Press this firmly into a 9×13 pan. Use the bottom of a measuring cup to ensure the crust is packed tight. Chill this immediately.
3. The Custard Masterclass
In a saucepan, whisk the sugar and cornstarch. Slowly pour in the AE Dairy Whole Milk, whisking constantly to prevent lumps. Cook over medium heat. Now, temper your eggs: whisk a cup of the hot milk mixture into your beaten yolks, then slowly pour the yolks back into the main pot. This prevents “scrambled egg” custard. Simmer for 10-12 minutes until thick. Off the heat, stir in the butter, vanilla, and toasted coconut.
4. The Cream Cheese & Assembly
Beat the room-temperature cream cheese with sugar and a splash of milk. Spread this over the chilled crust. Follow with the cooled coconut custard. Let this set for 30 minutes in the fridge.
5. The Finishing Touch
Whip the heavy cream, powdered sugar, sour cream, and vanilla until stiff peaks form. Spread over the custard and top with the remaining toasted coconut.
Expert Baking Tips
- The Spoon Test: To know if your custard is thick enough, dip a metal spoon into the pot. Run your finger across the back. If the line stays clean and the mixture doesn’t run, it is perfectly cooked.
- Temperature Matters: Never try to beat cold cream cheese. You will end up with small white lumps that won’t incorporate. Leave it on the counter for at least two hours.
- The Wait is Worth It: While you can eat these after two hours, a four-hour or overnight chill allows the crust to soften just enough to be cut cleanly without crumbling, while the custard fully hydrates.
The Secret “Barrier” Layer
Most coconut cream pies suffer from a “soggy bottom.” This happens because the moisture from the custard seeps into the crust over time. Our recipe utilizes a Cream Cheese Barrier. By spreading a dense, fat-rich cream cheese layer over the crust before adding the custard, we create a waterproof seal. This keeps the wafer crumbs crisp and adds a cheesecake-like tang that perfectly complements the sweet coconut. It is the professional secret to a dessert that looks as good on day two as it did on day one.
Serving Suggestions
For the cleanest slices, use a long, sharp knife dipped in hot water and wiped dry between every single cut. This prevents the whipped cream from dragging into the custard layer. Serve these bars chilled on a neutral plate to let the white and golden layers pop. They pair beautifully with a cup of dark roast coffee or a cold glass of AE Dairy milk.
Storage & Make-Ahead Tips
These bars are the ultimate make-ahead dessert. They actually improve after 12-24 hours in the refrigerator. Store them in the 9×13 pan covered tightly with plastic wrap or foil. They will stay fresh and delicious for up to 3-4 days. We do not recommend freezing this recipe, as the custard can become “weepy” and lose its silky texture upon thawing.
FAQs
Q: Can I use unsweetened coconut?
A: Yes, but you may want to increase the sugar in the custard by 2 tablespoons to compensate for the lack of sweetness in the coconut.
Q: Why did my custard not thicken?
A: This usually happens if the mixture wasn’t brought to a high enough temperature to activate the cornstarch, or if it wasn’t simmered long enough after adding the yolks.
Q: Do I have to use AE Dairy milk?
A: While you can use other brands, AE Dairy is known for its high standards and freshness, which results in a superior, creamier mouthfeel in homemade puddings.
Q: How do I get the bars out of the pan easily?
A: For easy removal, line your 9×13 pan with parchment paper, leaving an overhang on the sides to use as “handles” to lift the entire block out before slicing.
Final Thoughts
Coconut Cream Pie Bars are more than just a dessert; they are a celebration of textures and classic American flavors. By focusing on the “science” of the custard and the “architecture” of the layers, you can create a treat that is both nostalgic and impressively modern. Whether it’s a summer BBQ or a holiday dinner, these bars provide a tropical escape in every bite. Happy baking!
PrintCoconut Cream Pie Bars
A decadent, portable twist on the classic coconut cream pie. These bars feature four distinct layers: a crunchy toasted coconut and wafer crust, a silky cream cheese foundation, rich homemade coconut custard, and a cloud of fresh whipped cream.
- Prep Time: 45 minutes
- Cook Time: 15 minutes
- Total Time: 4 hours
- Yield: 15 bars
- Cuisine: American
Ingredients
Vanilla wafer crumbs – 2 cups
Toasted sweetened coconut – 1/4 cup
Salted butter, melted – 1/2 cup (1 stick)
Granulated sugar – 1/4 cup
Cream cheese, room temperature – 16 oz (2 blocks)
Granulated sugar – 1/2 cup
AE Dairy Whole Milk – 3 TBSP
Granulated sugar – 1 1/3 cups
Cornstarch – 7 TBSP
AE Dairy Whole Milk – 4 cups
Egg yolks, beaten – 6 large
Vanilla bean paste or extract – 2 tsp
Unsalted butter – 2 TBSP
Salt – 1 pinch
Toasted coconut – 1 1/2 cups
AE Dairy Heavy Whipping Cream – 1 1/2 cups
Powdered sugar, sifted – 1/2 cup
Sour cream – 1 TBSP
Vanilla extract – 1 tsp
Toasted coconut for garnish – 3/4 cup
Instructions
Toast coconut at 350°F for 7-10 minutes until golden; set aside.
Mix wafer crumbs, 1/4 cup toasted coconut, melted butter, and sugar. Press firmly into a 9×13 pan and chill.
In a saucepan, whisk 1 1/3 cups sugar and cornstarch. Gradually whisk in 4 cups milk.
Cook over medium heat until thickened. Temper yolks by adding a splash of hot milk mixture to them, then whisk yolks back into the pan.
Simmer for 10-12 minutes until very thick. Remove from heat; stir in vanilla, 2 TBSP butter, salt, and 1 1/2 cups toasted coconut. Cool 30 mins, then chill.
Beat cream cheese, 1/2 cup sugar, and 3 TBSP milk until smooth. Spread evenly over the chilled crust.
Spread the chilled coconut custard over the cream cheese layer. Chill for 30 minutes.
Whip heavy cream, powdered sugar, sour cream, and vanilla to stiff peaks.
Spread whipped cream over custard. Chill at least 2 hours (ideally 4+) before slicing.
Garnish with remaining toasted coconut before serving.
Notes
• Tempering the eggs is vital to prevent scrambling; go slowly with the hot liquid.
• Use the “Spoon Test”: the custard is ready when it coats the back of a spoon and holds a line drawn by your finger.
• For a shortcut, use 2 packages of instant vanilla pudding and 2 tubs of whipped topping.
• To make Banana Cream Bars, omit coconut and layer 3 sliced bananas into the custard.
• Always use room temperature cream cheese to ensure a lump-free base layer.


