
There is something profoundly nostalgic about a perfect slice of coconut cream pie. It’s the kind of dessert that conjures images of vintage diners and Sunday family gatherings. However, the secret to a truly memorable pie doesn’t come from a box or a pre-made pudding mix; it lies in a handcrafted, stovetop custard. This recipe for coconut cream pie filling is designed for those who crave a rich, velvety texture and an authentic tropical flavor profile. By balancing the sweetness of flaked coconut with the structural integrity of a cooked egg yolk custard, we create a filling that is stable enough to slice beautifully while remaining soft and decadent on the palate. Whether you are a seasoned baker or a newcomer to the world of pastry creams, this guide will ensure your next dessert is the star of the show.
Why You’ll Love This Recipe
You will fall in love with this filling because it strikes the perfect balance between ease of preparation and professional-grade results. Unlike many recipes that result in a “soupy” pie, our ratio of cornstarch to liquid ensures a firm set every single time. The addition of both vanilla and coconut extracts adds layers of complexity that mimic the depth of a high-end bakery dessert. Furthermore, the inclusion of real butter at the end of the cooking process provides a glossy finish and a “melt-in-your-mouth” quality that store-bought versions simply cannot replicate. It is customizable, reliable, and uses simple pantry staples to create something extraordinary.
What Is Coconut Cream Pie Filling?
At its core, coconut cream pie filling is a cooked custard, technically known in the culinary world as a crème pâtissière variation. It is made by thickening milk and egg yolks with a starch—in this case, cornstarch. Unlike a standard vanilla pudding, this filling is specifically engineered to be denser to support the weight of whipped cream toppings and to maintain its shape once sliced. The hallmark of this specific version is the “folding in” of shredded coconut, which provides a textural contrast to the smooth cream. It serves as the soul of the classic American Coconut Cream Pie, usually housed in a blind-baked shortcrust or a buttery graham cracker base.
Ingredients Overview
To achieve the best results, every ingredient in this list serves a specific functional purpose:
- Whole Milk: This is non-negotiable for a premium filling. The fat content in whole milk provides the necessary body and richness. Using skim or 1% milk will result in a thinner, less satisfying custard.
- Sugar & Salt: Granulated sugar provides sweetness, while a pinch of salt is crucial to brighten the coconut flavor and prevent the custard from tasting one-dimensional.
- Cornstarch: This is our thickening agent. Cornstarch provides a clean, translucent set that allows the white color of the coconut to shine.
- Egg Yolks: These provide the “gold” in the custard. They act as an emulsifier, creating a smooth bond between the fats and liquids while contributing to the rich, yellow hue.
- Unsalted Butter: Adding cold butter at the end (a technique called monter au beurre) creates a silky mouthfeel and a beautiful sheen.
- Extracts: Vanilla extract provides a base note of warmth, while coconut extract amplifies the tropical profile.
- Sweetened Flaked Coconut: This provides the iconic texture. The sugar in the flakes leaches slightly into the custard, enhancing the overall flavor.
Ingredient Substitutions & Tips
If you find yourself missing an ingredient, here are a few expert-tested swaps. You can substitute the whole milk with full-fat canned coconut milk for an even more intense coconut flavor and a dairy-free lean (though you must ensure your butter substitute is also plant-based). If you prefer a less sweet pie, you can use unsweetened shredded coconut, but you may want to increase the sugar in the custard by one tablespoon to compensate. For those who enjoy a bit of crunch, consider toasting half of the coconut flakes in a pan before stirring them into the filling; this adds a nutty, caramelized dimension to the finished product.
Step-by-Step Instructions
1. The Dry Base
Begin by selecting a medium-sized, heavy-bottomed saucepan. A heavy pan is essential as it distributes heat evenly, preventing the milk from scorching at the corners. Whisk together the sugar, cornstarch, and salt. This step is vital because it separates the cornstarch granules, ensuring they don’t clump together once the liquid is added.
2. Incorporating the Liquids
Slowly pour the 2 cups of whole milk into the dry ingredients while whisking constantly. Once the milk is in, add your 3 large egg yolks. Continue whisking until the mixture is a uniform pale yellow color and no streaks of yolk remain. It should look like a thin, watery latte at this stage.
3. The Cooking Process
Place the pan over medium heat. Do not walk away. You must whisk or stir with a heat-proof spatula continuously. Around the 5-minute mark, you will notice the mixture thickening at the bottom of the pan. Continue whisking vigorously as it reaches a boil. Once you see large, slow “blurp” bubbles breaking the surface, let it cook for about 30 seconds more to fully activate the cornstarch, then remove from heat.
4. Finishing Touches
Immediately whisk in the unsalted butter, one piece at a time, until the filling is glossy. Stir in the vanilla extract, coconut extract, and the cup of flaked coconut. The residual heat will soften the coconut and release its oils.
5. The Set
Pour the warm filling into your prepared pie shell. Smooth the top with the back of a spoon. To prevent a “skin” or film from forming, press a sheet of plastic wrap directly onto the surface of the custard. This is a pro-tip that keeps the filling creamy from top to bottom.
Expert Baking Tips
The most common mistake in custard making is “under-cooking.” If you don’t allow the mixture to reach a full boil, the cornstarch won’t fully hydrate, and your pie will be runny once it hits room temperature. Conversely, don’t over-boil, or you risk curdling the eggs. Another tip is the “Spoon Test”: the custard is ready when it heavily coats the back of a wooden spoon, and a line drawn through the coating with your finger remains distinct. Finally, always use room-temperature milk and yolks if possible to ensure the proteins don’t “shock” when they hit the heat, leading to a smoother emulsion.
Achieving the Perfect Texture: The Science of the Set
The magic of a great coconut cream pie lies in its rheology—how it flows and holds its shape. We use cornstarch because it provides a “short” texture, meaning it breaks cleanly when you bite into it, unlike flour which can be “long” or stretchy. The egg yolks provide lecithin, which helps the fat from the milk and butter stay suspended in the water-based custard. If your pie is too soft, it usually means the cornstarch wasn’t cooked long enough to neutralize an enzyme in the egg yolks called alpha-amylase, which can actually break down starch over time. Boiling for that critical 30-60 seconds kills that enzyme and guarantees a firm slice.
Serving Suggestions
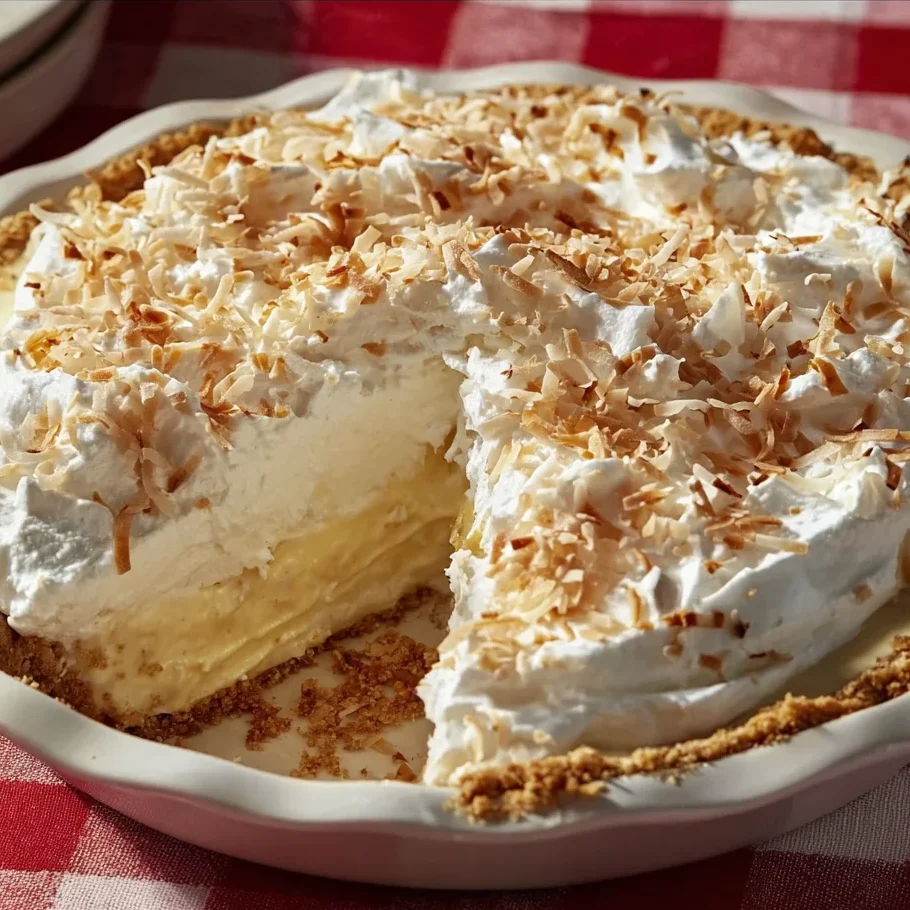
Once your pie has chilled and set, the classic way to serve it is topped with a generous layer of homemade stabilized whipped cream. For a professional aesthetic, sprinkle the top with toasted coconut chips or long-thread coconut flakes. If you want to get creative, a drizzle of salted caramel or a few shavings of white chocolate can elevate the tropical notes. This filling also works beautifully as a component in “pie jars” or parfaits, layered with crushed graham crackers.
Storage & Make-Ahead Tips
This filling is the ultimate make-ahead component. It must refrigerate for at least 6 hours, though overnight is preferred for the best sliceability. You can store the filled pie in the refrigerator for up to 3 days. However, do not freeze this filling; the freezing and thawing process breaks the starch bonds, resulting in a weeping, watery mess. If making ahead, add the whipped cream topping just before serving to keep it fresh and airy.
FAQs
Q: Can I use 2% milk instead of whole milk?
A: You can, but the filling will be noticeably less creamy and slightly less stable. Whole milk provides the fat necessary for that signature “cream pie” mouthfeel.
Q: Why is my filling watery after sitting in the fridge?
A: This is usually due to “weeping.” It happens if the custard wasn’t brought to a full boil or if the plastic wrap wasn’t pressed directly onto the surface, allowing condensation to form and drip back into the pie.
Q: Can I make this filling on its own as a pudding?
A: Absolutely! This recipe makes a delicious stand-alone coconut pudding. Simply pour it into individual ramekins instead of a pie shell.
Q: Is coconut extract necessary?
A: While the flakes add flavor, the extract provides that “bakery-style” punch. If you don’t have it, you can omit it, but the coconut flavor will be much more subtle.
Q: My custard has lumps, can I save it?
A: Yes! If you notice lumps forming, immediately remove from heat and whisk vigorously. If they persist, pass the warm custard through a fine-mesh sieve before adding the coconut flakes.
Making a coconut cream pie filling from scratch is a rewarding endeavor that transforms simple ingredients into a sophisticated dessert. By following the thermal cues and using high-quality fats, you ensure a result that is far superior to any commercial alternative. This recipe is a testament to the beauty of traditional pastry techniques, offering a slice of tropical paradise that is as stable as it is delicious. Happy whisking!
PrintCoconut Cream Pie Filling
This luxurious coconut cream pie filling is the gold standard for homemade desserts. Using real egg yolks and whole milk, it creates a stable, sliceable custard that bursts with tropical flavor. Perfect for a pre-baked pastry shell or a graham cracker crust.
Ingredients
1/2 cup granulated sugar
3–1/2 tablespoons cornstarch
1/8 teaspoon fine salt
2 cups whole milk (room temperature preferred)
3 large egg yolks
2 tablespoons unsalted butter, cut into 1/2-inch pieces
1 teaspoon pure vanilla extract
1/2 teaspoon coconut extract
1 cup sweetened flaked coconut
Instructions
1. In a medium-sized heavy saucepan (preferably nonstick), whisk together the granulated sugar, cornstarch, and salt until well combined.
2. Gradually pour in the whole milk and add the egg yolks. Whisk vigorously until the mixture is smooth and no yellow streaks from the yolks remain.
3. Place the saucepan over medium heat. Cook the mixture, whisking constantly to prevent scorching, until it thickens and reaches a boil—this typically takes 5 to 7 minutes.
4. Once large bubbles break the surface, remove from heat immediately. Whisk in the cold butter pieces one at a time until fully incorporated.
5. Stir in the vanilla extract, coconut extract, and the sweetened flaked coconut.
6. Pour the warm filling into a pre-baked and cooled 9-inch pie shell. Smooth the top with a spatula.
7. Press a piece of plastic wrap directly onto the surface of the filling to prevent a skin from forming. Cool on a wire rack, then refrigerate for at least 6 hours or overnight before serving.
Notes
For extra flavor, toast the coconut flakes in a dry skillet for 2-3 minutes before adding them to the custard.
Always use whole milk for the best structural stability and mouthfeel.
Ensure the cornstarch is fresh to guarantee the pie sets properly.


