
Remember that irresistible lunchbox treat, the Little Debbie Cosmic Brownie? The one with the fudgy chocolate base, shiny chocolate glaze, and those iconic rainbow chips? What if I told you that you could capture all that nostalgic magic in a perfectly portable, chewy, and utterly delightful Cosmic Cookie?
Get ready to embark on a sweet journey because today, we’re not just baking cookies; we’re recreating a beloved classic in an exciting new format. These aren’t just any chocolate cookies. They are rich, deeply fudgy, boasting a crackly exterior and a soft, chewy interior, crowned with a silky smooth chocolate ganache and, of course, a generous shower of those vibrant rainbow chip sprinkles. It’s a chocolate lover’s dream, a nostalgic trip, and an absolute showstopper all rolled into one.
Whether you’re looking for the ultimate party treat, a unique dessert to share, or simply craving a taste of childhood with a grown-up twist, these Cosmic Cookies are about to become your new favorite. They’re easier than you think to make, and the joy they bring is truly out of this world!
What Exactly Are Cosmic Cookies? Your New Favorite Nostalgic Treat!
Cosmic Cookies are my culinary homage to the legendary Little Debbie Cosmic Brownies. Imagine taking all the best elements of that iconic treat – the intense chocolate flavor, the incredibly fudgy texture, the shiny chocolate frosting, and those signature rainbow crunchies – and transforming them into a decadent, chewy cookie.
This recipe delivers:
- A Fudgy Chocolate Cookie Base: Unlike a typical chewy cookie, this one leans towards a brownie-like density, thanks to a careful balance of cocoa, flour, and a secret ingredient (cornstarch!) that keeps it supremely tender and moist.
- Silky Smooth Chocolate Ganache: A simple yet luxurious two-ingredient frosting that sets to a beautiful, glossy finish, providing that perfect complement to the rich cookie.
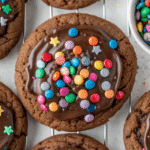
- Vibrant Rainbow Sprinkles: The unmistakable hallmark of a Cosmic Treat! These aren’t just for decoration; they add a delightful tiny crunch and a burst of color that makes every bite feel like a celebration.
They’re not just a dessert; they’re an experience. Perfect for packing in lunchboxes (for grown-ups and kids alike!), serving at parties, or simply indulging in a moment of pure chocolate bliss.
Why This Cosmic Cookies Recipe Will Become Your Go-To
There are countless reasons to fall head over heels for these Cosmic Cookies, and why they stand out in a sea of chocolate cookie recipes:
- Nostalgia Factor, Elevated: This recipe doesn’t just mimic the flavors; it enhances them. You get all the comfort and joy of the original, but with the superior taste and texture of a homemade, gourmet cookie.
- Unbelievably Fudgy Texture: We’re talking seriously fudgy. Thanks to a combination of brown sugar, an extra egg yolk, and careful baking times, these cookies achieve a melt-in-your-mouth tenderness that’s hard to beat.
- Simple Yet Elegant Ganache: Forget complicated frostings. Our ganache is a breeze to make, requiring just two ingredients, but delivers a rich, professional finish that tastes incredible.
- Perfect Balance of Sweetness: The deep cocoa in the cookie pairs beautifully with the semi-sweet ganache, creating a well-balanced flavor profile that’s sweet but not cloying.
- Visually Stunning: Those rainbow sprinkles aren’t just tasty; they make these cookies incredibly appealing and ready for their close-up. They’re a guaranteed crowd-pleaser and conversation starter!
- Customizable Fun: While the classic is perfect, this recipe provides a fantastic base for your own creative twists (more on that later!).
- E-E-A-T Approved! As an experienced recipe developer and baker, I’ve meticulously tested and refined this recipe to ensure success every time. I’ll share all my expert tips and tricks to guide you through each step, making you a Cosmic Cookie connoisseur!
So, gather your ingredients and prepare to create some edible magic that will bring smiles, satisfy cravings, and evoke wonderful memories.
Ingredients for Your Cosmic Journey: What You’ll Need & Why
Creating perfect Cosmic Cookies starts with understanding your ingredients. Each component plays a crucial role in achieving that signature fudgy texture and rich flavor.
For the Fudgy Chocolate Cookies:
- All-Purpose Flour (1¾ cups): The structural backbone of our cookies. Don’t overmeasure; scoop and level gently to avoid a dry, tough cookie.
- Cocoa Powder (1/2 cup): Use unsweetened natural cocoa powder for a deep, rich chocolate flavor. Dutch-processed cocoa can also work for a darker color and milder flavor, but natural cocoa provides a slight acidity that interacts perfectly with baking soda.
- Cornstarch (2 tablespoons): This is one of our secret weapons for chewiness and tenderness! Cornstarch inhibits gluten development, resulting in a softer, more delicate crumb that stays moist.
- Baking Soda (1 teaspoon): Our primary leavening agent. It reacts with the acidic cocoa powder and brown sugar to help the cookies rise slightly and spread just enough.
- Salt (½ teaspoon): I always recommend kosher or sea salt. It’s essential for balancing the sweetness and enhancing all the chocolate flavors. Don’t skip it!
- Salted Butter, softened (12 tablespoons / 1½ sticks): Using salted butter adds another layer of flavor and ensures the right salt balance. Make sure it’s properly softened (room temperature but not melted) for optimal creaming with the sugars. If using unsalted butter, add an extra ¼ teaspoon of salt.
- Light Brown Sugar, packed (¾ cup): Contributes to the fudgy texture and provides a molasses-rich sweetness. Packing it ensures accurate measurement.
- Granulated Sugar (½ cup): Adds sweetness and helps create a slightly crisp edge while keeping the interior tender.
- Large Egg (1): Binds the ingredients, adds moisture, and contributes to the cookie’s structure.
- Large Egg Yolk (1, discard the egg white): This is another key to ultimate fudginess and richness! The extra fat from the yolk provides a luxurious chewiness and tenderness that’s reminiscent of a brownie.
- Vanilla Extract (2 teaspoons): Pure vanilla extract enhances and complements the chocolate flavor. Don’t skimp on quality here!
For the Shiny Chocolate Ganache:
- Semi-Sweet Chocolate Chips (1 cup): Good quality chocolate chips will melt smoothly and give you the best ganache. Alternatively, use finely chopped semi-sweet chocolate baking bars.
- Heavy Cream (½ cup): The fat in heavy cream (also known as heavy whipping cream) is essential for creating that smooth, emulsified ganache. Avoid using half-and-half or milk, as they won’t give the same result.
For Decoration:
- Rainbow Chip Sprinkles (about ¼ cup): The iconic finishing touch! Look for “rainbow chip” or “candy-coated” sprinkles for that authentic Cosmic Brownie look and subtle crunch. Regular jimmies will also work.
Smart Substitutions (Use with Caution!)
- Butter: While salted butter is recommended, unsalted butter can be used. Just increase the added salt to ¾ teaspoon.
- Chocolate Chips: Finely chopped baking chocolate (semi-sweet or dark) can be used in place of chips for the ganache.
- Sprinkles: While rainbow chips are traditional, feel free to use other sprinkles for a different look, or omit them if preferred (though you’d lose the “Cosmic” vibe!).
- Cocoa Powder: For a truly rich, dark cookie, you can use Black Cocoa Powder, but be aware it has a very intense flavor.
Essential Equipment for Cosmic Cookie Success
Having the right tools makes all the difference in baking. For these Cosmic Cookies, you’ll want to have these on hand:
- Cookie Sheets (at least 2): Having two allows you to bake batches efficiently while the first batch cools.
- Pre-Cut Parchment Paper or Silicone Baking Mats: Non-stick surfaces are crucial for easy removal and even baking. Parchment paper also helps prevent over-browning on the bottom.
- 2 Tablespoon Cookie Scoop (medium): Ensures uniform cookie size, which leads to even baking. Consistency is key for perfect cookies!
- Large Mixing Bowl: For creaming butter and sugars, and combining dough.
- Small Bowl: For whisking dry ingredients.
- Electric Hand Mixer or Stand Mixer with Paddle Attachment: Essential for thoroughly creaming butter and sugars. A strong arm can work, but a mixer makes it much easier and ensures proper aeration.
- Rubber Spatula: For scraping down the sides of the bowl and gently folding in dry ingredients.
- Wire Cooling Rack: Allows air circulation around the cookies for even cooling and to prevent sogginess.
- Microwave-Safe Bowl: For making the ganache. Alternatively, a small saucepan and a heat-safe bowl for a double boiler method.
- Offset Spatula or Small Spoon: For spreading the ganache smoothly over the cookies.
Step-by-Step Instructions: Crafting Your Cosmic Cookies
Follow these detailed steps carefully, and you’ll be enjoying your homemade Cosmic Cookies in no time!
Part 1: Crafting the Fudgy Chocolate Cookie Dough
- Whisk Dry Ingredients: In a small bowl, combine the 1¾ cups all-purpose flour, ½ cup cocoa powder, 2 tablespoons cornstarch, 1 teaspoon baking soda, and ½ teaspoon salt. Whisk well to ensure everything is evenly distributed and there are no lumps of cocoa. Set this bowl aside.
- Cream Butter and Sugars: In a large mixing bowl (or the bowl of your stand mixer fitted with the paddle attachment), add the 12 tablespoons softened salted butter, ¾ cup packed light brown sugar, and ½ cup granulated sugar. Beat on medium-high speed for 2-3 minutes, until the mixture is light in color, fluffy, and well-combined. Scrape down the sides of the bowl frequently with a rubber spatula to ensure everything is incorporated. This step incorporates air, making your cookies lighter and more tender.
- Add Eggs and Vanilla: Reduce mixer speed to low. Add the 1 large egg, 1 large egg yolk, and 2 teaspoons vanilla extract to the creamed butter mixture. Beat until just combined, about 30 seconds. Do not overmix here; you just want to ensure the egg is fully incorporated.
- Combine Wet and Dry: With the mixer on low speed, gradually add the dry ingredient mixture from the small bowl into the wet ingredients. Beat just until combined and a soft, cohesive dough forms. As soon as you no longer see streaks of dry flour, stop mixing. Overmixing at this stage can develop too much gluten, leading to tough cookies.
- Chill the Dough: Gather the soft dough into a ball. Wrap it tightly in plastic wrap and place it in the refrigerator to chill for at least 1 hour, or preferably up to overnight (8-12 hours) for the best flavor and texture development. Chilling is non-negotiable for these cookies – it prevents spreading and deepens the chocolate flavor.
Part 2: Baking the Cookies
- Preheat Oven & Prep Sheets: Once your dough has chilled, preheat your oven to 350°F (175°C). Line two cookie sheets with parchment paper or silicone baking mats.
- Scoop and Roll: Use a 2-tablespoon cookie scoop to portion out the chilled dough. Roll each portion into a smooth ball between your palms. Place 12 dough balls evenly spaced on each prepared cookie sheet.
- Bake to Perfection: Bake for 12-15 minutes. The edges should look set, but the centers will still appear slightly soft and perhaps a little underdone. This is exactly what you want for that perfect fudgy, chewy interior!
- Cooling Down: Remove the cookie sheets from the oven. Let the cookies cool on the sheets for about 10 minutes. This allows them to set up and prevents them from breaking when you move them. After 10 minutes, carefully transfer the cookies to a wire cooling rack to cool completely to room temperature. It’s crucial that the cookies are fully cooled before frosting, or your ganache will melt!
Part 3: Mastering the Chocolate Ganache & Decoration
- Prepare the Ganache: Once your cookies are entirely cool, place 1 cup semi-sweet chocolate chips and ½ cup heavy cream into a microwave-safe bowl. Heat in 20-second intervals, stirring vigorously with a rubber spatula or whisk after each interval. Continue until the chocolate is completely melted and the mixture is smooth, glossy, and emulsified. Be patient and gentle; overheating will cause the ganache to seize and become grainy.
- Frost & Sprinkle: Immediately and gently spread a layer of the warm, smooth chocolate ganache over the top of each cooled cookie using an offset spatula or the back of a spoon. Work quickly, as the ganache will begin to set.
- Add the Cosmic Touch: Generously sprinkle each ganache-topped cookie with rainbow chip sprinkles while the ganache is still wet. This ensures they adhere beautifully.
- Allow to Set: Let the frosted cookies sit at room temperature for about 20 minutes (or longer, if your kitchen is warm) to allow the ganache to firm up slightly. This makes them easier to handle and stack.
Now, take a bite and savor the nostalgic, fudgy, chocolatey goodness of your homemade Cosmic Cookies!
Expert Tips for Perfect Cosmic Cookies Every Time
As an experienced baker, I’ve learned a few tricks that make a good cookie great. Here are my top tips for ensuring your Cosmic Cookies are truly out of this world:
- Room Temperature Ingredients are Key: Especially for butter and eggs. Room temperature butter creams with sugar more effectively, incorporating more air for a lighter texture. Room temperature eggs emulsify better into the mixture, creating a smoother batter. Pull them out about 30-60 minutes before you start baking.
- Don’t Overmix the Flour: Once you add the dry ingredients, mix only until just combined. Overmixing develops gluten, which can lead to tough, dense cookies instead of fudgy, chewy ones.
- Chill Your Dough! Seriously: I can’t stress this enough. Chilling the dough solidifies the butter, preventing excessive spreading. It also allows the flour to fully hydrate and the flavors to meld, resulting in a more complex, fudgier, and more flavorful cookie. For best results, chill for at least 1 hour, or even overnight.
- Use a Cookie Scoop: This isn’t just for convenience; it ensures all your cookies are the same size. Uniformity means they’ll all bake evenly, preventing some from being underdone and others overdone.
- Watch for Doneness, Not Time: Ovens vary! Always trust visual cues over strict baking times. Cookies are done when the edges are set and the centers still look slightly soft. They will continue to cook and set on the hot baking sheet after coming out of the oven. Undercooking slightly is the secret to fudgy, chewy cookies.
- High-Quality Cocoa Matters: The better your cocoa powder, the deeper and richer your chocolate flavor will be. Natural unsweetened cocoa is usually best for this recipe.
- Perfecting the Ganache: When melting chocolate chips and heavy cream, use low heat and stir frequently. Overheating the chocolate can cause it to seize and become grainy. If your ganache seems too thick, add a tiny splash more warm cream (1/2 teaspoon at a time) and stir until smooth. If it’s too thin, let it cool for a few minutes to thicken.
- Sprinkle Immediately: The ganache starts to set quickly. Have your sprinkles ready and apply them immediately after spreading the ganache on each cookie to ensure they stick properly.
Variations & Customizations: Make Them Your Own!
While the classic Cosmic Cookie is perfect as is, don’t be afraid to get creative!
- Different Chocolates: Experiment with dark chocolate ganache for a more intense flavor, or even a white chocolate ganache for a visual contrast.
- Extracts: A tiny hint of almond extract in the cookie dough, or a dash of espresso powder (enhances chocolate flavor) in the ganache, can add delightful complexity.
- Nuts: For a textural twist, finely chop some pecans or walnuts and fold them into the cookie dough.
- Boozy Ganache: For an adult-friendly version, add a teaspoon of Kahlua, rum, or Grand Marnier to the ganache once it’s smooth.
- Holiday Cosmic Cookies: Use holiday-themed sprinkles for Christmas (red/green), Halloween (orange/black), or Valentine’s Day (red/pink/white).
- Cookie Bar Version: Press the entire dough into a greased and parchment-lined 9×13 inch pan. Bake for 25-30 minutes, or until the edges are set. Cool completely, then spread with ganache and sprinkles, and cut into squares.
Storage & Make-Ahead Tips
These Cosmic Cookies are fantastic freshly baked, but they also store well!
- Room Temperature: Store cooled Cosmic Cookies in an airtight container at room temperature for up to 3-4 days. For best results, if stacking, place a piece of parchment paper between layers to prevent the ganache from sticking.
- Refrigeration: For longer storage, you can refrigerate them in an airtight container for up to a week. Allow them to come closer to room temperature before serving for the best fudgy texture.
- Freezing Baked Cookies: Once the ganache is fully set, arrange the cookies in a single layer on a baking sheet and freeze until solid (about 1-2 hours). Then, transfer them to a freezer-safe airtight container or bag, separating layers with parchment paper. They will keep for up to 2-3 months. Thaw at room temperature for several hours or overnight in the refrigerator.
- Freezing Cookie Dough: You can scoop the cookie dough balls, place them on a parchment-lined baking sheet, and freeze until solid. Transfer the frozen dough balls to a freezer-safe bag. Bake from frozen, adding an extra 2-4 minutes to the baking time. This is fantastic for having freshly baked cookies on demand!
Frequently Asked Questions (Cosmic Cookie Troubleshooting!)
We all have questions when baking, especially when striving for perfection! Here are some common queries about Cosmic Cookies:
Q: My cookies spread too much! What went wrong?
A: This is almost always due to insufficient chilling of the dough. The butter in the dough needs to be cold and firm to prevent excessive spreading in the oven. Ensure you chill the dough for at least 1 hour, or even overnight. Other culprits could be over-softened butter at the start, or an oven that isn’t at the correct temperature (use an oven thermometer!).
Q: Why are my cookies not fudgy? They’re dry and crumbly.
A: This typically indicates over-baking. Remember, the centers should look slightly underdone when you pull them from the oven. They will continue to set as they cool. Over-measuring flour can also lead to dry cookies; ensure you’re scooping and leveling your flour correctly. The extra egg yolk and cornstarch in this recipe are specifically included to boost fudginess, so following the recipe closely is key!
Q: My ganache isn’t smooth, it’s grainy or separated.
A: This is usually a sign of overheating the chocolate or not stirring enough. Chocolate is delicate! Heat in short bursts (20 seconds in the microwave) and stir vigorously between each. The residual heat from the cream should do most of the melting. If it does separate, try adding a tiny bit more warm heavy cream (1/2 teaspoon at a time) and whisking constantly until it comes back together.
Q: Can I make these without an electric mixer?
A: Yes, you can! You’ll need some arm strength. For creaming the butter and sugars, use a sturdy whisk or wooden spoon and be prepared for a good workout. It will take longer than with a mixer, but the goal is still light and fluffy. For mixing in dry ingredients, a wooden spoon or spatula is perfect.
Q: Do I have to use rainbow chip sprinkles?
A: Not strictly, but they give the cookies their iconic “Cosmic” appearance and a fun texture! Regular jimmie sprinkles will work, or you can use any sprinkles you like. If you omit them, they’ll just be delicious fudgy chocolate ganache cookies.
Serving Suggestions: Enjoy Your Cosmic Creations!
These Cosmic Cookies are delightful on their own, but here are a few ideas to make them even more special:
- With a Cold Glass of Milk: The classic pairing for any chocolate cookie!
- Coffee or Espresso Companion: The deep chocolate notes pair wonderfully with a hot beverage.
- Ice Cream Topper: Crumble a cookie over a scoop of vanilla or coffee ice cream for an instant dessert upgrade.
- Cookie Platter Star: Arrange them on a festive platter with other homemade treats for parties or potlucks. They are always a showstopper!
- Gifts: Package a few cookies in a cello bag with a pretty ribbon for a thoughtful homemade gift.
- Dessert Bar: A fantastic addition to any dessert spread, especially for birthdays or celebrations.
The End of Your Cosmic Baking Journey (For Now!)
And there you have it – your very own batch of homemade Cosmic Cookies! You’ve successfully channeled that beloved childhood treat into a sophisticated, fudgy, and utterly irresistible cookie. The rich chocolate, the smooth ganache, and those playful sprinkles come together in a symphony of flavor and texture that’s bound to bring smiles and maybe even a few “oohs” and “ahhs.”
Baking these cookies is more than just following a recipe; it’s about creating joy, revisiting cherished memories, and sharing something truly delicious with those you care about. So go ahead, grab a cookie (or two!), savor the moment, and bask in the glory of your baking prowess.
Happy baking, and may your kitchen always be filled with the scent of deliciousness! If you loved this recipe, please leave a comment and share your creations – I can’t wait to see them!
PrintCosmic Cookies Recipe
Fudgy chocolate cookies topped with a smooth chocolate ganache and vibrant rainbow chip sprinkles, just like your favorite Little Debbie Cosmic Brownies, but in cookie form! Perfect for parties or a nostalgic treat.
- Prep Time: 25
- Cook Time: 15
- Total Time: 1h 35m
- Yield: 20 cookies
- Category: Cookies, Dessert
- Method: Baking
- Cuisine: American
Ingredients
1¾ cups all-purpose flour
1/2 cup cocoa powder
2 tablespoons cornstarch
1 teaspoon baking soda
½ teaspoon salt (I use kosher salt or sea salt)
12 tablespoons salted butter, softened
3/4 cup packed light brown sugar
1/2 cup granulated sugar
1 large egg
1 large egg yolk (discard the egg white)
2 teaspoons vanilla extract
1 cup semi-sweet chocolate chips
1/2 cup heavy cream
rainbow chip sprinkles
Instructions
1. In a small bowl, whisk together the all-purpose flour, cocoa powder, cornstarch, baking soda, and salt. Set aside.
2. In a large mixing bowl using an electric hand mixer, or use the bowl of a stand mixer with the paddle attachment, cream together the butter, light brown sugar, and sugar until smooth, fluffy, and lighter in color. At least 2-3 minutes beaten on medium-high speed.
3. Add in the egg, egg yolk, and vanilla extract. Beat until thoroughly combined.
4. Gradually add the dry ingredients (from the smaller bowl) into the wet ingredients, beating on low speed just until combined and a soft dough is formed. Gather the dough into a ball and wrap it in plastic wrap. Place the wrapped dough ball in the refrigerator to chill for at least 1 hour or up to overnight.
5. Once the dough has chilled, preheat the oven to 350℉ (175°C). Prepare two cookie sheets by lining with parchment paper or a silicone baking mat.
6. Use a 2 tablespoon cookie scoop (medium cookie scoop) to portion out the dough and roll it into a dough ball. Place 12 dough balls per cookie sheet.
7. Bake for 12-15 minutes or until the edges are firm and the centers appear just slightly underdone. Remove the cookies from the oven and allow them to cool on the cookie sheet for about 10 minutes before moving them to a wire cooling rack to finish cooling completely.
8. Once the cookies are cooled to room temperature, place the semi-sweet chocolate chips and heavy cream into a microwave-safe bowl. Heat in 20-second intervals, stirring between each, until the chocolate is completely melted and smooth. *It’s important to stir between each 20-second interval to ensure you don’t overheat the ganache. Once it’s smooth and melted, don’t heat it any longer.*
9. Gently spread the melted chocolate ganache on top of each cookie with an offset spatula or spoon. Sprinkle each cookie with some rainbow chip sprinkles. Let the ganache set and cool for about 20 minutes before enjoying a cookie.
Notes
For the best fudgy texture and to prevent spreading, do not skip the dough chilling step. Ensure cookies are fully cooled before adding ganache to avoid it melting or sliding off. For easy cleanup, use parchment paper on your baking sheets.


