
There are certain flavour combinations that just feel right, and for me, the rich, gooey, iconic taste of a Cadbury Creme Egg combined with a thick, chewy, bakery-style NYC cookie is pure heaven. If you’re looking for an unforgettable Easter treat or just a truly decadent cookie to satisfy your sweet tooth, you have come to the right place.
Hi, I’m Sofie, and I’m obsessed with perfecting cookie recipes. This isn’t just another recipe I threw together; I’ve personally tested and tweaked this Creme Egg NYC Cookie recipe more than nine times to get it absolutely perfect. I’ve figured out all the little secrets to ensure you get that signature thick, tall cookie with a molten, lava-like chocolate center and a perfectly soft, chewy texture. Forget flat, disappointing cookies—this recipe is your ticket to bakery-quality results right in your own kitchen.
Why You’ll Be Obsessed With This Recipe
This isn’t just a cookie; it’s an experience. Here’s why I know you’re going to fall in love with it:
- Perfectly Thick & Chewy: Thanks to a crucial chilling step, these cookies bake up tall and thick, not flat and sad. They have that signature NYC-style chewy-soft texture that’s completely irresistible.
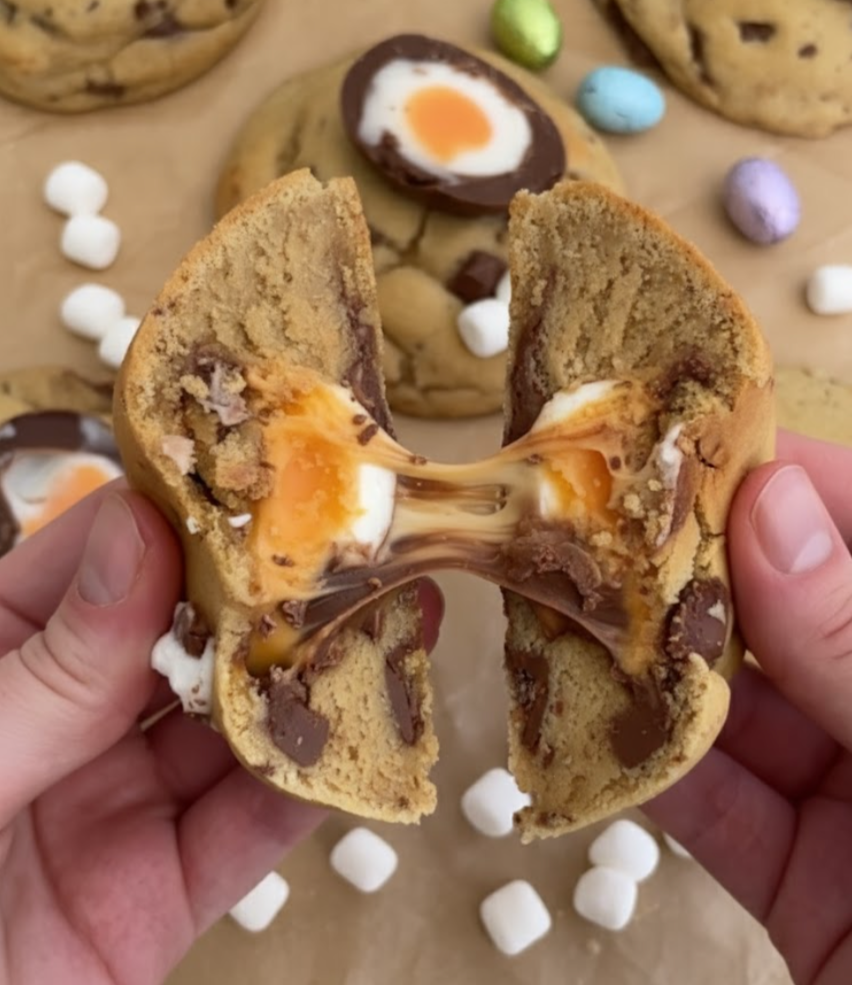
- Molten Chocolate Core: We’re stuffing these with frozen balls of crackling chocolate spread, which melts in the oven to create a gooey, lava-like center that oozes out when you break the cookie open.
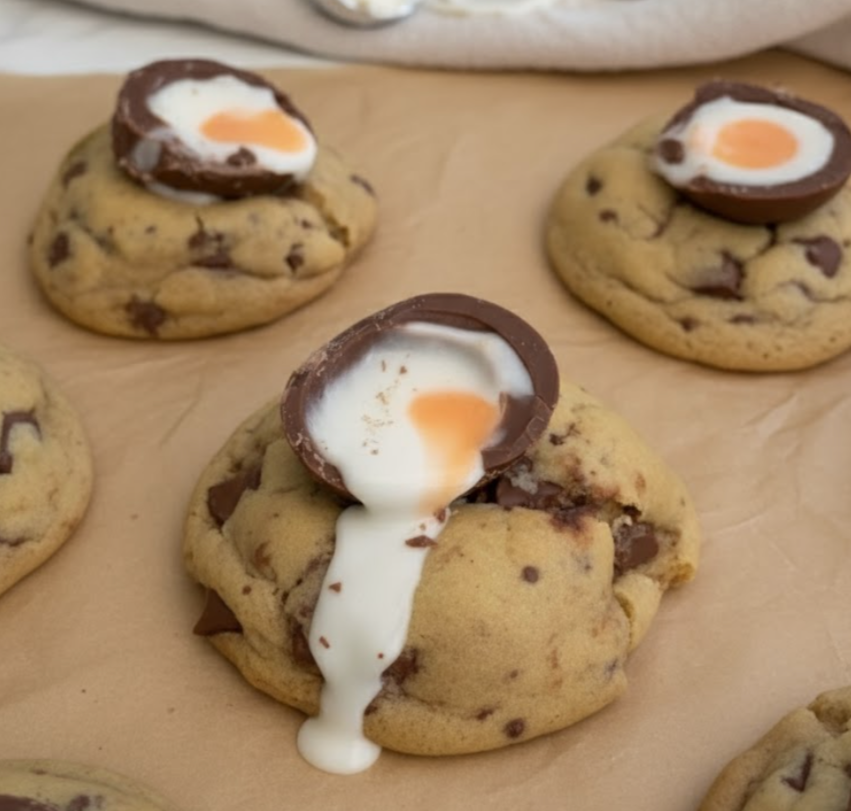
- Iconic Creme Egg Topping: The classic, sweet fondant of a Creme Egg melts slightly into the warm cookie, creating the perfect marriage of flavours and textures.
- Simple, Accessible Ingredients: No fancy, hard-to-find items here. Just basic pantry staples and a couple of special treats that come together to create something truly magical.
- Foolproof & Tested: As I mentioned, I’ve made these over and over. I’ve worked out all the kinks so you can bake with confidence, even if you’re a beginner.
Ingredients You’ll Need
Getting the right texture for an NYC-style cookie is all about using the right ingredients in the right proportions. Here’s what we’re working with and why it matters.
- Margarine: I use softened margarine for this recipe as it creates a wonderfully soft, tender crumb. You can use block butter, but the texture will be slightly different.
- Light Brown Sugar & Caster Sugar: The combination is key! Brown sugar provides moisture and a caramel-like chewiness, while caster (or granulated) sugar helps the cookies spread just the right amount and creates those crispy edges.
- Vanilla Extract: A non-negotiable for flavour. Use a good quality vanilla for the best results.
- Egg: This acts as our binder, holding everything together.
- Plain Flour: Also known as all-purpose flour. Be sure to measure it correctly! (More on that in my tips section).
- Baking Powder & Bicarbonate of Soda: This duo provides the lift. Baking powder gives the cookies their height, while the bicarbonate of soda encourages the perfect amount of spread.
- Milk Chocolate Chips: These are folded into the dough for pockets of melted chocolate in every bite.
- Crackling Chocolate Spread: This is our secret weapon for the molten center! I use the one from Asda, but any thick chocolate spread will work. The “crackling” adds a fun, subtle texture.
- Creme Eggs: The star of the show! We’ll freeze them to make them easier to cut and handle.
Step-by-Step Instructions for Perfect Creme Egg NYC Cookies
Ready to bake? Let’s do this. I’ve broken it down into simple, manageable steps. Remember to read through everything before you begin!
Step 1: Prepare and Freeze Your Fillings
This first step is the foundation for success. Do not skip it!
- Line a medium plate with a piece of baking paper.
- Spoon 8 evenly sized balls of the crackling chocolate spread onto the plate. Don’t worry about them being perfectly round.
- Place the entire plate in the freezer.
- At the same time, place your unopened pack of Creme Eggs in the freezer. Freezing them makes them much easier to cut in half later without creating a gooey mess.
Step 2: Make the Cookie Dough
Now for the fun part! This dough comes together in minutes.
- In a large mixing bowl, add the softened margarine and both the light brown and caster sugars. Using a hand mixer or a stand mixer with the paddle attachment, cream them together on medium speed until the mixture is light, fluffy, and smooth.
- Add the vanilla extract and the egg. Mix again until just combined. The mixture might look a bit curdled or split at this stage—that’s completely normal, so don’t panic!
- Sift the plain flour, baking powder, and bicarbonate of soda directly into the wet ingredients. Mix on low speed (or by hand with a spatula) until a soft but firm dough forms. It should be easy to handle and not sticky.
- Gently fold in the milk chocolate chips until they’re evenly distributed throughout the dough.
Step 3: Assemble and CHILL Your Cookies
This is where the magic happens.
- Retrieve your frozen balls of chocolate spread from the freezer.
- Divide your cookie dough into 8 equal portions. A kitchen scale makes this easy, but you can eyeball it.
- Take one portion of dough and flatten it into a disc in the palm of your hand.
- Place one frozen chocolate spread ball right in the center.
- Carefully fold the edges of the dough up and around the frozen ball, pinching to seal it completely inside. Roll it gently between your palms to form a smooth, round ball.
- Place the stuffed cookie dough ball on a tray lined with baking paper and repeat with the remaining dough and fillings.
- CRITICAL STEP: Place the entire tray of stuffed cookie dough balls into the freezer for a minimum of 45 minutes. This solidifies the fat, which is the secret to a thick cookie that doesn’t spread out thin in the oven.
Step 4: Bake and Decorate
The final stretch! Your kitchen is about to smell incredible.
- About 15 minutes before the cookies are done chilling, preheat your oven to 200°C (180°C for fan-assisted ovens). Line two large baking trays with parchment paper.
- Remove the chilled cookie dough balls from the freezer and place them on the prepared trays. Be sure to leave plenty of space between them for spreading—I recommend 4 cookies per tray.
- Bake for 8-10 minutes. The cookies are done when the edges are a light golden brown, but the centers still look soft and slightly underdone. This is what you want for a gooey middle!
- While the cookies are in their last couple of minutes of baking, take the Creme Eggs out of the freezer. Use a sharp, heavy knife to carefully cut each one in half lengthwise.
- As soon as you pull the cookies from the oven, gently press one Creme Egg half, cut-side up, into the center of each hot cookie. Be gentle but firm enough to nestle it into the soft dough.
- Patience is a virtue! Let the cookies cool completely on the baking trays for at least 2 hours. Do not attempt to move them to a wire rack. This cooling time is essential for the molten center to set up properly. If you move them too soon, they will break apart.
Sofie’s Expert Tips for Success
After making these cookies more times than I can count, I’ve gathered a few non-negotiable tips that will guarantee your success.
- Weigh Your Flour: This is my number one tip for all baking. Using a digital kitchen scale to measure your flour is far more accurate than using cups. Too much flour is the main reason for dry, dense cookies.
- Don’t Overmix the Dough: Once you add the flour, mix only until it’s just combined. Overmixing develops the gluten, which can lead to tough cookies instead of tender, chewy ones.
- The Freezer is Your Best Friend: I cannot stress this enough. Freezing the chocolate spread balls makes them easy to handle, and freezing the stuffed dough balls is the only way to get that signature thick, tall NYC cookie shape.
- The Perfect Shape Trick: If your cookies come out of the oven a little misshapen, no problem! While they are still hot on the tray, take a large round cookie cutter or the rim of a glass and place it around the cookie. Gently swirl it around the cookie to tuck in the edges and create a perfect circle.
- Trust the Baking Time: The cookies will look puffy and underbaked in the center when you take them out. This is exactly what you want! They will continue to cook from the residual heat on the tray, resulting in that perfect gooey-on-the-inside, chewy-on-the-outside texture.
Frequently Asked Questions
Is freezing the cookie dough absolutely necessary?
Yes, 100%! Freezing the stuffed cookie dough balls for at least 45 minutes is the most critical step for achieving that signature thick, tall NYC-style cookie. Chilling the dough solidifies the margarine, which prevents the cookies from spreading too quickly in the hot oven. This ensures they bake upwards instead of outwards, giving you that coveted thick and gooey texture.
Can I use butter instead of margarine?
You can, but the texture might be slightly different. Margarine often has a higher water content and a different fat structure, which can contribute to a softer, more cake-like cookie. If using butter, I recommend using a block-style unsalted butter for best results. The flavor will be richer, but the cookie might spread a little more.
What can I use if I can’t find crackling chocolate spread?
If you can’t find the specific crackling chocolate spread, don’t worry! You can easily substitute it with a thick chocolate-hazelnut spread like Nutella, or even a simple chocolate ganache that has been chilled until firm. The key is to use a filling that can be frozen into solid balls for easy stuffing.
How do I store these Creme Egg NYC Cookies?
Store the fully cooled cookies in an airtight container at room temperature for up to 5-7 days. For longer storage, you can freeze the baked cookies for up to 3 months. To enjoy, simply thaw them at room temperature or warm them gently in the oven or microwave for a few seconds to restore that gooey center.
Storing Your Cookies
At Room Temperature: Once completely cool, store your cookies in an airtight container. They will stay fresh and delicious for 5-7 days. I find they are even gooier on day two!
Freezing: These cookies freeze brilliantly.
- To Freeze Dough: You can freeze the stuffed cookie dough balls for up to 3 months. When ready to bake, there’s no need to thaw. Just add an extra 1-2 minutes to the baking time.
- To Freeze Baked Cookies: Place the cooled cookies in a freezer-safe bag or container. They will last for up to 3 months. Thaw at room temperature or give them a 10-15 second blast in the microwave for a warm, gooey treat.
More Decadent Cookie Recipes to Try
If you loved this recipe, you’re in the right place! Here are a few more of my favorite stuffed cookie creations:
- Gooey Stuffed Red Velvet Cookies
- Ultimate Pistachio NYC Cookies
- Classic Creme Egg Stuffed Cookies
- Irresistible Peanut Butter Nutella Cookies
- White Chocolate Stuffed Cookies
I can’t wait for you to try these Creme Egg NYC Cookies! They are truly one of my all-time favourite bakes, and I’m so excited to share my perfected recipe with you. If you make them, please leave a comment and a rating below—I love hearing from you
PrintCreme Egg NYC Cookies
Thick, gooey Creme Egg NYC Cookies with molten chocolate centers, stuffed with rich chocolate spread and topped with half a classic Cadbury Creme Egg. A bakery-style cookie perfected through nine rounds of testing — soft, chewy, and completely irresistible!
- Prep Time: 25 minutes
- Cook Time: 10 minutes
- Total Time: 1 hour 30 minutes (including chilling)
- Yield: 8 large cookies
- Category: Dessert, Cookies
- Method: Baked
- Cuisine: American
Ingredients
For the Cookie Dough
225g margarine or unsalted butter, softened
150g light brown sugar
100g caster sugar
1 large egg
1 teaspoon vanilla extract
350g plain flour
1 teaspoon baking powder
1/2 teaspoon bicarbonate of soda
1/2 teaspoon salt
150g milk chocolate chips
For the Filling & Topping
8 tablespoons thick chocolate spread (crackling or Nutella)
4 Cadbury Creme Eggs (halved, frozen)
(optional) extra chocolate chips for topping
Instructions
1. Line a medium plate with parchment paper and scoop 8 spoonfuls of chocolate spread onto it. Freeze until solid.
2. Freeze the Creme Eggs at the same time so they’re firm for slicing.
3. In a large bowl, cream margarine with both sugars until light and fluffy.
4. Add vanilla extract and egg; mix until just combined.
5. Sift in flour, baking powder, bicarbonate of soda, and salt. Mix on low speed until a soft dough forms.
6. Fold in the milk chocolate chips.
7. Divide dough into 8 equal portions (about 100–110g each).
8. Flatten one portion in your hand, place a frozen chocolate spread ball in the center, and wrap the dough around it. Roll into a ball. Repeat with remaining dough.
9. Place cookie dough balls on a lined tray and freeze for at least 45 minutes.
10. Preheat oven to 200°C (180°C Fan) and line 2 baking trays with parchment paper.
11. Place 4 frozen cookie dough balls per tray, leaving room to spread.
12. Bake 8–10 minutes, until edges are light golden but centers are soft and underbaked.
13. While baking, slice frozen Creme Eggs in half.
14. As soon as cookies are out of the oven, press one Creme Egg half, cut side up, into each warm cookie.
15. Cool cookies completely on trays for at least 2 hours before moving. This ensures gooey centers set perfectly.
Notes
Storage: Store cooled cookies in an airtight container at room temperature for up to 7 days.
Freezing: Freeze baked cookies or dough balls for up to 3 months. Bake from frozen, adding 1–2 minutes if needed.
Tips:
• Always weigh your flour for consistent texture.
• Don’t skip the chilling step — it ensures thickness and gooey centers.
• Bake from frozen for the best NYC-style height.
• Use a cookie cutter to “scoot” hot cookies into perfect circles after baking.
Substitutions:
• Replace crackling chocolate spread with Nutella or thick ganache.
• For butter version, use block-style unsalted butter (not spreadable).


