
Is there anything more nostalgic than a backyard BBQ on the Fourth of July? The smell of the grill, the sound of kids running through sprinklers, and the anticipation of fireworks at dusk—it’s the quintessential American summer experience. But let’s be honest: the highlight of any Independence Day gathering is the food, and specifically, the dessert table.
These 4th of July Cupcakes are designed to be the showstopper of your party. While they look like they came from a high-end boutique bakery, the secret is that they are incredibly easy to achieve with just a few simple tools. By using a classic star-piping technique, we’ll create miniature American flags that are as delicious as they are patriotic.
Whether you’re celebrating Memorial Day, Labor Day, or the 4th of July, these red, white, and blue treats are guaranteed to disappear in minutes!
Why You’ll Love This Recipe
- High Visual Impact: These look professional but require zero advanced baking skills.
- Make-Ahead Friendly: The colors actually get better if you prep the frosting a day early.
- Kid-Approved: Children love the star shapes and, of course, the extra sprinkles!
- Customizable: Use your favorite cupcake base—chocolate, vanilla, or even red velvet.
- Crowd-Pleaser: It’s a literal “flag” on a cupcake—what’s not to love?
Ingredient & Equipment Notes
Before you start piping, let’s talk about the essentials for success.
- The Cupcakes: You can use a boxed mix or your favorite “from-scratch” recipe. The most important thing is that they are completely cool. If the cupcake is even slightly warm, your flag will slide right off!
- Gel Food Coloring: This is non-negotiable. Liquid food coloring from the grocery store will thin out your frosting and give you a pastel pink instead of a vibrant fire-engine red. Use gel (like Wilton or Americolor) for deep, saturated hues.
- Vanilla Frosting: I used store-bought tubs for convenience, but a stiff homemade buttercream also works beautifully.
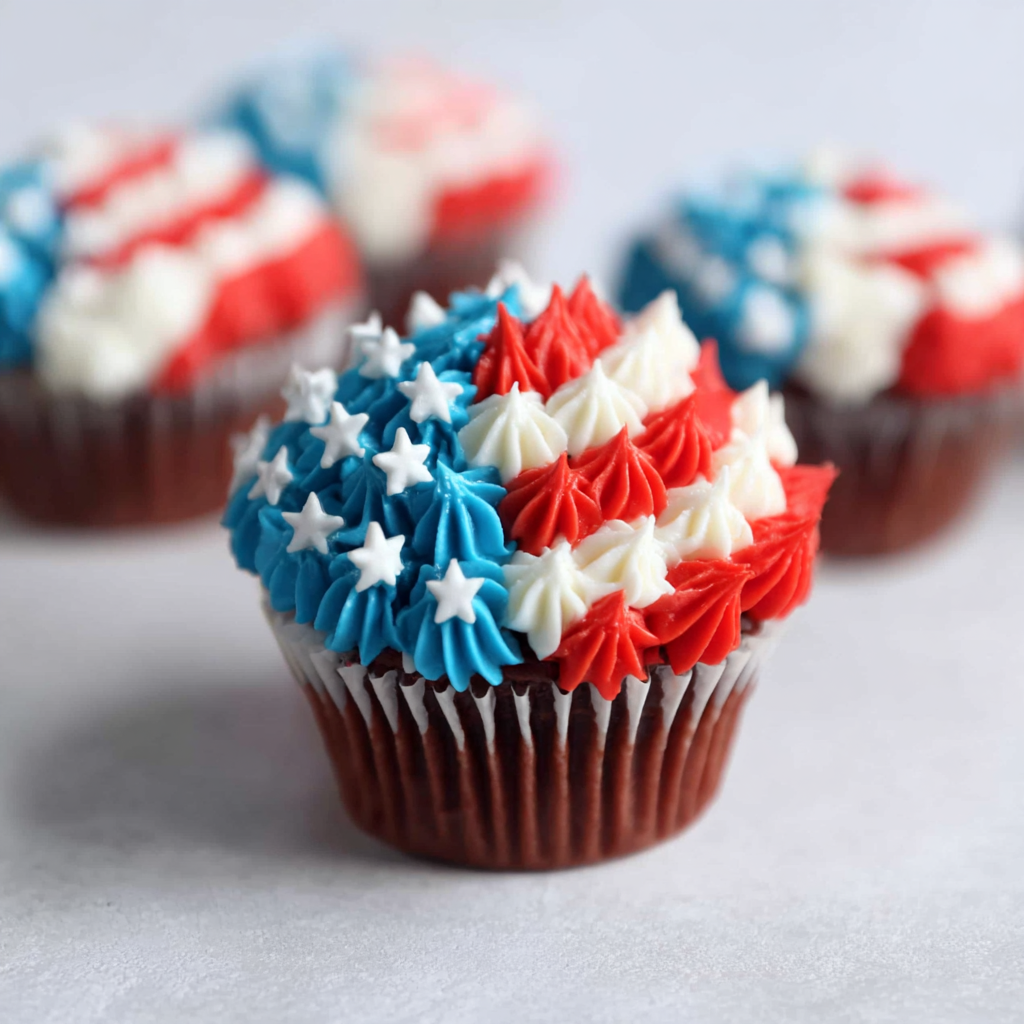
- Wilton #18 Tip: This is a small open-star tip. It creates those perfect, defined ridges that make the flag look “woven.”
- Star Sprinkles: These represent the 50 states! Look for “star quins” in the baking aisle.
How to Make 4th of July Flag Cupcakes (Step-by-Step)
1. Tinting the Frosting
The first step is achieving those bold patriotic colors. Divide two tubs of frosting into separate bowls.
- Red: Add a small amount of red gel with a toothpick. Mix well. If it looks pink, keep adding!
- Blue: Repeat the process in the second bowl with blue gel.
- Pro Tip: Remember that colors darken as they sit. If you achieve a “deep pink,” it will likely be a “true red” in a few hours.
2. Setting Up Your Piping Bag
If you have three star tips, you can set up three bags at once. If you only have one tip, don’t worry! You can use a coupler. A coupler allows you to swap the tip from the white bag to the red bag without having to empty the frosting.
3. The Star Piping Technique
The “Star” is the building block of this design. Hold your piping bag completely vertical (90 degrees). Squeeze gently until a star forms, stop squeezing, and then pull straight up.
4. Assembling the Flag
- White Stripes: Start at the bottom of the cupcake and pipe one solid horizontal row of white stars. Above that, pipe two partial rows, leaving about 1/3 of the space empty on the left side.
- Red Stripes: Fill in the gaps between the white rows with red stars. Pipe one full row at the very top (or very bottom, depending on your layout) to mimic the red-and-white stripe pattern.
- The Blue Field: In that empty space on the top left, pipe rows of blue stars until the cupcake surface is covered.
- Final Touch: Place a few white star sprinkles onto the blue section while the frosting is still “tacky.”
Expert Tips for Best Results
- Watch the Heat: If your hands are very warm, the frosting in the piping bag might start to melt. If it feels too soft, pop the whole bag in the fridge for 5 minutes to firm it up.
- Consistency is Key: Use the same amount of pressure for every star so your “stripes” look even.
- The “Toothpick” Rule: When adding gel color, always use a clean toothpick. Never double-dip, or you’ll get crumbs in your frosting tub!
- Clean Tips: If you are reusing the same tip for different colors, rinse it in warm water and dry it completely before switching. A drop of water can ruin the frosting consistency.
Variations and Substitutions
- The “Lazy” Flag: If piping individual stars takes too long, you can pipe straight lines (stripes) using a round tip or a petal tip, then just add a dollop of blue in the corner.
- Flavor Twists: Try using a lemon cupcake base for a refreshing summer vibe, or a red velvet cupcake to stay on theme with the color palette.
- Berry Toppers: If you want to skip the sprinkles, a single fresh blueberry on the blue section looks elegant and tastes great.
Storage and Freezing
Room Temperature: These cupcakes are best served the day they are frosted but can stay at room temperature in an airtight container for up to 24 hours.
Refrigeration: If your kitchen is hot, keep them in the fridge. Take them out 30 minutes before serving so the frosting softens back up.
Freezing: You can freeze the unfrosted cupcakes for up to 3 months. I do not recommend freezing the fully decorated flag cupcakes, as the colors may bleed during the thawing process.
FAQ
Can I use whipped frosting instead of vanilla?
Whipped frosting is usually too soft to hold the sharp ridges of the star tip. Stick to “Creamy” or “Classic” styles of frosting for the best definition.
How do I get my red frosting to be “Red” and not “Pink”?
The trick is using “No-Taste Red” gel color. Some red dyes can be bitter, so look for the no-taste variety. Also, give it time! The color develops significantly over 2 to 12 hours.
How many cupcakes does one tub of frosting cover?
Generally, one 16oz tub of frosting will cover 8-12 cupcakes if you are piping a design like this. Since we are using three colors, three tubs are perfect for a standard 24-count batch.
Celebrate with Style!
These 4th of July Cupcakes are more than just a dessert; they’re a festive centerpiece. There is something so satisfying about seeing a tray of these “flags” all lined up ready for a party. They capture the spirit of the holiday perfectly and prove that you don’t need to be a professional pastry chef to create something beautiful.
Happy baking, and have a wonderful Independence Day!
PrintEasy 4th of July Cupcakes

These festive 4th of July cupcakes are the ultimate patriotic treat! Using a simple star piping technique, you can transform standard vanilla cupcakes into beautiful American flags. Perfect for summer BBQs and Independence Day parties.
- Prep Time: 30
- Cook Time: 20
- Total Time: 50
- Yield: 24 cupcakes
- Category: Dessert
- Method: Piping
- Cuisine: American
Ingredients
24 vanilla or chocolate cupcakes (baked and cooled)
3 tubs (16 oz each) vanilla frosting
Red gel food coloring
Blue gel food coloring
White star sprinkles
Instructions
1. Scoop one tub of vanilla frosting into a bowl. Use a toothpick to add red gel food coloring and stir until bright red.
2. Scoop the second tub of frosting into another bowl and tint it blue with gel food coloring.
3. Fit a piping bag with a Wilton #18 star tip and fill with white frosting.
4. Pipe one full row of white stars at the bottom of the cupcake, then two partial rows above it, leaving space on the left.
5. Switch to (or use a second bag of) red frosting. Pipe one full row and two partial rows to complete the ‘stripes’.
6. Fill a bag with blue frosting and pipe stars in the remaining top-left empty space.
7. Immediately add white star sprinkles to the blue section.
8. Serve and enjoy your patriotic masterpiece!
Notes
For the brightest colors, tint the frosting 24 hours in advance. Gel colors deepen over time!
If you only have one piping tip, wash it thoroughly between colors to keep the white stars crisp.
Make sure cupcakes are completely cool before frosting to prevent melting.


