
Table of Contents
Warm, buttery, chocolatey — there’s nothing quite like the comfort of fresh-baked goods, and these Cookie Bars deliver every time. Forget the endless scooping and baking sheet rotations; this simple 1-pan recipe makes the best chocolate chip Cookie Bars you’ll ever bake, combining speed with irresistible flavor. You’re going to love how easy these are to whip up for any occasion.
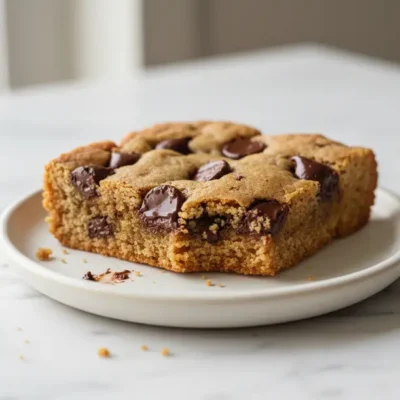
These bars are the perfect solution when you crave the classic taste of a chocolate chip cookie but don’t have the time or patience for individual cookies. They offer a delightful texture, with slightly crisp edges and a gooey, chewy center that everyone adores. Get ready to impress with minimal effort!
What Makes This Dish Worth Making
These chocolate chip cookie bars aren’t just easy; they are a game-changer for your dessert routine. The biggest advantage is the sheer convenience. Instead of baking multiple batches of individual cookies, you simply press the dough into one pan and bake it all at once. This saves you significant time, making them ideal for busy weeknights or last-minute potlucks.
The texture of these bars is truly something special. Because they bake as one large unit, the edges get that lovely golden crispness, while the center remains wonderfully soft, fudgy, and incredibly chewy. It’s like getting the best part of every cookie in a single, perfectly portioned square. Plus, you can cut them as big or as small as you like, making them super versatile for serving a crowd or just enjoying a treat yourself.
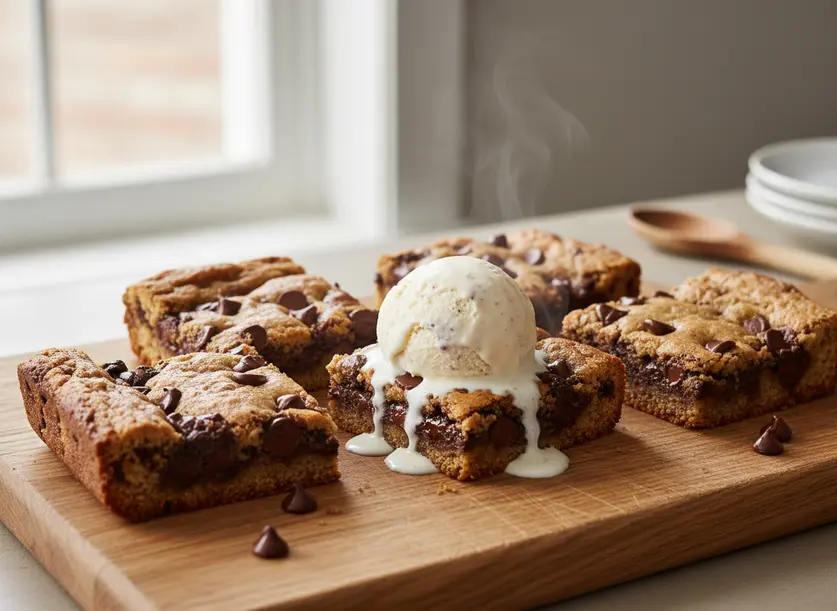
Another reason to love these cookie bars is how well they keep. They are fantastic on the day they’re baked, especially served warm with a scoop of vanilla ice cream. But honestly, they often taste even better the next day once the flavors have had more time to meld and the texture fully sets. They also freeze beautifully, so you can always have a delicious homemade treat on hand. These qualities make them an absolute staple in any home baker’s repertoire.
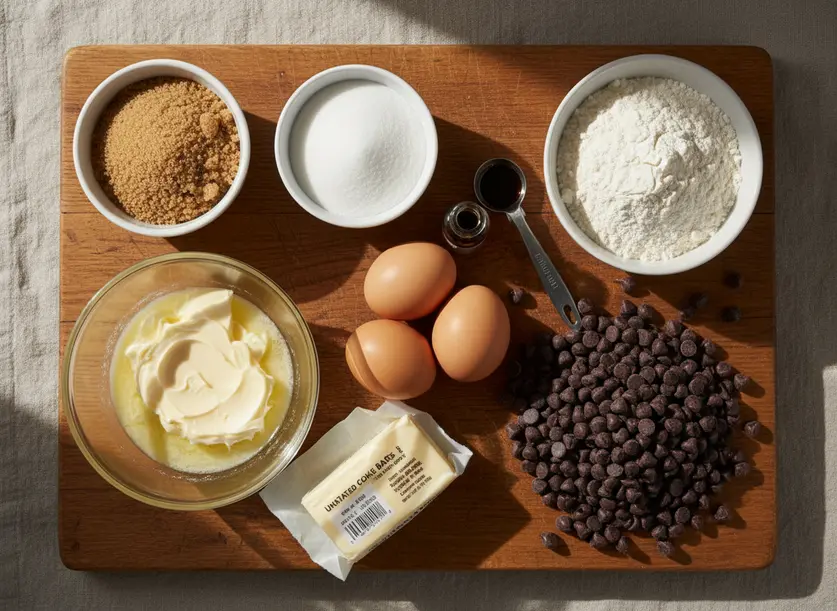
Ingredients You Will Need
To create these delectable cookie bars, you’ll start with a few pantry staples. For the dry ingredients, you’ll need all-purpose flour. While not strictly necessary, weighing your flour can lead to more consistent results than measuring by volume. Add a touch of baking soda for lift and a pinch of salt to enhance all those sweet flavors; if using unsalted butter, you might want to increase the salt slightly.
The wet ingredients begin with good quality butter, melted and then cooled slightly. Don’t add hot butter to your sugar mixture, or you risk cooking the eggs. You’ll also use a combination of brown sugar for its rich, molasses-like flavor and chewiness, and white sugar for a bit of crispness and sweetness. Large eggs act as a crucial binder, and a generous splash of vanilla extract deepens the overall flavor profile. Finally, the star of the show: chocolate chips. Semi-sweet are my personal favorite, but feel free to use milk chocolate, dark chocolate, or even a mix of different varieties. You could even swap out some of the chocolate for toffee bits or peanut butter chips if you’re feeling adventurous.
How to Make It Step by Step
- Preheat Oven and Prep Pan: Start by preheating your oven to 350°F (175°C). Line a 9×13-inch baking pan with parchment paper or foil, leaving an overhang on the sides. This makes it incredibly easy to lift the entire batch out for cutting later.
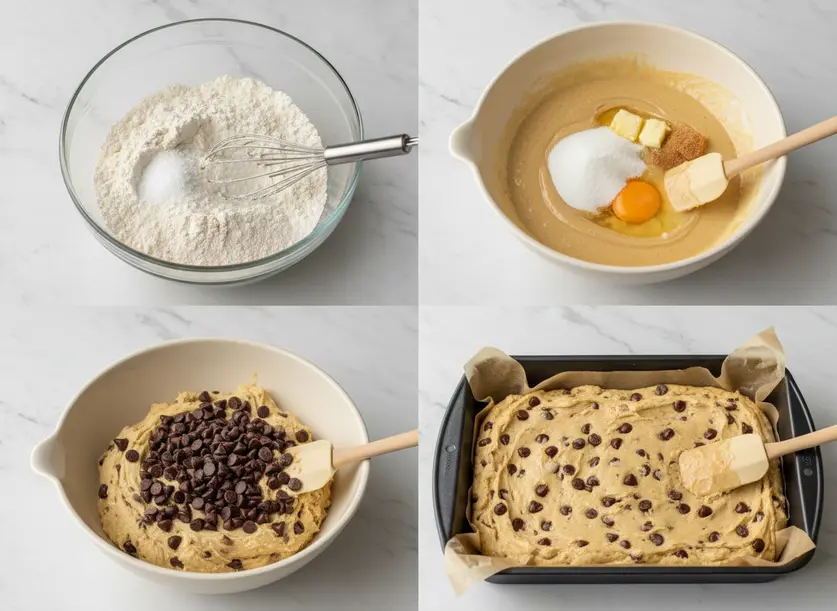
- Combine Dry Ingredients: In a medium bowl, whisk together your all-purpose flour, baking soda, and salt. Set this aside for a moment.
- Mix Wet Ingredients: In a large mixing bowl, combine the slightly cooled melted butter with both brown sugar and white sugar. Mix thoroughly until smooth and well combined. Then, beat in the eggs one at a time, followed by the vanilla extract. Mix until everything is fully incorporated and looks creamy.
- Gradually Add Dry to Wet: Slowly add the dry flour mixture to the wet ingredients, mixing on low speed or by hand until just combined. Be careful not to overmix, as this can lead to tough cookie bars.
- Fold in Chocolate Chips: Gently fold in your chocolate chips. If you want a few extra melty pools on top, reserve a small handful to sprinkle over the dough before baking.
- Press into Pan: Transfer the dough to your prepared 9×13-inch pan. Press it evenly into the bottom of the pan. A lightly greased piece of parchment paper or your hands can help with this.
- Bake: Bake for 25-35 minutes. The edges should be golden brown, and the center should still look slightly soft and gooey. Remember, they will continue to set as they cool.
- Cool Completely: This step is crucial! Remove the pan from the oven and let your chocolate chip cookie bars cool completely on a wire rack before attempting to cut them. If you try to cut them while warm, they’ll be very messy and fall apart. Patience is key for perfectly sliced Cookie Bars.
Tips for the Best Results
Achieving perfect cookie bars is all about a few key techniques. First and foremost, do not overbake them. Cookie bars, like individual cookies, are often best when slightly underbaked. The center should look soft and a bit shiny when you pull them from the oven; the residual heat will continue to cook them as they cool, leading to that coveted chewy texture. If you bake them until they’re firm all the way through, you’ll end up with dry, crumbly bars.
Cooling completely is non-negotiable. I know it’s hard to wait, but cutting warm cookie bars almost guarantees a gooey mess. They need time to firm up and fully set. If you’re really impatient, you can pop the cooled bars into the fridge for 30 minutes before cutting for cleaner slices. Lining your baking pan with parchment paper or foil, with an overhang, also makes removal and cutting incredibly easy.
For optimal flavor and texture, use good quality ingredients. Real butter makes a big difference, and don’t skimp on the vanilla extract. When it comes to troubleshooting, if your bars turn out too crumbly, you likely overbaked them. If they seem overly greasy, your butter might have been too hot when added to the sugar, or you might have used too much. For storage, keep any leftover cookie bars in an airtight container at room temperature for up to 3-4 days. For longer storage, wrap them tightly and freeze for up to 3 months. Thaw at room temperature or gently warm for a fresh-baked taste.
Variations to Try
Once you master the basic chocolate chip cookie bars, the possibilities for variations are endless! One popular twist is adding different types of nuts. Stir in a cup of chopped walnuts or pecans along with the chocolate chips for a delightful crunch and nutty flavor. Toasted nuts work especially well here, as the toasting brings out their full aroma and taste.
Another fantastic idea is to experiment with various mix-ins. Beyond classic chocolate, try peanut butter chips, white chocolate chunks, or even M&M’s for a pop of color and extra sweetness. For a salty-sweet combination, coarsely chopped pretzels can be folded into the dough. If you love a rich caramel flavor, swirl a few tablespoons of warm caramel sauce over the top of the dough before baking. These simple additions can completely transform your cookie bars and cater to different cravings.
Feeling even more adventurous? Consider adding a hint of spice to the dough itself. A quarter teaspoon of cinnamon or a pinch of espresso powder can deepen the flavor profile of the chocolate and add a wonderful warmth. You can also press a layer of cream cheese mixture into the middle of the dough for a decadent cream cheese swirl cookie bar. Don’t be afraid to get creative and make these Cookie Bars your own unique creation.
FAQ
Can I double this recipe?
Yes, you can absolutely double the recipe, but it’s generally best to bake it in two separate 9×13-inch pans. Baking a doubled batch in one larger pan, like a 12×17-inch, can significantly alter baking times and result in uneven cooking. It’s often safer to stick to the recommended pan size per batch for consistent results.
How do I store leftover Cookie Bars?
Store leftover chocolate chip cookie bars in an airtight container at room temperature for up to 3-4 days. For a firmer texture, especially in warmer climates, you can keep them in the refrigerator. They also freeze beautifully when wrapped tightly, and can be enjoyed for up to three months.
Why are my Cookie Bars gooey in the middle?
If your cookie bars are excessively gooey, you might have cut into them too soon. The centers need ample time to set after coming out of the oven. Always let them cool completely, preferably for several hours or even overnight, before slicing to achieve the perfect chewy yet firm texture that defines great Cookie Bars.
Cookie Bars
Ingredients
- 2 1/4 cups all-purpose flour
- 1 tsp baking soda
- 1/2 tsp salt
- 3/4 cup unsalted butter melted and cooled
- 1 cup light brown sugar packed
- 1/2 cup granulated sugar
- 2 large eggs
- 1 tsp vanilla extract
- 1 1/4 cups semi-sweet chocolate chips or your favorite variety
Instructions
- Preheat your oven to 350°F (175°C). Line a 9x13-inch baking pan with parchment paper or foil, leaving an overhang on the sides for easy removal.
- In a medium bowl, whisk together the all-purpose flour, baking soda, and salt. Set aside.
- In a large mixing bowl, combine the slightly cooled melted butter with both brown sugar and white sugar. Mix thoroughly until smooth and well combined. Then, beat in the eggs one at a time, followed by the vanilla extract. Mix until everything is fully incorporated and looks creamy.
- Slowly add the dry flour mixture to the wet ingredients, mixing on low speed or by hand until just combined. Be careful not to overmix, as this can lead to tough cookie bars.
- Gently fold in your chocolate chips. If desired, reserve a small handful to sprinkle over the dough before baking for extra melty pools on top.
- Transfer the dough to your prepared 9x13-inch pan. Press it evenly into the bottom of the pan. A lightly greased piece of parchment paper or your hands can help with this.
- Bake for 25-35 minutes. The edges should be golden brown, and the center should still look slightly soft and gooey. Remember, they will continue to set as they cool.
- Remove the pan from the oven and let your chocolate chip cookie bars cool completely on a wire rack before attempting to cut them. Cutting warm bars will result in a messy, crumbling texture.


