
Table of Contents
There’s nothing quite like the smell of fresh baked cookies, right? But sometimes, you just don’t have the time or patience for endless scooping. That’s where these amazing Chocolate Chip Cookie Bars come in. They deliver all that classic cookie goodness in a simple, fuss free package.
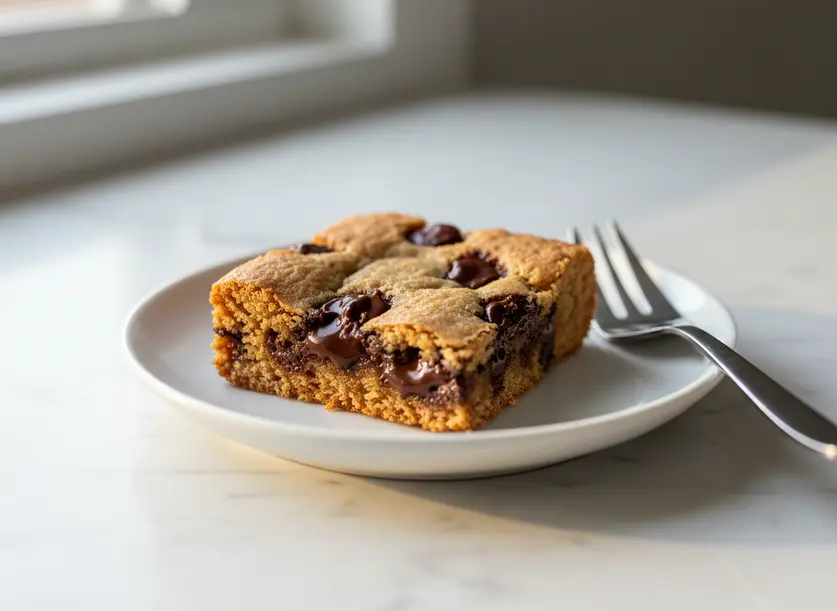
I’ve been making these Chocolate Chip Cookie Bars for years, and they’re always a hit. This recipe is my absolute favorite because it’s so quick to throw together. You get that perfect balance of crispy edges and a super soft, chewy center, all baked in one pan. No need to chill dough or wait for multiple batches. Just mix, press, bake, and enjoy. It’s the easiest way to satisfy that cookie craving, especially when you need a treat fast.
What Makes These Chocolate Chip Cookie Bars Worth Making
Honestly, these cookie bars are a lifesaver. You get the same incredible taste and texture as traditional cookies, but without all the effort. The prep time is minimal, often less than 10 minutes from start to oven. You just mix everything in one bowl, press it into a pan, and bake.
Baking in a single pan also means every piece gets that delightful chewy middle. No more fighting over the center cookies! They’re perfect for potlucks, parties, or just a simple weeknight dessert. Plus, they slice beautifully, making them ideal for sharing. The convenience factor alone makes them my go-to when I want a homemade treat without the fuss.
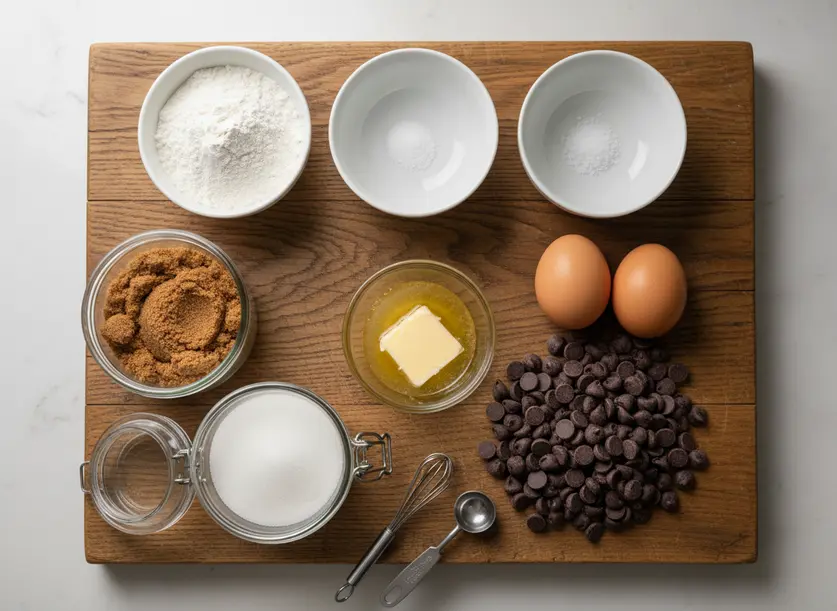
Ingredients You Will Need
You’ll need a few pantry staples to bring these delicious bars to life. Start with all-purpose flour, which gives them structure. For leavening, we use baking soda to help them rise perfectly. A pinch of kosher salt (or half the amount of table salt) balances the sweetness and enhances the flavors. The richness comes from melted butter; I always recommend using real butter for the best taste, salted or unsalted works, just adjust your added salt if using salted. If you need a dairy free option, a good quality plant based butter substitute might work, though I haven’t personally tested it.
For sweetness and chewiness, a mix of packed brown sugar and white sugar is key. The brown sugar adds moisture and a slight caramel note. Two large eggs bind everything together, and a generous splash of vanilla extract boosts the overall flavor. And of course, chocolate chips! You can use any kind you love – semi sweet, milk, dark, or even a mix. Sometimes I even throw in a handful of white chocolate chips for variety. Finally, toffee bits are an optional but fantastic addition for extra crunch and buttery flavor.
How to Make It Step by Step
Making these cookie bars is incredibly straightforward. Just follow these simple steps, and you’ll have a warm, chewy treat in no time.
- Preheat your oven to 350°F (175°C). Line a 9×13-inch baking pan with parchment paper or foil, leaving an overhang on the sides. This makes it super easy to lift the entire slab out later. If you don’t have parchment, spray the bottom with cooking spray.
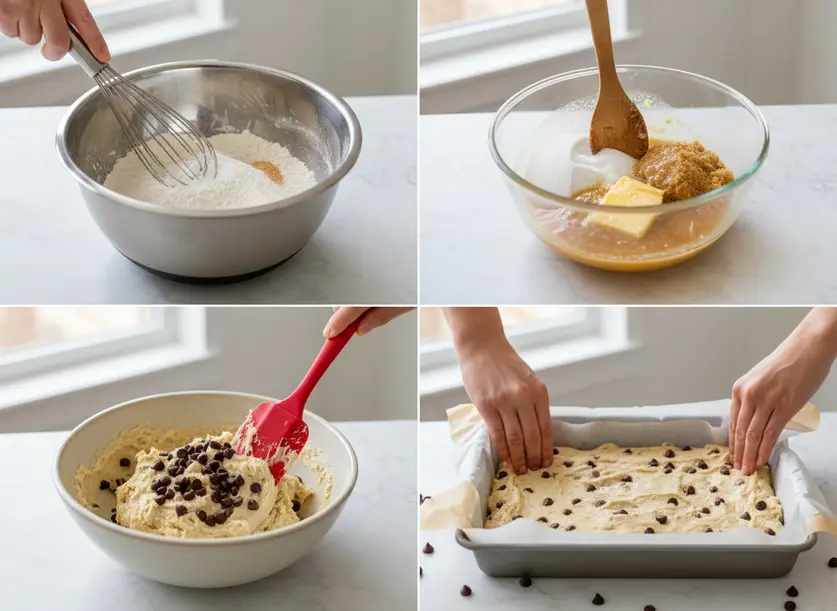
- In a medium bowl, whisk together the flour, baking soda, and salt. Set this aside for a moment.
- In a large mixing bowl, combine the melted butter, brown sugar, and white sugar. Stir until they are thoroughly combined and smooth.
- Add the eggs one at a time to the butter-sugar mixture, stirring well after each addition. Then, stir in the vanilla extract.
- Gradually add the dry ingredients to the wet ingredients, mixing on low speed or by hand until just combined. Be careful not to overmix the dough.
- Fold in the chocolate chips. If you want to, save a few to sprinkle on top before baking for a prettier finish. If you’re using toffee bits, stir them in now or sprinkle them on top before baking.
- Press the cookie dough evenly into your prepared 9×13-inch baking pan. Make sure it’s spread from edge to edge.
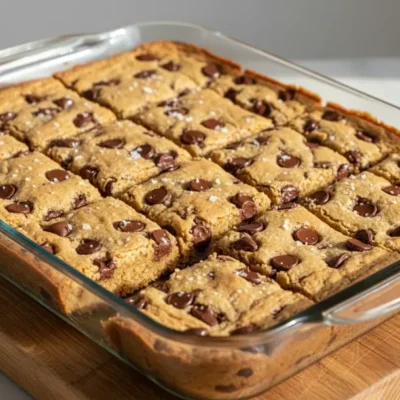
- Bake for 25-35 minutes, or until the edges are golden brown and the center still looks a little soft or slightly underdone. A perfectly baked bar will have a slightly gooey center when it first comes out of the oven.
- Remove the pan from the oven and place it on a wire rack to cool completely. This is the hardest part, but it’s crucial for the bars to set up properly.
- Once cooled, use the parchment paper overhang to lift the entire cookie slab out of the pan. Place it on a cutting board and slice into squares or rectangles of your desired size.
Tips for the Best Results
Getting these Chocolate Chip Cookie Bars just right is easy with a few tricks. The biggest one is to never overmix the dough once you add the flour. Overmixing develops the gluten too much, leading to tough, dense bars instead of soft, chewy ones. Mix until just combined, and then stop.
Cooling is key for the perfect texture. I know it’s tempting to cut into them warm, but resist! Cutting them while hot will result in a gooey, crumbly mess. Let them cool completely, preferably to room temperature, or even chill them in the fridge. This allows them to set up, giving you clean, firm squares with that signature chewy center. For serving warm, scoop them out with a spoon and top with ice cream.
Using parchment paper or foil with an overhang is a game changer. It means you can lift the entire baked slab right out of the pan, making cutting a breeze and cleanup practically non-existent. Without it, you’ll be scraping stuck on bits from the pan.
For storage, keep your cooled cookie bars in an airtight container at room temperature for up to 3-4 days. You can also refrigerate them for up to a week, which makes them extra chewy. They also freeze wonderfully; wrap individual bars or the whole slab tightly in plastic wrap and then foil. Thaw at room temperature or pop them in the microwave for a quick warm treat.
Variations to Try
While these Chocolate Chip Cookie Bars are fantastic as is, there are so many ways to switch them up. For a nutty twist, fold in about ½ cup of chopped walnuts or pecans with your chocolate chips. The nuts add a lovely crunch and a rich, earthy flavor that pairs perfectly with the sweet chocolate.
If you’re a fan of white chocolate, try making white chocolate macadamia nut cookie bars. Swap half or all of the chocolate chips for white chocolate chunks and add a ½ cup of chopped macadamia nuts. The buttery macadamias and sweet white chocolate are a classic combination that really shines here.
For a fun, colorful version, replace some of the chocolate chips with M&M’s or other small candies. This is especially great for parties or when you want to make them appealing to kids. You can also drizzle a little salted caramel sauce over the top after they’ve cooled for an extra layer of decadence. Just be sure the bars are fully cool so the caramel doesn’t melt everywhere.
You can also try making chocolate chip cookies in a more traditional format if you prefer.
FAQ
Can I use different types of chocolate in these cookie bars?
Absolutely! This recipe is very versatile. While semi sweet or dark chocolate chips are classic, feel free to use milk chocolate, white chocolate, or a mix of several kinds. Chocolate chunks or even chopped candy bars can also work beautifully for a different texture and flavor profile.
How do I know when my cookie bars are done baking?
Your cookie bars are ready when the edges are set and a light golden brown. The center will still look quite soft, perhaps even a little gooey or underbaked. This is exactly what you want! They will continue to cook and set as they cool, resulting in that perfect soft and chewy texture.
Can I freeze these Chocolate Chip Cookie Bars?
Yes, these cookie bars freeze exceptionally well. Once they are completely cooled, you can wrap the entire slab tightly in plastic wrap and then foil, or wrap individual bars. They will keep in the freezer for up to 2-3 months. Thaw them at room temperature or warm briefly in the microwave for a fresh baked taste.
Chocolate Chip Cookie Bars
Ingredients
- 2 1/4 cups all-purpose flour
- 1 tsp baking soda
- 1/2 tsp kosher salt (or 1/4 tsp table salt)
- 1 cup melted butter (2 sticks), salted or unsalted
- 1 1/2 cups packed brown sugar
- 1/2 cup white sugar
- 2 large eggs
- 2 tsp vanilla extract
- 2 cups chocolate chips (semi-sweet, milk, dark, or a mix)
- 1/2 cup toffee bits (optional)
Instructions
- Preheat your oven to 350°F (175°C). Line a 9x13-inch baking pan with parchment paper or foil, leaving an overhang on the sides. This makes it super easy to lift the entire slab out later. If you don't have parchment, spray the bottom with cooking spray.
- In a medium bowl, whisk together the flour, baking soda, and salt. Set this aside for a moment.
- In a large mixing bowl, combine the melted butter, brown sugar, and white sugar. Stir until they are thoroughly combined and smooth.
- Add the eggs one at a time to the butter-sugar mixture, stirring well after each addition. Then, stir in the vanilla extract.
- Gradually add the dry ingredients to the wet ingredients, mixing on low speed or by hand until just combined. Be careful not to overmix the dough.
- Fold in the chocolate chips. If you want to, save a few to sprinkle on top before baking for a prettier finish. If you’re using toffee bits, stir them in now or sprinkle them on top before baking.
- Press the cookie dough evenly into your prepared 9x13-inch baking pan. Make sure it's spread from edge to edge.
- Bake for 25-35 minutes, or until the edges are golden brown and the center still looks a little soft or slightly underdone. A perfectly baked bar will have a slightly gooey center when it first comes out of the oven.
- Remove the pan from the oven and place it on a wire rack to cool completely. This is the hardest part, but it’s crucial for the bars to set up properly.
- Once cooled, use the parchment paper overhang to lift the entire cookie slab out of the pan. Place it on a cutting board and slice into squares or rectangles of your desired size.


