
Table of Contents
- What Makes These Bars a Must-Bake Treat
- Simple Ingredients for Amazing Chocolate Chip Cookie Bars
- Your Step-by-Step Guide to Perfect Chocolate Chip Cookie Bars
- Top Tips for Irresistible Chocolate Chip Cookie Bars
- Exciting Variations for Your Chocolate Chip Cookie Bars
- Chocolate Chip Cookie Bars: Your Questions Answered
There’s nothing quite like the smell of warm cookies filling your home. And if you love classic cookies but dread the endless baking sheets, these Chocolate Chip Cookie Bars are your new best friend. You get all the gooey, chocolatey goodness of a perfect cookie, baked in a single pan.
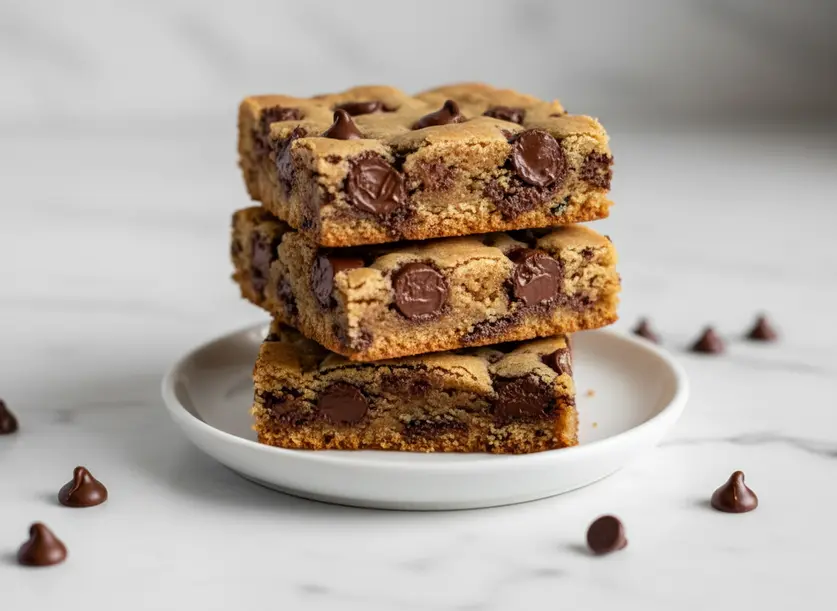
I’ve been making these bars for years, and they’re always a hit. They’re faster than individual cookies and just as satisfying. Imagine a thick, chewy center, loaded with chocolate, and slightly crisp edges. It’s pure dessert magic that comes together with minimal fuss.
What Makes These Bars a Must-Bake Treat
These bars are a game-changer for anyone who loves homemade cookies but doesn’t have endless time. Baking them in one pan means you skip the repetitive scooping and multiple rounds in the oven. This saves you so much time and effort.
The texture is what truly makes them special. You get that coveted soft, chewy doughy center in every single bite. The edges bake up just golden brown, offering a delightful contrast.
They’re also incredibly versatile. You can easily adapt them to whatever you have on hand or what you’re craving. Plus, they’re ideal for sharing – think potlucks, parties, or just a simple weeknight treat. Everyone loves a good chocolate chip cookie, and these bars deliver all that comfort in an easy-to-serve form. Seriously, once you try them, you’ll be hooked.
Simple Ingredients for Amazing Chocolate Chip Cookie Bars

You probably have most of these ingredients in your pantry right now, which makes these bars even easier to whip up. You’ll start with real butter, melted and cooled slightly. If you only have unsalted, just increase your added salt slightly. For a dairy-free option, a good quality plant-based butter alternative can work, though the texture might vary a little.
Next, a mix of brown sugar and white sugar creates that perfect chewy texture and deep flavor. Don’t skimp on the vanilla extract; it really enhances the taste. Large eggs bind everything together and add richness.
For the dry ingredients, you’ll need all-purpose flour. If you’re gluten-free, a 1:1 gluten-free baking blend can often be substituted, but be aware the bars might be a little more delicate. Baking soda provides lift, and kosher salt balances the sweetness. If using table salt, reduce the amount by half.
And of course, plenty of chocolate chips! I love using semi-sweet or a mix of semi-sweet and dark for a richer flavor. Milk chocolate can make them overly sweet, but use what you love. You can even mix in white chocolate chips or mini chocolate chips for extra variety.
Your Step-by-Step Guide to Perfect Chocolate Chip Cookie Bars
Making these bars is incredibly straightforward. Just follow these simple steps for a delicious result every time.
- Preheat your oven to 350°F (175°C). Line a 9×13 inch baking pan with parchment paper or foil, leaving an overhang on the sides. This makes lifting the bars out much easier. You can also spray the pan with cooking spray.
- In a medium bowl, whisk together the all-purpose flour, baking soda, and salt. Set this bowl aside for a moment.
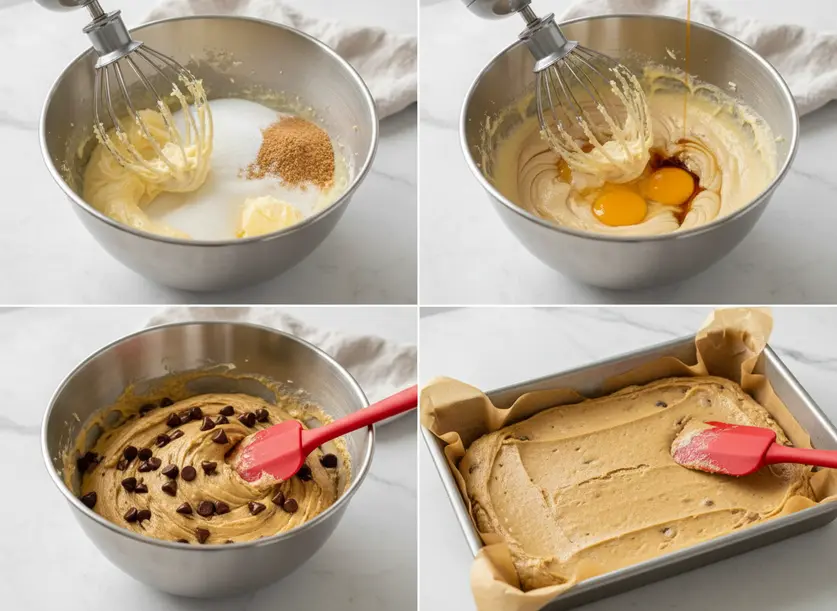
- In a large mixing bowl, combine the melted and slightly cooled butter with both brown sugar and white sugar. Mix thoroughly until creamy and well combined. This can be done by hand or with an electric mixer.
- Add the large eggs, one at a time, mixing well after each addition until fully incorporated. Stir in the vanilla extract. The mixture should look smooth and light.
- Gradually add the dry ingredient mixture to the wet ingredients. Mix on low speed or by hand until just combined. Be careful not to overmix the dough, as this can lead to tough bars.
- Stir in the chocolate chips. You can save a few to sprinkle on top if you like, but I usually just mix them all in. The dough will be thick and sticky.
- Press the dough evenly into your prepared 9×13 inch baking pan. Use your hands or the back of a spatula to ensure it’s spread from edge to edge. If you’re adding any optional toppings, sprinkle them on now.
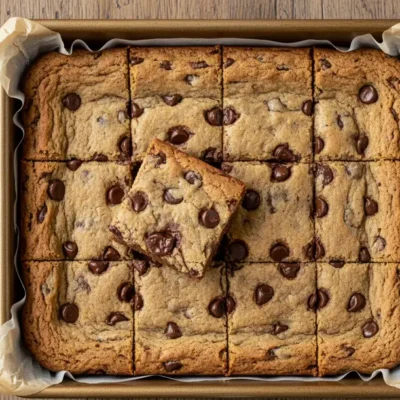
- Bake for 25-35 minutes. Start checking around 25 minutes. The edges should be golden brown, and the center should appear set but still look soft and slightly underdone. A toothpick inserted into the center should come out with moist crumbs, not wet batter.
- This is the hardest part: cool the bars completely in the pan on a wire rack. If you cut into them while warm, they will be very gooey and fall apart. They continue to set as they cool. Once fully cooled to room temperature, lift the bars out using the parchment paper overhang and cut into squares.
Top Tips for Irresistible Chocolate Chip Cookie Bars
Making great cookie bars is easy, but a few tricks will ensure yours are truly outstanding every time.
Don’t Overbake Them:
This is the most crucial tip! Your bars will look soft and even a little gooey in the center when you pull them from the oven. This is exactly what you want. They will continue to cook and set as they cool, leading to that perfect chewy, soft center.
Cool Completely:
I know, it’s torture. But cutting into warm bars will result in a messy, crumbly experience. Let them cool completely, preferably for at least 2-3 hours, or even chill them in the fridge for an hour. This allows them to firm up for clean cuts and a perfect texture.
Line Your Pan:
Using parchment paper or foil with an overhang makes removal incredibly simple. You can just lift the entire slab of bars out of the pan. This prevents sticking and makes cutting much tidier.
Proper Storage:
Store leftover Chocolate Chip Cookie Bars in an airtight container at room temperature for up to 3-4 days. For longer storage, you can store them in the refrigerator for up to a week. They also freeze beautifully for up to 3 months; wrap individual squares tightly in plastic wrap before placing them in a freezer bag.
Exciting Variations for Your Chocolate Chip Cookie Bars
These bars are a fantastic base for all sorts of flavor experiments. Don’t be afraid to get creative and make them your own!
Nutty Boost:
Add 1/2 to 1 cup of chopped nuts like walnuts, pecans, or almonds to the dough along with the chocolate chips. This adds a lovely crunch and earthy flavor that pairs wonderfully with the chocolate.
Candy Mix-ins:
Instead of or in addition to chocolate chips, try stirring in M&M’s, butterscotch chips, or chopped toffee bits. You could even crush up your favorite candy bars, like Snickers or Heath bars, and fold them into the dough for an extra indulgent treat.
Salty-Sweet Swirls:
Before baking, drizzle melted caramel sauce or peanut butter over the top of the pressed dough. Use a knife or skewer to gently swirl it into the top layer. This adds an extra layer of richness and flavor.
Coconut Delight:
Stir in 1/2 cup of shredded coconut for a tropical twist. You could even toast the coconut lightly before adding it for a deeper flavor. This variation brings a delightful chewiness and aroma to the bars.
Chocolate Chip Cookie Bars: Your Questions Answered
Making these bars should be a joyful experience. Here are answers to some common questions that pop up when baking these delicious treats.
Can I use different kinds of chocolate chips?
Absolutely! This recipe is very forgiving with chocolate choices. Feel free to use all semi-sweet, milk chocolate, dark chocolate, white chocolate, or a combination. I often mix semi-sweet and dark for a balanced flavor, but if you prefer a sweeter bar, milk chocolate works well. Mini chocolate chips are great for ensuring chocolate in every tiny bite.
Why are my cookie bars crumbly or dry?
The most common culprit for dry or crumbly bars is overbaking. Keep a close eye on your oven, as baking times can vary. Remove them when the edges are golden and the center still looks soft. Another reason could be too much flour. Make sure you’re measuring your flour correctly, preferably by weighing it or using the spoon-and-level method.
How long do Chocolate Chip Cookie Bars last?
These cookie bars stay fresh and delicious for about 3-4 days when stored in an airtight container at room temperature. If you want them to last longer, you can store them in the refrigerator for up to a week. For the ultimate make-ahead option, freeze them. Wrap individual bars tightly in plastic wrap, then place them in a freezer-safe bag or container for up to 3 months. Thaw at room temperature when ready to enjoy.
Chocolate Chip Cookie Bars
Ingredients
- 1/2 cup unsalted butter melted and cooled slightly; if using unsalted, increase salt slightly
- 3/4 cup packed light brown sugar
- 1/2 cup granulated sugar
- 2 large eggs
- 1 teaspoon vanilla extract
- 1 3/4 cups all-purpose flour for gluten-free, a 1:1 gluten-free baking blend can often be substituted, but the bars might be a little more delicate
- 1/2 teaspoon baking soda
- 1/2 teaspoon kosher salt if using table salt, reduce the amount by half
- 1 1/2 cups semi-sweet chocolate chips or a mix of semi-sweet and dark; milk chocolate can make them overly sweet; can mix in white chocolate chips or mini chocolate chips for extra variety
Instructions
- Preheat your oven to 350°F (175°C). Line a 9x13 inch baking pan with parchment paper or foil, leaving an overhang on the sides. This makes lifting the bars out much easier. You can also spray the pan with cooking spray.
- In a medium bowl, whisk together the all-purpose flour, baking soda, and salt. Set this bowl aside for a moment.
- In a large mixing bowl, combine the melted and slightly cooled butter with both brown sugar and white sugar. Mix thoroughly until creamy and well combined. This can be done by hand or with an electric mixer.
- Add the large eggs, one at a time, mixing well after each addition until fully incorporated. Stir in the vanilla extract. The mixture should look smooth and light.
- Gradually add the dry ingredient mixture to the wet ingredients. Mix on low speed or by hand until just combined. Be careful not to overmix the dough, as this can lead to tough bars.
- Stir in the chocolate chips. You can save a few to sprinkle on top if you like, but I usually just mix them all in. The dough will be thick and sticky.
- Press the dough evenly into your prepared 9x13 inch baking pan. Use your hands or the back of a spatula to ensure it's spread from edge to edge. If you’re adding any optional toppings, sprinkle them on now.
- Bake for 25-35 minutes. Start checking around 25 minutes. The edges should be golden brown, and the center should appear set but still look soft and slightly underdone. A toothpick inserted into the center should come out with moist crumbs, not wet batter.
- This is the hardest part: cool the bars completely in the pan on a wire rack. If you cut into them while warm, they will be very gooey and fall apart. They continue to set as they cool. Once fully cooled to room temperature, lift the bars out using the parchment paper overhang and cut into squares.
Notes
Don't Overbake Them: Your bars will look soft and even a little gooey in the center when you pull them from the oven. This is exactly what you want. They will continue to cook and set as they cool, leading to that perfect chewy, soft center.
Cool Completely: Cutting into warm bars will result in a messy, crumbly experience. Let them cool completely, preferably for at least 2-3 hours, or even chill them in the fridge for an hour. This allows them to firm up for clean cuts and a perfect texture.
Line Your Pan: Using parchment paper or foil with an overhang makes removal incredibly simple. You can just lift the entire slab of bars out of the pan. This prevents sticking and makes cutting much tidier.
Proper Storage: Store leftover Chocolate Chip Cookie Bars in an airtight container at room temperature for up to 3-4 days. For longer storage, you can refrigerate them for up to a week. They also freeze beautifully for up to 3 months; wrap individual squares tightly in plastic wrap before placing them in a freezer bag. Exciting Variations:
Nutty Boost: Add 1/2 to 1 cup of chopped nuts like walnuts, pecans, or almonds to the dough along with the chocolate chips. This adds a lovely crunch and earthy flavor that pairs wonderfully with the chocolate.
Candy Mix-ins: Instead of or in addition to chocolate chips, try stirring in M&M's, butterscotch chips, or chopped toffee bits. You could even crush up your favorite candy bars, like Snickers or Heath bars, and fold them into the dough for an extra indulgent treat.
Salty-Sweet Swirls: Before baking, drizzle melted caramel sauce or peanut butter over the top of the pressed dough. Use a knife or skewer to gently swirl it into the top layer. This adds an extra layer of richness and flavor.
Coconut Delight: Stir in 1/2 cup of shredded coconut for a tropical twist. You could even toast the coconut lightly before adding it for a deeper flavor. This variation brings a delightful chewiness and aroma to the bars. FAQs:
Can I use different kinds of chocolate chips? Yes, feel free to use all semi-sweet, milk chocolate, dark chocolate, white chocolate, or a combination. A mix of semi-sweet and dark is balanced, while milk chocolate makes a sweeter bar. Mini chocolate chips are great for ensuring chocolate in every tiny bite.
Why are my cookie bars crumbly or dry? The most common cause is overbaking. Remove them when edges are golden and the center looks soft. Too much flour can also cause this; measure flour correctly, preferably by weighing or using the spoon-and-level method.
How long do Chocolate Chip Cookie Bars last? They stay fresh for 3-4 days in an airtight container at room temperature. Refrigerate for up to a week, or freeze individual bars tightly wrapped for up to 3 months. Thaw at room temperature.


