
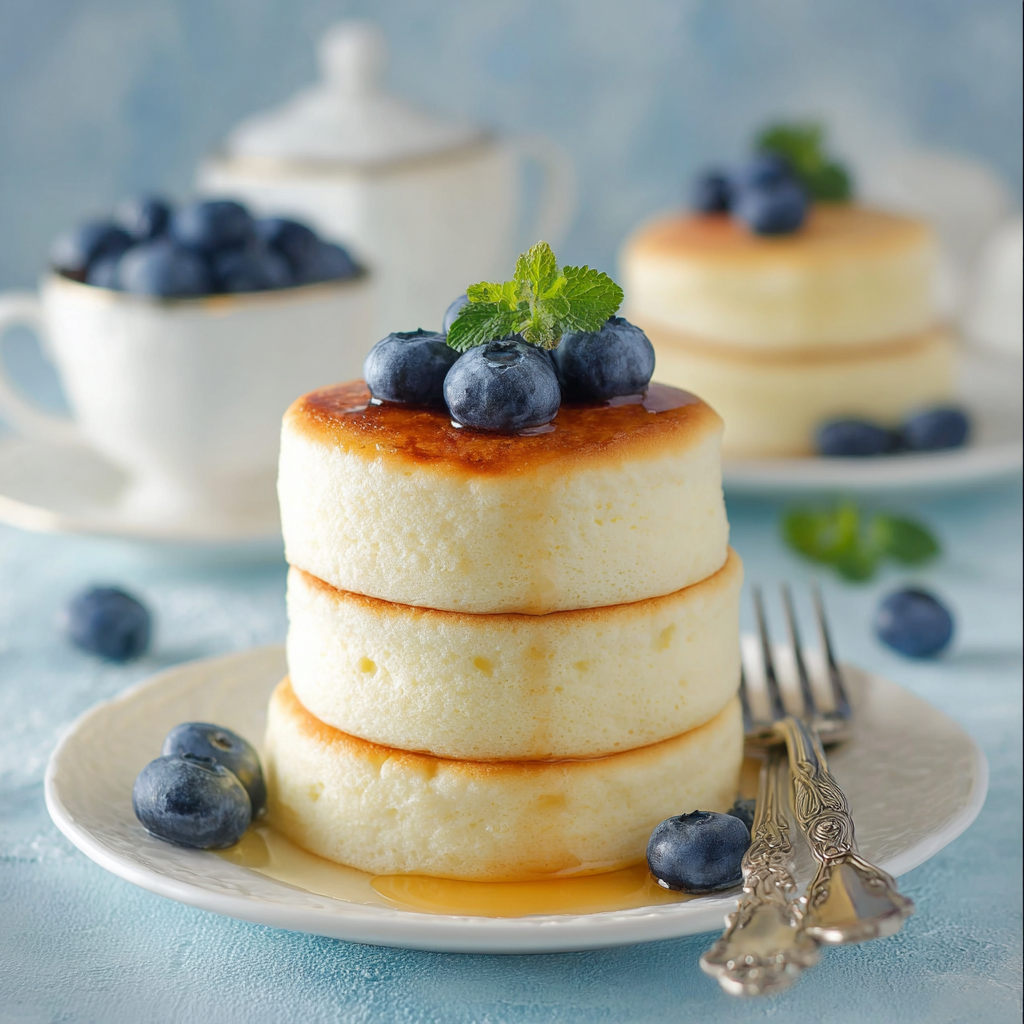
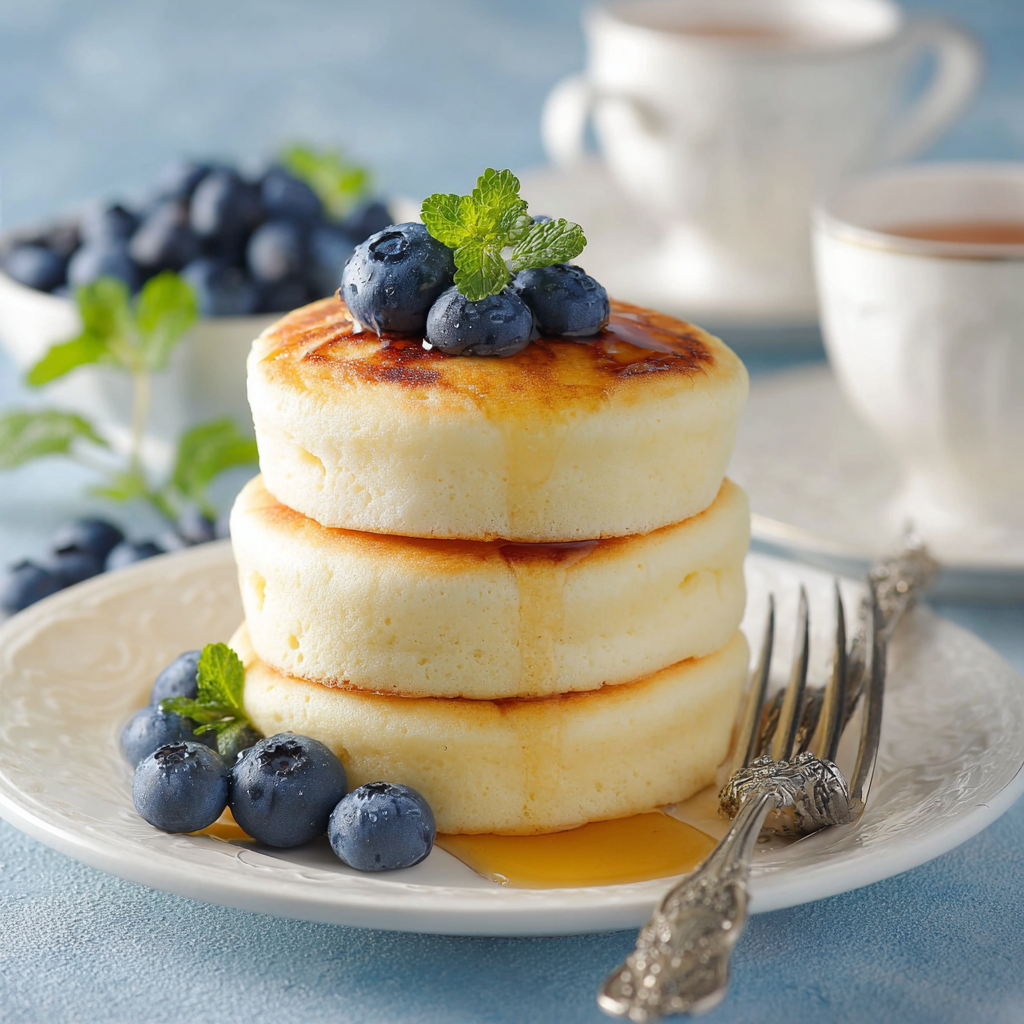
Nothing says a cozy weekend morning quite like a towering stack of perfectly golden, pillowy-soft pancakes. We have all been there: trying to replicate that diner-style fluffiness only to end up with thin, rubbery discs. If you have been searching for the definitive guide to creating the thickest, softest pancakes imaginable, you have arrived at the right place. This recipe isn’t just another breakfast instruction; it is a masterclass in morning comfort. By using simple pantry staples and a few specific techniques, you can transform a handful of ingredients into a cloud-like feast. Whether you are feeding a hungry family or treating yourself to a solo brunch, these pancakes are guaranteed to be the star of the show. Let’s dive into how to master the art of the griddle and achieve that sought-after fluffy texture every single time.
Why You’ll Love This Recipe
You are going to fall in love with this recipe because it strikes the perfect balance between simplicity and gourmet results. First, it uses basic ingredients you likely already have in your kitchen, meaning no last-minute grocery store runs. Second, the texture is unparalleled; these are “tall” pancakes that hold their shape while remaining incredibly light and airy on the inside. Furthermore, the prep time is a mere five minutes, making it feasible even for busy weekday mornings. Lastly, this recipe is incredibly versatile. It serves as a perfect blank canvas for any toppings, from classic maple syrup to fresh berries, chocolate chips, or even a savory twist.
What Is a Fluffy Pancake?
A “Fluffy Pancake” is a classic American breakfast staple characterized by its significant height and aerated, sponge-like interior. Unlike European crepes, which are thin and unleavened, or Swedish pancakes, which are buttery and flat, the American fluffy pancake relies on chemical leaveners like baking powder and baking soda to create air pockets within the batter. When these leaveners react with heat and moisture, they produce carbon dioxide gas, which gets trapped by the gluten structure of the flour. The result is a thick, cake-like disc that is incredibly absorbent—perfect for soaking up butter and syrup. It is the gold standard for a hearty, comforting breakfast.
Ingredients Overview
To achieve the perfect rise, every ingredient in this list plays a critical role in the chemical reaction of the batter.
- All-Purpose Flour: This provides the necessary structure. Using all-purpose ensures the pancakes are sturdy enough to flip but tender enough to melt in your mouth.
- Granulated Sugar: Beyond just sweetness, sugar aids in the “Maillard reaction,” which is responsible for that beautiful golden-brown color on the outside.
- Baking Powder & Baking Soda: This is the “lift” team. We use a generous amount of baking powder for height and a touch of baking soda to neutralize acidity and enhance browning.
- Milk: This provides the moisture needed to hydrate the flour. Whole milk offers the richest flavor, but 2% works beautifully as well.
- Unsalted Butter: Melted butter adds fat, which coats the flour proteins and prevents excess gluten formation, ensuring the pancakes stay tender rather than tough.
- Vanilla Extract & Salt: These are your flavor enhancers. Vanilla adds a warm aroma, while salt balances the sweetness and brings out the richness of the butter.
- Large Egg: The egg acts as a binder and contributes to the structural integrity of those air bubbles as they expand.
Ingredient Substitutions & Tips
If you find yourself missing an ingredient or have dietary preferences, this recipe is quite forgiving. For a dairy-free version, you can easily swap the cow’s milk for almond, soy, or oat milk. In place of butter, a neutral oil like avocado oil or melted coconut oil works well. If you are out of baking soda, you can omit it and add an extra teaspoon of baking powder, though the pancakes may be slightly paler. For a gluten-free option, a 1:1 gluten-free baking flour blend containing xanthan gum usually yields excellent results. Always ensure your leavening agents are fresh; if your baking powder is over six months old, your pancakes might not reach their full height potential.
Step-by-Step Instructions
1. Prepare the Dry Base:
Start by selecting a large mixing bowl. Sift or whisk together your 2 cups of all-purpose flour, 4 tablespoons of sugar, 4 teaspoons of baking powder, 1/4 teaspoon of baking soda, and 1/2 teaspoon of salt. Sifting is highly recommended here as it aerates the flour, contributing to that final fluffy texture and removing any stubborn lumps.
2. Mix the Wet Ingredients:
In the center of your dry mixture, create a “well” (a small hole). Pour in the 1 3/4 cups of milk, 4 tablespoons of melted (but slightly cooled) butter, 2 teaspoons of vanilla extract, and one large egg. By starting in the center, you can gradually incorporate the flour, which prevents the over-development of gluten.
3. The Gentle Whisk:
Using a wire whisk or a large spoon, begin mixing the wet and dry ingredients. The goal here is to mix until just combined. You will notice the batter is quite thick—this is exactly what you want! Small lumps are perfectly fine and will actually disappear during the cooking process. If you whisk until the batter is perfectly smooth, you will likely end up with tough pancakes.
4. The Heat Setup:
Place a non-stick skillet or a heavy-bottomed griddle over medium-low heat. It is crucial to let the pan heat up thoroughly before the first drop of batter hits. Lightly grease the surface with a small pat of butter or a quick spray of non-stick oil.
5. Cooking to Perfection:
Pour exactly 1/4 cup of batter onto the hot surface. Use the back of your measuring cup to gently nudge the batter into a round shape, but do not press down. Wait for bubbles to form on the surface and the edges to look matte and set.
6. The Flip:
Slide a thin spatula underneath and flip in one confident motion. Cook the second side for about 1-2 minutes until golden brown. Repeat with the remaining batter, adjusting the heat if the pancakes are browning too quickly before the center is cooked.
Expert Baking/Cooking Tips
The most common mistake in pancake making is the “over-stir.” Once the flour is moistened, stop mixing! Over-mixing creates gluten, which leads to a chewy, bread-like texture instead of a soft cake texture. Another secret is the “Resting Period.” Let your batter sit for about 5 minutes while your pan heats up. This allows the flour to fully hydrate and the leavening agents to begin creating those tiny air bubbles. Lastly, watch your temperature. If the pan is too hot, the outside burns before the inside rises. A low and slow heat ensures the pancake has time to grow tall and cook through.
The Secret to Extra Height
If you want pancakes that look like they belong in a professional food photograph, the secret lies in the Batter Thickness. Many people are tempted to add more milk if the batter looks “clumpy,” but a thin batter will always spread out on the pan, resulting in a flat pancake. A thick batter stays contained, forcing the expansion to go up rather than out. Additionally, ensure you are using a non-reactive bowl (glass or stainless steel) so the baking soda can do its job without interference. For an even bigger boost, make sure your egg and milk are at room temperature so they don’t seize the melted butter.
Serving Suggestions
Serve these beauties immediately while they are still steaming. The classic preparation involves a generous pat of salted butter and a heavy pour of pure Grade A maple syrup. For a fresh twist, top with a handful of blueberries and a dusting of powdered sugar. If you’re feeling indulgent, try sliced bananas and a drizzle of warmed peanut butter or chocolate hazelnut spread. For a savory-sweet combo, serve them alongside crispy bacon or breakfast sausage links.
Storage & Make-Ahead Tips
These pancakes are excellent for meal prep. Once cooled, store them in an airtight container in the refrigerator for up to 3 days. For longer storage, flash-freeze them on a baking sheet for an hour, then transfer to a freezer bag for up to 2 months. To reheat, avoid the microwave if you want to keep the texture; instead, pop them into a toaster or a 350°F (175°C) oven for a few minutes until heated through and slightly crisp.
FAQs
Q: Why are my pancakes flat?
A: This usually happens for two reasons: either your baking powder is expired, or your batter was too thin. Make sure to measure your flour correctly (spoon and level) and check the date on your leavening agents.
Q: Can I make the batter the night before?
A: It is not recommended. The leavening agents (baking powder and soda) start reacting as soon as they hit the liquid. If the batter sits overnight, it will lose its “lift,” and the pancakes won’t be as fluffy.
Q: How do I know when to flip the pancake?
A: Look for bubbles that pop and stay open on the surface. The edges should also look dry and set rather than wet.
Q: Can I use whole wheat flour?
A: Yes, but the pancakes will be denser. You may need to add an extra tablespoon or two of milk as whole wheat flour absorbs more liquid.
Q: Why is my first pancake always bad?
A: The “first pancake syndrome” usually happens because the pan isn’t evenly heated yet. Give your pan a full 3-5 minutes to preheat on low-medium before starting.
Mastering the fluffy pancake is a milestone for any home cook. With this recipe, you have the blueprint for a breakfast that is consistently delicious and impressively thick. Remember to be patient with the heat and gentle with the whisk. Once you see that first golden-brown stack on your plate, you’ll never go back to boxed mixes again. Enjoy your homemade breakfast feast!
PrintFluffy Pancakes
These Fluffy Pancakes are absolutely perfect if you are looking for a soft and thick pancake recipe. Just a hand-full of staple ingredients and 5-minute prep for a delicious breakfast!
- Prep Time: 5 minutes
- Cook Time: 15 minutes
- Total Time: 20 minutes
- Yield: 12 pancakes
- Cuisine: American
Ingredients
All-purpose Flour – 2 cups
Granulated Sugar – 4 Tbsp
Baking Powder – 4 tsp
Baking Soda – 1/4 tsp
Salt – 1/2 tsp
Milk – 1 3/4 cups
Unsalted Butter – 4 Tbsp (melted)
Pure Vanilla Extract – 2 tsp
Large Egg – 1
Instructions
In a large bowl, whisk together the flour, sugar, baking powder, baking soda, and salt.
Create a well in the center of the dry ingredients and pour in the milk, melted butter, vanilla, and egg.
Whisk until the batter is combined and relatively smooth, but don’t worry about small lumps.
Let the batter rest for 5 minutes for maximum fluffiness while the pan heats.
Heat a non-stick skillet or griddle over medium-low heat and lightly grease with butter.
Pour 1/4 cup of batter per pancake, spreading slightly with the back of the cup.
Cook until bubbles form on the surface and edges look set, then flip and cook until golden brown.
Serve immediately with your favorite toppings.
Notes
• Do not overmix the batter; small lumps help maintain the structure and height.
• Ensure your baking powder is fresh for the best rise.
• For a dairy-free version, substitute milk with almond or oat milk and butter with oil.


