
Nothing signals a relaxing weekend quite like the sweet, buttery aroma of fresh pancakes wafting through the house. We have all been there: reaching for that blue boxed mix because it seems easier, only to end up with flat, rubbery discs that leave us underwhelmed. But what if I told you that the perfect, cloud-like pancake is actually easier to achieve from scratch? By using a few simple pantry staples and mastering a specific technique, you can create pancakes that are significantly taller, softer, and more flavorful than anything you can buy in a store. This recipe is designed to be foolproof, ensuring that even a novice cook can achieve that coveted golden-brown finish and airy interior that makes Sunday brunch feel truly special. Get ready to transform your breakfast routine forever.
Why You’ll Love This Recipe
You are going to fall in love with this recipe because it balances simplicity with gourmet results. First, it relies entirely on ingredients you likely already have in your pantry, eliminating any last-minute grocery store runs. Second, the texture is unparalleled; these pancakes are engineered to be thick and airy, not thin and dense. This recipe also offers incredible versatility—whether you want to add blueberries, chocolate chips, or a hint of lemon zest, the base batter handles additions beautifully. Most importantly, it is a “forgiving” recipe. Even if your measurements aren’t down to the micro-gram, the chemical reactions between the baking powder and the milk ensure a beautiful rise every single time you cook.
What Is a Fluffy Pancake?
At its core, a pancake is a flat cake, often thin and round, prepared from a starch-based batter. However, the “Fluffy Pancake” is a specific American iteration that prioritizes height and a soft, cake-like crumb. Unlike the French crêpe or the Swedish pancake, which are thin and delicate, the fluffy pancake uses leavening agents—specifically baking powder—to create carbon dioxide bubbles within the batter. This results in a thick, spongy texture that is perfect for soaking up maple syrup and butter. Historically, pancakes have existed for centuries across various cultures, but the modern “fluffy” version became a staple of American diners in the early 20th century, celebrated for its comforting and filling nature.
Ingredients Overview
To achieve pancake perfection, every ingredient plays a critical role in the structural integrity and flavor profile of the final product.
- All-Purpose Flour: This provides the necessary gluten structure. Sifting it is essential to remove clumps and ensure a light, airy batter.
- Baking Powder: This is the engine of your fluffiness. It reacts with heat and moisture to create the lift. Ensure it is fresh for the best results.
- White Sugar: Beyond adding sweetness, sugar helps with the “Maillard reaction,” which gives the pancakes that beautiful golden-brown exterior.
- Salt: A pinch of salt is vital; it enhances the flavor of the butter and vanilla, preventing the pancakes from tasting flat.
- Milk: This provides the moisture. You can use whole milk for a richer flavor or 2% for a lighter version.
- Egg: The egg acts as a binder, holding the structure together while adding richness.
- Unsalted Butter: Melting the butter into the batter adds that classic “diner” flavor and creates a tender crumb.
- Vanilla Extract: A splash of pure vanilla elevates the batter from “good” to “extraordinary” by adding aromatic depth.
Ingredient Substitutions & Tips
If you find yourself missing an ingredient, don’t worry. For a dairy-free version, substitute the milk with almond or oat milk and use melted coconut oil instead of butter. If you want a “Buttermilk” style pancake but don’t have buttermilk, simply add a teaspoon of lemon juice or white vinegar to your regular milk and let it sit for five minutes before mixing. For those seeking a gluten-free option, a high-quality 1:1 gluten-free baking flour works well, though you may need to add an extra tablespoon of milk as GF flours tend to be more absorbent. Always ensure your egg and milk are at room temperature to prevent the melted butter from re-solidifying when mixed.
Step-by-Step Instructions
1. Whisk the Dry Ingredients: Start by sifting your cup of flour into a large bowl. Add the baking powder, sugar, and salt. Use a whisk to combine them thoroughly. This ensures the leavening agent is evenly distributed, which prevents uneven rising.
2. Prepare the Wet Mix: In a separate smaller bowl, whisk together the beaten egg, milk, and vanilla extract. Melt your butter and let it cool slightly. Slowly stream the butter into the milk mixture while whisking constantly. If the butter is too hot, it might scramble the eggs, so patience is key here.
3. The Incorporation: Create a well in the center of your dry ingredients. Pour the wet mixture into the well. Using a spatula, gently fold the ingredients together. This is the most critical step: stop mixing as soon as the flour streaks disappear. The batter should be thick and have visible lumps. Over-mixing develops too much gluten, which leads to tough, chewy pancakes.
4. The Essential Rest: Let the batter sit on your counter for 10 to 15 minutes. You will see small bubbles starting to form on the surface. This “rest” allows the flour to fully hydrate and the baking powder to begin its magic.
5. Cooking to Perfection: Heat a nonstick skillet or griddle over medium-low heat. Lightly coat the surface with a neutral oil like canola. Use a 1/4 cup measure to pour the batter. Do not crowd the pan.
6. The Flip: Wait until the surface of the pancake is covered in bubbles and the edges look set and matte. Gently slide a spatula underneath and flip in one fluid motion. Cook for another minute or until golden.
Expert Baking Tips
The biggest secret to fluffy pancakes is temperature control. If your pan is too hot, the outside will burn before the middle is cooked. If it’s too cool, the pancake won’t get that initial “jump” of steam that helps it rise. Another tip: never press down on the pancake with your spatula after flipping. This deflates the air pockets you worked so hard to create. Finally, use a heavy-bottomed pan. This ensures even heat distribution, which prevents “hot spots” that cause uneven browning. If you are making a large batch, keep the finished pancakes in a 200°F oven on a wire rack to keep them crisp and warm.
The Science of Fluffiness
What actually makes a pancake fluffy? It is a combination of chemical leavening and gluten management. When the baking powder (a base and an acid) meets the liquid in the batter, it releases carbon dioxide gas. During the “rest” period, these gas bubbles expand. When the batter hits the hot pan, the heat causes those bubbles to expand even further and sets the flour proteins around them, trapping the air inside. If you over-mix the batter, you create a strong web of gluten that is too tough for the bubbles to expand against, resulting in a flat, heavy pancake. This is why “lumpy” batter is actually a sign of success.
Serving Suggestions
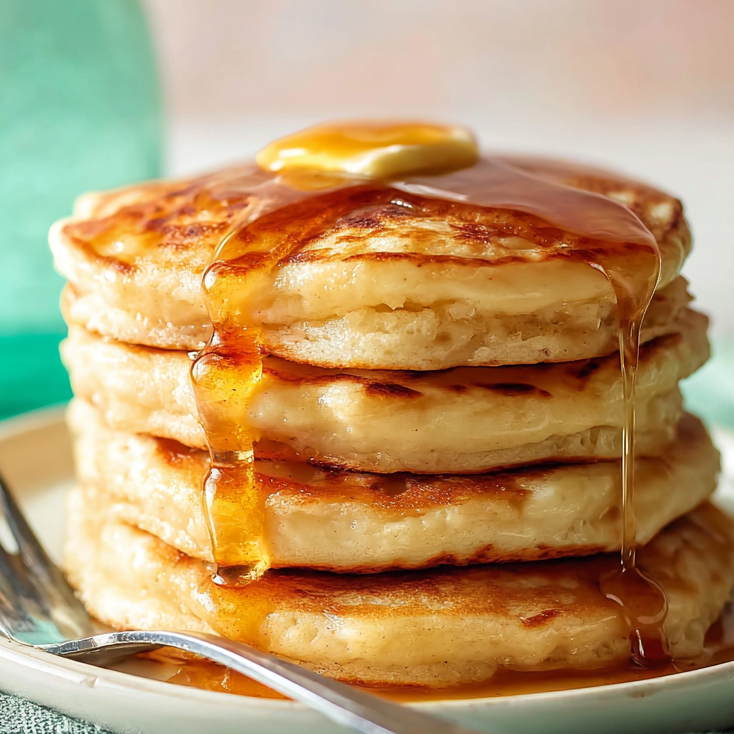
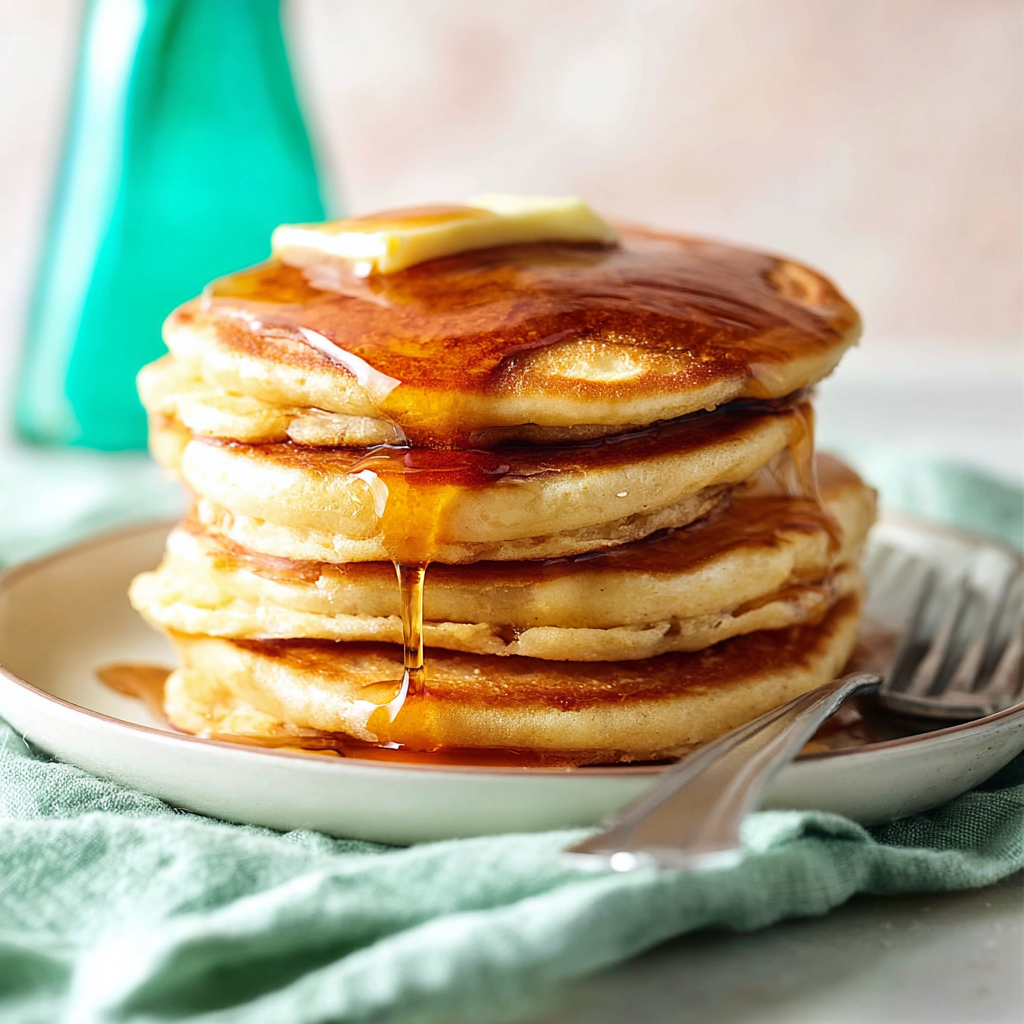
For the classic experience, stack three pancakes high, top with a generous knob of salted butter, and pour over warm, Grade A maple syrup. If you want to get creative, try a “berry compote” by simmering frozen blueberries with a little sugar and lemon juice. For a protein boost, a dollop of Greek yogurt and a sprinkle of toasted pecans adds a wonderful textural contrast. Kids often love “pancake tacos”—simply fold a pancake around sliced bananas and a drizzle of peanut butter for a fun, hand-held breakfast.
Storage & Make-Ahead Tips
Leftover pancakes store surprisingly well. Allow them to cool completely on a wire rack to prevent sogginess, then stack them with parchment paper in between and place them in a freezer-safe bag. They will stay fresh in the freezer for up to two months. To reheat, skip the microwave, which can make them rubbery. Instead, pop them into a toaster or a 350°F oven for a few minutes until they are heated through and the edges are slightly crisp again.
FAQs
Q: Why are my pancakes flat?
A: Usually, this is due to expired baking powder or over-mixing the batter. Ensure your leavening agent is fresh and that you stop mixing while the batter is still lumpy.
Q: Can I use oil instead of butter in the batter?
A: Yes, you can. While butter adds a superior flavor, a neutral oil like canola or vegetable oil will still provide the necessary fat for a tender crumb.
Q: How do I know when to flip the pancake?
A: Look for bubbles. When the bubbles on the surface pop and stay open, and the edges look dry and “set,” it is time to flip.
Q: Can I make the batter the night before?
A: It is not recommended. The baking powder begins reacting as soon as it hits the liquid. If left overnight, the batter will lose its “lift,” and the pancakes will be much denser.
Q: My pancakes are raw in the middle! What happened?
A: Your heat is likely too high. The exterior is browning faster than the heat can penetrate the center. Lower the heat and cook them more slowly.
Making the perfect fluffy pancake is a culinary skill that brings joy to any kitchen. By following these steps especially sifting your flour and allowing the batter to rest—you are guaranteed a breakfast that looks and tastes like it came from a high-end bistro. Remember, cooking is as much about the process as the result, so take your time, watch for those bubbles, and enjoy the delicious rewards of your labor!
PrintFluffy Pancakes rECIPE

These thick and fluffy homemade pancakes are the gold standard of breakfast. Using simple pantry staples and a few expert techniques, you can achieve diner-quality results in your own kitchen. The key lies in the 10-minute rest time and not over-mixing the batter.
- Prep Time: 15 minutes
- Cook Time: 15 minutes
- Total Time: 30 minutes
- Yield: 8-10 pancakes
- Cuisine: American
Ingredients
All-purpose flour, sifted – 1 cup
Baking powder – 2 tsp
Salt – 1 pinch
White sugar – 2 tbsp
Milk (room temperature) – ¾ cup
Large egg, beaten – 1
Unsalted butter, melted and cooled – 2 tbsp
Pure vanilla extract – 1 tsp
Canola oil (for cooking) – 1 tbsp
Instructions
1. In a large mixing bowl, whisk together the sifted flour, baking powder, salt, and sugar until well combined.
2. In a separate medium bowl, whisk the egg, milk, and vanilla extract. Slowly pour in the melted butter while whisking (ensure butter is not hot to avoid curdling the egg).
3. Create a well in the center of the dry ingredients and pour in the wet mixture.
4. Gently fold the ingredients together using a spatula or whisk until mostly incorporated. Stop when the batter is thick and slightly lumpy; do not over-mix.
5. Let the batter rest at room temperature for 10–20 minutes to allow the leavening agents to activate.
6. Heat a heavy-bottomed nonstick skillet over medium-low heat and lightly coat with oil.
7. Use a 1/4 cup measure to pour batter into the pan. Cook until the surface is covered in bubbles and the edges appear dry.
8. Carefully flip the pancake and cook for another 1–2 minutes until golden brown on both sides. Serve immediately.
Notes
• Avoid over-mixing the batter; lumps are your friend for a fluffy texture.
• Ensure your baking powder is fresh (less than 6 months old) for maximum lift.
• Resting the batter allows the gluten to relax and the starch to hydrate.
• Use a medium-low heat to ensure the center cooks through without burning the exterior.
• Flip only once; flipping multiple times results in a tougher pancake.


