
There is something truly magical about the smell of a fresh batch of fudgy homemade brownies wafting through the house. It’s a scent that promises comfort, indulgence, and that perfect hit of chocolate we all crave. For years, I was a die-hard fan of the boxed brownie mix—it was reliable, easy, and let’s be honest, hard to beat. Or so I thought.
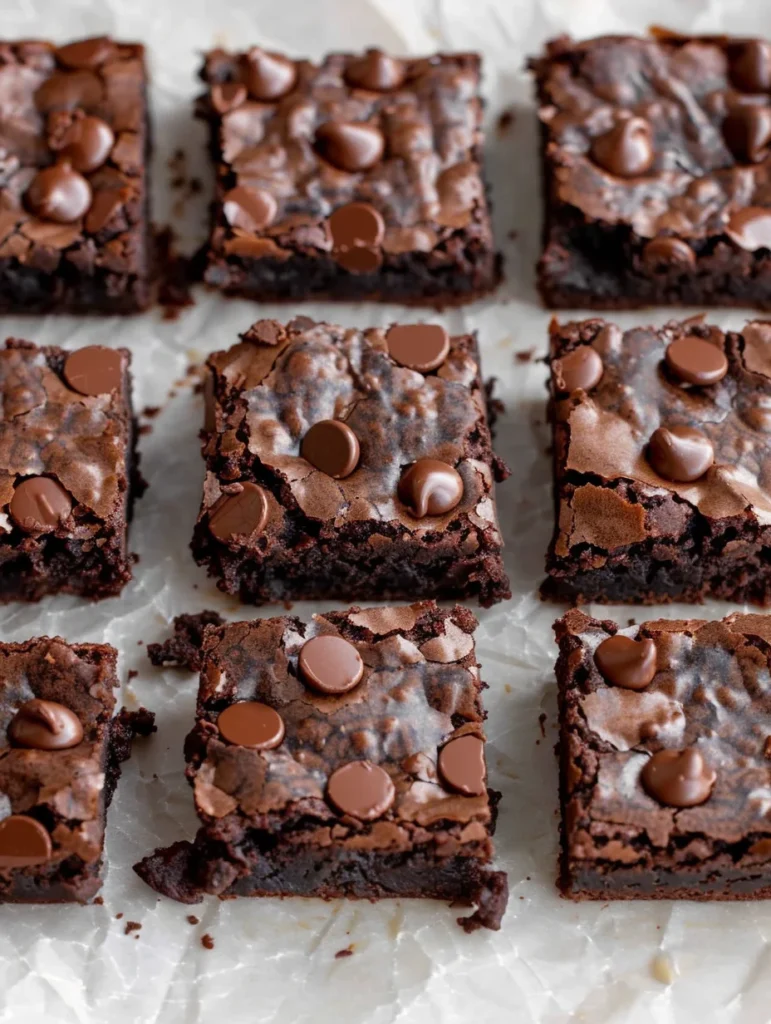
After months of testing ratios, tweaking oven temperatures, and experimenting with different fats, I finally perfected this recipe. It has everything you want in a brownie: that signature shiny, paper-thin crackly top, chewy “corner” edges, and a center so fudgy it almost melts on your tongue.
Whether you’re making these for a rainy Sunday afternoon or a celebratory potluck, this recipe is destined to become your new “secret weapon” dessert.
Why You’ll Love This Recipe
- The Texture: We’re talking ultimate fudginess here. No cakey, bread-like brownies allowed.
- One-Bowl Friendly: While we use a medium and a large bowl, the cleanup is minimal and the process is straightforward.
- Pantry Staples: You likely have every single one of these ingredients in your kitchen right now.
- Customizable: From the type of oil you use to the amount of sugar, this recipe is incredibly forgiving.
- Better than Boxed: No artificial aftertaste—just pure, deep chocolate bliss.
Ingredient Notes for Success
To get that perfect fudgy brownie texture, the quality and choice of ingredients matter more than you might think.
- Granulated & Powdered Sugar: We use a combination of both. The granulated sugar helps create those crisp edges, while the powdered sugar (which contains a touch of cornstarch) contributes to the tender, fudgy melt-in-your-mouth interior.
- Cocoa Powder: Use a high-quality unsweetened cocoa powder. If your cocoa is lumpy, definitely sift it! It makes a huge difference in the smoothness of the batter.
- Dark Chocolate Chips: These are the “secret” to extra fudginess. As they melt in the oven, they create little pockets of intense chocolate.
- The Oil (Canola vs. Olive Oil): This is where you can get creative. I personally love using a high-quality extra-virgin olive oil. It brings out the fruity notes of the chocolate and creates a sophisticated flavor profile. However, if you want a classic, neutral brownie, stick with canola or vegetable oil.
- Sea Salt: Please don’t skip the salt! It balances the sugar and makes the chocolate flavor “pop.”
Step-by-Step Instructions
- Prep the Pan: Preheat your oven to 325°F. The lower temperature is key to preventing the edges from overcooking before the center sets. Line an 8×8 pan with parchment paper, leaving a little overhang on the sides. This acts as a “sling” to lift the brownies out later.
- Whisk Dry Ingredients: In a medium bowl, combine your sugar, flour, cocoa powder, powdered sugar, chocolate chips, and salt. Make sure there are no large lumps.
- Mix Wet Ingredients: In a larger bowl, whisk the eggs, your choice of oil, water, and vanilla extract. You want the eggs to be well-incorporated and the mixture to look glossy.
- Combine: Gently sprinkle the dry ingredients over the wet. Using a flexible spatula, fold the mixture together. The batter will be very thick and dark—this is exactly what you want! Stop stirring as soon as the last streak of flour disappears.
- Bake: Spread the batter into your prepared pan. Smooth the top with a spatula. Bake for 40–48 minutes.
- The Toothpick Test: This is crucial. When you insert a toothpick, it should not come out clean. You want a few moist crumbs attached. If it’s clean, they’re overbaked. If it’s liquid, they need more time.
Expert Tips for Best Results
- Don’t Overmix: Once you add the dry ingredients to the wet, be gentle. Overmixing develops gluten, which leads to a tough, cakey brownie rather than a fudgy one.
- The “Sift” Secret: If you want that perfectly smooth, professional look, take the extra 30 seconds to sift your cocoa powder and powdered sugar.
- Bang the Pan: Halfway through baking, gently lift the pan and drop it onto the oven rack. This releases air bubbles and helps create that dense, fudgy texture.
- The Waiting Game: I know it’s hard, but you must let these brownies cool completely (about 2 hours) before slicing. If you cut them while warm, they will fall apart and look messy. For the cleanest, “bakery-style” squares, chill them in the fridge for an hour before cutting with a sharp knife.
Variations and Substitutions
- The Nutty Version: Add 1/2 cup of toasted chopped walnuts or pecans for a classic crunch.
- Salted Caramel: Drizzle a little caramel sauce over the batter before baking and swirl it in with a knife.
- Gluten-Free: You can swap the all-purpose flour for a 1:1 gluten-free flour blend with great results.
- Mocha Brownies: Add a teaspoon of espresso powder to the dry ingredients to intensify the chocolate flavor.
Storage and Freezing
Room Temperature: Store your brownies in an airtight container for up to 3 days. They actually taste even better on day two as the flavors have time to meld!
In the Fridge: If you like a very firm, chewy brownie, store them in the refrigerator for up to a week.
Freezing: These brownies freeze beautifully. Wrap individual squares in plastic wrap and place them in a freezer-safe bag. They will stay fresh for up to 3 months. Just thaw at room temperature for an hour before enjoying.
FAQ
Can I use a 9×9 pan instead of an 8×8?
I don’t recommend it for this specific recipe. A 9×9 pan has more surface area, which will make the brownies much thinner and prone to overcooking. If you must use a 9×9, reduce the baking time significantly (start checking at 30 minutes).
Why didn’t my brownies get the crackly top?
The crackly top comes from the sugar dissolving into the eggs. Make sure you whisk your wet ingredients well and don’t reduce the sugar too much, as the sugar-to-fat ratio is what creates that “meringue-like” crust.
My brownies are too oily. What happened?
This usually happens if the ingredients weren’t fully incorporated or if the oven temperature was too low. Ensure your eggs are at room temperature to help them emulsify with the oil more effectively.
Making fudgy homemade brownies from scratch is one of the most rewarding things you can do in the kitchen. There’s no complex technique required—just good ingredients and a little bit of patience while they cool. Once you try this version with its deep cocoa flavor and perfect texture, you’ll never go back to the box!
Happy baking!
PrintFudgy Homemade Brownies
These are the ultimate fudgy homemade brownies. Featuring a shiny, crackly top, chewy edges, and a dense, chocolatey center, they are far better than any box mix. Simple to make and incredibly decadent.
Ingredients
1 1/2 cups granulated sugar (see notes for reduction)
3/4 cup all-purpose flour
2/3 cup cocoa powder, sifted if lumpy
1/2 cup powdered sugar, sifted if lumpy
1/2 cup dark chocolate chips
3/4 teaspoons sea salt
2 large eggs
1/2 cup canola oil or extra-virgin olive oil
2 tablespoons water
1/2 teaspoon vanilla extract
Instructions
1. Preheat the oven to 325°F. Lightly spray an 8×8 baking dish with cooking spray and line it with parchment paper, leaving an overhang for easy removal. Spray the parchment paper.
2. In a medium bowl, combine the granulated sugar, flour, cocoa powder, powdered sugar, chocolate chips, and sea salt. Whisk until well blended.
3. In a large bowl, whisk together the eggs, oil, water, and vanilla until smooth.
4. Sprinkle the dry mix over the wet mix and stir using a spatula until just combined. Do not overmix.
5. Pour the batter into the prepared pan (the batter will be thick) and smooth the top. Bake for 40 to 48 minutes, or until a toothpick comes out with only a few moist crumbs.
6. Cool completely in the pan for at least 2 hours before slicing to allow the structure to set.
Notes
Sugar Reduction: You can reduce the granulated sugar to 1 cup for a less sweet, deeper chocolate flavor.
Oil Choice: Olive oil adds a beautiful floral note that pairs perfectly with chocolate, but canola oil provides a neutral flavor.
Cooling is Key: These brownies are very fudgy; if you cut them warm, they will be messy. For the cleanest slices, refrigerate before cutting.


