
“Me want cookie!” We all know the famous line, and let’s be honest, who can’t relate? Especially when the cookie in question is a giant, super-chewy, vibrantly blue masterpiece loaded with not one, but two kinds of classic cookies.
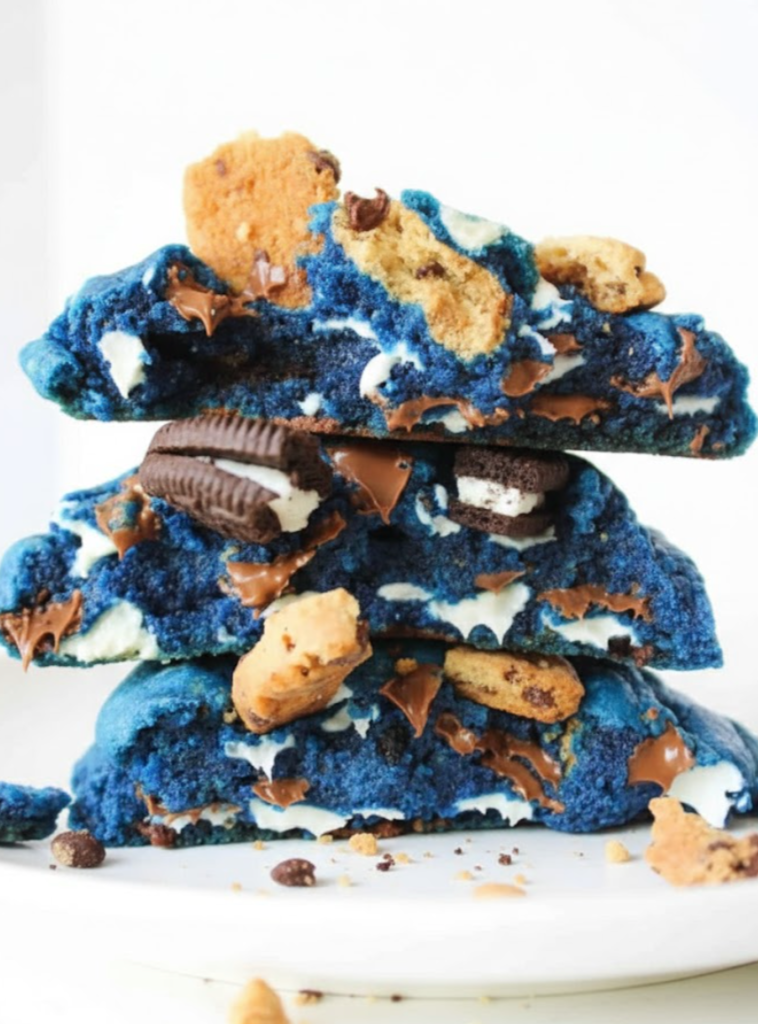
These Giant Cookie Monster Cookies are pure, unadulterated joy in edible form. They have those perfectly crisp, golden-brown edges that give way to a ridiculously soft, gooey, and dense center. Every single bite is an adventure, packed with pools of melted chocolate, crunchy Oreo pieces, and familiar crumbles of Chips Ahoy.
This isn’t just a cookie; it’s an experience. It’s the ultimate comfort-food treat that will delight kids and bring out the inner child in every adult at the party.
Why This Recipe Will Be Your New Favorite
Hi, I’m Sofie, and I’m obsessed with perfecting cookie recipes. This one was a personal mission. I tested this recipe more than nine times to get everything just right—the perfect shade of blue that doesn’t fade, the ultimate chewy texture that lasts for days, and the ideal ratio of mix-ins. I’m so excited to share my foolproof method with you!
Here’s why you’ll fall in love with this recipe:
- Perfectly Thick & Chewy: Thanks to a few key techniques (like using cold butter and corn starch), these cookies bake up incredibly thick and stay soft and chewy for days. No flat, sad cookies here!
- Loaded with Goodies: We’re not skimping on the fillings. A delicious combination of semi-sweet and white chocolate chips, plus generous chunks of Oreos and Mini Chips Ahoy, makes every bite a flavor explosion.
- That Iconic Blue Color: I’ve figured out the secret to getting that signature Cookie Monster blue that’s bright and beautiful, even after baking.
- Impressively Giant: These are bakery-style giant cookies! They make a fantastic dessert for family gatherings and are guaranteed to get a “wow” from everyone who sees them.
Key Ingredients for Monster-Sized Flavor
While the full list is in the recipe card below, let’s talk about the key players that make these cookies truly special. The magic is in the details!
For the Perfect Cookie Base
- Cold Salted Butter: This is non-negotiable for thick cookies! Using butter cold and cubed, straight from the fridge, prevents it from melting too quickly in the oven. This helps the cookies hold their tall, mounded shape instead of spreading into thin discs.
- Brown & Granulated Sugar: The combination is crucial. Granulated sugar provides structure and crisp edges, while brown sugar adds moisture, chewiness, and that classic caramel-like depth of flavor.
- Corn Starch: This is my secret weapon for the softest, most tender cookie centers. It inhibits gluten formation just enough to create a melt-in-your-mouth texture.
- Egg + Egg Yolk: Using one whole egg plus an extra yolk adds richness and fat, which contributes to a chewier, more flavorful cookie.
For the “Cookie Monster” Effect
- Royal Blue Gel Food Coloring: This is the only way to get that vibrant, deep blue color. Liquid food coloring is water-based, less concentrated, and will fade significantly during baking, leaving you with a pale, sad-looking cookie. Gel coloring is heat-stable and powerful.
- Oreo & Mini Chips Ahoy Cookies: The stars of the show! Roughly chopping them creates pockets of crunchy, chocolatey goodness throughout the dough.
- Chocolate & White Chocolate Chips: Using two types of chocolate chips adds visual appeal and a more complex flavor profile that complements the other mix-ins perfectly.
If you’re a fan of cookies packed with delicious fillings, you absolutely must try my famous Stuffed Red Velvet Cookies next!
How to Make Giant Cookie Monster Cookies (Step-by-Step)
This recipe comes together surprisingly quickly. The key is to follow the steps precisely for the best results.
Step 1: Prep & Combine Dry Ingredients
First things first, preheat your oven to 400°F (200°C) and line a large baking sheet with parchment paper. This prevents sticking and makes for easy cleanup.
In a medium bowl, whisk together your dry ingredients: all-purpose flour, corn starch, baking soda, and salt. Whisking them now ensures everything is evenly distributed, which is key for a uniform cookie texture.
Step 2: Cream the Butter and Sugars
In the bowl of a stand mixer fitted with the paddle attachment, add your cold, cubed butter. Mix it on medium-high speed for about a minute. It will break down and start to soften. Scrape down the sides of the bowl and mix for another 30 seconds.
Now, add the granulated sugar and brown sugar. Mix on medium speed until the mixture is light, fluffy, and well-combined. This step incorporates tiny air pockets that help the cookies rise.
Step 3: Add Wet Ingredients & Flour
Add the egg, extra egg yolk, and vanilla extract to the bowl. Mix on low speed until just combined. It’s crucial not to overmix here; overmixing can lead to tough cookies.
With the mixer on its lowest speed, gradually add your dry ingredient mixture in a few increments. Mix until the flour is just incorporated and no dry streaks remain.
Step 4: Get That Perfect Blue Color
Now for the fun part! Add two full teaspoons of the royal blue gel food coloring. Mix on low until the color is uniform and vibrant.
My Pro Tip: The gel coloring can make the dough a bit sticky. If you notice the dough sticking to the sides of the bowl, just add 2-3 extra tablespoons of all-purpose flour, one at a time, until the dough pulls away from the sides cleanly. This was a key discovery during my 9+ test batches!
Step 5: Load It Up with Mix-Ins!
Turn off the mixer. It’s time to fold in your goodies by hand using a spatula. Add the chocolate chips and white chocolate chips first, then gently fold in the chopped Oreos and Mini Chips Ahoy. I like to reserve a few cookie chunks and chocolate chips to press onto the tops before baking for that picture-perfect look.
For another over-the-top cookie experience, check out my decadent Peanut Butter Nutella Cookie Recipe.
Step 6: Roll & Bake
Using a kitchen scale for precision, portion the dough into 160-gram balls. This will give you 6 truly giant cookies. If you don’t have a scale, aim for a ball slightly larger than a tennis ball.
Place the dough balls on your prepared baking sheet, leaving plenty of space between them as they will spread a little.
Bake on the middle rack for 10-12 minutes. The edges should look set and lightly golden, but the centers will appear slightly soft and underdone. This is the secret to a gooey middle!
Step 7: The Most Important Step – Let Them Set!
Once you remove the cookies from the oven, do not move them immediately. Let them rest on the hot baking sheet for 10-15 minutes. This process, called carry-over cooking, allows the centers to finish setting up perfectly without over-baking in the oven. After they’ve set, transfer them to a wire rack to cool completely.
Sofie’s Pro Tips for Cookie Perfection
After making these cookies more times than I can count, I’ve gathered a few tips that guarantee success.
- Measure Flour Correctly: Don’t scoop flour directly from the bag with your measuring cup! This compacts the flour, and you’ll end up with too much, leading to dry, cakey cookies. Instead, fluff the flour with a spoon, spoon it into your measuring cup, and level it off with a knife.
- Don’t Overmix: I’ve said it before, but it’s the most common cookie mistake. Overmixing after adding the flour develops too much gluten, resulting in tough, dense cookies instead of soft, chewy ones.
- Press Chips In Upside Down: If you add extra chocolate chips to the tops of your cookie dough balls before baking, press them in with the pointy side down. This prevents the tips from burning and browning in the hot oven.
- Trust the Process: The cookies will look puffy and underbaked in the center when you pull them out. Have faith! Leaving them on the hot pan is the magic step that creates that irresistible gooey-on-the-inside, chewy-on-the-outside texture.
If you love this bakery-style approach, you’ll also adore my Pistachio NYC Cookies Recipe and my White Chocolate Stuffed Cookies.
Frequently Asked Questions
Why did my cookies spread too much?
The most likely culprit is butter that was too soft or melted. Using cold, cubed butter is essential. Another reason could be mis-measured flour. Ensure you’re spooning and leveling your flour, not scooping.
Can I make these cookies smaller?
Absolutely! You can make 12 medium-sized cookies instead of 6 giant ones. Just reduce the baking time to 8-10 minutes and watch them closely.
How do I store Cookie Monster Cookies?
Store the completely cooled cookies in an airtight container at room temperature. They will stay soft and chewy for up to 5 days. For an extra boost of softness, place a slice of sandwich bread in the container with them!
Can I make the dough ahead of time?
Yes! You can prepare the dough, roll it into balls, and chill it in the refrigerator for up to 72 hours. Chilling the dough will result in an even thicker cookie with a more developed flavor. You may need to add 1-2 minutes to the bake time when baking from cold. You can also freeze the dough balls for up to 3 months.
I know you’re going to have so much fun making—and eating—these incredible Giant Cookie Monster Cookies. They are a true showstopper and a guaranteed crowd-pleaser. If you love this recipe, you might also like my Creme Egg Stuffed Cookies for another fun treat!
PrintGiant Cookie Monster Cookies
These Giant Cookie Monster Cookies are bakery-style blue cookies loaded with Oreo chunks, Mini Chips Ahoy, white and semi-sweet chocolate chips. Tested over 9 times, this foolproof recipe guarantees thick, chewy, and vibrant cookies that stay soft for days!
- Prep Time: 15 minutes
- Cook Time: 12 minutes
- Total Time: 27 minutes
- Yield: 6 giant cookies (160g each)
- Category: Dessert, Cookies, Bakery-Style
- Method: Baked
- Cuisine: American
Ingredients
3/4 cup (170g) cold salted butter, cubed
3/4 cup (150g) brown sugar
1/2 cup (100g) granulated sugar
1 large egg
1 egg yolk
2 teaspoons vanilla extract
2 1/4 cups (280g) all-purpose flour
2 teaspoons cornstarch
1 teaspoon baking soda
1/2 teaspoon salt
2 teaspoons royal blue gel food coloring
3/4 cup (130g) semi-sweet chocolate chips
3/4 cup (130g) white chocolate chips
5 Oreo cookies, roughly chopped
1/2 cup Mini Chips Ahoy cookies, chopped
(optional) extra chips and cookie pieces for topping
Instructions
1. Preheat oven to 400°F (200°C). Line a large baking sheet with parchment paper.
2. In a medium bowl, whisk together flour, cornstarch, baking soda, and salt. Set aside.
3. In a stand mixer fitted with the paddle attachment, beat the cold, cubed butter for 1 minute until it begins to soften.
4. Add both sugars and beat until the mixture is light and fluffy.
5. Add the egg, egg yolk, and vanilla extract. Mix on low speed until just combined.
6. Gradually add the dry ingredients, mixing on low until just incorporated—do not overmix.
7. Add the royal blue gel food coloring and mix on low speed until the color is evenly distributed.
8. Fold in the chocolate chips, white chocolate chips, chopped Oreos, and Mini Chips Ahoy by hand with a spatula.
9. Portion the dough into 160g (giant) balls—about the size of a tennis ball—and place them on the prepared baking sheet.
10. Press extra cookie chunks and chocolate chips on top for decoration.
11. Bake for 10–12 minutes until the edges are just set but the centers look slightly underdone.
12. Cool the cookies on the baking sheet for 10–15 minutes before transferring to a wire rack to finish setting.
Notes
Storage:
• Store completely cooled cookies in an airtight container for up to 5 days.
• Add a slice of sandwich bread to the container to keep cookies soft.
Freezing:
• Dough balls may be frozen for up to 3 months.
• Bake straight from frozen, adding 1–2 minutes to baking time.
Tips:
• Always use cold, cubed butter for the perfect thick cookie.
• Use high-quality gel food coloring (e.g., Americolor Royal Blue) for vibrant results.
• Measure flour correctly using the spoon-and-level method.
• Press chocolate chips and cookie pieces into the tops of dough balls for a bakery-style finish.
• Trust the process—cookies continue to bake on the hot sheet after removal from the oven.


