
Hello, fellow cookie lovers! Sophie here from SweetCraft Recipes, and today I’m absolutely thrilled to share a recipe that holds a very special place in my heart (and my taste buds!). If you’re anything like me, you adore a good chocolate cookie, but what if we could elevate that classic comfort food to a whole new level of gooey, chocolatey bliss? Enter my Chocolate Marshmallow Swirl Cookies.
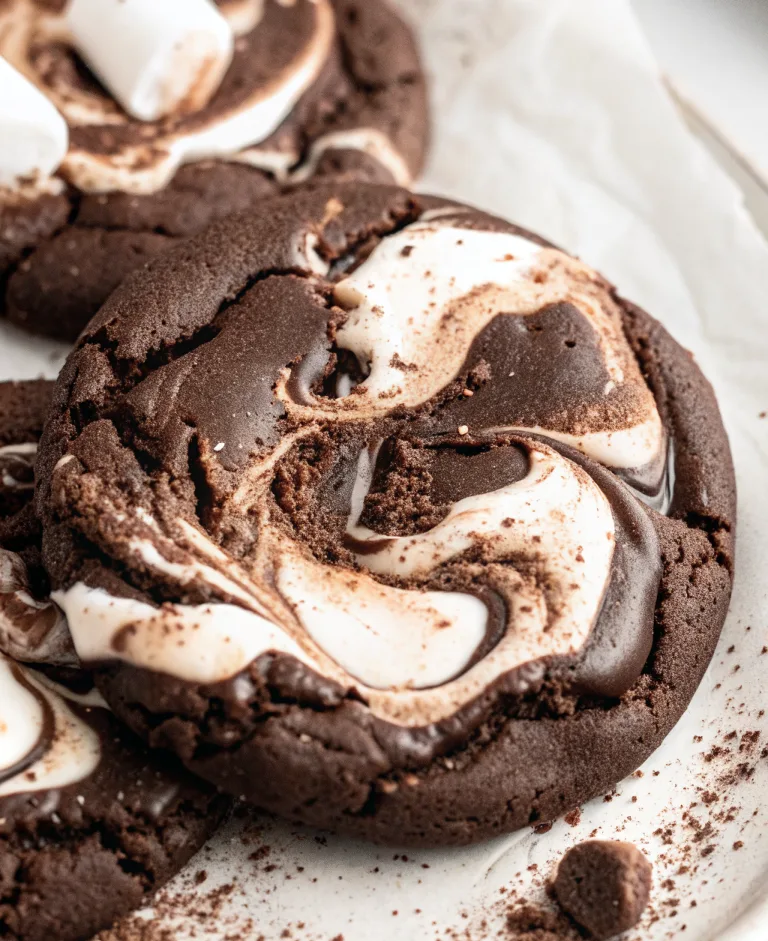
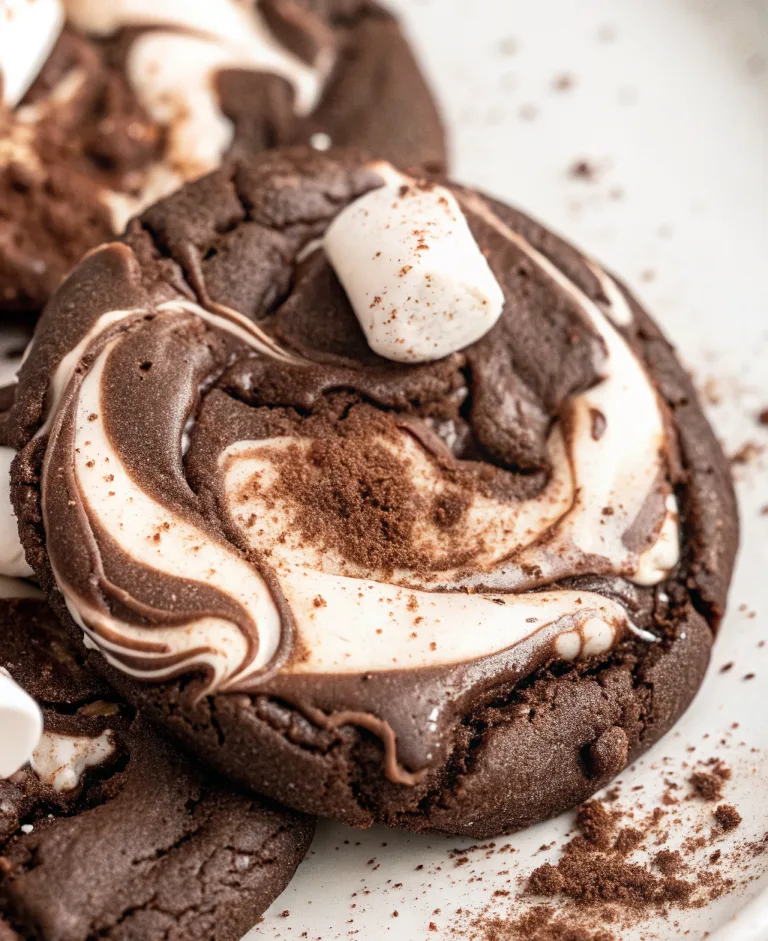
Imagine biting into a soft, rich chocolate cookie, only to discover a hidden pocket of warm, melted marshmallow fluff swirled within. It’s a moment of pure culinary magic, a perfect blend of rich cocoa and sweet, stretchy marshmallow that will transport you straight to dessert heaven. These cookies aren’t just a treat; they’re an experience, a visually stunning masterpiece that’s surprisingly easy to achieve.
I’ve tested this recipe countless times – I’m talking nine-plus iterations! – perfecting every detail to ensure you get the most incredible texture, the richest flavor, and that irresistible, picture-perfect marshmallow swirl every single time. My goal was to create a cookie that feels both nostalgic and wonderfully unique, a recipe that brings joy to any gathering, from a casual family night to a festive dessert table.
So, get ready to dive into the world of truly decadent, homemade cookies. Let’s bake some joy!
Sophie’s Secret to the Perfect Swirl (and Why My 9+ Tests Mattered!)
My journey to perfecting these Chocolate Marshmallow Swirl Cookies was a labor of love, driven by a desire for that ideal balance of chocolate richness and marshmallow gooeyness. Over nine different attempts, I tweaked ingredient ratios, chilling times, and baking temperatures until I hit on the absolute sweet spot. Here’s what I learned that will make your baking experience effortlessly perfect:
- The Marshmallow Medium: Initially, I experimented with different types of marshmallows. Mini marshmallows melted down too quickly and spread too much. Jumbo marshmallows gave a great gooey pocket but didn’t allow for that beautiful swirl. Marshmallow fluff, or melted regular marshmallows, proved to be the golden ticket. It holds its shape better, swirls beautifully, and creates that consistent, stretchy texture we’re after.
- The Chilling Imperative: This is non-negotiable! Chilling the dough for at least an hour does two vital things: it prevents the cookies from spreading into flat puddles, maintaining their gorgeous shape, and it makes the dough firm enough to easily handle and create that marshmallow pocket without a sticky mess. If your dough is still a bit sticky, don’t hesitate to chill it for another 30 minutes. Trust me, patience here pays off.
- The Indent and Swirl Technique: The magic truly happens when you create a small indent in your dough ball. This little well is where the marshmallow fluff resides. Spooning the fluff in and then gently swirling with a toothpick doesn’t just look pretty; it ensures the marshmallow is evenly distributed and melts beautifully within the cookie.
- Optional Mid-Bake Fluff Boost: For those who desire the absolute maximum gooey factor, I discovered a trick: add a second small dollop of fluff about halfway through the baking time. This creates an extra layer of melted marshmallow goodness that’s simply divine.
These insights, gained through trial and error, are embedded in the recipe to guarantee your success. You get to reap the rewards of my extensive testing, creating bakery-quality cookies right in your own kitchen!
Understanding Your Ingredients: Quality Matters
As with any baking, the quality of your ingredients can significantly impact the final product. For these Chocolate Marshmallow Swirl Cookies, each component plays a crucial role:
- All-Purpose Flour: This forms the structure of our cookies. While specific flours like cake flour might alter texture slightly, standard all-purpose works beautifully to give a tender yet substantial cookie.
- Unsweetened Cocoa Powder: This is where the deep chocolate flavor comes from. I recommend a good quality unsweetened cocoa powder. Dutch-processed cocoa will give a darker color and a milder, less acidic chocolate flavor, which works wonderfully here.
- Baking Soda & Salt: These are your leavening agent and flavor enhancer. Baking soda reacts with the slight acidity in the cocoa to give the cookies a gentle lift and a tender crumb. Salt balances the sweetness and brings out the chocolate flavor.
- Unsalted Butter, Room Temperature: Using unsalted butter allows you to control the salt content. Room temperature butter is essential for creaming properly with sugar, incorporating air that leads to a lighter, fluffier cookie.
- Granulated Sugar: Provides sweetness and contributes to the cookie’s texture and spread.
- Large Eggs, Room Temperature: Like butter, room temperature eggs emulsify better with the creamed butter and sugar, resulting in a smoother, more uniform dough. They also add moisture and richness.
- Vanilla Extract: A touch of vanilla enhances all the other flavors, especially the chocolate. Use good quality pure vanilla extract for the best results.
- Marshmallow Fluff: The star of the swirl! Marshmallow fluff is incredibly easy to work with and provides that characteristic gooey, stretchy texture. If you don’t have fluff, you can melt regular marshmallows for a similar effect, or use one jumbo marshmallow per cookie for a more defined center.
Essential Equipment for Cookie Success
To make your cookie baking experience smooth and enjoyable, ensure you have these basic kitchen tools:
- Large Mixing Bowls: For both wet and dry ingredients.
- Electric Mixer (Stand or Handheld): Crucial for creaming butter and sugar effectively.
- Rubber Spatula: For scraping down the bowl and folding ingredients.
- Whisk: For combining dry ingredients.
- Measuring Cups and Spoons: Accurate measurements are key in baking.
- Parchment Paper or Silicone Baking Mats: Prevents sticking and ensures even baking.
- Baking Sheets: Two are ideal so you can rotate them.
- Cookie Scoop: For uniform cookie sizes, which helps with even baking.
- Toothpicks: For creating that beautiful marshmallow swirl.
- Wire Cooling Rack: For cooling the cookies completely.
Step-by-Step Baking Guide with Expert Tips
Here’s my detailed breakdown to ensure every step leads to cookie perfection:
1. Mix Dry Ingredients
In a medium bowl, whisk together the all-purpose flour, unsweetened cocoa powder, baking soda, and salt.
- Sophie’s Tip: Whisking dry ingredients thoroughly ensures that the leavening agent (baking soda) and salt are evenly distributed throughout the flour mixture, which prevents pockets of unmixed ingredients and promotes even rising. Set this bowl aside for later.
2. Cream Butter and Sugar
In a large mixing bowl, using an electric mixer (stand mixer with paddle attachment or a hand mixer), cream the room temperature unsalted butter with the granulated sugar until the mixture is light, fluffy, and pale yellow. This usually takes about 3-4 minutes.
- Sophie’s Tip: This step is foundational for good cookie texture. Creaming incorporates air into the butter and sugar, which makes your cookies lighter and more tender. Don’t rush it! Scrape down the sides of the bowl periodically to ensure everything is evenly combined.
3. Add Eggs and Vanilla
Beat in the large eggs one at a time, ensuring each egg is fully incorporated before adding the next. Once the eggs are mixed in, stir in the vanilla extract.
- Sophie’s Tip: Adding eggs one at a time helps to create a stable emulsion with the butter and sugar, preventing the mixture from separating or curdling. It also ensures the eggs are fully integrated, contributing moisture and richness evenly.
4. Combine Wet and Dry
Gradually add the dry ingredients to the wet mixture, mixing on low speed just until the dough comes together. Be careful not to overmix! If you choose to swirl in some marshmallow fluff directly into the dough for a more diffused effect, do so lightly now. Otherwise, wait until after chilling.
- Sophie’s Tip: Overmixing flour can develop the gluten too much, leading to tough, chewy cookies. Mix only until no streaks of dry flour remain. The dough will be soft.
5. Chill the Dough
Cover the bowl with plastic wrap and refrigerate for at least 1 hour. For very warm kitchens or stickier dough, chill for 1.5 to 2 hours.
- Sophie’s Tip: This step is crucial for flavor development, preventing excessive spreading, and making the dough much easier to handle when forming the cookies. Cold dough equals happy cookies!
6. Preheat Oven & Prep Sheets
Preheat your oven to 350°F (175°C). Line two baking sheets with parchment paper or silicone mats.
- Sophie’s Tip: Preparing your baking sheets in advance means you can quickly transfer the formed cookies to the oven once they’re ready, preventing the dough from warming up too much.
7. Form Cookies
Scoop the chilled dough into balls, about 1.5 to 2 tablespoons each, and place them 2 inches apart on the prepared baking sheets. Using your thumb or the back of a spoon, press a small indent into the center of each dough ball. Spoon about a teaspoon of marshmallow fluff into each indent. Gently swirl the marshmallow fluff with a toothpick for that signature marble effect.
- Sophie’s Tip: A cookie scoop ensures uniform cookies, which bake more evenly. The indent is key for holding the marshmallow and preventing it from oozing out too much during baking. Don’t overfill the indent!
8. Bake
Bake for 10–12 minutes, or until the edges are set and the centers still look soft and slightly puffy. They might not look fully ‘done’ in the middle, but they will continue to set as they cool. If you opted for the extra gooeyness, add a small dollop of fluff to the centers halfway through baking.
- Sophie’s Tip: Don’t overbake! An overbaked chocolate cookie can be dry. The soft centers are what create that perfect gooey texture upon cooling. Rotate your baking sheets halfway through the baking time to ensure even cooking.
9. Cool on Pan
Remove the baking sheets from the oven and let the cookies cool on the hot pan for 5 minutes. Then, carefully transfer them to a wire rack to cool completely.
- Sophie’s Tip: Cooling on the baking sheet for a few minutes allows the cookies to set up a bit more and prevents them from breaking when transferred to the wire rack. Enjoy them slightly warm for the best gooey experience!
Troubleshooting Common Cookie Problems
Even seasoned bakers run into issues sometimes. Here are solutions to common problems you might encounter with these Chocolate Marshmallow Swirl Cookies:
- Cookies Spreading Too Much: This is usually due to dough that wasn’t chilled enough or butter that was too soft. Ensure your butter is room temperature, not melted, and always chill the dough for the recommended time (or even longer if your kitchen is warm). Also, avoid using greased baking sheets; parchment paper or silicone mats are best.
- Cookies Are Dry or Crumbly: Overmixing the dough can lead to tough, dry cookies. Mix only until the dry ingredients are just incorporated. Also, overbaking is a common culprit; keep an eye on the clock and trust that the cookies will set as they cool.
- Marshmallow Oozing Out Completely: This can happen if the indent isn’t deep enough, too much fluff is added, or the dough isn’t chilled enough. Make sure to create a good indent and don’t overfill it. Chilling is your friend!
- Marshmallow Not Gooey Enough: Ensure you don’t overbake the cookies. The marshmallow should still be soft and pliable when removed from the oven. For extra gooeyness, try the mid-bake fluff addition trick mentioned above.
Creative Variations & Serving Suggestions
These Chocolate Marshmallow Swirl Cookies are fantastic on their own, but they also lend themselves beautifully to customization:
- Peppermint Twist: During the holidays, add ½ teaspoon of peppermint extract along with the vanilla, and sprinkle crushed candy canes on top right after they come out of the oven.
- Nutty Crunch: Fold in ½ cup of finely chopped toasted pecans or walnuts into the dough for added texture.
- Espresso Boost: Add 1 teaspoon of instant espresso powder to the dry ingredients to deepen the chocolate flavor. It won’t make them taste like coffee, but it will intensify the cocoa.
- S’mores Style: Sprinkle a few mini chocolate chips on top along with the marshmallow before baking, or right after for a melted effect.
- Spice It Up: A pinch of cayenne pepper in the cocoa powder can add a subtle, intriguing heat to the chocolate.
Serving Suggestions:
- Classic Milk Pairing: Nothing beats a tall, cold glass of milk with a warm chocolate cookie.
- Coffee or Tea: Enjoy them with your favorite hot beverage for a cozy treat.
- Ice Cream Sandwich: Once cooled, sandwich a scoop of vanilla or coffee ice cream between two cookies for an epic dessert.
- Dessert Platter: Arrange them artfully on a dessert table with other treats.
Craving More Irresistible Cookie Recipes?
If you’ve loved these Chocolate Marshmallow Swirl Cookies, I know you’ll adore some of our other decadent creations that are perfect for sharing, gifting, or simply indulging yourself:
- For an incredibly rich experience, check out our Stuffed Red Velvet Cookies Recipe.
- If you’re a fan of those famously thick, bakery-style cookies, our Pistachio NYC Cookies Recipe is a must-try.
- For a truly unique treat, especially around Easter, you won’t want to miss our Creme Egg Stuffed Cookies Recipe.
- The ultimate combination of sweet and salty awaits in our Peanut Butter Nutella Cookie Recipe.
- And for white chocolate lovers, our White Chocolate Stuffed Cookies are pure bliss!
Storage, Freezing, and Making Ahead
Being prepared is key, especially when you want to enjoy these cookies fresh or save some for later!
Storage:
Store your baked Chocolate Marshmallow Swirl Cookies in an airtight container at room temperature. They will remain wonderfully fresh and gooey for up to 3-4 days. For optimal gooeyness, a quick 10-15 second zap in the microwave can revive that melted marshmallow center.
Freezing Baked Cookies:
If you want to keep them longer, cooled baked cookies can be frozen for up to 2 months. Place them in a single layer on a baking sheet to freeze solid, then transfer to a freezer-safe bag or container, separating layers with parchment paper. Thaw at room temperature or gently warm in the microwave or oven.
Freezing Dough:
This is my favorite make-ahead trick! You can freeze the shaped cookie dough balls (with the marshmallow fluff already swirled in). Place them on a baking sheet and freeze until solid, then transfer to a freezer-safe bag. They can be stored for up to 3 months. When you’re ready to bake, there’s no need to thaw! Simply place the frozen dough balls on a prepared baking sheet and bake for an extra 2-3 minutes (typically 12-15 minutes total). This means fresh, warm cookies anytime a craving strikes!
Nutrition Spotlight: Enjoying Your Treat Mindfully
While these Chocolate Marshmallow Swirl Cookies are undoubtedly an indulgent comfort food, enjoying homemade treats offers unique benefits. You control the ingredients, avoiding many of the artificial additives found in store-bought options.
Per cookie, you’re looking at approximately:
- Calories: 184
- Total Fat: 8g (5g saturated)
- Cholesterol: 36mg
- Sodium: 59mg
- Carbohydrates: 25g (15g sugar)
- Protein: 2g
Remember, baking is about joy and connection. These cookies are meant to be savored as part of a balanced diet, a delightful treat to share with family and friends. The act of creating something delicious from scratch is a healthy endeavor in itself!
Frequently Asked Questions About Chocolate Marshmallow Swirl Cookies
Why do I need to chill the dough for these Chocolate Marshmallow Swirl Cookies?
Chilling the dough is crucial for several reasons. It helps to firm up the butter, which prevents the cookies from spreading too much during baking, ensuring they retain their shape. It also makes the dough much easier to handle when scooping and forming the cookies, especially when adding the marshmallow fluff. This step also allows the flavors to meld, leading to a richer cookie.
Can I use regular marshmallows instead of marshmallow fluff?
Yes, you can! For a fluffier, more distinct marshmallow center, you can melt regular marshmallows (about 1 cup of mini marshmallows) and use that instead of fluff. You can also press a jumbo marshmallow into the center of each dough ball if you prefer a single, large pocket of gooey marshmallow rather than a swirl effect. Just be aware that melted regular marshmallows might be a bit stickier to work with than fluff.
How do I store Chocolate Marshmallow Swirl Cookies?
To keep your cookies fresh and delicious, store them in an airtight container at room temperature for up to 3-4 days. For longer storage, see our freezing tips outlined above! If you like them warm and gooey, a quick 10-15 second microwave session will do the trick.
Can I freeze Chocolate Marshmallow Swirl Cookie dough?
Absolutely! Freezing the cookie dough is a fantastic way to prepare ahead. Shape the dough into balls, press the indent, and even add the marshmallow fluff before freezing on a baking sheet until solid. Once frozen, transfer them to a freezer-safe bag or container for up to 3 months. When ready to bake, place frozen dough balls on a prepared baking sheet and bake for 2 extra minutes than the original recipe suggests, no need to thaw!
How can I get an extra gooey center in my Chocolate Marshmallow Swirl Cookies?
For an ultimate gooey experience, after your cookies have baked for about 5-7 minutes (halfway through baking), carefully open the oven and add another small dollop of marshmallow fluff into the indent of each cookie. Continue baking for the remaining time. This ensures a super fresh and melty marshmallow surprise inside!
Get Baking and Share the Joy!
There you have it – my ultimate recipe for Chocolate Marshmallow Swirl Cookies! I truly believe these cookies are a masterpiece of comfort and indulgence, designed to bring smiles and satisfy even the most intense sweet cravings. The combination of rich chocolate and gooey marshmallow is simply unbeatable.
I can’t wait for you to try this recipe in your own kitchen. Whether you’re baking them for a special occasion or just because, remember the joy that comes from creating something delicious by hand. If you make these cookies, please share your creations with me on social media or in the comments below! I love seeing your baking triumphs.
Happy baking, and enjoy every single gooey, chocolatey bite!
PrintGooey Chocolate Marshmallow Swirl Cookies: Sophie’s Easy Decadent Recipe
Dive into the indulgence of these Chocolate Marshmallow Swirl Cookies — soft, rich, and irresistibly gooey. Each bite blends deep cocoa flavor with creamy marshmallow for a dessert that’s as beautiful as it is delicious. These cookies are perfect for holidays, bake sales, or simply when you want something decadent and comforting.
- Prep Time: 20 mins
- Cook Time: 30 mins
- Total Time: 50 mins
- Yield: 24 cookies
- Category: Cookies
- Method: Baking
- Cuisine: American
Ingredients
2 cups all-purpose flour
¾ cup unsweetened cocoa powder
½ teaspoon baking soda
¼ teaspoon salt
1 cup unsalted butter, room temperature
1½ cups granulated sugar
2 large eggs, room temperature
2 teaspoons vanilla extract
1 cup marshmallow fluff
Instructions
In a medium bowl, whisk together flour, cocoa powder, baking soda, and salt. Set aside.
In a large mixing bowl, use an electric mixer to cream butter with sugar until light and fluffy, about 3–4 minutes.
Beat in eggs one at a time, then mix in vanilla extract until fully combined.
Gradually add the dry ingredients to the wet mixture, mixing on low speed just until the dough comes together. Lightly swirl in the marshmallow fluff or wait until after chilling for easier shaping.
Cover the dough and refrigerate for at least 1 hour. Chilling helps the dough firm up and prevents spreading during baking.
Preheat oven to 350°F (175°C). Line two baking sheets with parchment paper or silicone mats.
Scoop chilled dough into balls and place 2 inches apart on the prepared baking sheets. Press a small indent into each ball and spoon a teaspoon of marshmallow fluff into the center. Swirl gently with a toothpick for a marbled look.
Bake for 10–12 minutes, or until the edges are set and the centers remain soft. For extra gooey cookies, add a touch more fluff halfway through baking.
Cool cookies on the baking sheet for 5 minutes before transferring to a wire rack to cool completely. Enjoy warm or at room temperature for a fudgy, marshmallow-filled treat!
Notes
**Baking Tips & Variations:**
• Chill the dough well — at least 1 hour, or up to overnight, for thicker cookies.
• For a more dramatic swirl, use a skewer or toothpick to marble the marshmallow just before baking.
• Swap marshmallow fluff for melted mini marshmallows for a fluffier texture.
• Add one jumbo marshmallow in the center instead of swirling if you prefer a molten core.
**Storage:**
Store cookies in an airtight container at room temperature for up to 3 days, or refrigerate for up to a week. Reheat in the microwave for 10–15 seconds for that fresh-from-the-oven gooeyness.
**Freezing:**
Freeze unbaked dough balls on a tray until solid, then store in a freezer-safe bag for up to 3 months. Bake straight from frozen, adding about 2 extra minutes to the baking time.
**Serving Idea:**
Drizzle with melted chocolate or sprinkle crushed graham crackers on top for a s’mores-inspired twist!


