
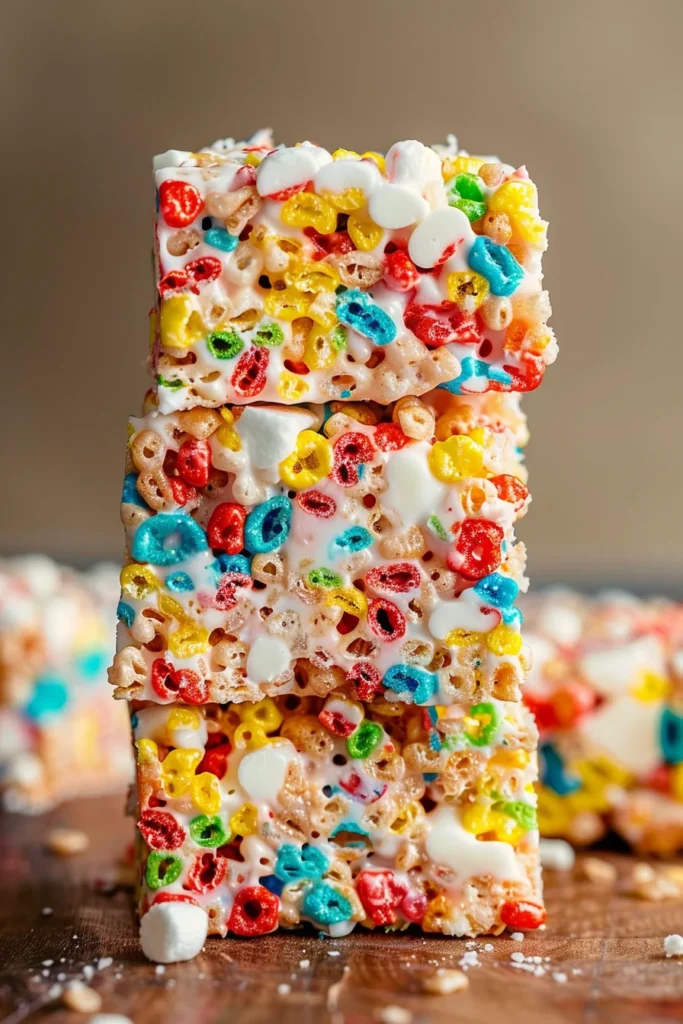
There is something undeniably nostalgic about a cereal treat. It brings us back to after-school snacks, bake sales, and Saturday mornings. But while the standard boxed version is fine, we are here to elevate the classic into something truly gourmet. These Fruity Pebbles Rice Krispie Treats are a vibrant, technicolor upgrade to the original. By combining the iconic crunch of Rice Krispies with the intense fruit flavor of Fruity Pebbles, we create a flavor profile that is balanced, not just sugary. The secret, however, lies in our “double marshmallow” technique, which ensures every single bite has a soft, gooey pull that lasts for days. Whether you are making these for a kid’s birthday party or just to satisfy a late-night craving, this recipe delivers the perfect texture every single time.

Why You’ll Love This Recipe
You will fall in love with these treats because they master the art of the marshmallow-to-cereal ratio. Most recipes result in dry, hard bars that hurt the roof of your mouth. Ours uses five full tablespoons of butter and a 16-ounce bag of marshmallows to ensure maximum silkiness. The addition of salt and high-quality vanilla extract cuts through the sweetness, providing a sophisticated depth of flavor that is often missing from no-bake snacks. Plus, the “mix-in” method—adding whole marshmallows at the end—creates pockets of pure marshmallow clouds throughout the bar. They are quick to make, require no oven, and are visually stunning with their rainbow flecks.
What Is a Fruity Pebbles Rice Krispie Treat?
A Fruity Pebbles Rice Krispie Treat is a modern variation of the classic “Rice Krispies Treat,” which was originally popularized by the Kellogg’s company in the 1930s. While the original uses toasted rice cereal, our version incorporates Fruity Pebbles—a sweetened, fruit-flavored rice cereal. This variation has gained massive popularity on social media and in boutique bakeries because of its bright aesthetic and intense nostalgic flavor. By blending both cereals, we provide the structural integrity of the Rice Krispie with the flavor punch of the Pebbles. It is the ultimate fusion of two breakfast icons, held together by a rich, buttery marshmallow binder.
Ingredients Needed
To achieve professional-level results, the quality of your ingredients matters more than you might think for such a simple recipe.
- Miniature Marshmallows (16 oz): We use a full pound of marshmallows. Mini marshmallows are preferred because they melt faster and more evenly than the large ones, preventing the butter from browning too much.
- Unsalted Butter (5 tbsp): Butter is the fat that keeps the marshmallows soft. We use unsalted to have total control over the sodium levels. Fresh, high-quality European-style butter can add a lovely richness.
- Fruity Pebbles (4 cups): This provides the “wow” factor. The colorful flakes are thinner than traditional rice cereal, which is why we blend them for better texture.
- Rice Krispies (2 cups): Adding classic rice cereal provides a “heavier” crunch and prevents the treats from becoming overly sweet or cloying.
- Vanilla Extract (1 tsp): Do not skip this! Vanilla acts as a flavor enhancer, making the marshmallow base taste like a homemade confection rather than just melted candy.
- Sea Salt (1/4 tsp): A pinch of salt is the “secret ingredient” that balances the sugar and makes the fruit flavors pop.
Ingredient Substitutions & Tips
If you have dietary restrictions or simply want to experiment, here are a few ways to swap things out. For a dairy-free version, you can substitute the butter with a high-quality vegan butter stick (avoid tub margarines, as they have too much water). To make these vegan, you must also use gelatin-free marshmallows, such as Dandies. If you want a more intense chocolate flavor, you can swap the Rice Krispies for Cocoa Pebbles for a “Neapolitan” fruit-and-chocolate effect. Lastly, if you find Fruity Pebbles too sweet, you can reverse the ratio: 4 cups of Rice Krispies and 2 cups of Fruity Pebbles for a more subtle hint of fruit.
Step-by-Step Instructions
1. Prepare Your Station: Start by lining a 9×9-inch square baking pan with parchment paper. Leave a little bit of overhang on the sides; this “sling” will allow you to lift the entire block out for easy cutting later. Spray the parchment lightly with non-stick cooking spray.
2. The Marshmallow Split: Open your 16-ounce bag of marshmallows. Measure out 2-1/2 cups (about 120 grams) and set them aside in a small bowl. These will be your “pockets of joy” that stay whole.
3. Low and Slow Melting: In a large, heavy-bottomed nonstick pot, melt the butter over low heat. Once melted, add the remaining marshmallows from the bag. Stir constantly with a silicone spatula. Keep the heat low. If you rush this step with high heat, the sugar in the marshmallows will cook and turn hard once cooled. Stir until the mixture is smooth and glossy.
4. Flavoring: Remove the pot from the heat immediately once the marshmallows have melted. Stir in the vanilla extract and salt.
5. The Folding Process: Add the Rice Krispies and Fruity Pebbles cereal to the pot. Use a folding motion to coat the cereal in the marshmallow mixture. Once mostly combined, add the reserved 2-1/2 cups of marshmallows. Fold gently until they are distributed but still holding their shape.
6. Pressing (The Most Important Part): Transfer the mixture into your prepared pan. Spray your hands or the back of a spatula with cooking spray. Gently pat the mixture into the corners. Do not press down hard. If you pack them tightly, the bars will be dense and tough. You want them to stay airy.
7. Setting: Let the bars sit at room temperature for at least 60 minutes. Slicing them while they are still warm will result in a messy (though delicious) clump.
Expert Baking Tips
The most common mistake people make is using old marshmallows. If your marshmallows are stuck together in the bag or feel a bit firm, they won’t melt into a smooth sauce; instead, they will create a grainy, rubbery texture. Always buy a fresh bag specifically for this recipe. Another expert tip is to use a non-stick pot. Marshmallow is incredibly glue-like, and a standard stainless steel pot can make the process frustrating and difficult to clean. Finally, use European butter if possible. The higher fat content (82% or more) creates a creamier emulsion with the marshmallows, leading to a superior mouthfeel.
The Science of the “Double Marshmallow”
Why do we reserve some marshmallows to add at the end? This is a technique used by professional pastry chefs to create “texture contrast.” When you melt all the marshmallows, they become a uniform binder. By adding whole marshmallows at the end, the residual heat of the cereal mixture slightly softens them without melting them completely. This creates “marshmallow pulls” when you bite into the bar—those stretchy, gooey strands that are the hallmark of a perfect treat. It also adds a visual element, as the white marshmallow clouds look beautiful against the rainbow colors of the Fruity Pebbles.
Serving Suggestions
These treats are a showstopper on their own, but you can dress them up for special occasions. For a “birthday cake” vibe, top the bars with a few extra sprinkles and a drizzle of melted white chocolate. They also make incredible ice cream sandwiches—simply slice them thin, place a scoop of strawberry or vanilla bean ice cream in the middle, and press. Serve them on a wooden board at parties to show off the vibrant colors, or wrap them individually in cellophane for the perfect homemade gift or school lunch surprise.
Storage & Make-Ahead Tips
Cereal treats are best enjoyed within the first 24 hours when they are at their peak “gooeyness.” However, they will stay fresh for up to two days if stored correctly. Place them in an airtight container at room temperature. Never refrigerate these treats! The cold air will cause the butter and sugar to harden, turning your soft bars into bricks. If you need to make them ahead of time, you can wrap the entire unsliced block in plastic wrap and store it in a cool, dry place, slicing only when you are ready to serve.
FAQs
1. Why are my Rice Krispie treats so hard?
Usually, this happens because the marshmallows were melted over too high a heat. High heat changes the structure of the sugar, causing it to harden as it cools. Always use the lowest heat setting possible.
2. Can I use a 13×9 pan instead of a 9×9?
Yes, but the bars will be much thinner. If you prefer the thick, “bakery-style” look shown in photos, stick to a 9×9 or 8×8-inch pan. If using a 13×9, you may want to increase the recipe by 50%.
3. How do I stop the mixture from sticking to my hands?
Grease your hands with a little bit of butter or non-stick cooking spray. Alternatively, use a piece of greased parchment paper to gently press the mixture into the pan.
4. Can I freeze Fruity Pebbles treats?
You can, but it’s not recommended as the cereal can lose its crispness. If you must, wrap them tightly in layers of plastic wrap and foil. Thaw completely at room temperature before eating.
5. Are these gluten-free?
Fruity Pebbles are generally considered gluten-free, but Rice Krispies often contain malt flavoring derived from barley, which contains gluten. To make this 100% gluten-free, ensure you use a certified gluten-free puffed rice cereal.
These Gooey Fruity Pebbles Rice Krispie Treats are the ultimate low-effort, high-reward dessert. They take less than 20 minutes of active work but result in a treat that looks and tastes like it came from a professional bakery. By following the “low heat” rule and using our double-marshmallow method, you’ll never go back to the standard recipe again. Give them a try, and don’t forget to leave a review to let us know how they turned out!
PrintGooey Fruity Pebbles Rice Krispie Treats Recipe
These aren’t your average cereal bars. By mixing classic Rice Krispies with vibrant Fruity Pebbles and adding a ‘double marshmallow’ technique, you get a treat that is colorful, crunchy, and incredibly gooey.
- Prep Time: 10 minutes
- Cook Time: 10 minutes
- Total Time: 80 minutes
- Yield: 16 bars
- Cuisine: American
Ingredients
Unsalted butter – 5 tablespoons
Miniature marshmallows – 16 ounces
Salt – 1/4 teaspoon
Vanilla extract – 1 teaspoon
Fruity Pebbles cereal – 4 cups
Rice Krispies cereal – 2 cups
Instructions
Line a 9×9-inch pan with parchment paper and spray with nonstick spray. Reserve 2-1/2 cups of marshmallows for later.
Melt butter in a large nonstick pot over low heat. Add the remaining marshmallows and stir until completely smooth.
Remove from heat. Stir in the salt and vanilla extract until well incorporated.
Gently fold in the Fruity Pebbles and Rice Krispies cereals until coated.
Add the reserved 2-1/2 cups of whole marshmallows and fold gently to distribute.
Transfer to the pan and press down very lightly with greased hands. Do not pack tightly.
Allow to set for 60 minutes at room temperature before slicing into squares.
Notes
• Use fresh marshmallows for the best melt and ‘pull’ texture.
• Avoid high heat, which causes the sugar to crystallize and makes the bars hard.
• For a less sweet version, use a 3:3 ratio of the two cereals.
• Store at room temperature in an airtight container for up to 48 hours.


