
Let’s be honest, sometimes you don’t just want a cookie. You want an experience. You want a giant, warm, ridiculously gooey cookie that feels like a hug in dessert form. That’s exactly what these OREO NYC Cookies are. After testing this recipe more than nine times, I can confidently say this is the ultimate comfort food creation for any Oreo lover.
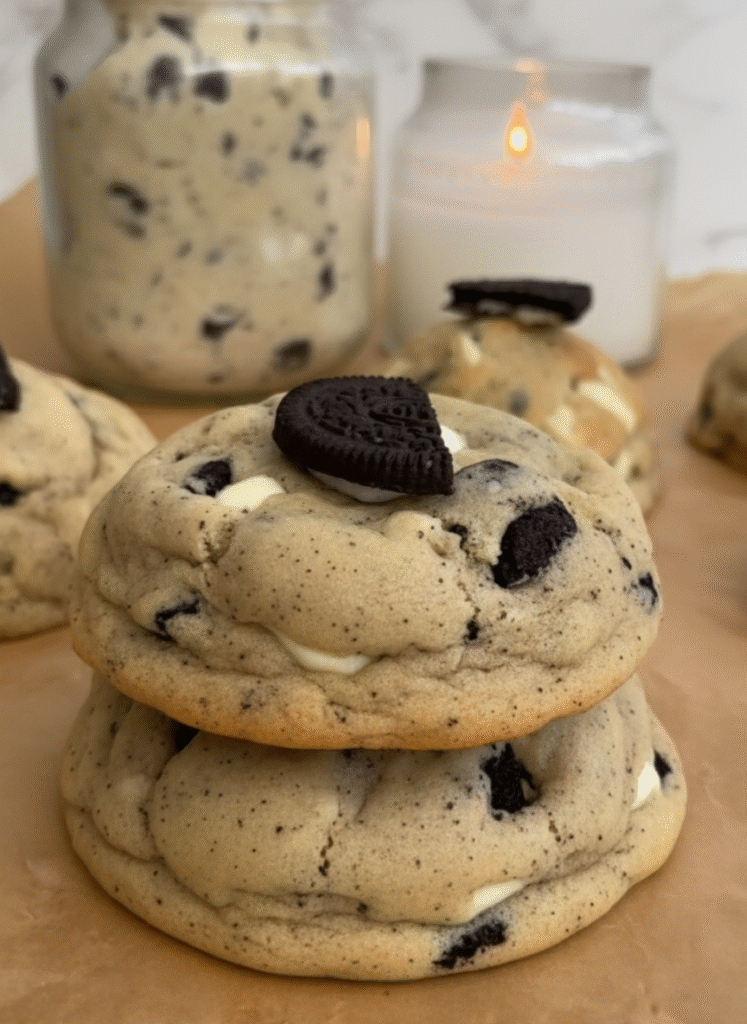
We’re not just adding a few crushed Oreos here. This is a triple-threat Oreo extravaganza. We have Oreo chunks mixed into the dough, an entire Oreo cookie hidden inside, and a molten core of cookies and cream spread that erupts when you break it open. Topped with even more Oreo, it’s pure, unadulterated cookie bliss.
These are the cookies you make for family gatherings, for a weekend treat, or when you just need to bake something truly special. Get ready to fall in love with your new favorite cookie.
Why You’ll Be Obsessed With This Recipe
- Triple Oreo Flavor: With Oreos in the dough, in the center, and on top, it’s a dream come true for cookies and cream fans.
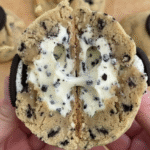
- Insanely Gooey Center: The hidden pocket of cookies and cream spread melts into a lava-like core that is absolutely irresistible.
- Perfect NYC-Style Texture: They’re thick, chunky, slightly crispy on the edges, and beautifully soft and chewy in the middle.
- Tried and Tested: I’ve personally made these over 9 times to perfect the method, ensuring you get flawless results every time.
- A True Showstopper: These cookies look as incredible as they taste, making them perfect for sharing (or not!).
The Star Ingredients for Perfect Cookies
While the ingredient list is straightforward, understanding why each one is there is key to baking success. Here’s a quick look at the main players:
- Margarine: Provides the necessary fat for a soft, tender cookie. You can substitute with unsalted butter if you prefer.
- Light Brown & Caster Sugar: The combination is crucial! Light brown sugar adds moisture and a slight caramel flavor for chewiness, while caster sugar helps the cookies spread just the right amount and creates those crisp edges.
- Baking Powder & Bicarbonate of Soda: This duo works together to give the cookies lift and tenderness. The bicarb soda helps with the spread, while the baking powder provides the puffiness.
- Cookies and Cream Spread: This is the secret to the molten center. Freezing it before wrapping it in dough ensures it doesn’t just dissolve during baking.
- Oreos: The star of the show! We use them chopped in the dough, whole in the center, and halved as a garnish.
How to Make OREO NYC Cookies (Step-by-Step)
This might look like a lot of steps, but I’ve broken it down to make it super simple. Follow along, and you’ll have bakery-worthy cookies in no time.
Step 1: Prepare the Gooey Filling
First things first, we need to prep our molten centers. Line a medium plate with baking paper. Using a teaspoon, scoop 8 balls of the Cookies and Cream spread onto the paper. Don’t worry about making them perfect. Pop the plate in the freezer while you prepare the dough. This step is essential for easy handling later!
Step 2: Make the Cookie Dough
In a large mixing bowl, add your margarine and both the light brown and caster sugars. Using an electric mixer or a wooden spoon and some elbow grease, cream them together until the mixture is light, fluffy, and smooth.
Next, mix in the vanilla extract, followed by the egg. Mix until just combined. The mixture might look a little curdled at this point – that’s completely normal, so don’t panic!
Sift in the plain flour, baking powder, and bicarbonate of soda. Mix on a low speed or by hand until a thick, cohesive dough forms. It should be easy to handle and not sticky. Finally, fold in the white chocolate chips and 4 chopped Oreos.
Step 3: Stuff and Shape the Cookies
Your dough is ready! Retrieve the frozen balls of spread from the freezer. Divide the cookie dough into 8 equal portions.
Take one portion of dough and flatten it in the palm of your hand. Place one frozen ball of spread in the center, then press a whole Oreo cookie on top of it. Carefully wrap the dough around the fillings, rolling it gently between your hands to form a smooth, sealed ball. Repeat with the remaining 7 dough portions.
Step 4: The Crucial Freezing Step
Place your 8 stuffed cookie dough balls on a baking-paper-lined tray and put them in the freezer for 45 minutes. I cannot stress this enough: do not skip this step! This is the secret to thick, chunky NYC-style cookies. Freezing the dough solidifies the fat, preventing the cookies from spreading too much in the hot oven. This is the main lesson I learned from my many test batches!
About 15 minutes before the cookies are done freezing, preheat your oven to 200°C (180°C for fan ovens) and line two large baking trays with parchment paper.
Step 5: Bake to Perfection
Remove the cookie dough balls from the freezer and place them on your prepared trays, leaving plenty of space between them (I recommend 4 per tray).
Bake for 8-10 minutes. You’re looking for a light golden color on the edges. The centers will still look a little soft, which is exactly what you want for a gooey texture. While they’re baking, carefully slice 4 Oreos in half horizontally.
Once baked, remove the trays from the oven. If you want perfectly round cookies, you can gently nudge the edges with the back of a teaspoon while they are still hot. Immediately (and very gently!), press half an Oreo, cream-side down, onto the top of each cookie.
Let the cookies cool completely on the baking trays for at least 2 hours. This allows the centers to set and the molten spread to firm up, so they don’t fall apart when you move them.
My Top Tips for Flawless NYC Cookies
After making these OREO NYC Cookies more times than I can count, I’ve picked up a few game-changing tricks.
- Weigh Your Ingredients: For baking, accuracy is everything. Using a digital kitchen scale, especially for flour, is the best way to guarantee the correct dough consistency.
- Don’t Overmix the Dough: Once you add the flour, mix only until it’s just combined. Overmixing develops the gluten and can lead to tough, dense cookies instead of soft, chewy ones.
- Trust the Process: The dough will be thick. The freezing step is vital. The cooling time is non-negotiable. Trust these steps, and you will be rewarded with the best cookies of your life!
- Don’t Overbake! The cookies will continue to bake from the residual heat of the tray after you take them out of the oven. Pulling them out when they look slightly underdone in the middle is the key to a perfectly soft and gooey final product.
More Stuffed Cookie Inspiration
If you’ve fallen in love with the magic of a stuffed cookie (and who wouldn’t?), you’re in the right place! My kitchen is always buzzing with new ways to pack more flavor into every bite. If you enjoyed these, you will be absolutely obsessed with my other stuffed cookie creations:
- For a truly decadent treat, try my Stuffed Red Velvet Cookies, filled with a luscious cream cheese frosting.
- Nut lovers will adore these nutty and elegant Pistachio NYC Cookies.
- If you’re a fan of classic flavor combinations, you must make my Peanut Butter Nutella Cookies.
- And for the ultimate white chocolate fan, these White Chocolate Stuffed Cookies are pure heaven.
- When Easter rolls around, don’t miss out on the fan-favorite Creme Egg Stuffed Cookies!
Frequently Asked Questions (FAQ)
Why do my NYC cookies spread too much?
The most common reason for NYC-style cookies spreading is that the dough wasn’t cold enough. This recipe includes a crucial 45-minute freezing step for the stuffed dough balls. Do not skip this! Freezing solidifies the fat, which means it takes longer to melt in the oven, preventing the cookies from spreading out into thin crisps.
Can I make the dough ahead of time?
Absolutely! You can prepare the cookie dough balls, stuff them, and then freeze them for up to 3 months. Place them in a single layer on a baking sheet to freeze solid, then transfer them to a freezer-safe bag or container. When you’re ready to bake, you can bake them directly from frozen; just add 2-3 extra minutes to the baking time.
How do I get that perfectly gooey center?
The secret to a gooey center is two-fold: the frozen ‘Cookies and Cream’ spread filling and not overbaking. The spread melts into a molten pool, while slightly underbaking the cookie ensures a fudgy texture once it cools on the hot baking tray.
How should I store these OREO NYC Cookies?
Store the cooled cookies in an airtight container at room temperature for up to 5 days. They will taste their best within the first 2-3 days. If you want to warm them up to get that gooey center again, a quick 10-15 seconds in the microwave does the trick!
Gooey OREO NYC Cookies
Discover how to make the ultimate OREO NYC Cookies. This recipe guides you through creating giant, thick, and gooey cookies, triple-stuffed with cookies and cream spread, white chocolate chips, and Oreo chunks. A tried-and-tested recipe for the perfect indulgent treat.
- Prep Time: 30m
- Cook Time: 10m
- Total Time: 85m
- Yield: 8 cookies
- Category: Dessert
- Method: Baking
- Cuisine: American
Ingredients
125g Margarine
100g Light Brown Sugar
50g Caster Sugar
1 Tsp Vanilla Extract
1 Egg
310g Plain Flour
1 and 1/2 Tsp Baking Powder
1/2 Tsp Bicarbonate of Soda
100g White Chocolate Chips
1 Jar of Cookies and Cream Spread
2 x Packs of Oreos (154g each)
Instructions
1. Firstly, take out a medium sized plate and place a piece of baking paper on top.
2. Add 8 balls of Cookies and Cream Spread onto the plate (use the photo provided as a guide for the size of each ball). Then add your balls of spread to the freezer until needed.
3. Next, move on to making the cookie dough. Add the margarine and both sugars into your mixing bowl, then combine them together by hand or with an electric mixer until smooth.
4. Add in the vanilla extract at this stage.
5. Next, add in your egg and mix again until it has been incorporated. It doesn’t matter if the mixture looks curdled at this stage.
6. Pour in your sifted flour, baking powder and bicarbonate of soda. Then mix again until a dough has formed. You should be able to pick up your dough easily and it should not be sticky.
7. Add your white chocolate chips and 4 chopped up Oreos to the dough, then mix again to combine.
8. Once you have created your dough, retrieve your balls of spread from the freezer.
9. Portion the dough into 8 balls and flatten each one. Place a ball of frozen spread in the centre of each flattened cookie, then add 1 Oreo. Repeat for each cookie.
10. Once done, shape the dough back into balls, ensuring it fully covers the fillings.
11. Freeze your stuffed cookies for 45 minutes. This step is essential when creating thick cookies as freezing prevents them from spreading when in the oven.
12. Preheat your oven to 200°C (or 180°C for fan ovens) 15 minutes before the cookies have finished freezing.
13. While you are waiting, line 2 Baking Trays with Parchment Paper.
14. Remove the cookies from the freezer and place them onto your baking trays. I recommend 4 cookies per tray.
15. Bake your cookies for 8-10 minutes. You will know they are done when they are a light golden colour.
16. While the cookies are baking, carefully cut 4 Oreos in half horizontally.
17. Once baked, feel free to lightly press on the edges of the cookies with a teaspoon to ensure they are completely circular. Do not remove the cookies from their trays.
18. Gently press half an Oreo onto each cookie, cream side down, so that it sticks. Be very gentle when doing this to avoid any spread leaking out of the cookie.
19. Once decorated, allow the cookies to cool completely on the trays for a minimum of 2 hours so that the spread can firm up. Then they are ready to enjoy!
Notes
**Don’t Skip the Freeze:** The 45-minute freeze time for the stuffed dough balls is non-negotiable for achieving that thick, NYC-style cookie. It prevents the cookies from spreading into thin discs.
**Cooling is Key:** Letting the cookies cool completely on the baking tray is crucial. It allows the center to set and the molten spread to firm up slightly, preventing a mess when you pick them up.
**Ingredient Temperature:** For best results, use a room temperature egg and margarine/butter. This helps the ingredients combine smoothly into a uniform dough.


