
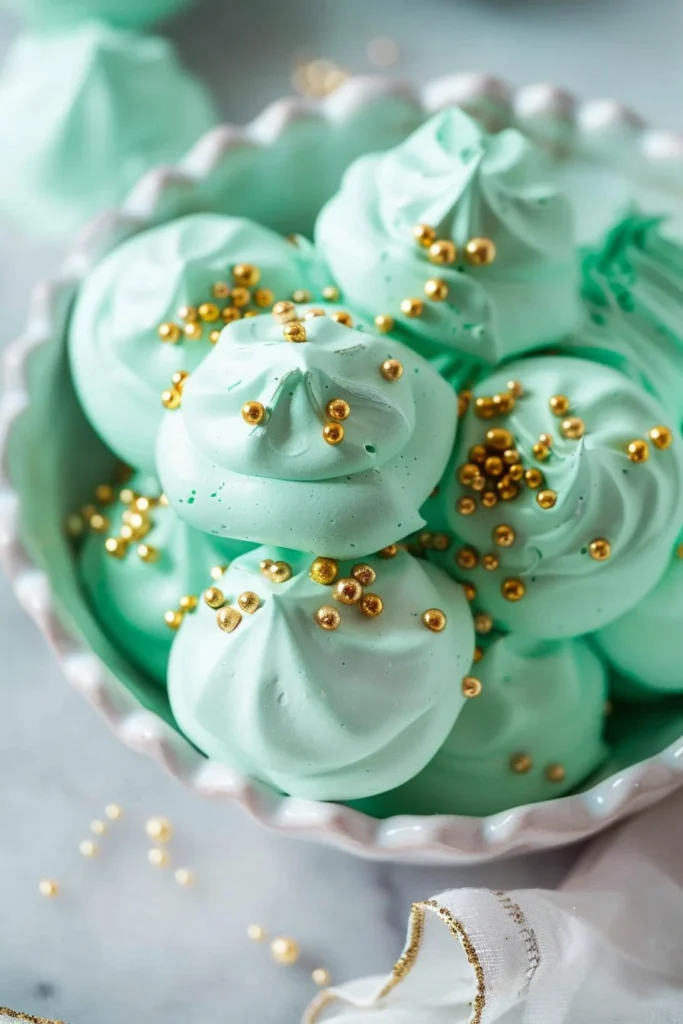
There is something truly magical about the transformation of simple egg whites and sugar into a cloud-like, crispy confection. These Green Meringue Medallions are a testament to the beauty of minimalist baking. Whether you are looking for the perfect addition to a Christmas cookie tray, a festive St. Patrick’s Day treat, or a whimsical dessert for a garden-themed party, these medallions deliver on both aesthetics and flavor. With their vibrant emerald hue and shimmering golden sprinkles, they look like high-end boutique sweets, yet they require only five basic ingredients. In this guide, we will walk you through the precise techniques needed to ensure your meringues are never chewy or weepy, but always perfectly crisp and airy.
Why You’ll Love This Recipe
You will fall in love with these meringues for their incredible texture—a delicate, shatteringly crisp exterior that gives way to a weightless, sweet interior. Beyond the taste, this recipe is a favorite for home bakers because it is naturally gluten-free and dairy-free, making it an inclusive choice for gatherings. These cookies are also incredibly light in calories compared to traditional butter-based cookies, allowing for guilt-free indulgence. Furthermore, the “low and slow” baking method is remarkably hands-off. Once they are in the oven, your work is largely done, leaving your kitchen smelling like a professional patisserie while you attend to other holiday preparations.
What Is a Meringue Medallion?
A meringue medallion is a specific variation of the French meringue technique. Unlike Italian or Swiss meringues, which involve cooking the egg whites with hot syrup or over a double boiler, French meringue is created by beating cold or room-temperature egg whites with sugar until they reach a stable, glossy peak. The “medallion” shape refers to the flat, circular piping technique used here, which results in a sophisticated disk rather than the traditional “kiss” or star shape. This flat surface provides the perfect canvas for decorations like our golden sprinkles, making them look like festive coins or ornaments. They are the epitome of simple elegance in the world of confectionery.
Ingredients Overview
To achieve the perfect meringue, the quality and state of your ingredients are paramount. This recipe relies on the chemical reaction between proteins and air, so every component counts:
- 4 Large Egg Whites: Use fresh eggs for the best stability. It is essential that these are at room temperature to ensure maximum volume when whipped.
- 1/4 Teaspoon Lemon Juice: This acts as an acid stabilizer. It helps the egg white proteins bond together more effectively, preventing the meringue from collapsing and ensuring a tall, stiff peak.
- 1 Cup Granulated Sugar: Fine granulated sugar is best as it dissolves more easily. Avoid using powdered sugar here, as it contains cornstarch which can alter the texture of a classic French meringue.
- Green Gel Food Coloring: Gel is crucial. Liquid food coloring adds too much moisture, which can deflate the air bubbles you’ve worked so hard to create. Gel provides a vibrant color with just a tiny drop.
- Golden Sprinkles: These add a touch of luxury and a contrasting crunch.
Ingredient Substitutions & Tips
While the core recipe is simple, you can make slight adjustments. If you don’t have lemon juice, an equal amount of Cream of Tartar or white distilled vinegar will serve the same purpose of stabilizing the proteins. If you want to vary the flavor, you can add 1/2 teaspoon of clear vanilla extract or almond extract—just ensure the extract is oil-free, as oil is the enemy of meringue. For the sugar, you can use “caster sugar” (extra fine) if available, which will dissolve even faster and result in a smoother, less grainy texture. However, standard granulated sugar works perfectly well if added slowly enough.
Step-by-Step Instructions
- Preparation is Key: Start by preheating your oven to a low 200ºF. Line a large baking sheet with high-quality parchment paper or a silicone baking mat. Ensure your mixing bowl and whisk attachment are spotlessly clean; even a trace of grease or egg yolk will prevent the whites from foaming.
- The Initial Foam: Place your room-temperature egg whites in the bowl. Start the electric mixer on medium speed. You are looking for the whites to become frothy and translucent, which usually takes about 2 minutes. Add the lemon juice during this phase.
- Building the Structure: Increase the speed to high. Now, begin adding the sugar one tablespoon at a time. This patience is vital—adding sugar too quickly will weigh down the proteins. Continue beating until the mixture is thick, white, and holds “stiff peaks” (when you lift the whisk, the point stands straight up without drooping).
- Coloring: Once stiff peaks are achieved, dip a toothpick into the green gel and swirl it into the batter. Whisk for a few more seconds until the color is uniform.
- Piping: Transfer the mixture to a piping bag fitted with a large round tip. Pipe 1.5-inch circles (medallions) about an inch apart. They won’t spread much, but they need airflow.
- The Finish: Carefully add your golden sprinkles to the top of each medallion.
- The Bake: Bake for two hours. Do not open the oven door during this time!
- The Cure: After two hours, turn the oven off but leave the cookies inside. Let them sit for 35-45 minutes. This “drying out” phase is what creates the perfect crispness.
Expert Baking Tips
The most important tip for meringue success is to avoid humidity. Making meringues on a rainy or very humid day can be a recipe for disaster, as the sugar in the cookies will actually absorb moisture from the air, making them sticky or “weepy.” Additionally, always use a metal or glass bowl rather than plastic. Plastic bowls can retain microscopic films of oil even after washing, which prevents egg whites from reaching their full volume. If you aren’t sure if your sugar has dissolved, rub a bit of the meringue between your fingers; if it feels gritty, keep whisking until it feels smooth.
The Secret to the Perfect “Snap”
What separates a mediocre meringue from a professional one is the cooling process. Many beginners make the mistake of removing the cookies from the oven as soon as the timer goes off. Meringues are essentially “dried” rather than “baked.” By turning off the oven and leaving them inside with the door closed, you allow the residual heat to evaporate any remaining moisture from the center of the medallion. This ensures that the cookie has a uniform “snap” and won’t be chewy in the middle. This slow cooling also prevents the meringues from cracking due to sudden temperature changes.
Serving Suggestions
These Green Meringue Medallions are stunning on their own, but they also make excellent accompaniments to other desserts. Serve them alongside a cup of rich hot chocolate or a dark roast coffee for a sophisticated afternoon treat. They also look beautiful when used as edible decorations on top of a chocolate cake or clustered together on a festive dessert charcuterie board. For a more decadent presentation, you can sandwich two medallions together with a bit of chocolate ganache or lemon curd just before serving.
Storage & Make-Ahead Tips
Meringues are the ultimate make-ahead cookie because they have a long shelf life when stored correctly. Once completely cooled, place them in an airtight container immediately. If stored in a cool, dry place, they will remain perfectly crisp for up to two weeks. Do not refrigerate them, as the humidity in the fridge will turn them soft. If they do happen to lose their crunch, you can “revive” them by placing them in a 200ºF oven for about 10 minutes and letting them cool again.
FAQs
Q: Why did my meringues turn brown?
A: Browning is a sign that the oven temperature was too high or the cookies were too close to the heating element. Ensure your oven is truly at 200ºF; you may want to use an oven thermometer to verify.
Q: Can I use liquid food coloring?
A: It is highly discouraged. Liquid coloring adds excess water which destabilizes the egg white structure, often resulting in meringues that collapse or fail to crisp up.
Q: My meringue is grainy, what happened?
A: This happens when the sugar hasn’t fully dissolved. Next time, add the sugar more slowly, one tablespoon at a time, and continue whisking until the mixture feels smooth between your fingers.
Q: Why are my cookies “weeping” or sticky?
A: This is usually due to high humidity in the kitchen or adding the sugar too quickly. The sugar is attracting moisture from the air.
Making Green Meringue Medallions is a rewarding baking project that proves you don’t need a long list of ingredients to create something spectacular. By following the “low and slow” method and ensuring your equipment is pristine, you will produce professional-quality cookies every time. These airy, crispy treats are sure to be the star of your next holiday gathering, providing a light and festive touch that everyone can enjoy. Happy baking!
PrintGreen Meringue Medallions
These Green Meringue Medallions are the definition of “melt-in-your-mouth.” Naturally gluten-free and incredibly light, they offer a delicate crunch followed by a sweet, airy finish. Perfectly tinted for Christmas or St. Patrick’s Day!
Ingredients
4 large egg whites (room temperature)
1/4 teaspoon lemon juice
1 cup granulated sugar
Green gel food coloring
Golden sprinkles
Instructions
1. Line a baking sheet with parchment paper and preheat the oven to 200ºF.
2. Using an electric mixer, beat egg whites on medium speed for 2 minutes. Add lemon juice and gradually increase the speed to high.
3. As you beat the egg mixture, slowly add the 1 cup of sugar one tablespoon at a time.
4. Once the mixture forms stiff, glossy peaks, add one small drop of green gel food coloring.
5. Using a piping bag, pipe a dollop of meringue onto your lined baking sheet, about 1.5 inches in diameter.
6. Garnish the top portion of each “medallion” with golden sprinkles.
7. Bake for two hours. Once the time is up, turn off the heat and let the cookies sit in the oven for 35-45 minutes to dry completely.
8. Remove from oven and allow to cool to room temperature before storing.
Notes
Calories are estimated based on 40 servings. Ensure your bowl is completely grease-free before starting for the best rise. Use gel food coloring rather than liquid to maintain the meringue’s stability.


